- Как скачать и установить Redis на Windows
- Скачиваем Redis:
- Установка Redis:
- Вывод:
- Как установить Redis в ОС Windows без использования Docker
- Установка Chocolatey
- Требования к системе
- Проверяем версию системы
- Проверяем версию PowerShell
- Проверяем версию.NET Framework
- Установка Chocolatey
- *Download
- Unstable
- Stable (6.2)
- Docker Hub
- In the Cloud
- *Other versions
- Old (6.0)
- Older (5.0)
- *Other
- *How to verify files for integrity
- *Installation
- *From source code
- *From the official Ubuntu PPA
- *From Snapcraft
- Redis for Windows 4.0.2.3 (alpha)
- Alpha version of Redis 4.0.2 for Windows.
- Redis for Windows 4.0.2.2 (alpha)
- Alpha version of Redis 4.0.2 for Windows.
- Redis for Windows 4.0.2.1 (alpha)
- Alpha version of Redis 4.0.2 for Windows.
- Redis Enterprise For Windows
- Redis Enterprise On The Windows Platform
- .NET Redis Client
- Deployment Options
- Docker On Windows
- Redis Enterprise as a hosted service on Azure
- Fully Managed Redis Enterprise in your Azure Virtual Network (VNet)
- As software on your server instance on Azure
- On other cloud platforms
- Using Redis with .Net C#
- Installing StackExchange.Redis
- Opening a Connection to Redis Using StackExchange.Redis
- Connection Pooling with StackExchange.Redis
- Using SSL and StackExchange.Redis
- Converting Certificates from .key to .pfx Format
- Using SSL and a StackExchange.Redis-based Provider
- Reading and Writing Data with StackExchange.Redis
Как скачать и установить Redis на Windows

В этой очень короткой статье вы прочитает, как установить Redis на Windows 10, также инструкция подойдёт начиная с Windows 7.
Также, если вы не знаете что это такое, то посмотрите статью: «Что такое Redis».
Скачиваем Redis:
Перед тем как установить, нужна скачать msi файл с Redis, для этого перейдите на GitHub, спуститесь чуть ниже, до версии 3.0.504, и там скачиваем файл с названием «Redis-x64-3.0.504.msi».

На этом скачивание закончилось.
Установка Redis:
Теперь перейдём к самой установки, для этого открываем файл, который скачали, тем везде нажимаем «next», патом вам дадут выбрать папку, куда устанавливать, выбираете, и самое главное для удобства выбираем галочку, она нужна, что бы c Redis с командной строки.

Нажимаем «Next», потом вам даёт выбрать порт подключения по умолчанию, я рекомендую не чего не менять, хотя вам возможно что то нужно.

После этого нажимаете «Next», у вас всё установится и всё, перезагрузите компьютер.
Вывод:
В этой очень короткой статье было показано как установить Redis на Windows 10, также инструкция подойдёт начиная с Windows 7.
Как установить Redis в ОС Windows без использования Docker
Пошаговое руководство по работе с популярной NoSQL базой данных.
Просто и быстро установить Redis в ОС Windows позволяет Chocolatey. Это менеджер пакетов в среде Windows, аналогичный apt-get в мире Linux. С его помощью можно устанавливать множество программ и обновлять их, не скачивая каждый раз дистрибутив с сайта.
Установка Chocolatey
Действуем по инструкции с официального сайта проекта Chocolatey.
Требования к системе
- Windows 7+ / Windows Server 2003+;
- PowerShell v2+. Для установки с сайта требуется как минимум v3 (из-за требований TLS 1.2);
- .NET Framework 4+. Программа попытается установить .NET 4.0, если он не установлен. Минимальная необходимая версия для установки с этого веб-сайта — 4.5 (из-за требований TLS 1.2).

Преподаватель Skillbox. Пишет про Java, учит Go. Помнит рассвет PHP и как «грабить корованы».
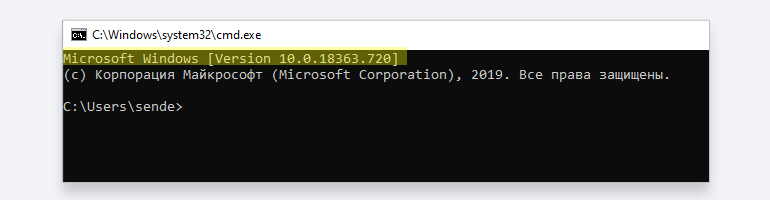
Проверяем версию системы
Запустите консоль запуска команд, нажав WIN + R, и введите команду cmd. Если вверху выведена версия Windows, как на скриншоте, этого достаточно.
Если нет, введите команду systeminfo. В начале вывода должна появиться версия Windows.
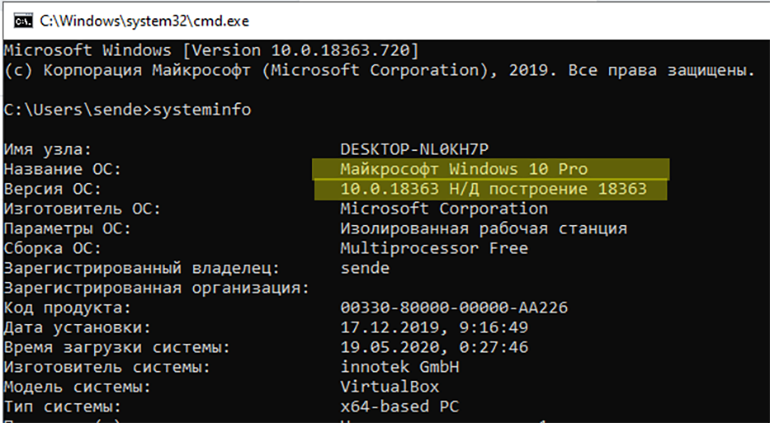
Если у вас установлена версия 7 или выше — переходим к следующему шагу.
Проверяем версию PowerShell
Для этого открываем PowerShell, вводим команду $PSVersionTable.PSVersion и получаем ответ:
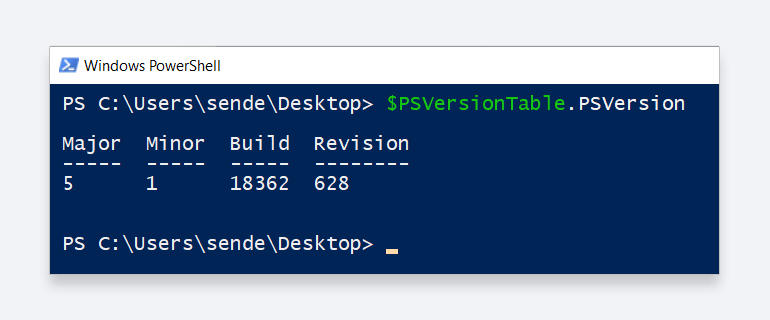
На нашем скриншоте версия PowerShell 5.1. Если у вас версия ниже 3, необходимо установить PowerShell версии 3 (или выше). Инструкция есть по этой ссылке.
Проверяем версию.NET Framework
Запускаем редактор реестра: нажимаем WIN + R и выполняем команду regedit.
Переходим в раздел
HKEY_LOCAL_MACHINE\SOFTWARE\Microsoft\NET Framework Setup\NDP и смотрим, какие папки там присутствуют:
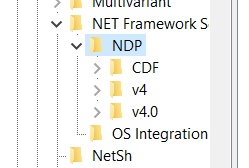
Если нет такой ветки или отсутствует версия 4.0 и выше, то необходимо её установить. Подробная инструкция находится по этой ссылке.
Установка Chocolatey
После всех подготовительных действий устанавливаем Chocolatey. Это делается одной командой PowerShell.
Важно! До начала установки необходимо проверить, есть ли на это права. Если прав недостаточно, их нужно добавить.
В PowerShell необходимо убедиться, что Get-ExecutionPolicy не является Restricted. Рекомендуется использовать Bypass для снятия ограничений или AllSigned для более безопасного использования.
Выполните команду Get-ExecutionPolicy. Если она вернёт Restricted, запустите Set-ExecutionPolicy AllSigned (рекомендуется) или Set-ExecutionPolicy Bypass -Scope Process.
*Download
Stable releases liberally follow the usual major.minor.patch semantic versioning schema.
Unstable
Stable (6.2)
Docker Hub
In the Cloud
*Other versions
Old (6.0)
Older (5.0)
*Other
Scripts and other automatic downloads can easily access the tarball of the latest Redis stable version at https://download.redis.io/redis-stable.tar.gz, and its respective SHA256 sum at https://download.redis.io/redis-stable.tar.gz.SHA256SUM. The source code of the latest stable release is always browsable here, use the file src/version.h in order to extract the version in an automatic way.
*How to verify files for integrity
The Github repository redis-hashes contains a README file with SHA1 digests of released tarball archives. Note: the generic redis-stable.tar.gz tarball does not match any hash because it is modified to untar to the redis-stable directory.
*Installation
*From source code
Download, extract and compile Redis with:
The binaries that are now compiled are available in the src directory. Run Redis with:
You can interact with Redis using the built-in client:
*From the official Ubuntu PPA
You can install the latest stable version of Redis from the redislabs/redis package repository. Add the repository to the apt index, update it and install:
*From Snapcraft
You can install the latest stable version of Redis from the Snapcraft marketplace:
Redis for Windows 4.0.2.3 (alpha)
This 4.0.2.3 release is still an alpha version, but contains enhancements and fixes for:
- #14: decrease logging verbosity of some cluster-related messages
- #23: ZRANK/ZREVRANK bugfix (win-port only)
- failed unit tests (bdcf80e).
Alpha version of Redis 4.0.2 for Windows.
Redis 4.0.2 for Windows is a merge of Windows-specific changes from latest (unsupported) 3.2.100 release from MSOpenTech and Redis 4.0.2 and this alpha release consists of:
- all Redis 4.0.2 features except modules,
- all executables of Redis (redis-server, redis-cli, redis-benchmark, redis-check-aof, redis-check-rdb).
Main difference to official Redis 4.0.2 (except no support for modules at the moment) is old version of jemalloc-win dependency, which is planned to be updated to the same version in beta release.
tporadowski released this Mar 26, 2018
Redis for Windows 4.0.2.2 (alpha)
This 4.0.2.2 release is still an alpha version, but contains a fix to issue #12 (crash when rewriting AOF file — this issue was specific to Windows port only).
Alpha version of Redis 4.0.2 for Windows.
Redis 4.0.2 for Windows is a merge of Windows-specific changes from latest (unsupported) 3.2.100 release from MSOpenTech and Redis 4.0.2 and this alpha release consists of:
- all Redis 4.0.2 features except modules,
- all executables of Redis (redis-server, redis-cli, redis-benchmark, redis-check-aof, redis-check-rdb).
Main difference to official Redis 4.0.2 (except no support for modules at the moment) is old version of jemalloc-win dependency, which is planned to be updated to the same version in beta release.
tporadowski released this Mar 17, 2018
Redis for Windows 4.0.2.1 (alpha)
This 4.0.2.1 release is still an alpha version, but contains a fix to issue #11, which was related to sending back larger amounts of data to Redis clients (this issue was specific to Windows port only).
Note: If you have installed the previous 4.0.2 version — please back up your config files and uninstall it first.
Alpha version of Redis 4.0.2 for Windows.
Redis 4.0.2 for Windows is a merge of Windows-specific changes from latest (unsupported) 3.2.100 release from MSOpenTech and Redis 4.0.2 and this alpha release consists of:
- all Redis 4.0.2 features except modules,
- all executables of Redis (redis-server, redis-cli, redis-benchmark, redis-check-aof, redis-check-rdb).
Main difference to official Redis 4.0.2 (except no support for modules at the moment) is old version of jemalloc-win dependency, which is planned to be updated to the same version in beta release.
Redis Enterprise For Windows
High availability and scalability using Redis Labs technology
Redis Enterprise On The Windows Platform
Redis Enterprise offers many options to develop applications for Redis on Windows platform. This page will get you started with connecting your .NET based application to any Redis Enterprise database. You will also learn about all the deployment options you have while running your application on Windows.
.NET Redis Client
If you are developing apps for Redis on the Windows platform using C#, then you will need a .NET Redis client. Here’s the complete list of .NET clients from redis.io. StackExchange.Redis is a popular choice among .NET developers.
Deployment Options
The variety of deployment options available in Redis Enterprise enables you to deploy your Redis database closer to your application so that you achieve local data access latency.
Docker On Windows
Redis Enterprise can be deployed as a Docker container on Windows. This is a popular deployment option for your development environment. Each container represents a node in a Redis Enterprise Cluster. You could deploy multi-node cluster on a single host machine. Learn more about getting started as a Docker container .
Redis Enterprise as a hosted service on Azure
Redis Enterprise as a hosted service delivers stable high performance, effortless scaling and robust high availability features including persistence, cross zone/region/datacenter replication and instant automatic failover, with no data loss. In this deployment option, you can get started with Redis Enterprise in less than 2 minutes. You can signup for free and enjoy Redis Lab’s 30 MB free plan for unlimited time. Once you sign up you can create a new Redis database on Azure platform.
Fully Managed Redis Enterprise in your Azure Virtual Network (VNet)
Redis Enterprise as a fully managed service delivers cost effective, stable high performance Redis databases in dedicated clusters within your Azure VNet, with the option to run on RAM or on Flash as an extension.
As software on your server instance on Azure
Redis Enterprise downloadable software allows you to deploy and run the Redis database in your environment of choice – on-premises data center or your preferred public or private cloud platform with full control of your data and configuration. Enjoy the 30 day free trial of Redis Enterprise software .
On other cloud platforms
If you are developing and deploying your applications on the other cloud platforms, Redis Enterprise as a hosted service is available on Amazon Web Services (AWS), Google Cloud Platform (GCP), and IBM SoftLayer. Redis Enterprise as a fully managed service is available in Virtual Private Cloud(VPC) environment of AWS and GCP.
Using Redis with .Net C#
In order to use Redis with C# you will need a C# Redis client. In following sections, we will demonstrate the use of StackExchange.Redis, General purpose Redis client. Additional C# clients for Redis can be found under the C# section of the Redis Clients page.
Installing StackExchange.Redis
StackExchange.Redis’ installation instructions are given in the “Installation” section of its README file. It can be installed via the nuget package manager console with the following command:
Opening a Connection to Redis Using StackExchange.Redis
The following code creates a connection to Redis using StackExchange.Redis:
To adapt this example to your code, make sure that you replace the following values with those of your database:
- In line 1, the first part of the string argument to Connect should be your database’s endpoint
- In line 1, the second part of the string argument to Connect should be your database’s password
Connection Pooling with StackExchange.Redis
While StackExchange.Redis does not provide direct means for conventional connection pooling, we recommend you share and reuse the ConnectionMultiplexer object. The ConnectionMultiplexer object should not be created per operation – it is to be created only once at the beginning and reused for the duration of the run. ConnectionMultiplexer is thread-safe so it can be safely shared between threads. For more information, refer to StackExchange.Redis’ Basic Usage document.
Using SSL and StackExchange.Redis
StackExchange.Redis is the first Redis client that natively supported SSL. The following code opens an SSL connection:
- In line 6, the first part of the string argument should be your database’s endpoint or IP address
- In line 6, the second part of the string argument should be your database’s port
- In line 7, the string argument should be your database’s password
- In line 11, replace with the path to your .pfx file
Converting Certificates from .key to .pfx Format
To easily convert a .key certificate to .pfx format use OpenSSL:
Important: if you’re using a self-signed certificate, remember to install it on your server with the Certificate Manager tool.
Using SSL and a StackExchange.Redis-based Provider
Sometimes you need to use a 3rd-party library, such as when running a session on a cache provider that connects to Redis with the StackExchange.Redis client. When you need to provide an SSL certificate for the connection and the 3rd-party library does not expose a public interface for it, you can “sideload” the certificate to StackExchange.Redis by setting the following environment variables:
- SERedis_ClientCertPfxPath should be set to the path of your .pfx file
- SERedis_ClientCertPassword should be set to the password of your .pfx file
Reading and Writing Data with StackExchange.Redis
Once connected to Redis, you can start reading and writing data. The following code snippet writes the value bar to the Redis key foo , reads it back, and prints it:
The output of the above code should be:
For more information on using Redis Labs’ products and services with net-c please see the Howto page.


By continuing to use this site, you consent to our updated privacy agreement as described here. You can change your cookie settings at any time as described here but parts of our site will not function correctly without them.
TRY REDIS ENTERPRISE CLOUD FREE
Redis Enterprise Cloud provides complete automation of day-to-day database operations. Start now with 30MB of free storage.
- YouTube
- GlassDoor
© 2021 Redis Labs. Redis and the cube logo are registered trademarks of Redis Labs Ltd.


