- Как переустановить службу обновлений в Windows XP / Vista / 7 / 8 / 2003 / 2008 / 2012
- 1. Остановите службы обновления Windows
- 2. Удалите файлы обновлений Windows
- 2.1 Удалите файлы qmgr*.dat.
- 2.2 Удалите загруженные обновления (не обязательно)
- 3. Переименуйте резервные копии папок распространения программного обеспечения
- 4. Восстановите дескрипторы безопасности по умолчанию
- 5. Перерегистририруйте файлы службы BITS и центра обновления Windows
- 6. Сбросьте Winsock
- 7. Настройте параметры прокси-сервера (в WinHTTP)
- 7.1 Windows XP
- 7.2 Windows Vista/7/8/2008/2012
- 8. Запустите службы BITS, центра обновления Windows и криптографии
- 9. Установите последнюю версию агента Центра обновления Windows
- 10. Перезагрузите компьютер
- Итог: Автоматизируем процесс переустановки обновлений
- How to Remove Installed Updates in Windows 10 and Windows Server?
- How to Uninstall Windows Updates Using the Control Panel?
- How to Prevent (Block) a Specific Update from Installing in Windows 10?
- WUSA.exe: Removing Windows Updates via the Command Line
- How to Uninstall a Windows Update using WSUS?
- Removing Windows Update Using the GPO
- How To Uninstall Windows Updates When Computer Is Not Booting?
- How to Uninstall and Reinstall Windows Updates
- Delete SoftwareDistribution Folder
- Check for Windows Updates
- Conclusion
Как переустановить службу обновлений в Windows XP / Vista / 7 / 8 / 2003 / 2008 / 2012
Если у Вас не загружаются обновления в Windows, выдавая различные ошибки, то Вы можете попробовать переустановить службу обновлений Windows, т.е. вернуть к исходному состоянию Windows Update.
Для этого Вам необходимо пройти несколько этапов:
1. Остановите службы обновления Windows
Для остановки службы Windows Update (и связанных с ней служб) выполните из командной строки от имени администратора:
net stop bits
net stop wuauserv
net stop appidsvc
net stop cryptsvc
2. Удалите файлы обновлений Windows
2.1 Удалите файлы qmgr*.dat.
Удалите файлы qmgr*.dat. Для этого в командной строке введите следующую команду:
Del «%ALLUSERSPROFILE%\Application Data\Microsoft\Network\Downloader\qmgr*.dat»
2.2 Удалите загруженные обновления (не обязательно)
Этот пункт выполнять не обязательно, поскольку все эти файлы будут удалены при выполнении следующего (3-го) этапа.
Del %systemroot%\SoftwareDistribution\DataStore\DataStore.edb
Del /Q %systemroot%\SoftwareDistribution\DataStore\Logs\*.*
Del /Q /S %systemroot%\SoftwareDistribution\Download\*.*
3. Переименуйте резервные копии папок распространения программного обеспечения
Если это первая попытка устранить проблемы с Центром обновления Windows, выполняя действия, описанные в этой статье, следует пропустить этот этап и переходить к следующему этапу. Необходимо выполнить этот этап только в том случае, если Вам не удается разрешить ваши проблемы с Центром обновления Windows после выполнения всех действий, за исключением данного этапа.
Выполните из командной строки (от имени администратора):
Ren %systemroot%\SoftwareDistribution SoftwareDistribution.bak
Ren %systemroot%\system32\catroot2 catroot2.bak
4. Восстановите дескрипторы безопасности по умолчанию
Восстановите в службе BITS и службе Центра обновления Windows дескрипторы безопасности по умолчанию:
sc.exe sdset bits D:(A;;CCLCSWRPWPDTLOCRRC;;;SY)(A;;CCDCLCSWRPWPDTLOCRSDRCWDWO;;;BA)(A;;CCLCSWLOCRRC;;;AU)(A;;CCLCSWRPWPDTLOCRRC;;;PU)
sc.exe sdset wuauserv D:(A;;CCLCSWRPWPDTLOCRRC;;;SY)(A;;CCDCLCSWRPWPDTLOCRSDRCWDWO;;;BA)(A;;CCLCSWLOCRRC;;;AU)(A;;CCLCSWRPWPDTLOCRRC;;;PU)
5. Перерегистририруйте файлы службы BITS и центра обновления Windows
Повторно зарегистрируйте файлы службы BITS и центра обновления Windows. Для этого выполните в командной строке от имени администратора:
cd /d %windir%\system32
regsvr32 /s atl.dll
regsvr32 /s urlmon.dll
regsvr32 /s mshtml.dll
regsvr32 /s shdocvw.dll
regsvr32 /s browseui.dll
regsvr32 /s jscript.dll
regsvr32 /s vbscript.dll
regsvr32 /s scrrun.dll
regsvr32 /s msxml.dll
regsvr32 /s msxml3.dll
regsvr32 /s msxml6.dll
regsvr32 /s actxprxy.dll
regsvr32 /s softpub.dll
regsvr32 /s wintrust.dll
regsvr32 /s dssenh.dll
regsvr32 /s rsaenh.dll
regsvr32 /s gpkcsp.dll
regsvr32 /s sccbase.dll
regsvr32 /s slbcsp.dll
regsvr32 /s cryptdlg.dll
regsvr32 /s oleaut32.dll
regsvr32 /s ole32.dll
regsvr32 /s shell32.dll
regsvr32 /s initpki.dll
regsvr32 /s wuapi.dll
regsvr32 /s wuaueng.dll
regsvr32 /s wuaueng1.dll
regsvr32 /s wucltui.dll
regsvr32 /s wups.dll
regsvr32 /s wups2.dll
regsvr32 /s wuweb.dll
regsvr32 /s qmgr.dll
regsvr32 /s qmgrprxy.dll
regsvr32 /s wucltux.dll
regsvr32 /s muweb.dll
regsvr32 /s wuwebv.dll
6. Сбросьте Winsock
Сбросьте Winsock. Для этого в командной строке введите следующую команду (от имени администратора):
netsh winsock reset
7. Настройте параметры прокси-сервера (в WinHTTP)
7.1 Windows XP
Если используется Windows XP, необходимо настроить параметры прокси-сервера. Для этого в командной строке введите следующую команду:
proxycfg.exe -d
7.2 Windows Vista/7/8/2008/2012
Для сброса настроек прокси-сервера WinHTTP выполните следующую команду от имени администратора:
netsh winhttp reset proxy
8. Запустите службы BITS, центра обновления Windows и криптографии
Для запуска служб, связанных с обновлением Windows, выполните следующие команды:
net start bits
net start wuauserv
net start appidsvc
net start cryptsvc
9. Установите последнюю версию агента Центра обновления Windows
Для установки последней версией агента обновления Windows воспользуйтесь статьей Microsoft KB949104.
10. Перезагрузите компьютер
Итог: Автоматизируем процесс переустановки обновлений
Для автоматического выполнения всех вышеуказанных действий воспользуйтесь готовым BAT файлом, который выполняет ПОЛНУЮ переустановку всех компонентов Windows Update (включая 3-й этап — переименование/удаление папок распространения программного обеспечения).
В качестве источников для данной статьи использовались:
How to Remove Installed Updates in Windows 10 and Windows Server?
Sometimes it happens that the security updates for Microsoft products (released under MS Patch Tuesday) cause problems with the OS or third-party software. The issues caused by the updates can be either mass and occur in a large number of devices or private that occur in some combinations of the Windows OS version and some apps.
If the Windows (or Office) patch causes a problem on the computers of many users, and this is confirmed by Microsoft experts, the update is pulled by the company and after a while is replaced by a new one with the bugs fixed. But if necessary, in Windows there is a way to uninstall any security update or patch.
In this article we’ll show how to properly uninstall updates in Windows OS (the article covers Windows 10, 8.1, 7 and Windows Server 2016, 2012/R2, 2008/R2). These ways of removing updates can be used if you installed the update manually from a CAB or MSU file, your device automatically received it from the Windows Update servers or your WSUS server.
There are several ways to uninstall updates in Windows (Windows Server):
How to Uninstall Windows Updates Using the Control Panel?
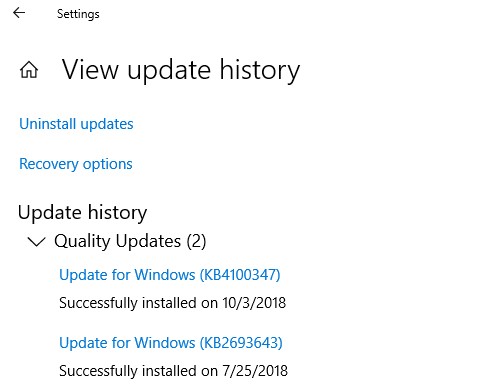
Let’s look on how to uninstall updates in Windows 10. Open the menu Settings app and go to the Update & Security -> Windows update -> View Update History -> Uninstall updates.
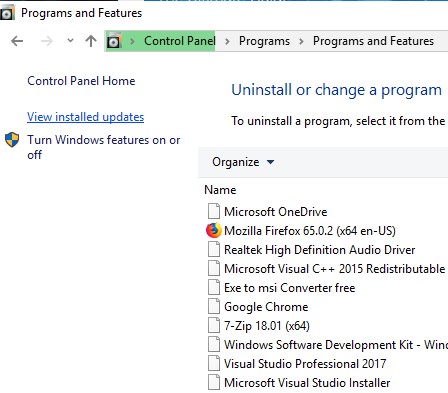
You can also go to the “Uninstall an update” panel using the classic Control Panel (Control Panel\Programs\Programs and Features) and press the button “View installed updates”.
A list of all Windows and Office updates installed on your device will appear. Find the necessary update in the list (or, to be more precise, unnecessary :)), select it, click the Uninstall button. The uninstall update wizard starts.
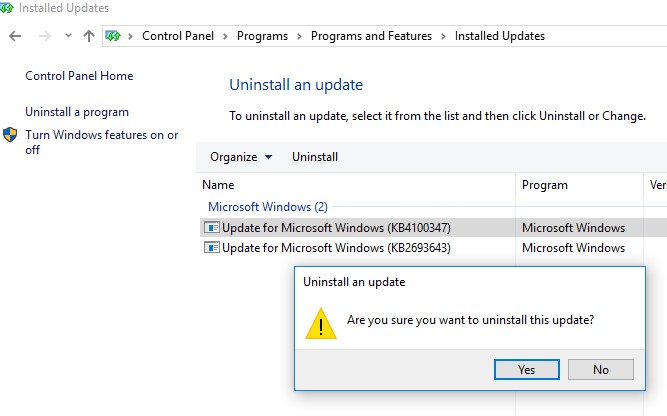
Click Yes when prompted if you want to uninstall this update.
And wait till it is uninstalled. After the update is removed, Windows may request a system restart.
How to Prevent (Block) a Specific Update from Installing in Windows 10?
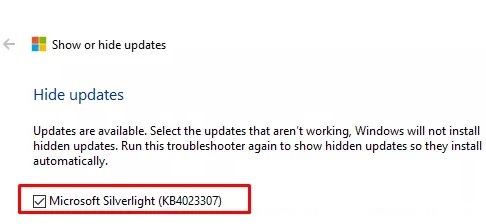
If your computer is configured to automatically receive Windows updates through Windows Update or WSUS, this update will most likely be installed on your computer again. But you can prevent the installation of a specific update by hiding (blocking) it. To do this, use the official tool Microsoft Show or Hide Updates https://support.microsoft.com/en-us/help/3073930/how-to-temporarily-prevent-a-driver-update-from-reinstalling-in-window
- Download and run the wushowhide.diagcab;
- Select the option Hide Updates;

- Select the update you want to hide and click Next;
- After that, this update won’t be installed in Windows automatically via Windows Update. You can remove the hidden update by selecting it in the Show hidden updates.

WUSA.exe: Removing Windows Updates via the Command Line
Windows updates can also be uninstalled from the command prompt. To do it, there is a built-in CLI tool wusa.exe (Windows Update Standalone Installer).
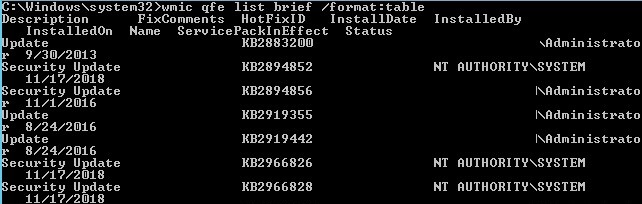
You can list all updates installed on a computer with the command:
wmic qfe list brief /format:table
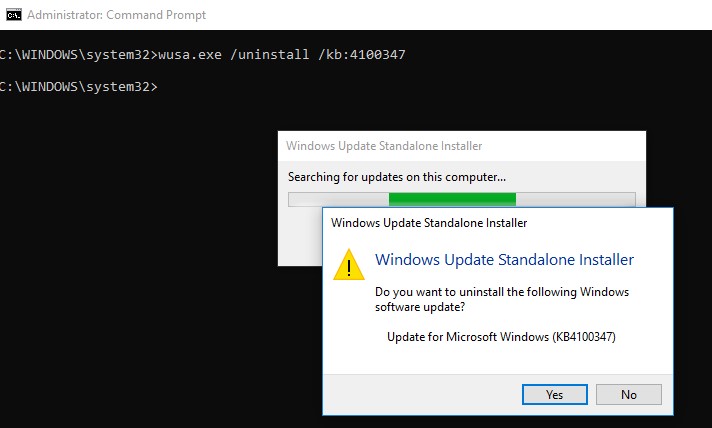
Using the following command, running as administrator, you can remove the specific update (KB 4100347):
wusa.exe /uninstall /kb:4100347
A user must confirm the removing of the update.
If the update has to be uninstalled in a quiet mode without a user request and notifying about of the subsequent system reboot, the command will look like that:
wusa.exe /quiet /uninstall /kb:4100347 /promptrestart
If you need to suppress the reboot request, use the command:
wusa.exe /quiet /uninstall /kb:4100347 /norestart
You can also remove the update from PowerShell using the PSWindowsUpdate module. The Remove-WindowsUpdate cmdlet is used:
Remove-WindowsUpdate -KBArticleID KB4100347 -NoRestart
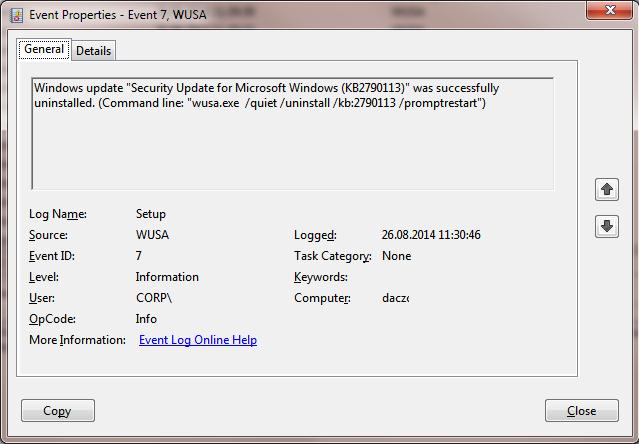
The Windows update uninstall event is recorded to the Setup log with the EventID 7 from the WUSA source:
Using PsExec you can uninstall an update on a remote computer, the command is as follows:
psexec.exe \\RemotePCName C:\Windows\System32\wusa.exe /quiet /uninstall /kb:4100347 /warnrestart:600
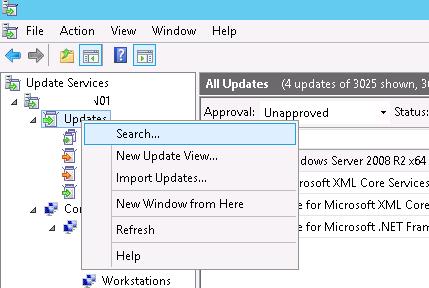
How to Uninstall a Windows Update using WSUS?
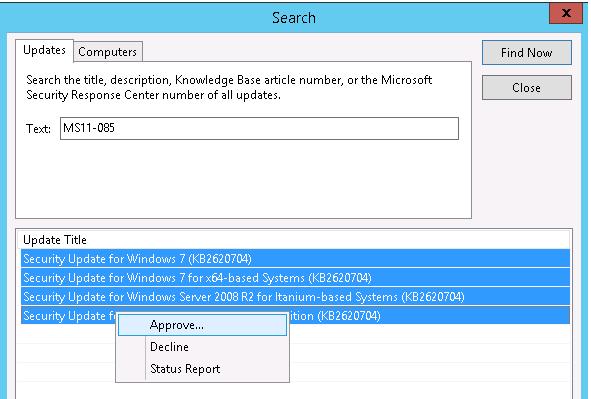
If a corporate WSUS server is used in your company to install updates on a domain computers and servers, you can remove the update approved for install using the Update Services management console. To do it, right-click the Updates branch and then click Search in the menu.
Specify the KB number or a security bulletin you need to find and click Find now. In the list containing the updates that have been found for different Windows versions, select the updates to be uninstalled and click Approve in the menu.
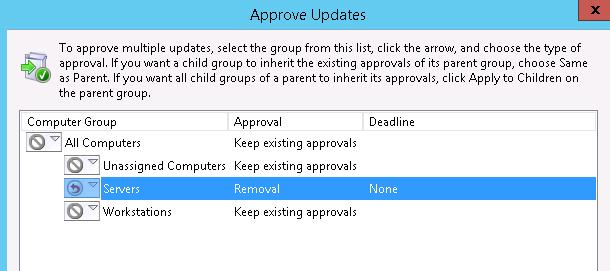
Then select the WSUS Target group you need and choose Approved for Removal in the drop-down list.
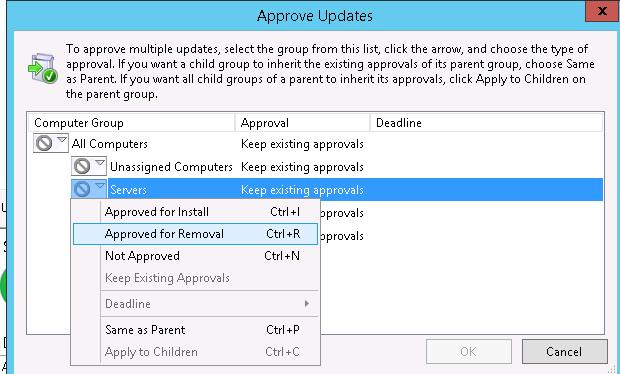
In our example, we want to uninstall update on a group of computers named Servers (more about WSUS GPO targeting).
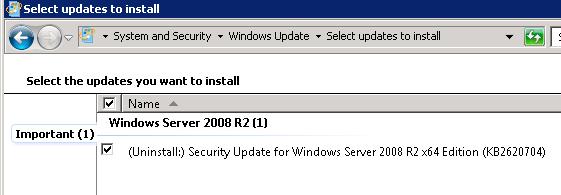
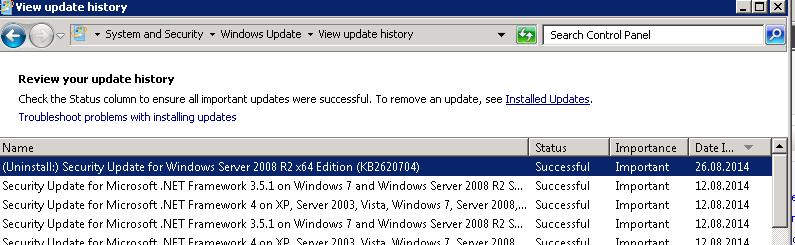
After updating data on the side of WSUS clients (which occurs on a schedule in accordance with the WSUS policy and the synchronization frequency, which is set by the Automatic Update detection frequency, or can be done manually by running wuauclt /detectnow ) , the corresponding update appears with the prefix (Uninstall:) in its name in the Windows Update panel.
After the update has been uninstalled, this event is displayed in Windows Update History.
Removing Windows Update Using the GPO
If you want to remove a specific update on multiple computers of Active Directory domain that doesn’t use WSUS, you can use Startup/Shutdown GPO scripts.
To do it, create a new GPO object linked to the necessary OU, AD site or computer group. Then create a new startup script with the wusa.exe command in the section Computer Configuration -> Policies -> Windows Settings -> Scripts (Startup/Shutdown).
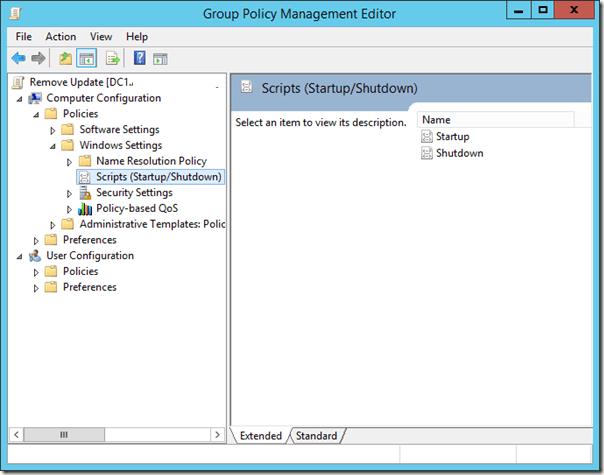
You can also use PowerShell startup scripts to remove installed updates.
How To Uninstall Windows Updates When Computer Is Not Booting?
Sometimes it happens that you cannot remove an update directly from the Windows, since the OS simply not booting after installing the problematic update. In this case, you may have to boot the computer from the rescue or install boot disk and delete the updates via DISM (see the article “Computer Won’t Start After Windows Update”) or using the “Hotfix uninstall” utility from the MSDaRT.
So, we have covered common scenarios of how to uninstall updates on Windows computers.
How to Uninstall and Reinstall Windows Updates
Hint: Don’t delete the SoftwareDistribution folder
Even though installing updates in Windows is an easy process, the mechanism in the background that manages it all is fairly complicated. There is also a lot of misinformation on the Internet about how to deal with problems relating to Windows Update.
One of the biggest misconceptions is that all Windows updates can be installed at once by simply deleting the SoftwareDistribution folder stored in C:\Windows. This is completely wrong. Yes, you might save some space (anywhere from 500 MB to several GB’s), but deleting the folder will not remove any installed update.
In addition it’s a bad idea to delete the SoftwareDistribution folder unless it is absolutely required. There is a subfolder called DataStore that has a large database of all the Windows Updates available. This database will probably be a couple of hundred MBs in size. Deleting this database simply removes the Windows Update history for the computer.
To prove this to myself, I did a test. I opened Control Panel, clicked on Windows Update and then clicked on View Update History in the left hand menu.

This screen just gives you a full list of installed updates with the Status, Importance and Date Installed. When we delete the SoftwareDistribution folder, this dialog will be completely empty as if you have never installed any updates. Before I show you that, click on the Installed Updates link at the top where it tells you how to remove an update.

As you can see, I have a couple of hundreds updates currently installed for Office, Windows, Silverlight, etc. Now if you follow the instructions below for deleting the folder, you can go back to View Update History dialog and you will see it’s now empty.
![]()
However, if you click on Installed Updates again, you will see that all the updates that were listed before and still listed there. This is because we simply deleted the log history of the updates and not the actual updates.
This dialog is where you can actually uninstall an update, but only one at a time. Simply click on an update and then click Uninstall. Unfortunately, there is no way to remove all updates at once unless you use System Restore.

If you use System Restore and restore the computer to a previous restore point, any updates that were installed after that restore point will be gone. To remove all updates, though, you would need a restore point created right after the OS was installed. Even if a restore point was created at that point, older ones normally get deleted over time to make space for newer restore points.
Still, if you have a lot of space allocated to System Restore, you might be able to roll back a couple months worth of updates at once.
Once you delete the contents of the folder, you will need to revisit Windows Update via Control Panel and check for updates. The entire database will be built from scratch and you may notice that Windows shows Checking for updates for a very long time. This is because a list of every update applicable to the OS has to be downloaded again and then compared to the updates currently installed on the system.
Delete SoftwareDistribution Folder
In order to remove this folder, you first have to stop the Windows Update and BITS services in Windows. To do this, click on Start and type in services.msc into the search box.

Next, right-click on the Windows Update service and click on Stop. Do the same thing for the Background Intelligent Transfer Service (BITS) service too.

Now navigate to the following folder shown below and you will see several folders listed there. The main ones that we will talk about are Downloads and DataStore.
C:\Windows\SoftwareDistribution

If you are trying to regain hard drive space only, then you should only delete the contents of the Download folder, though in theory this should not really be necessary. The Download folder actually holds all the updates that have been downloaded, but not yet installed. Once they are installed, the updates are removed within 10 days. So theoretically, that folder should shrink in size soon after you have installed all the Windows updates.
The DataStore folder contains the database with the full Windows update history for the computer. Once it is deleted, the update history dialog will be blank like I had shown above, but all your updates will still remain. You should really never delete the DataStore folder unless you are told to do so or if Windows Update is completely corrupt and misconfigured.
Note that you may not be able to delete certain folders and the ReportingEvents file. In the case where you can’t delete a folder, just open the folder and delete all the contents inside. For me, I got an error when trying to delete the DataStore folder, so I just went inside the folder and deleted the database file and all the other files in the folder.
Check for Windows Updates
If you did remove the SoftwareDistribution folder, you will want to go to Windows Update again to check for updates. It will show that you have never perform a check for updates since the update history is now gone.

Click the Check for updates button and be prepared to wait a while as the database is being recreated.
Conclusion
So the main point here is that you cannot really get rid of all Windows Updates at once unless you have a really old restore point saved on the system. Secondly, you should only delete the Downloads folder in the SoftwareDistribution folder if you are looking to save space or simply install all the latest updates and wait 10 days to see if they are removed automatically.
Thirdly, you should only delete the DataStore folder if something is really wrong with Windows Update like not showing any new updates for several months, etc. Hopefully, this gives you a better understanding of how Windows Update works and how the files are stored. If you have any questions, post a comment. Enjoy!
Founder of Online Tech Tips and managing editor. He began blogging in 2007 and quit his job in 2010 to blog full-time. He has over 15 years of industry experience in IT and holds several technical certifications. Read Aseem’s Full Bio


