Reinstalling Windows Vista — No disc!
Can anyone help me please! My Vista Home Premium has recently become slow with multiple problems. I’ve recently upgraded my virus software, and installed and run a registry clean up program. The new version of anti virus seems to have caused the problems — auto quarantining and deleting .exe files for quite alot of programs (wmplayer for example!). The anti-virus software has also corrupted as I can no longer open it! I cannot uninstall or reinstall teh Virus software as ‘windows installer’ is also now apparently not installed!
So i figured the best thing to do is reinstall Vista and reformat the hard drive. Problem. I have teh product key on the sticker on the back of the laptop, but as it came pre-installed with vista, I do not have a installation cd or dvd. Does anyone know how can I reininstall without one, or how I can get one from either Sony or Microsoft? Thank you.
![]()
If the computer manufacturer did not include Vista disk/s, there should be a Recovery Partition on your Hard drive.
That is the way they do it now, most of the time. We are supposed to make the Recovery Disks ourselves, with instructions included in the installed Manufacturer’s Software in Start >Programs.
At the bottom of the splash Screen at startup/power on, there usually is a Key number, F10, or F11, to hit to start Recovery Process, to take it back to factory standards (out of the box).
Another way I have seen on some models is to tap F8, and go to a list of Startup options , and start a factory standards recovery from in there, by selecting the Repair computer option.
See if a Manual came with the computer, or go to the Manufacturer’s website, email or phone them for info on how to do a Recovery.
Each manufacturer has their own way of doing a Recovery to factory standards.
And save all your Data before you do it, as a reinstall wipes everything from your Hard Drive..
16 people found this reply helpful
Was this reply helpful?
Sorry this didn’t help.
Great! Thanks for your feedback.
How satisfied are you with this reply?
Thanks for your feedback, it helps us improve the site.
How to Reinstall Windows 7 Without a Disc
Many Windows computers that come with Windows 7 out of the box are sold and shipped without Windows 7 installation discs, and many Windows 7 users end up misplacing or losing track of their Windows 7 installation discs. In such cases, users can end up stumped if they ever need to reinstall Windows 7 on their computers. Computers that aren’t accompanied by a Windows 7 installation disc when they are sold or shipped often come with ‘recovery discs’ or ‘recovery partitions’ that are meant to be used to restore them to the exact way they were when they were taken out of the box.
Unfortunately, if you go the recovery disc or partition route, your computer will be restored to the exact way it was when you booted it up for the very first time – bloatware and manufacturer-installed programs included, you won’t be reinstalling vanilla Windows 7. In addition, restoring your computer to the way it was when you started it up for the very first time isn’t always as effective as completely reinstalling Windows from scratch when it comes to fixing issues and problems with Windows.
Reinstalling Windows from scratch is not only one of the best and most effective solutions to an extremely wide range of different problems pertaining to Windows but doing so also ensures that your computer runs on a standard, completely vanilla and bloatware-free installation of Windows. Thankfully, though, not having a Windows 7 installation disc is far from the end of the world. You can successfully and quite easily reinstall Windows 7 even if you don’t currently have a Windows 7 installation disc on you. How would something like this go, you ask? Well, here’s what you need to do in order to reinstall Windows 7 on a computer if you don’t have a Windows 7 installation disc:
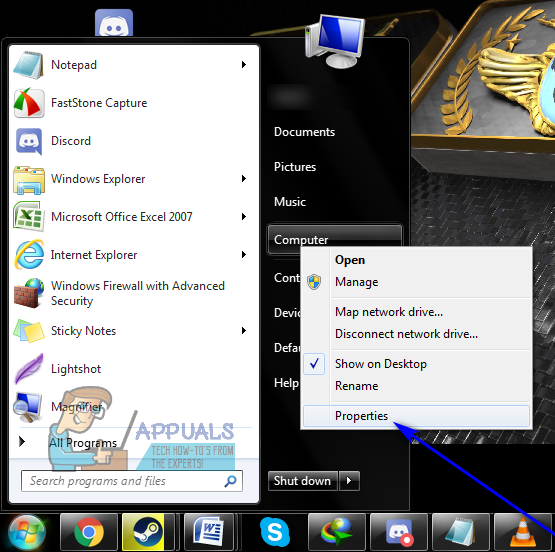
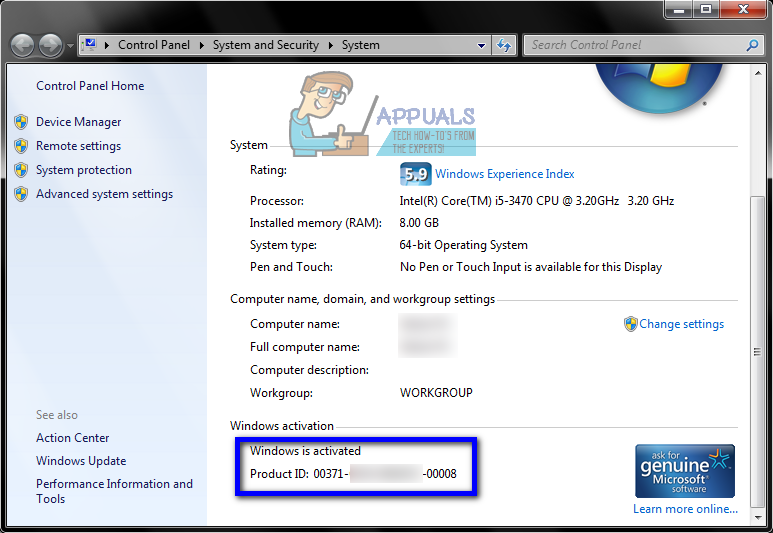
- First and foremost, you are going to have to find your alphanumeric Windows 7 product key (which, typically, is 25 characters long). If you can still log in to Windows on your computer, you can find your product key by right-clicking on Computer on your Desktop or in the Start Menu, clicking on Properties and scrolling down to the Windows activation section. The Product ID described under the Windows activation section is your Windows 7 product key. If you can’t log in to Windows on your computer, however, look for your Windows 7 product key on any stickers on the body of your computer or in documentation that came with your computer when you purchased it.

- Create a Windows 7 installation medium. Obviously, you can’t install Windows 7 on a computer unless you have something to install Windows 7 from. If you don’t have a Windows 7 installation disc, however, you can simply create a Windows 7 installation DVD or USB that you can boot your computer from use to reinstall Windows 7. Create a bootable Windows 7 installation medium.
- Reinstalling Windows 7 will permanently delete any data stored on your computer (at least on the same partition of your computer’s hard drive that you’ll be installing Windows 7 on), so be sure to back up any files and data you don’t want to lose. Once you’re ready to go ahead with the installation, insert the Windows 7 installation DVD or USB you created into your computer and restart it.
- On the very first screen, you see while the computer boots up, press the respective key on your keyboard to get into your computer’s BIOS or Setup. The key you need to press will be clearly described on the first screen you see while your computer boots up.
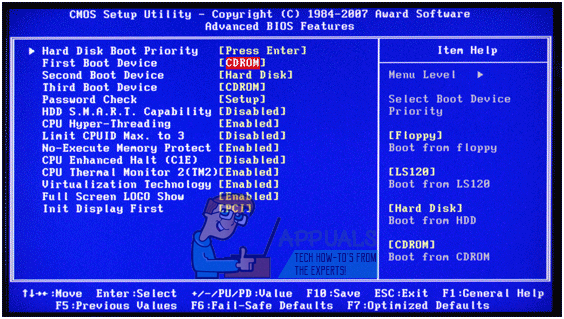
- Navigate to the Boot tab of the BIOS.
- Configure theBoot order of your computer to first boot from the CD-ROM (if you’re using a Windows 7 installation CD/DVD) or from USB (if you’re using a Windows 7 installation USB).
- Save the changes you have made to the BIOS and exit it.
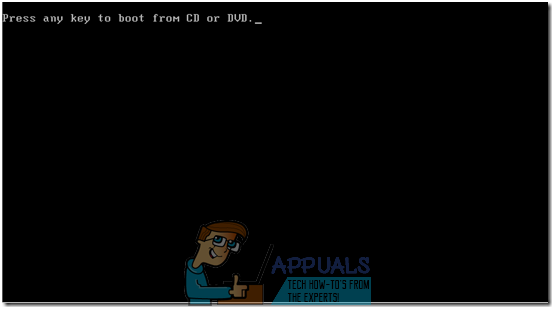
- When the computer boots up, it will try to boot from the installation CD/DVD or USB and ask you to press any key on your keyboard to boot from the medium. When it does, simply press any key to proceed.
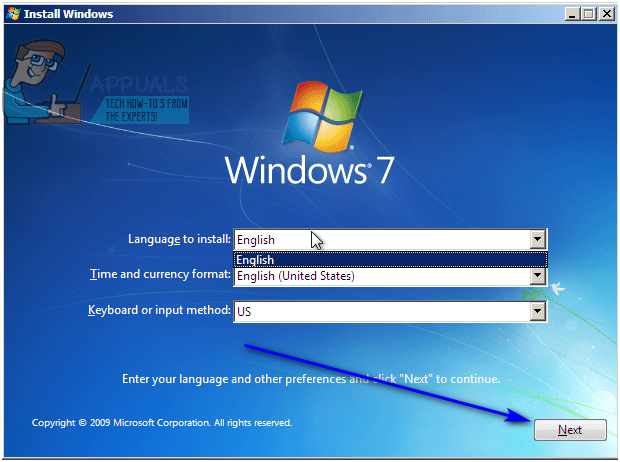
- Agree to Microsoft’s Terms of use, configure your language and other preferences on the Install Windows page and click on Next. Also follow any other onscreen instructions you see until you get to the Which type of installation do you want? page.
- On the “Which type of installation do you want?” page, click on Custom (advanced).
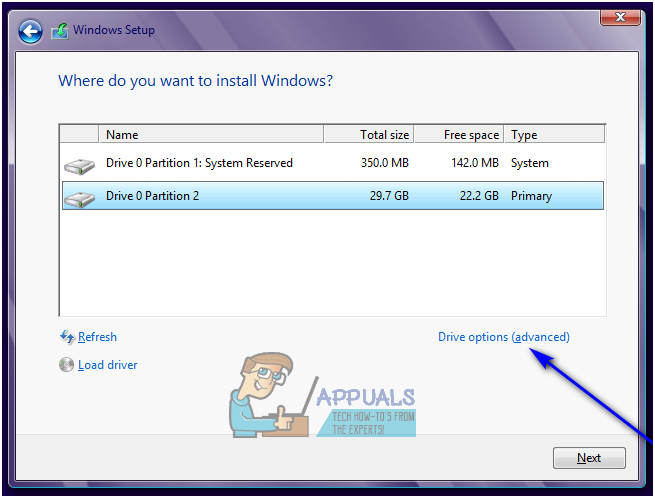
- On the “Where do you want to install Windows?” page, click on Drive options (advanced), click on the partition of your computer’s hard drive that Windows 7 is currently installed on to select it, and click on Delete.
- Click on Yes in the resulting popup to confirm the action. Once you do so, Windows 7 and all other data on the selected hard drive partition will be completely and permanently erased.
- Once the hard drive partition has been successfully wiped clean, click on it to select it as the destination for the new installation of Windows 7, and click on Next.
- Simply wait for Windows 7 to be installed. The process can take anywhere between a few minutes to over an hour (depending entirely on how fast your computer is), and your computer will automatically restart on multiple occasions throughout the installation process so there’s no need to worry when that happens.
- Once the preliminary installation of Windows 7 has been completed, you will be asked to set Windows 7 up by creating a user account for yourself and configuring a few different preferences. Simply follow the onscreen instructions and prompts, and the installation will start being finalized once you do. Once the installation has been successfully completed, you will be taken to your Desktop.
Not having a Windows 7 installation disc or losing the one you had isn’t something that can keep you from reinstalling Windows 7 on a computer – all you really need to do is create a new Windows 7 installation medium (it can be a DVD or a USB or even a CD) altogether and use it to reinstall Windows 7 like you normally would with any Windows 7 installation disc.
How to uninstall Windows 8 and reinstall Windows 7 with no disc
I purchased my Toshiba laptop a few months ago, and it came installed with Windows 7. No disc was included.
When Windows 8 came out I installed it to try, and I’ve found that I just don’t like it. My work computer, in which I spend 8+ hours a day on, has Windows 7 and that’s what I’m used to, so I’d like my personal computer to go back to that.
Everything I’ve been seeing shows a simple uninstall and reinstall if you have the Windows 7 disc- which I don’t. Is there any way to uninstall and reinstall 7 without the disc?
Any help would be appreciated.
Replies (5)
You should have a recovery partition on the laptop that should allow you to restore the laptop to the way it was when you bought it.
You can also download the version that came installed on the laptop and create a bootable dvd or usb stick.
1 person found this reply helpful
Was this reply helpful?
Sorry this didn’t help.
Great! Thanks for your feedback.
How satisfied are you with this reply?
Thanks for your feedback, it helps us improve the site.
How satisfied are you with this reply?
Thanks for your feedback.
Toshiba’s inbuilt recovery utility is started by holding down the zero (0) key when powered up
Read this instruction page , provided the recovery partition is intact it should then reinstall it back to factory default so you need to back up any personal files to a separate device.
When you have finished and logged back on make sure you run the disk creation utility so you have your own disks, the recovery utility is only good if the hard disk is OK. You would need the disk set if the drive is replaced.
Was this reply helpful?
Sorry this didn’t help.
Great! Thanks for your feedback.
How satisfied are you with this reply?
Thanks for your feedback, it helps us improve the site.
How satisfied are you with this reply?
Thanks for your feedback.
Doing a Custom Install
Using the custom install option allows you to reinstall your original copy of Windows while preserving your personal data by moving it to the Windows.old folder. Of course, you will need to reinstall your applications and hardware drivers. To begin, retrieve your installation disc for your copy of Windows and make sure you have the product key.
- Boot to the Windows 8 desktop.
- Insert your Windows 7, Vista or XP disc
- Click Install Now (Windows XP users, please restart from the installation or recovery disc).
To learn how to change your BIOS options to boot from the DVD drive, see the following tutorial:
http://notebooks.com/2011/05/05/how-to-load-bios-and-change-boot-configuration/
If you have an RTM disc
If you have the original RTM disc for Windows 7 or Vista, you can download an updated disc with Windows 7 SP1 or Vista SP1 integrated. This should at least take some of the load off when it comes installing post SP1 updates or Service Pack 2 for Vista.
Download the corresponding edition of Windows 7 you have a license for from the following link. You can identify the edition on the COA sticker attached to your machine, at the bottom or within the battery compartment (laptop) or top/side if its a desktop computer.
COA Certificate of Authenticity:
http://www.microsoft.com/howtotell/content.aspx?pg=coa
What is the Windows Certificate of Authenticity?
http://windows.microsoft.com/en-US/windows7/What-is-the-Windows-Certificate-of-Authenticity
Windows Vista SP1:
(The above Windows Vista image allows you to install the appropriate edition by having the appropriate key).
ImgBurn – In addtion to supporting the creation of CD’s from .ISO files,
it supports a wide range of other image file formats, and it’s free.
(BIN, CUE, DI, DVD, GI, IMG, MDS, NRG, PDI and ISO)
http://www.imgburn.com/
http://neosmart.net/wiki/display/G/Burning+ISO+Images+with+ImgBurn
Note: Always use the slowest burn speed (4x or 2x) if offered a choice.
Unfortunately, Windows XP users will need to get a hold of a genuine copy of Windows XP with SP3 disc. It should not be hard to get one, but will require that you look for one if you can’t find yours.
If Windows came preinstalled on your computer.
If Windows XP, Vista or Windows 7 came with your computer, this might be a bit tricky depending on the version of Windows you are running and the options you selected during the installation of the Windows 8 preview. I have noticed that installing later versions of Windows can sometimes render a recovery partition inoperable.
Some computers that come preinstalled with Windows often have what is called a recovery partition. This is used to reinstall the operating system in the event of a system crash. To access it, you will need to boot into it when you start your computer by pressing a function key. This can be either F1, F2, F9, F10, F11, F12 or even DEL or Tab key. Consult the owners manual that came with your PC for instructions about how to reinstall Windows.
This is how the recovery partition is accessed for the most popular computer brands:
- For Dell, press CTRL + F11 directly after powering up the unit.
- For HP, press F11 directly after powering up the unit
- For Toshiba, press and hold ’0′ BEFORE and during the power up
- For Acer, press and hold ALT + F10 as soon as you see the logo.
- For Samsung: Tap the F4 Key at the Samsung logo when you first power on.
- For Asus, press F9 as soon as you see the Asus logo.
- For Advent, restart your computer. Then Press F10 repeatedly until the message “Starting System Recovery” is displayed
- Lenovo http://www-307.ibm.com/pc/support/site.wss/document.do?lndocid=MIGR-4HWSE3
Lenovo notebooks include a feature called the Lenovo OneKey Recovery button, which is used to boot into the Recovery Environment and reinstall Windows.
If your recovery partition happens to be damaged, then you will need to use the link to download the corresponding edition of Windows you have a license for and use the product on you COA sticker. Again, Windows XP users will need to borrow a disc or likely use the recovery discs that came with your system.
Doing the Custom Install
A custom install allows you to reinstall Windows without actually formatting the hard disk.

You can Start the installation from within Windows 8 preview. Click Install Now.

Wait while setup copies files.

Select the option ‘Do not get latest updates for installation

Accept the license agreement, then click Next

Click Custom (Advanced)

Select drive C:\ where Windows 8 installed.

An important warning will appear on screen, click OK

Windows will now begin the installation process.

When installation is complete, setup your user account and password.
Recovering your personal files
Now the important part of doing this will be recovering your personal files. To do that, browse to the root of the drive where Windows is installed, normally C:\. There you will see a folder called Windows.old

In this folder you will find your old User folder with all your personal folders for Documents, Pictures, Music, Videos etc. You can copy the contents from within each folder and paste them into your respective personal folders in Windows 7.


