- Remote Assistance в Windows 7
- Windows 10: How to Send Remote Assistance Invitation
- Send Invite to Control Computer
- Connect to a Computer After Receiving Invitation
- You Might Also Like
- Reader Interactions
- Comments
- Did this help? Let us know! Cancel reply
- Solve PC problems remotely with Remote Assistance and Easy Connect
- Password Recovery
- Provide remote support to Windows 10 users with Windows Remote Assistance
- What you need to be able to provide Windows remote support with Windows Remote Assistance
- How to ask for help using Windows Remote Assistance
- How to provide remote support using the Windows Remote Assistance app
- How to configure a remote support session established via Windows Remote Assistance
- Do you use Windows Remote Assistance for helping others?
Remote Assistance в Windows 7
В нашей компании одним из способом доступа служб технической поддержки к пользовательским рабочим местам является стандартный механизм Windows XP — Remote Assistance.
В Windows XP, чтобы инициировать доступ к ПК пользователя со стороны техподдержки или специалиста Helpdesk, нужно было воспользоваться механизмом «Offer Remote Assistance», например, набрав в браузере следующий URL (hcp://CN=Microsoft%20Corporation,L=Redmond,S=Washington,C=US/Remote%20Assistance/Escalation/unsolicited/unsolicitedrcui.htm). В результате появляется окно с предложением ввести имя или IP адрес компьютера с удаленной системой Windows XP.

В общем-то Remote Assistance достаточно удобное средство для подключения к рабочему столу пользователя в Windows XP, а что же делать, еcли на вашей рабочей станции установлен Windows 7 x64 Enterprise?
Напомню, что работа Remote Assistance в Windows XP, основывалась на службе Help and Support. Еще начиная с Windows Vista, Microsoft решила отказаться от использования службы «Help and Support», ну и, естественно, ее нет и в Windows 7.
Чтобы запустить Windows Remote Assistance в Windows 7 (Vista), необходимо перейти: Start -> All Programs -> Maintenance -> Windows Remote Assistance. Запустить Remote Assistance в Windows 7 можно также при помощи командной строки, для чего существует утилита msra.
Со всеми параметрами команды можно познакомиться, набрав: msra /?
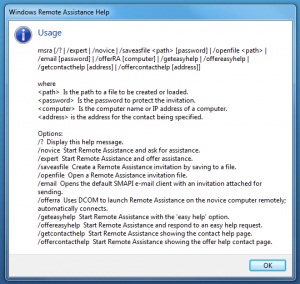
Чтобы быстро и просто подключится при помощи Microsoft Remote Assistance из Windows 7 к другому ПК, нужно набрать следующую команду:
msra.exe /offerRA <IP адрес или имя компьютера>
Мне такая процедура очень понравилась, так как не нужно копаться в дебрях GUI и нужное соединение можно инициировать из командной строки.
Не забудьте также что, доступом к компьютерам при помощи Windows Remote Assistance можно регулировать при помощи групповой политики.
Windows 10: How to Send Remote Assistance Invitation
By Mitch Bartlett 9 Comments
If you have a friend who’s experiencing computer trouble on their Microsoft Windows 10 system, or you just need to show them how to do something, you can help them right from where you’re sitting. Applications like WinVNC or LogMeIn used to be what was needed to access a computer remotely. They aren’t really needed anymore because Windows 10, 8, and 7 all come with Windows Remote Assistance built into the OS. Here’s how to use the feature.
Send Invite to Control Computer
- Hold the Windows Key, then press “R” to bring up the Run box.
- Type “msra“, then press “Enter“
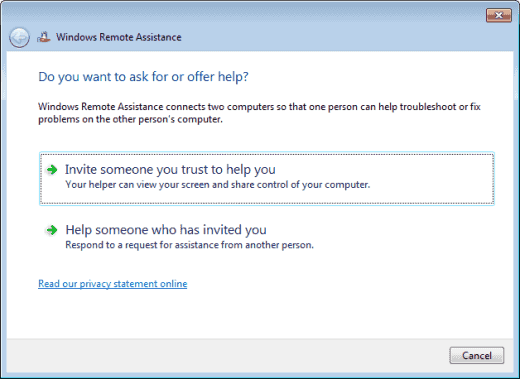
- Select “Invite someone you trust to help you“.

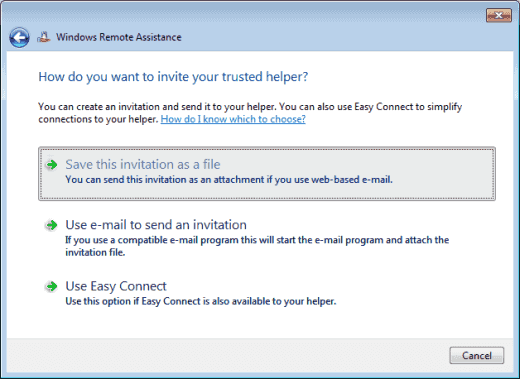
- You may be able to select “Use e-mail to send an invitation” if your default email client is setup properly. This option will automatically start an email message and add the attachment you need. All you’ll have to do is type in the email address to the person you’re sending it to and send it. In most cases, you’ll have to choose “Save this invitation as a file” and proceed with the next step.
- Choose a place to save the invitation file. I like to place it where I can find it on my Desktop. Choose a location, then select “Save“.
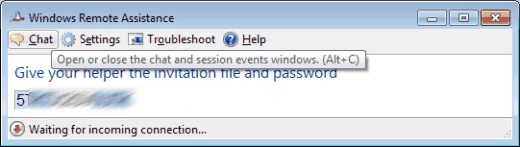
- A window will open with a password. Keep this window open, otherwise the session will end.
- Compose a new email message using whatever email service you use. Provide the password you were provided and attach the invitation file to the message. Send it off to the person you want to connect to your computer.

Connect to a Computer After Receiving Invitation
- Hold the Windows Key, then press “R” to bring up the Run box.
- Type “msra“, then press “Enter“.
- Select “Help someone who has invited you“.
- Select “Use an invitation file“.
- Select the invitation file.
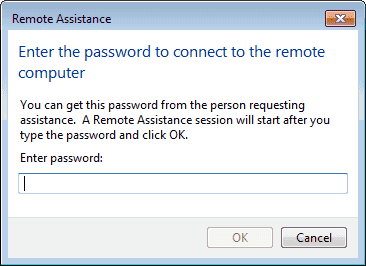
- Type the password provided in the email.
- Select “OK” and you are connected and can control the desktop using Remote Assistance.
You Might Also Like
Filed Under: Windows Tagged With: Windows 10
Reader Interactions
Comments
Thanks Mitch this is a great site.
reynaldo Vazquez says
I couldn’t connect either
Mary Yamada says
I hate microsoft.
Remote Assistance doesn’t work on the Pro version of Windows 10 that I have in my PC. I tried it today because my mother needed help and we’ve been able to use Remote Assistance before (then under Windows 7). BUT, because she now have Win 10 Home I can’t connect to her computer at all, and I’m using Win10 Pro. She can actually send an invitation file and the password and I received and place it in my RA window but nothing happened. It says that I can not connect to the remote computer. Nothingelse worked. Very frustrating indeed, What can I do?
Because of the new security procedures done by Windows 10 at the beginning of May, I could not remotely connect to my office computer from my home computer. Through the use of ZOOM and assistance from my institution’s IT person, he was able to find and solve the situation. Now I can successfully connect to my office computer from my home computer. The new update of Windows 10 done on or around May 8 really screwed up remote connections and I was not the only one from my place of employment to be affected.
Remote Assistance doesn’t work on less than the Pro version of Windows 10. I tried it today because my mother needed help and we’ve been able to use Remote Assistance before (then under Windows 7). BUT, because she now have Win10 Home I can’t connect to her computer at all, and I’m using Win10 Pro. She can actually send an invitiation file and everything, but nothing else works (the way it used to). Very frustrating indeed, and especially cause I blamed her a bit for doing something wrong.. as I thought.
All you need to do is click in the search box then type “help”.
It will show up as one of the choices.
The run command is a precise and direct choice from several different ways to get there.
Nathan Elke says
Why in the WORLD was Remote Assistance changed to a “Run” Command?
Ever since I went to Windows 10 I have been unable to connect to ANY computer I was able to before, making helping my family and friends MUCH more difficult. The emails I get from them requesting assistance will not work – double-clicking the attached file doesn’t work – then, using this “Run” command method of bringing up RA is not intuitive, when before it was actually on the start menu of programs, and finally if NEVER successfully connects.
RA used to be a great tool, and now it’s completely useless. And, looking on the Microshaft site, Looking for help is nigh-impossible, as all the Windows 10-specific help is on a different area with NO search capability.
My 83 year old Mom recently downloaded Windows 10. Now her printer is not set up, and several other issues she can’t handle including finding where to request my help that she could do with my help in Windows 7. This tutorial will help so much. Thanks.
Did this help? Let us know! Cancel reply
This site uses Akismet to reduce spam. Learn how your comment data is processed.
Solve PC problems remotely with Remote Assistance and Easy Connect
Windows Remote Assistance lets someone you trust take over your PC and fix a problem from wherever they are.
Before you can use it, you’ll need to enable access. In the search box on the taskbar, type remote assistance, and then select Allow Remote Assistance invitations to be sent from this computer from the list of results. Then, on the Remote tab, select the Allow Remote Assistance connections to this computer check box, and then select OK.
In the search box on the taskbar, type remote assistance again and select Invite someone to connect to your PC and help you, or offer to help someone else.
Select Invite someone you trust to help you.
Do one of the following: If you’ve never used Easy Connect, select Use Easy Connect. If you’ve used Easy Connect before, select your helper’s contact name. To invite someone who isn’t on your contact list, select Invite someone to help you.
Follow the instructions.
To give help if someone has requested it:
Go to the search box and enter remote assistance, then select Invite someone to connect to your PC and help you, or offer to help someone else.
Select Help someone who has invited you.
Do one of the following: If you’re using Easy Connect for the first time, select Use Easy Connect. Or, if you’ve used Easy Connect before, select the contact name of the person you want to help. To help someone not on the list, tap or click Help someone new.
Follow the instructions.
You can also use Quick Assist to give and receive remote assistance.
Password Recovery
How do I enable Remote Assistance from the command line? Windows Remote Assistance allows someone else to temporarily take control of your PC over the Internet in order to fix a problem for you. This tutorial will show you how to enable Remote Assistance and allow it through firewall in Windows 10 / 8 / 7.
Method 1: Enable Remote Assistance in System Properties
- Right-click on the “This PC” ( or “My Computer”) icon on your desktop and then click Properties.
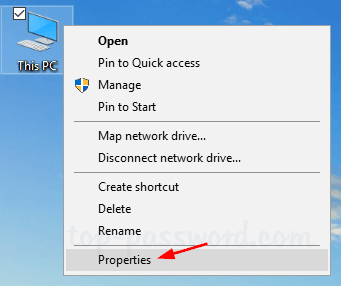
On the left side of the System window, click Remote settings.
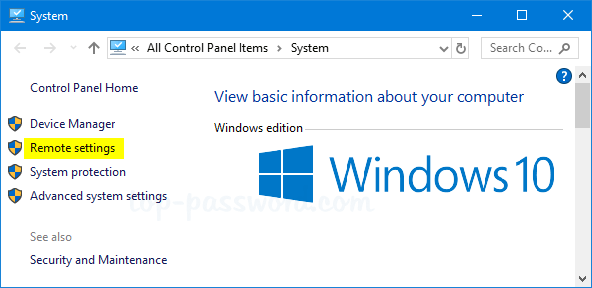
In the “System Properties” window, go to the Remote tab and make sure the “Allow Remote Assistance connections to this computer” check box is checked. Next, click Advanced.
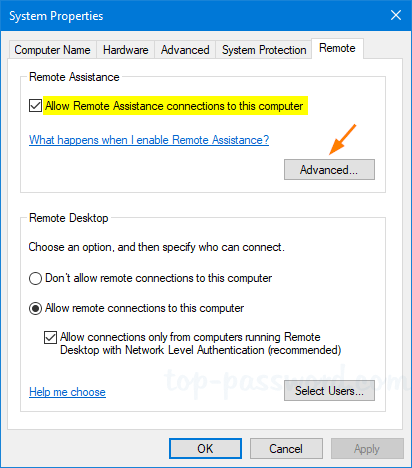
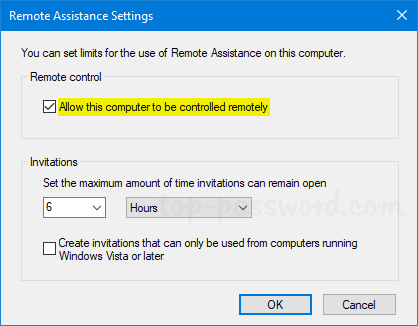
If you clear the “Allow this computer to be controlled remotely” checkbox, the helpers can see your screen, but not take control of your PC.
Method 2: Enable Remote Assistance Using Registry Editor or Command Line
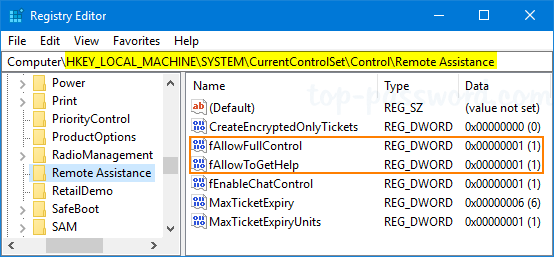
- Open the Registry Editor and browse to the following registry key:
HKEY_LOCAL_MACHINE\SYSTEM\CurrentControlSet\Control\Remote Assistance - In order to enable Remote Assistance, double-click the DWORD entry fAllowToGetHelp in the right pane, and set its value data to 1. If you want to disable Remote Assistance, just change it to 0.
- Next, double-click the DWORD entry fAllowFullControl and set its value to 1 if you want to allow the person offering the assistance to take full control of this PC.
If you want to make the same registry changes with Command Prompt, just run the following commands to enable Windows Remote Assistance:
reg add «HKLM\System\CurrentControlSet\Control\Remote Assistance» /v fAllowToGetHelp /t REG_DWORD /d 1 /f
reg add «HKLM\System\CurrentControlSet\Control\Remote Assistance» /v fAllowFullControl /t REG_DWORD /d 1 /f
Allow Remote Assistance Through Firewall
What port should I open to allow Windows Remote Assistance? Enabling Remote Assistance using the above methods will not configure Windows Firewall with the appropriate ports to allow remote connections. In order to allow Remote Assistance through Windows Firewall, type the following into an elevated Command Prompt:
netsh advfirewall firewall set rule group=»remote assistance» new enable=Yes
Provide remote support to Windows 10 users with Windows Remote Assistance
There aren’t many people who know about Windows Remote Assistance and how to use it to provide remote technical support to other Windows 10 users. Therefore, in this tutorial, we’re going to cover this tool in detail. It’s an app that works smoothly for quick assist sessions and does not require installing any third-party software whatsoever. So, without further ado, here’s how to provide Windows remote support using the built-in Windows Remote Assistance app:
What you need to be able to provide Windows remote support with Windows Remote Assistance
Windows Remote Assistance requires two parties: one who requests help via this tool and another who accepts the invitation to provide remote support. For it to work, the party receiving assistance must have Windows Remote Assistance enabled in the System Properties of his or her Windows 10 PC. If you don’t know how to do that, or if you want to double-check, you can find all the details here: How to enable Remote Desktop in Windows 10 (or Windows 7).
The party in need of help has to request remote support using the Windows Remote Assistance tool. To do that, one has to send a Windows remote assistance file to the helper.
In older versions of Windows 10, you could also use an option called Easy Connect. However, since Windows 10 version 1909 (May 2019), it no longer works for establishing Windows remote assistance sessions. That’s because it relied on Microsoft’s Peer Name Resolution Protocol (PNRP), which has been removed from newer Windows 10 iterations. If you don’t know what Windows 10 version you have, read: How to check the Windows 10 version, OS build, edition, or type.
Finally, you should also know that, even if you have previously connected to it, you cannot connect to another Windows 10 device using Windows Remote Assistance unless its user did not send you an invitation and is waiting for an incoming connection.
How to ask for help using Windows Remote Assistance
Before anything else, you have to open Windows Remote Assistance. In Windows 10, the fastest way to do it is to type the words “windows remote assistance” in the search box from your taskbar. Then, click or tap on the “Invite someone to connect to your PC and help you, or offer to help someone else” search result.
Another way of launching Windows Remote Assistance is to run the msra.exe file, found in the “C:WindowsSystem32” folder.
Once you’ve opened Windows Remote Assistance, click or tap on “Invite someone to help you.”
Select “Save this invitation as a file” as the way to connect with the person who will help you. As we’ve mentioned earlier, although present, the Easy Connect method doesn’t work. Also, while testing the Windows Remote Assistance app, we found out that the “Use email to send an invitation” option doesn’t work either, although we tried it with both Windows 10 Mail and Microsoft Outlook apps.
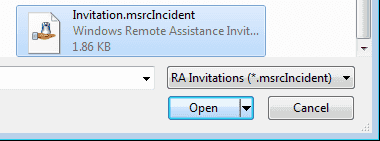
When you choose to send a Windows remote support invitation, make sure the other person receives it and knows about it. The invitation is stored as a file with the “.msrcIncident” extension, which is opened only by Windows Remote Assistance. Save it somewhere on your PC, like on your desktop, for instance.
Once the remote support invitation is saved, Windows Remote Assistance shows you a long password and starts waiting for the incoming connection. Use your email, a messenger app, or any other means, to send the invitation file that you’ve saved earlier, and the password shown by the app, to the person who is about to connect to your Windows 10 PC to help you.
Unless he or she gets both these items, the remote assistance connection can’t be established.
How to provide remote support using the Windows Remote Assistance app
Start Windows Remote Assistance like we’ve shown you in the previous section of this tutorial. Then, select “Help someone who has invited you.”
Now you need to choose the connection method. If you received an invitation, download it to your computer, and then click or tap on “Use an invitation file.”
Browse through your PC and select the Windows remote assistance file. Then, click or tap on Open.
Then, Windows Remote Assistance initiates the remote support connection. Once the other Windows 10 computer or device is found, and the connection is ready, you are asked for the password. Type the connection password that you’ve received from the other party, and press OK.
The remote party will be asked to approve the connection. You will have to wait until the user on the remote PC accepts the incoming remote connection.
Then, your Windows 10 PC connects to the remote device via Windows Remote Assistance, and you can see its desktop.
In order to take control and use the mouse and keyboard on the remote computer, you need to first press the Request control button and wait for the other party’s approval.
A good recommendation is for the remote party to check the box that says “Allow… to respond to User Account Control prompts”, especially if you have to install applications or configure important aspects of the operating system.
How to configure a remote support session established via Windows Remote Assistance
At the top of the Windows Remote Assistance window, there is a toolbar with several buttons. Their number varies depending on the party involved. For example, Request control and Actual size/Fit to Screen are available only to the computer providing help, while both parties can choose to Stop sharing.
Both the host and the remote Windows 10 users can access the built-in Chat feature and use it to communicate.
On the computer that receives assistance, you can use the Settings to configure the way bandwidth is used. If the connection is poor, try moving the Bandwidth usage slider to Low.
Unfortunately, the computer which provides remote assistance cannot configure the bandwidth usage optimization. It has only two options available: “Save a log of this session” and “Exchange contact information when using easy connect.”
The other options you can have in the Windows Remote Assistance menu are a Help and a Troubleshoot button. Help is self-explanatory, and it’s available for both parties, regardless of whether a connection is running: it opens your default web browser and looks for help information about Windows Remote Assistance on Microsoft’s websites. Troubleshoot is available only on the Windows 10 PC that asks for remote support. Pressing the Troubleshoot button launches a wizard that can help in identifying the problem and fixing it.
Do you use Windows Remote Assistance for helping others?
We used Windows Remote Assistance on a couple of different Windows 10 PCs, and it always worked well. Although it seems that Microsoft doesn’t spend any efforts on modernizing it, in our opinion, Windows Remote Assistance is still a decent alternative to some well-known remote desktop support solutions, such as TeamViewer or UltraVNC. Its only downside is that it only works for Windows operating systems. Have you ever used Windows Remote Assistance to help other people?


