- Удаленный рабочий стол в Ubuntu
- Удаленный рабочий стол VNC в Ubuntu
- Удалённый рабочий стол RDP в Ubuntu
- Выводы
- How to Connect to Windows PC Using Ubuntu OS With Remote Desktop Connection
- IMPORTANT:
- Step 1: Enable/Turn On the Windows Remote Desktop Connection Feature on Your Windows Host Computer
- Step 2: Download and Install a Remote Client Software from Ubuntu Software Center
- Step 3: Configuring the Remote Desktop Session to be Established
- Beware of Larger Desktop Screen Resolution
Удаленный рабочий стол в Ubuntu
Удаленный рабочий стол позволяет подключиться к вашему компьютеру через интернет с помощью другого компьютера или даже смартфона. Вам может достаточно часто понадобится сделать что-то на другом компьютере, даже если вы не рядом с ним. Такая возможность есть и у Ubuntu.
В этой статье мы рассмотрим как настроить удаленный рабочий стол в Ubuntu 20.04, а также как подключиться к нему с помощью различных устройств. В качестве протокола удаленного доступа мы будем использовать VNC, он медленный и уже устаревший, но зато везде поддерживается. В Ubuntu почти все программное обеспечение уже установлено по умолчанию, вам остается только изменить несколько настроек.
Удаленный рабочий стол VNC в Ubuntu
Как я уже сказал, в качестве протокола удаленного доступа мы будем применять VNC. А в качестве сервера — стандартный VNC сервер Ubuntu. Надо только немного его настроить.
Откройте главное меню, а затем запустите утилиту Параметры системы. Здесь откройте раздел Общий доступ:

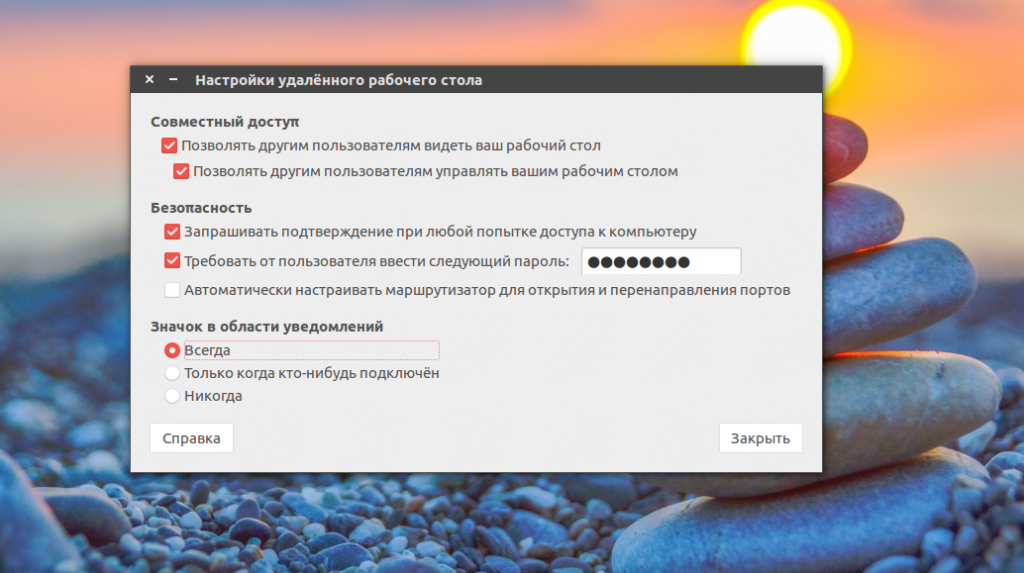
Здесь кликните по пункту Общий доступ к экрану, чтобы открыть окно настроек:

Здесь надо включить переключатель вверху окна, затем напротив поля «Требовать пароль» введите пароль, который будет использоваться для подключения:
Настройки можно закрыть, удаленный рабочий стол Ubuntu настроен. И уже сейчас вы можете пытаться подключиться к вашему компьютеру с помощью другого дистрибутива Linux. Но есть еще один момент. Вы не сможете подключиться из Windows. По умолчанию включено обязательное шифрование. А это поддерживается не всеми клиентами. Чтобы отключить принудительное шифрование нужно установить dconf-editor:
sudo apt install dconf-editor
Затем откройте программу и перейдите по пути org.gnome.desktop.remote-access там сделайте этот пункт Disabled:

Теперь вы готовы тестировать подключение к удаленному рабочему столу Ubuntu. Откройте главное меню и найдите клиент удаленного подключения Remmina.
В строке подключения выберите протокол VNC, затем введите адрес, поскольку мы собрались проверять на локальной машине, то введите localhost, в других же случаях вам придется использовать IP адрес компьютера. Дальше нажмите «Подключиться»:

Сразу же программа спросит у вас пароль чтобы получить удаленный доступ к компьютеру:

После этого вы увидите ваш рабочий стол. В случае с локальной машиной получится такая рекурсия:

Теперь самое время подключаться из другого компьютера. Вы можете использовать любой VNC клиент для Linux, Windows или Android и подключиться к своему компьютеру если он находится в локальной сети. Кроме того, вы можете получить к нему доступ даже из Интернет создав частную локальную сеть, например, с помощью hamachi или OpenVPN.
Удалённый рабочий стол RDP в Ubuntu
Если вам надо часто подключаться удалённо к Ubuntu из Windows, то лучше использовать протокол разработанный для Windows — RDP. Он тоже уже достаточно старый, но почти везде поддерживается. Для установки RDP сервера выполните:
sudo apt install xrdp
После установки убедитесь, что сервис запущен:
sudo systemctl status rdp

Затем вы можете подключатся к настроенному серверу из Windows стандартными средствами системы или из Linux с помощью утилиты Reminna как в предыдущем варианте, только протокол надо будет выбрать RDP вместо VNC.
В Windows откройте поиск и найдите там подключение к удалённому рабочему столу:

Введите IP адрес сервера, на котором запущен RDP клиент и к которому вы хотите подключится:

Затем нажмите кнопку Подключится и введите логин и пароль от пользователя в системе, к которой вы подключаетесь:

Теперь вы можете использовать RDP подключение.
Выводы
В этой статье мы рассмотрели как выполняется настройка удаленного рабочего стола Ubuntu 20.04, а также как получить к нему доступ с помощью других устройств. Все очень просто, даже проще, чем с тем же x11vnc, для которого нужно создать несколько конфигурационных файлов. Если у вас остались вопросы, спрашивайте в комментариях!
How to Connect to Windows PC Using Ubuntu OS With Remote Desktop Connection
Windows has a very useful feature that is capable of connecting the computer that you are currently using right now with another one that is found in a different location. We’ve talked about this feature in our previous tutorials but there are still some aspects to it that needs to be discussed and one of them is going to be the meat of this tutorial.
Now, let’s say for instance that you are using a computer that has a different operating system installed to it and not Windows? What will you do? Can you still connect to your host computer that runs on Windows while the client computer is of a different operating system?
Connecting the Windows Remote Desktop Connection is actually possible even from other operating system platforms such as certain Linux OS distributions like Ubuntu. Since the Remote Desktop Connection feature does not work in OS platforms like this, you must be willing to download a third party app that will allow you to connect to your host computer and the steps that are involved in doing this are going to be demonstrated in this tutorial.
IMPORTANT:
This tutorial was performed using Ubuntu version 13.04 aka Raring Ringtail.
Step 1: Enable/Turn On the Windows Remote Desktop Connection Feature on Your Windows Host Computer
Remote Desktop Connection will not work if you did not enable it on your host computer. This tutorial assumes that your host computer (the computer that you are going to connect remotely into) runs on Windows and in order to allow other computers to connect to it remotely, you will first need to enable the Remote Desktop Connection tool in it. If you don’t know yet how it is done, you can follow the steps that are found in this tutorial.
Step 2: Download and Install a Remote Client Software from Ubuntu Software Center
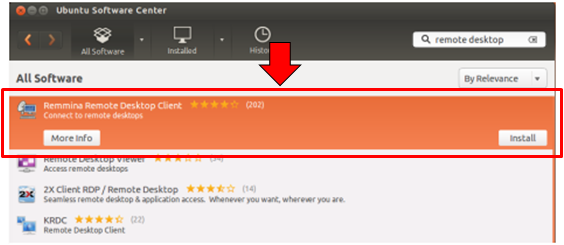
The next step that you need to do will now involve downloading a Remote Client Software from Ubuntu’s Software Center so you can install it on your Linux computer. The software which we are going to use in this tutorial is called the Remmina Remote Desktop Client since it is the best one we found so far and it works seamlessly with the Windows Remote Desktop software tool.

Next, you will simply need to type in the words “remote desktop” into the search box that is located at the top-right portion of the Ubuntu Software Center screen as you can see being highlighted on the screenshot above. Once the search results appear, just click on the one that is labeled Remmina Remote Desktop Client in order to show the “More Info” and “Install” buttons as shown below.
In order to have the software installed into your host computer that runs on Ubuntu, all you need to do is click on the “Install” button that has appeared at the bottom-right area when you selected the Remmina Remote Desktop Client software and a prompt that is labeled “Authenticate” will then appear which asks for your “Password”. From here, just enter your Ubuntu login password then hit the “Authenticate” button that is found at the bottom-right portion as highlighted on the screenshot below.

Take note that in order to install any software in Ubuntu such as the Remmina Remote Desktop Client tool, you will need to be logged in as an administrator or the account that you are using should have administrative permissions and privileges. If you are just using a standard account then you can’t install any software into your Ubuntu machine.
In case you were able to pass through the authentication process and the software is currently installing, just wait for a few minutes until installation process is complete.
Step 3: Configuring the Remote Desktop Session to be Established
Now that the Reminna Remote Desktop Client Software is installed, it is time to fire it up so you can start using it in establishing connection. First, you will need to search your Ubuntu computer by typing in “reminna”. The search result will then show the software shortcut which you will simply need to click in order to get the software started.

Once Remmina opens, just click on the “Create a new remote desktop file” button that is found on the top-left portion of the software screen itself as shown below. This is the time where you can start entering the needed credentials in order to establish Remote Desktop Connection with a Windows machine.

Right after hitting the “Create a new remote desktop file” as we have shown on the screenshot above, you will now be able to open the Remote Desktop Preference screen and from here, you can start configuring the Remote Desktop Connection credentials that you want to establish with another computer which runs on as Windows operating system.

Now, under the “Profile” section, you will need to type in the name that you want to assign to the Remote Desktop Connection that you want to set up and under the “Protocol” section, you will need to choose “RDP- Remote Desktop Protocol”. Afterwards, you will need to click on the “Basic” tab that is found just below the “Profile” section then enter the IP address of the Windows computer that you want to remotely connect to in the “Server” field.
Next, you will also need to type in the Username and the Password for the user account in the Windows computer to which Remote Desktop Connections is enabled. Remember to let any user on the Windows computer to exit before initiating the connection so you won’t encounter errors. If you are going to connect to a Windows 8.1 or Windows 10 computer and the user account to which Remote Desktop Connections is enabled uses a Microsoft account as logins then you can simply use the Microsoft email in the Username then enter the Microsoft account password into the Password field.
Beware of Larger Desktop Screen Resolution
After entering the IP address, Username, Password and other credentials needed, you will now be encountering the section which will allow you to choose and tweak the Resolution options. It is important to note that choosing high Resolution and Color Depth can affect the performance of the Remote Desktop Session that you want to initiate so it is best to just leave it untouched. In case the current setting causes you to experience lags during the session then feel free to adjust these two aspects to your most comfortable values.

You can also share folders that are found on the Ubuntu computer that you are using towards the Windows computer which serves as the host machine and in order to do this, simply click on the “Basic” tab found below the Profile section and on its bottom-most portion, simply click inside the tick box beside the “Share folder” option then browse towards the folder that you want to share as highlighted on the screenshot above.

If you want to see even more advanced settings and options for the Remote Desktop session that you want to set up then you will simply need to click on the “Advanced” tab that is found just beside (to the right) of the “Basic” tab. Under this section, you can choose to turn sounds on or off, share printers to boost productivity in the office or anywhere else or even disable clipboard sync and many others as show on the screenshot above but we recommend that you only tweak this if you know what each one does.
After making all the changes that you want, just hit the “Connect” button found on the bottom-right portion of the screen as highlighted below. If you plan to establish the Remote Desktop Connection at a later time, you can simply click on the “Save” button and just close the software. If you chose to do the former then you will see a notification screen that looks like the one shown below.

From this prompt, all you need to do is click on the “OK” button found on its bottom-right portion then just wait until the Remote Desktop Connection is established. Just make sure that the Windows computer which you want to remotely connect to is also on the same network and is turned on. If you close the connection, Remmina Remote Desktop Client will save it for future reconnection so you won’t need to be setting up everything again if ever you need to remotely connect to the same Windows computer.
As you can see, setting up a Remote Desktop connection between a Ubuntu computer as client and Windows computer as host is not that complicated. It doesn’t even require any technical knowledge and if you followed the steps that we have show above then you should be enjoying your remote desktop connection now. Let us know if you have any questions by posting them on the comments section below.


