- Используем функцию Remote Disk в Mac Mini, iMac последнего поколения, MacBook Air и Retina MacBook Pro.
- Remote disk mac os ��� ���
- Hint Options
- Question: Q: Why would ‘Remote Disc’ show up on my MacBook Pro?
- Helpful answers
- Как подключиться по RDP из-под MacOS
- Загрузка Microsoft Remote Desktop
- Параметры RDP подключения
- Подключение к удалённому рабочему столу
Используем функцию Remote Disk в Mac Mini, iMac последнего поколения, MacBook Air и Retina MacBook Pro.

Название опции говорит само за себя: с ее помощью Mac со встроенным или внешним оптическим приводом SuperDrive можно удаленно подключить к одному из последних компьютеров Apple, лишенных такого рода устройства. В результате на новом Mac получится и обычный CD или DVD диск воспроизвести/считать, и записать что-то на чистую «болванку».
Функция Remote Disk проста в использовании и поддерживается разными версиями OS X. Например, новенький MacBook Air или Retina MacBook Pro с самой последней версией «Пумы» (OS X 10.8) на борту может с помощью Remote Disk получить доступ к приводу SuperDrive в древнем компьютере, работающим под управлением OS X 10.6 Snow Leopard.
Для этого на Mac с подключенным к нему SuperDrive нужно открыть доступ к дисководу для других компьютеров. В Настройках Системы выбирается «Общий доступ» («Sharing»). В открывшемся окне нужно поставить галочку напротив «Remote Disc» (а в OS X 10.6 – напротив «DVD or CD Sharing», это одно и то же). Останется только поместить нужный CD или DVD диск в SuperDrive.

Теперь – завершающий этап, удаленное подключение Mac без SuperDrive к дисководу с помощью Remote Disc. Если в настройках компьютера указано, что доступный CD или DVD диск должен отображаться прямо на рабочем столе, так и будет. В противном случае пользователю понадобится обратиться к Finder и перейти в нем на свое устройство (кстати, оно может и не отображаться, тогда надо в настройках Finder поставить галочку напротив этого элемента бокового меню). Там он найдет либо Remote Disc, либо просто диск с соответствующим названием (тот самый CD или DVD, к которому был нужен доступ). По умолчанию доступ к диску в приводе открыт. С ним можно работать так, будто он находится в собственном оптическом приводе компьютера, которого у того на самом деле нет.

Особенность удобна тем, что избавляет маковода от необходимости специально покупать SuperDrive, если у него уже есть более старая модель Mac с встроенным дисководом или второй Mac с подключаемым к нему SuperDrive. С помощью Remote Disk также можно решить проблему с компьютерами, в которых родной оптический привод не работает или функционирует неправильно. Наконец, благодаря Remote Disk можно подключить новый Mac даже к компьютеру на базе Windows. Естественно, компьютеры должны находиться в одной Сети.
Источник
Remote disk mac os ��� ���
A little known capability of Mac OS X disk image system allows remote mounting of most disk images directly from «http://» URLs. However, this feature is not available in Disk Copy, so one must resort to the Terminal for mounting remote disk images. There are several reasons why one may want to mount a disk image remotely. Firstly, it allows selective downloads of just the interesting files from a disk image. This can be a real time-saver if you are on a modem trying to download just a few files from a huge disk image. Secondly, it avoids cluttering the hard drive with disk image files.
To mount a disk image remotely, enter the following command in Terminal:For example:NOTE: Shown on multiple lines for narrower reading; type on one line with no additional spaces in order to use the command. That command will mount the disk image containing the 45 MB large combo update to 10.1.5. Useful if you only need to retrieve a file or two using Pacifier. The feature is documented in the manual page for hdid, the command line program that is used by hdiutil to do the actual mounting.
[Editor’s note: I had no idea this was possible . and as the tip author points out in the comments, there is a GUI for it. Simply select a «.dmg» file in any Cocoa application, then do Services -> Disk Copy -> Mount Image, and the remote .dmg file will mount — very very cool!]
- Currently 4.25 / 5
You rated: 5 / 5 (4 votes cast)
Hint Options
Just tried this on my home machine running a webserver. Dragged an image to the Web folder and mounted it thru the Terminal over the internet just as you detailed.
(e.g. hdiutil mount «http://www.mydomain.com/Image.dmg»)
Wouldn’t be very hard at all to make a Cocoa wrapper. I’ll see if I get around to it today. Any ideas on how it should be designed (feature-wise and/or gui-wise)?
Select an URL in a Cocoa program. Go to the Services menu. Disk Copy. Mount Image. DC will launch and the disk image will be mounted remotely! That explains what that strange Service item was used for!
Since Services are only available in Cocoa apps, I think a general app that did this would still be quite useful. Drag-and-drop a URL onto the program, and that’s basically it. Maybe when it’s running there’s a small «well» onscreen where you can drag stuff, in addition to the usual drag to dock.
Maybe a list of recently visited .dmg files, too, to make going back easier.
Thoughts off the top of my head.
The obvious question is, is it a good idea to mount a large update like this remotely and then run the updater from it or is that going to be worse/slower/use-more-bandwidth than just downloading the entire image and mounting it then?
It depends, really. It depends on how the programs you use on the files were written — if they keep files in memory or read them again or again. At the recent WWDC, Apple emphasized that developers should use the disk sparingly, as it could reside on a network with slow performance.
For most applications it probably doesn’t matter. Its probably best to download the dmg if you are going to use most of its contents. I haven’t done a lot of testing, so you may have to experiment some to find the optimal working pattern.
I just mounted a remote copy of the new QuickTime installer. Whee! I was able to examine the contents with Pacifist and SNAX, although examining them with the Terminal was much faster, including the VolumeCheck script. One use for this would be to quickly decide whether you wanted to download such a package at all (esp. if us are stuck with a dial-up connection). I was tempted to try running the installer, but I decided there was likely no faster road to spinning-beachball hell.
On a less successful note, when I try to mount a volume (even a local one) with the Disk Copy service, the classic version of Disk Copy is invoked, even though the correct application open it when it is double-clicked.
Couldn’t get this to work for me. Running 10.1.5 on a Powerbook. Tried one of the examples at the Terminal command line and got:
hdid: unable to convert path to CFURL — error 0x000003E7 (999)
hdiutil: mount: mount failed (59136).
hdiutil: mount failed — unknown error (59136)
No idea what that all means.
Umm. never mind. I had a couple misplaced spaces in the imagename string.
Does hdiutil have a timeout? Is it trying to pull the update over and then mount it, or when I access something on the remote disk image does it access that remote server?
It worked fine with my iBook 500 (10.1.5, 320MB) on a LAN connected to the outside world via a T1.
It doesn’t download the complete image. It access it in a random fashion, using resume/continue commands, i would guess. Which is why some servers will not be supported.
Yes, the content is only partially retrieved: here’s a sample HTTP request made by hdid:
GET /diskImaget/encrypted.dmg HTTP/1.1.
Host: 192.168.7.12:80.
Range: bytes=0-511.
There is also a side note not yet mentioned: if you mount an encrypted disk image remotely, the encryption is deciphered only after the partial retrieval, that is the data is secured during transmission. (At least that is what it looks like, based on analyzing the HTTP requests sent. I wish someone could confirm this.)
i remember the Disk Utility in the services menu under 10.1.5 but it seems to be missing from the jaguar services menu. can anyone confirm this?
Not sure about Jaguar, but it sure ain’t here under Panther.
comes up with the error «does not appear to be a disk image: internal error». Seems to be logical since Apple binhexed the the images. Is there an option in hdiutil which allows binhexing first before the image is remotely mounted?
I managed to mount a .bin image. Hmm.
Alright, I’ve spent a few hours (literally) hacking up a GUI for this little trick. Its written in AppleScript Studio, so Quick n’ Dirty is the name of the game. Regardless, it works and is customizable. Check it out at Remote Image Mounter.
This could be really great for an IT department that wanted to make disk images available to its clients. There are dozens of handy uses for this!
I’ve administered Suns, and as a matter of fact we used NFS servers (Network File Systems) to remote mount users home directories. This way you could log in to any system in the company and see all your files.
We even remote mounted CDs, as several older Sun systems didn’t come with CD-ROMs as standard.
Local UNIX accounts from what I’ve seen are a bit unusual in the business world.
Macs have been able to remotely mount volumes and CDs as well, but this is the first time we have seen remote mounting of disk _images_.
Is there a way to mount the images so they are writeable? I’ve tried a few different things (setting permissions on the image itself, converting the type of image to UDRW, etc.) but nothing seems to work. Mounting the image locally will allow me to write, mounting the same image remotely wont.
I’d like to have a few 100 MB images on my server and allow my family and friends to access the images to mimick iDisk functionality. I’m aware that there might be better ways to provide space, but this way I can limit their disk use to 100 MB (or whatever)
Any information would be greatly appreciated.
URLs which start with «disk://» automatically spawn Disk Copy to mount them over the internet. For an example, go check out WHAMB:
The download section offers you the option of downloading the disk image containing the software or mounting it over the internet. It seems that you just have to make sure it’s an actual .dmg file (not .sit or .gz or any other compression applied), get the web download address, and replace «http» with «disk».
And all without the command-line.
Disk Copy doesn’t seem to honor the Proxy settings in the Network System Preferences unfortunately, so this doesn’t work for me behind our firewall, but it all should in theory.
Источник
Question: Q: Why would ‘Remote Disc’ show up on my MacBook Pro?
Opened up my Macbook Pro this afternoon and the ‘Remote Disc’ icon was displayed in my Finder sidebar under devices. Since I don’t do sharing, and the icon wasn’t there this morning, why would it show up?
MacBook Pro, macOS High Sierra (10.13.1)
Posted on Dec 4, 2017 5:16 PM
Helpful answers
It is for you to share from that Mac. It is for you to connect to another computer that has a CD/DVD drive.
You can hide it using Finder Preferences, Sidebar.
Dec 4, 2017 6:08 PM
thoughts on how to get ride of it?
Have you tried dragging it out of the Sidebar?
You have to drag it out, then pause until you see an X appear, then drop.
Jan 3, 2018 2:39 PM
There’s more to the conversation
Loading page content
Page content loaded
It is for you to share from that Mac. It is for you to connect to another computer that has a CD/DVD drive.
You can hide it using Finder Preferences, Sidebar.
Dec 4, 2017 6:08 PM
I have a 15″ MBP produced from June 2017 and running OS Sierra 10.12.6. I have unchecked all the boxes listed in
Preferences>Sidebar and I still have the Remote Disc showing in the Finder sidebar. Other than Hiding it, any other
thoughts on how to get ride of it?
Jan 2, 2018 11:03 PM
thoughts on how to get ride of it?
Have you tried dragging it out of the Sidebar?
You have to drag it out, then pause until you see an X appear, then drop.
Jan 3, 2018 2:39 PM
Remote Disc appears if another Mac on your network has an optical disc drive and is advertising disc sharing services: System Preferences. > Sharing > DVD or CD Sharing > select.
The Mac advertising sharing services may or may not be yours.
Jan 3, 2018 2:51 PM
Question: Q: Why would ‘Remote Disc’ show up on my MacBook Pro? More Less
Источник
Как подключиться по RDP из-под MacOS
5814 просмотров 4 2021-04-26 2021-04-28
У пользователей MacOS периодически возникает необходимость оперировать приложениями, запущенными на удалённых рабочих станциях или серверах, работающих на Windows. В качестве удалённого рабочего места, при решения подобного рода задач, сейчас довольно часто используются виртуальные выделенные сервера (VPS). Стандартным приложением для связывания MacOS и Windows в последние годы стал Microsoft Remote Desktop . И, к счастью, установка и работа в Microsoft Remote Desktop на MacOS довольно просты. Итак, далее о том, как подключиться по RDP из-под MacOS к виртуальной рабочей станции или серверу.
Загрузка Microsoft Remote Desktop
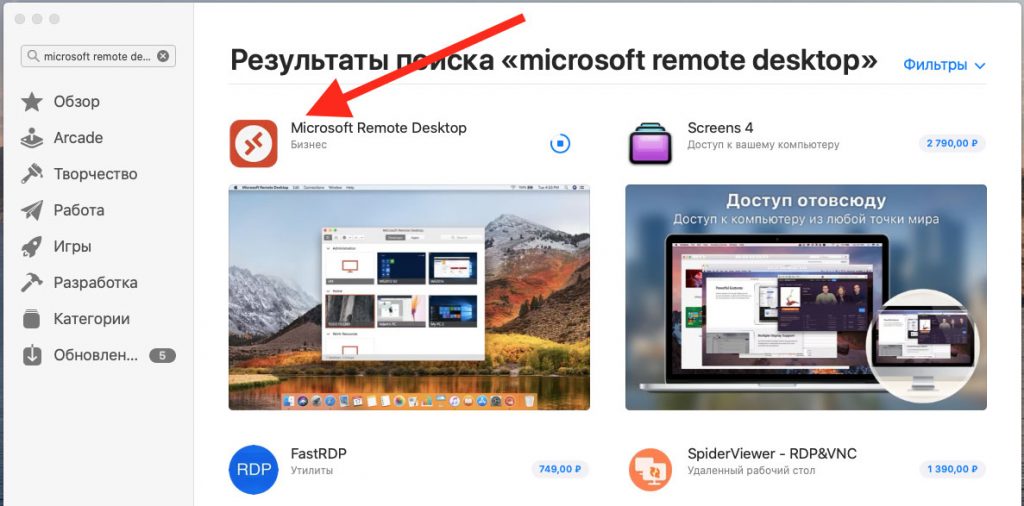
Как и все современные Mac-приложения, Microsoft Remote Desktop доступен для скачивания через Mac App Store . Поэтому, найдет иконку App Store на вашем рабочем столе и щелкните по ней чтобы открыть.
В поисковой строке Mac App Store наберите “Microsoft Remote Desktop”. Среди найденных компонентов найдите оранжевую иконку с изображением компьютера. Скорее всего, она будет первая в открывшемся списке приложений. Чтобы загрузка началась, нажмите на кнопку Get синего цвета. Поскольку Microsoft Remote Desktop является бесплатным приложением, возле его значка не будет указана стоимость. Как только вы нажмёте на Get , кнопка изменит свой цвет на зелёный, и будет содержать надпись Install app . Нажмите на кнопку ещё раз.
Теперь, после завершения загрузки, App Store можно закрыть. Чтобы открыть только что скачанную программу, запустите значок Launchpad , находящийся в Dock . Далее, нажмите на иконку Microsoft Remote Desktop и приложение запустится. В случае, если вы не можете найти значок искомого приложения, попробуйте пролистать влево. Вероятно, Launchpad имеет несколько страниц из-за большого количества имеющихся приложений.
Есть ещё один способ найти загруженное приложение. Им является использование поисковой компоненты Spotlight. Вы можете запустить её нажав на значок с изображением глаза в правом верхнем углу рабочего стола. Также, можно запустить поисковик с клавиатуры, нажав комбинацию клавиш Command + Пробел . В открытом окне Spotlight наберите “Microsoft Remote Desktop” и нажмите Enter .
Когда вы запустите приложение в первый раз, скорее всего, при его запуске откроется всплывающее окно, которое сообщит вам о том, что нового появилось в установленной версии Microsoft Remote Desktop . Вы можете спокойно закрыть это окно и продолжить свою работу.
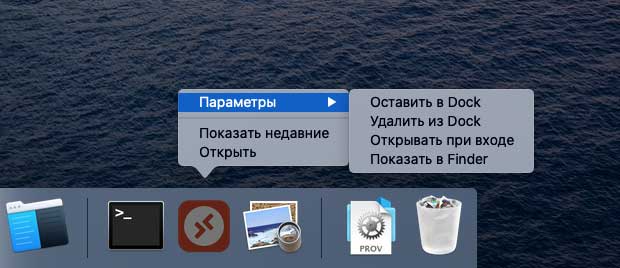
Чтобы получить быстрый доступ к приложению в будущем, вы можете поместить его в свой Dock . Чтобы это сделать, на иконке приложения нажмите правую кнопку мыши, выберите Options (Параметры) , затем нажмите Keep in Dock (Оставить в Dock) .
Параметры RDP подключения
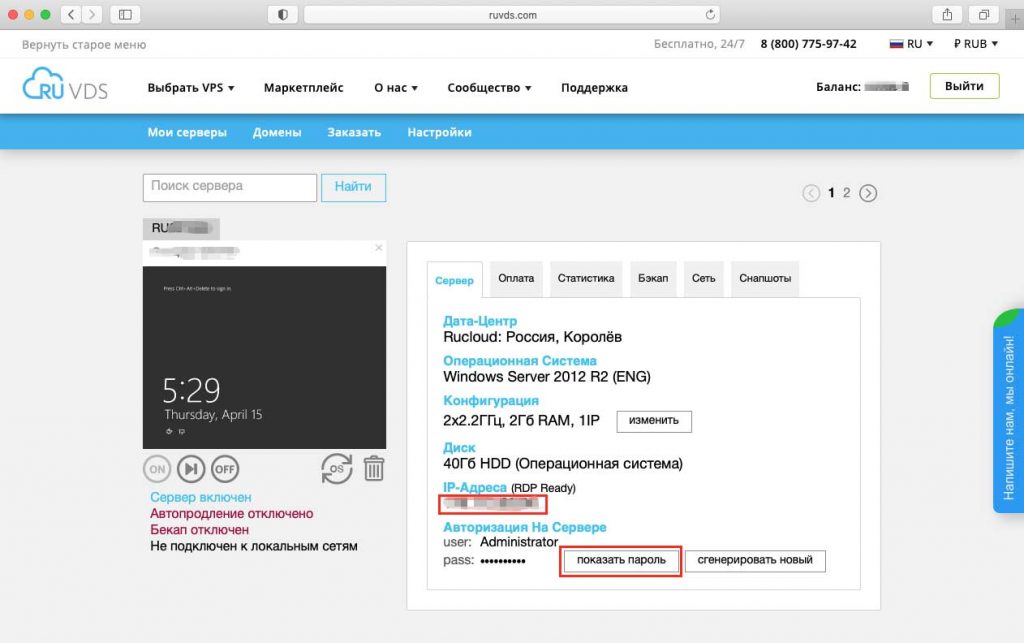
Для доступа к вашей удалённой машине вам понадобится её IP-адрес. Чтобы узнать его, в браузере перейдите на сайт RUVDS и авторизуйтесь на нём при помощи своей учётной записи. IP-адрес будет указан в разделе Мои серверы . В этом же окне вы можете увидеть учётные данные, необходимые для авторизации на удалённом сервере. Имя пользователя доступно для просмотра в строке user , а для того, чтобы увидеть пароль, нажмите кнопку Показать пароль .
Подключение к удалённому рабочему столу
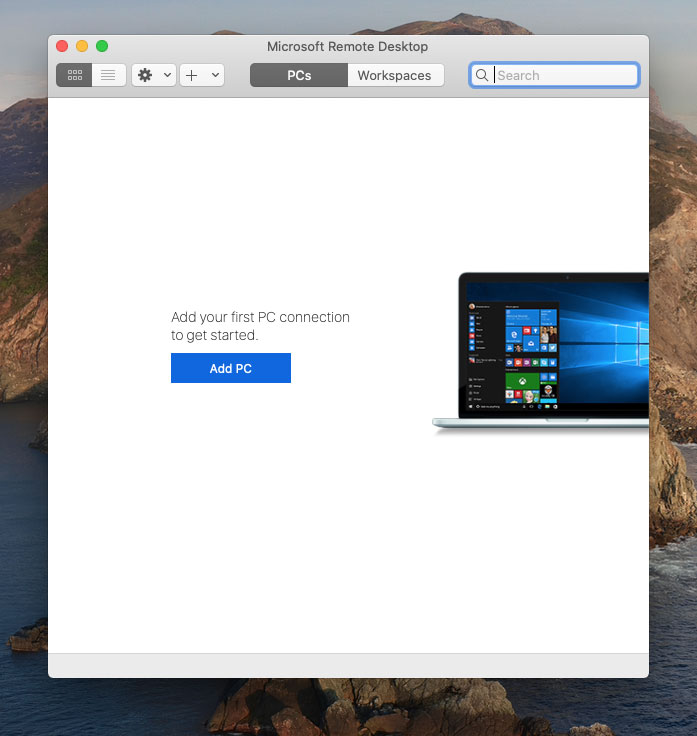
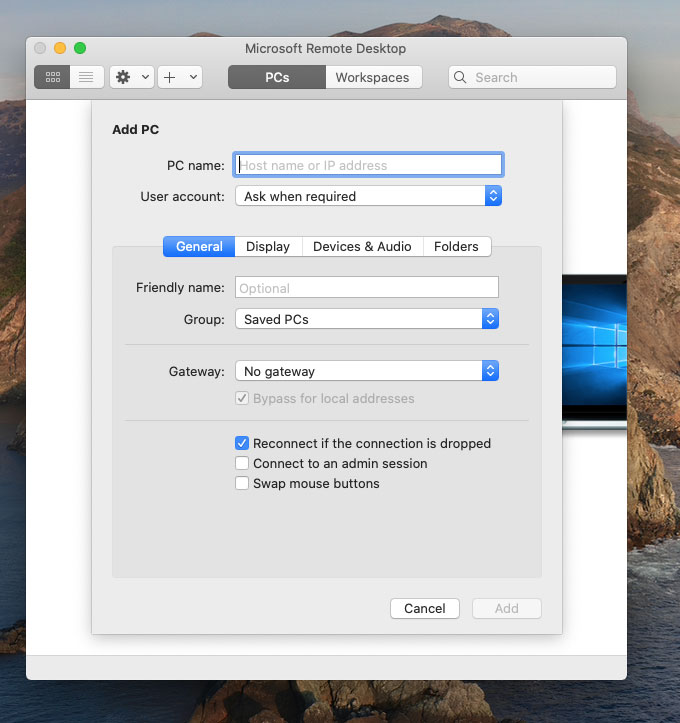
Теперь, когда открыт доступ к машине, работающей на Windows, и вы знаете её IP-адрес и учётные данные для подключения, можно перейти на ваш Mac. На нём запустите Microsoft Remote Desktop и в левом верхнем углу окна найдите и нажмите кнопку New .
В открывшемся окне заполните:
- PC Name – IP-адрес вашей удалённой машины (см. раздел Параметры RDP подключения).
- User account – Если оставить по умолчанию Ask when required , то логин и пароль будут спрашиваться при подключении. Если выбрать Add User Account , то можно сразу ввести учетный данные для входа на сервер. Эти данные вы можете найти в личном кабинете RUVDS (см. раздел Параметры RDP подключения).
- Friendly name . Это просто произвольное название, например, Сервер Windows 2012 .
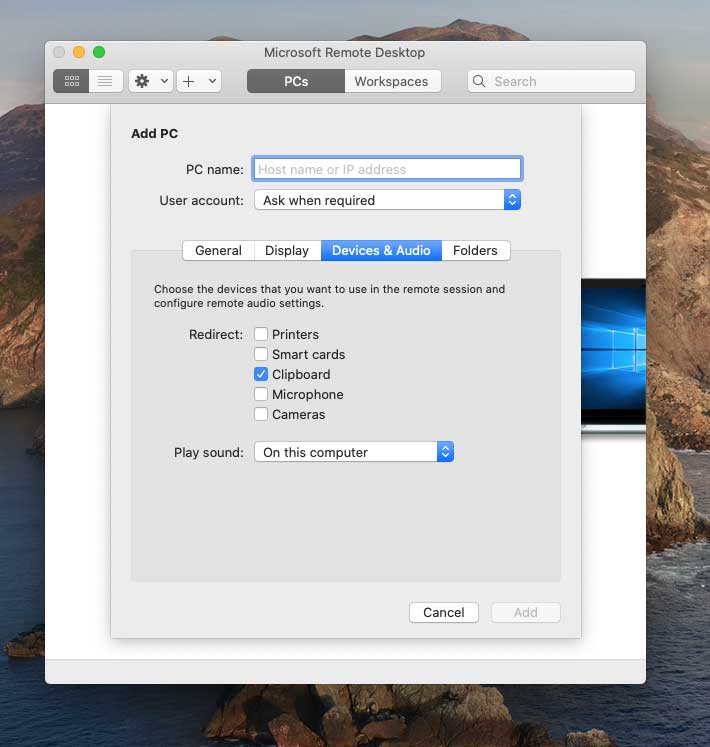
На вкладке Devices & Audio можно настроить периферийное оборудование на удалённом компьютере. Например, в выпадающем меню Play sound вы можете, выбрать какое из действий будет сопровождаться проигрыванием звуков.
Опция Printers поможет вам сделать доступными локальные принтеры при удалённом подключении.
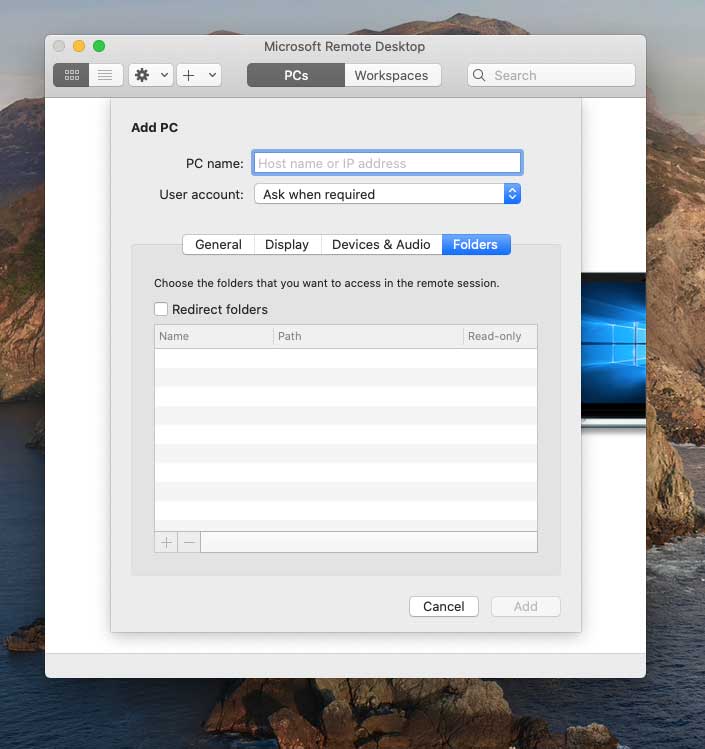
Крайняя правая закладка окна – это Folders . В ней вы можете выбрать локальный каталог для того, чтобы он был доступен из удалённой сессии. Нажмите кнопку + , выберите имя папки и введите путь до неё.
Когда вы закончите настройку подключения к удалённому рабочему столу, нажмите кнопку Add в правом нижнем углу окна. Тем самым, вы сохраните новое подключение. Чтобы начать сессию этого подключения, просто щёлкните на нём двойным щелчком мыши.
Если вам понадобится отредактировать, дублировать, экспортировать или удалить данное удалённое подключение, используйте клик правой кнопкой на имени подключения, чтобы получить доступ к этим опциям.
Источник


