- Настройка и использование функции «Доступ к моему Mac»
- Необходимые условия
- Настройка функции «Доступ к моему Mac»
- Подключение к удаленным компьютеру Mac или базовой станции AirPort в сети «Доступ к моему Mac»
- Удаление компьютера Mac или базовой станции AirPort из сети «Доступ к моему Mac»
- Получение помощи
- Remote management mac os
- Best ways to remotely access and control your Mac from any device and location
- What is remote desktop connection for Mac?
- How to access your Mac from another location
- Allow remote login to your Mac from another computer
- Allow others to access your computer using Apple Remote Desktop
- How to stay on the same page with Screens
- Share files between devices
- Native macOS File Sharing
- AirDrop
- Dropshare
- File Transfer Protocol (FTP)
- Do you need to use a VPN (Virtual Private Network)?
- How to use your iOS device as a remote mouse
- FAQ on Mac remote access
- How do I set up Microsoft remote desktop on Mac?
- How do I send Ctrl+Alt+Del to a remote computer?
- How do I uninstall Microsoft Remote Desktop from Mac?
- How do I copy files from Windows Remote Desktop to Mac?
Настройка и использование функции «Доступ к моему Mac»
Функция «Доступ к моему Mac» обеспечивает возможность безопасного подключения к вашим компьютерам Mac через Интернет.
«Доступ к моему Mac» — это функция службы iCloud, которая позволяет настроить сетевое подключение между компьютерами Mac для удаленного доступа к ним. Функция «Доступ к моему Mac» предоставляет следующие возможности.
- Общий доступ к файлам: поиск файлов и папок на удаленном компьютере Mac и их копирование на локальный компьютер Mac.
- Общий доступ к экрану: использование компьютера Mac через удаленный доступ. Для работы в программах и редактирования документов на удаленном компьютере Mac можно использовать локальную мышь и клавиатуру.
Начиная с macOS Mojave функция «Доступ к моему Mac» более недоступна. Вместо нее вы можете воспользоваться такими возможностями, как iCloud Drive, общий доступ к экрану и Apple Remote Desktop.
Необходимые условия
Чтобы настроить и использовать функцию «Доступ к моему Mac», требуется следующее.
- Два или больше компьютеров Mac с OS X Lion 10.7.5 или более поздней версии, но не позднее macOS High Sierra. На каждом компьютере необходимо выполнить вход в iCloud с использованием одного и того же идентификатора Apple ID.
- Базовая станция AirPort Time Capsule, AirPort Extreme или AirPort Express либо другой маршрутизатор, который поддерживает протокол UPnP или NAT-PMP, с последней версией прошивки. На базовых станциях AirPort должна быть установлена прошивка версии 7.6.1 или более поздней и программа «Утилита AirPort» версии 6.3 или более поздней.
- Чтобы можно было использовать функцию общего доступа к экрану, требуется двухстороннее (получение/отправка) подключение к Интернету со скоростью 300 Кбит/с (или выше) для обмена данными между компьютерами. При низкоскоростном подключении к Интернету можно использовать общий доступ к файлам. Если функция общего доступа к файлам не работает должным образом, проверьте настройки и подключения.
- Брандмауэр, настройки которого разрешают удаленное подключение. Некоторые брандмауэры могут запрещать использование ряда соединений, необходимых для работы функции «Доступ к моему Mac». Например, в таком случае вы не сможете обратиться к своему рабочему компьютеру Mac из дома, но при этом сможете с работы обратиться к своему домашнему компьютеру. Необходимые сведения о разрешениях брандмауэра использовать удаленные подключения с помощью функции «Доступ к моему Mac» можно получить у администратора сети по месту работы.
Чтобы с помощью AirPort Extreme or AirPort Time Capsule использовать файлы на внешнем жестком диске, необходим жесткий диск USB, отформатированный как Mac OS Extended (журналируемый). Во время использования жесткого диска функцией «Доступ к моему Mac» он будет отображаться как базовая станция в папке «Общий доступ» на боковой панели Finder.
Настройка функции «Доступ к моему Mac»
Перед началом использования функции «Доступ к моему Mac» необходимо настроить ее на каждом компьютере Mac, который будет использоваться.
- Выберите меню Apple () > «Системные настройки» и нажмите значок iCloud.
- Если вход в iCloud еще не выполнен, введите свой идентификатор Apple ID и нажмите «Войти».
- Установите флажок «Доступ к моему Mac».
- Следуйте инструкциям по настройке рядом с параметром «Доступ к моему Mac».
- Настройте параметры безопасности.
Чтобы получить доступ к файлам на жестком диске, подключенном к базовой станции AirPort Extreme или AirPort Time Capsule, выполните следующие действия по настройке функции «Доступ к моему Mac» на базовой станции.
- Убедитесь, что вы подключены к той же локальной сети, что и базовая станция AirPort, которую необходимо настроить.
- Откройте программу «Утилита AirPort» в подпапке «Утилиты» папки «Программы».
- Выберите базовую станцию AirPort, которую необходимо настроить для использования функции «Доступ к моему Mac», и нажмите «Изменить». Если базовая станция не отображается, нажмите «Другие устройства Wi-Fi», чтобы открыть список доступных базовых станций. Возможно, вам понадобится выбрать другой сетевой интерфейс из всплывающего меню.
- Введите пароль базовой станции. Этот пароль отличается от пароля службы iCloud.
- Перейдите на вкладку «Базовая станция».
- В разделе «Доступ к моему Mac» нажмите кнопку «Добавить» (+) и введите свой идентификатор Apple ID и пароль, которые используются с функцией «Доступ к моему Mac». Если функция «Доступ к моему Mac» включена, отобразится зеленый индикатор состояния.
- Нажмите кнопку «Обновить», чтобы сохранить внесенные изменения.
Подключение к удаленным компьютеру Mac или базовой станции AirPort в сети «Доступ к моему Mac»
После завершения настройки каждого компьютера Mac и базовой станции AirPort к ним можно удаленно подключиться следующим образом.
- На панели меню Finder выберите Finder > «Настройки», затем перейдите на вкладку «Боковое меню».
- В разделе «Общий доступ» установите флажок «Доступ к моему Mac».
- Откройте окно Finder и найдите раздел «Общий доступ» на боковой панели. Если там нет ни одного компьютера или базовой станции, находящихся в общем доступе, наведите указатель мыши на слова «Общий доступ» и выберите пункт «Показать».
- Выберите удаленный компьютер или базовую станцию, к которым необходимо получить доступ, и нажмите кнопку «Подключиться как». (Чтобы совместно использовать экран с удаленным компьютером Mac, выберите компьютер Mac и нажмите «Общий экран».) Если нужные компьютер Mac или базовая станция не отображаются, нажмите «Все», чтобы просмотреть список доступных компьютеров Mac и базовых станций.
Удаление компьютера Mac или базовой станции AirPort из сети «Доступ к моему Mac»
Функцию «Доступ к моему Mac» можно отключить в любое время. В этом случае компьютер Mac или базовая станция AirPort, на которых эта функция отключена, будут удалены из сети «Доступ к моему Mac».
Чтобы удалить компьютер Mac из сети «Доступ к моему Mac», выполните следующие действия.
- Выберите меню Apple () > «Системные настройки» и нажмите значок iCloud.
- Снимите флажок «Доступ к моему Mac», чтобы отключить функцию. Можно также нажать «Выйти», чтобы полностью выйти из iCloud.
Чтобы удалить базовую станцию, выполните следующие действия.
- Откройте программу «Утилита AirPort» в подпапке «Утилиты» папки «Программы».
- Выберите базовую станцию AirPort, которую больше не нужно использовать, и нажмите «Изменить». Если базовая станция не отображается, нажмите «Другие устройства Wi-Fi», чтобы открыть список доступных базовых станций. Возможно, вам понадобится выбрать другой сетевой интерфейс из всплывающего меню.
- Введите пароль базовой станции. Этот пароль отличается от пароля службы iCloud.
- Перейдите на вкладку «Базовая станция».
- В разделе «Доступ к моему Mac» нажмите кнопку «Удалить» (–) и введите свой идентификатор Apple ID, который используется с функцией «Доступ к моему Mac». Если функция «Доступ к моему Mac» отключена, зеленый индикатор состояния исчезнет.
- Нажмите кнопку «Обновить», чтобы сохранить внесенные изменения.
Получение помощи
Сведения об устранении проблем с настройкой или использованием функции «Доступ к моему Mac» см. в этой статье.
Информация о продуктах, произведенных не компанией Apple, или о независимых веб-сайтах, неподконтрольных и не тестируемых компанией Apple, не носит рекомендательного или одобрительного характера. Компания Apple не несет никакой ответственности за выбор, функциональность и использование веб-сайтов или продукции сторонних производителей. Компания Apple также не несет ответственности за точность или достоверность данных, размещенных на веб-сайтах сторонних производителей. Обратитесь к поставщику за дополнительной информацией.
Источник
Remote management mac os

Apple Remote Desktop gives you the complete tools you need to control all the Mac computers in your network right from your own computer. You can even save task settings as templates and apply them in the future, or use one of more than 30 included sample scripts.

Save yourself the legwork. Apple Remote Desktop gives you more than a dozen commands you can use to control your remote systems easily. You can shut down all systems simultaneously, put to sleep, wake up, or restart any or all computersall without leaving your desk.
You also have the ability to remotely designate the startup disk for your client Mac computers. Set any number of computers to start up from a NetBoot image or their local hard drives. You’ll find this to be an indispensable feature if you are in charge of a computer lab or cluster-computing environment where startup disks are often changed.
And for minimum disruption, you have the ability to schedule any of your admin tasks. All you have to do is save the settings for future deployment and Apple Remote Desktop will initiate the process at the scheduled time.

Apple Remote Desktop also gives you the power to execute UNIX shell scripts or commands on your remote client systems. You can view either a summary or the complete results of the command’s output. This lets you script many standard functions built into UNIX systems or third-party tools. You can also take advantage of the command-line interfaces included in OS X.
These prepopulated UNIX commands are available via the Send UNIX Task Template:
- List All Network Services
- Set Manual IP
- Set DHCP IP
- Set BOOTP
- Set Manual IP with DHCP
Router - Set DNS Servers
- Set Search Domains
- Set Web Proxy
- Allow Power Button to Sleep
- Bonjour Name
- Current Date
- Current Time
- Time Zone
- Network Time
- Network Time Server
- Remote Apple Events
- Remote Login (SSH)
- Restart After Freeze
- Restart After Power Failure
- System Sleep Time
- Display Sleep Time
- Hard Disk Sleep Time
- Delay After Power Failure
- Wake On Modem Activity
- Wake On Network Access
- Quit Application
- Volume On
- Volume Off
- List Required Software Updates
- Download Required Software Updates
- Repair Disk Permissions
- Computer Uptime
- Free Swap Space
Источник
Best ways to remotely access and control your Mac from any device and location
Remote access to Mac, anywhere
While many countries are on a lockdown due to COVID-19, remote work is becoming a lifestyle. Remotely accessing a Mac is designed to be easy. Apple has spent a lot of time ensuring anyone can log in to their Macs — both desktop and laptop — from any other Mac device, anywhere. And, besides, there are a variety of third-party apps ready to help with that too.
Still, remotely managing their Mac sounds overly complicated to a lot of people. From how you connect to sharing files or screens to using your Apple device as a remote mouse, we want to demystify the process in the easy-to-follow guide below.
Best Remote Access Apps for Mac
Setapp sets you up with all the tools you need to access your computer remotely. Best utilities in one pack, give it a go!
What is remote desktop connection for Mac?
Remote access can mean many things, so let’s ensure we’re on the same page here. You can access specific files on your Mac remotely using shared folders — for example, Google Drive, shared Notes, etc. — or using FTP. Screen sharing can also be considered remote connection because you can view Mac’s screen when someone shares it with you through Zoom, Slack, or similar tools. However, you can’t control it.
In this guide, we’ll focus on the types of remote connection that let you control your Mac when it’s not physically there. Mainly, we’ll talk about remote control with mobile apps and remote desktop access — it’s when you can access folders, edit files, and basically complete any task on your remote Mac.
How to access your Mac from another location
There’re two ways: you can allow remote login to your Mac from another computer, or allow others to access your computer using Remote Desktop (it’s available from the App Store).
Allow remote login to your Mac from another computer
For devices using the same macOS, you can allow remote Mac login using a Secure Shell (SSH). This enables Mac remote desktop access using a Secure File Transfer Protocol (SFTP).
To set up Remote Login:
- Go to System Preferences > Sharing
- Select Remote Login.
- Choose which users you want to have remote access to or the ability to control your Mac.
You can either select All Users, which means any other device on your network, or any Mac you own, can access and connect, or click the plus sign to pick the exact users.
When you want to remotely log in to your Mac from another device, you need to know your username (the name that appears when you login) and your computer’s IP address. Write them down and keep them safe, as allowing access to your Mac does make it potentially less secure, especially over cellular or public Wi-Fi networks.
Accessing, controlling, or viewing information on your Mac can be done with a built-in Terminal or any other SSH app using your username and IP address.
Allow others to access your computer using Apple Remote Desktop
With macOS remote Mac access, things are even easier. To set up it:
- Go to Menu > System Preferences > Sharing
- Select Remote Management — it should appear as a checkbox.
- Now you can select who has remote desktop access. Either select, All Users, which means any other device on your network, or Mac you own, can access and connect, or click the Add button(+), which gives you the ability to select who can have remote access and/or control.
If you are using a VPN or VNC viewer and want to access your Mac remotely, you will need to set up a password first. It is also possible to use iOS devices, such as an iPhone and iPad, through Apple Remote Desktop, available from the App Store.
How to stay on the same page with Screens
Collaboration has become of utmost importance to today’s workplaces. And with more and more people working remotely, being on the same screen (ahem, page) is a must.
Screens allows you to work remotely with any computer regardless of your location. Whether you are on a business trip or traveling, stay confident knowing you can access any file on your home computer at any time.
This robust screen sharing tool for Mac supports:
- Multiple displays
- Drag-and-drop file sharing
- Hiding your remote screen while accessing it
- Accessing other computers (e.g. colleague’s) as a guest
- Alternative shortcuts (useful when connecting Mac to PC)
- Custom actions in case of disconnection
To start using Screens, get the app from Setapp and configure the following:
- Remote login and remote management (as per the guide above)
- Install Screens Connect helper app and create a Screens ID on every machine you’d like to connect to in the future
- Use your Screens ID in the Screens app and it will automatically determine which of your computers are available for connection
Remote desktop client for Mac
Control any computer remotely – a perfect way to access your Mac from anywhere without limitations.
Share files between devices
Today we have plenty of ways to send and share files. But ask someone to send something, and you are likely to get it through email. Due to the ubiquitousness of email, it’s still the default method for file sharing, despite its obvious flaws and constraints.
Fortunately, there are much better ways:
Native macOS File Sharing
Few people know that their Mac has native file sharing functionality built-in. To use this feature, activate it in the Sharing pane of System Preferences by checking File Sharing. If you only want to share specific folders, add them to the Shared Folders list. If you only want specific users to access the folder, add them to its Users list. Otherwise, everyone will be able to access it.
AirDrop
Although not the most reliable solution, AirDrop works fine for occasional sharing a file between Apple devices. In the Finder, choose Go and then AirDrop on both the sending and receiving Mac. As soon as you see the receiver’s user icon, drag the desired file onto it to send.
Dropshare
If you don’t want to send files Mac-to-Mac directly but rather through a cloud storage, there is no easier way than Dropshare. The app works with numerous cloud providers, from Dropbox to Google Drive, and saves your files for sharing by simply dragging them onto its menu bar icon.
File Transfer Protocol (FTP)
The most technical but also the most robust way to share files from your Mac is to use FTP, which you could do either through Terminal or an FTP Client, the latter being much more user friendly.
There are a few popular FTP clients one could choose from. The robust file managing app ForkLift covers most of the FTP functionality but takes it to the next level and could be a viable replacement for the Finder altogether with its quick search, instant previews, and file comparison.
DCommander is another full-featured file transfer app for Mac that combines speed and reliability, able to handle thousands of files, schedule backups, and even automate transfers.
At last, when it comes to sharing the same files on different devices, an app like ChronoSync Express becomes invaluable.
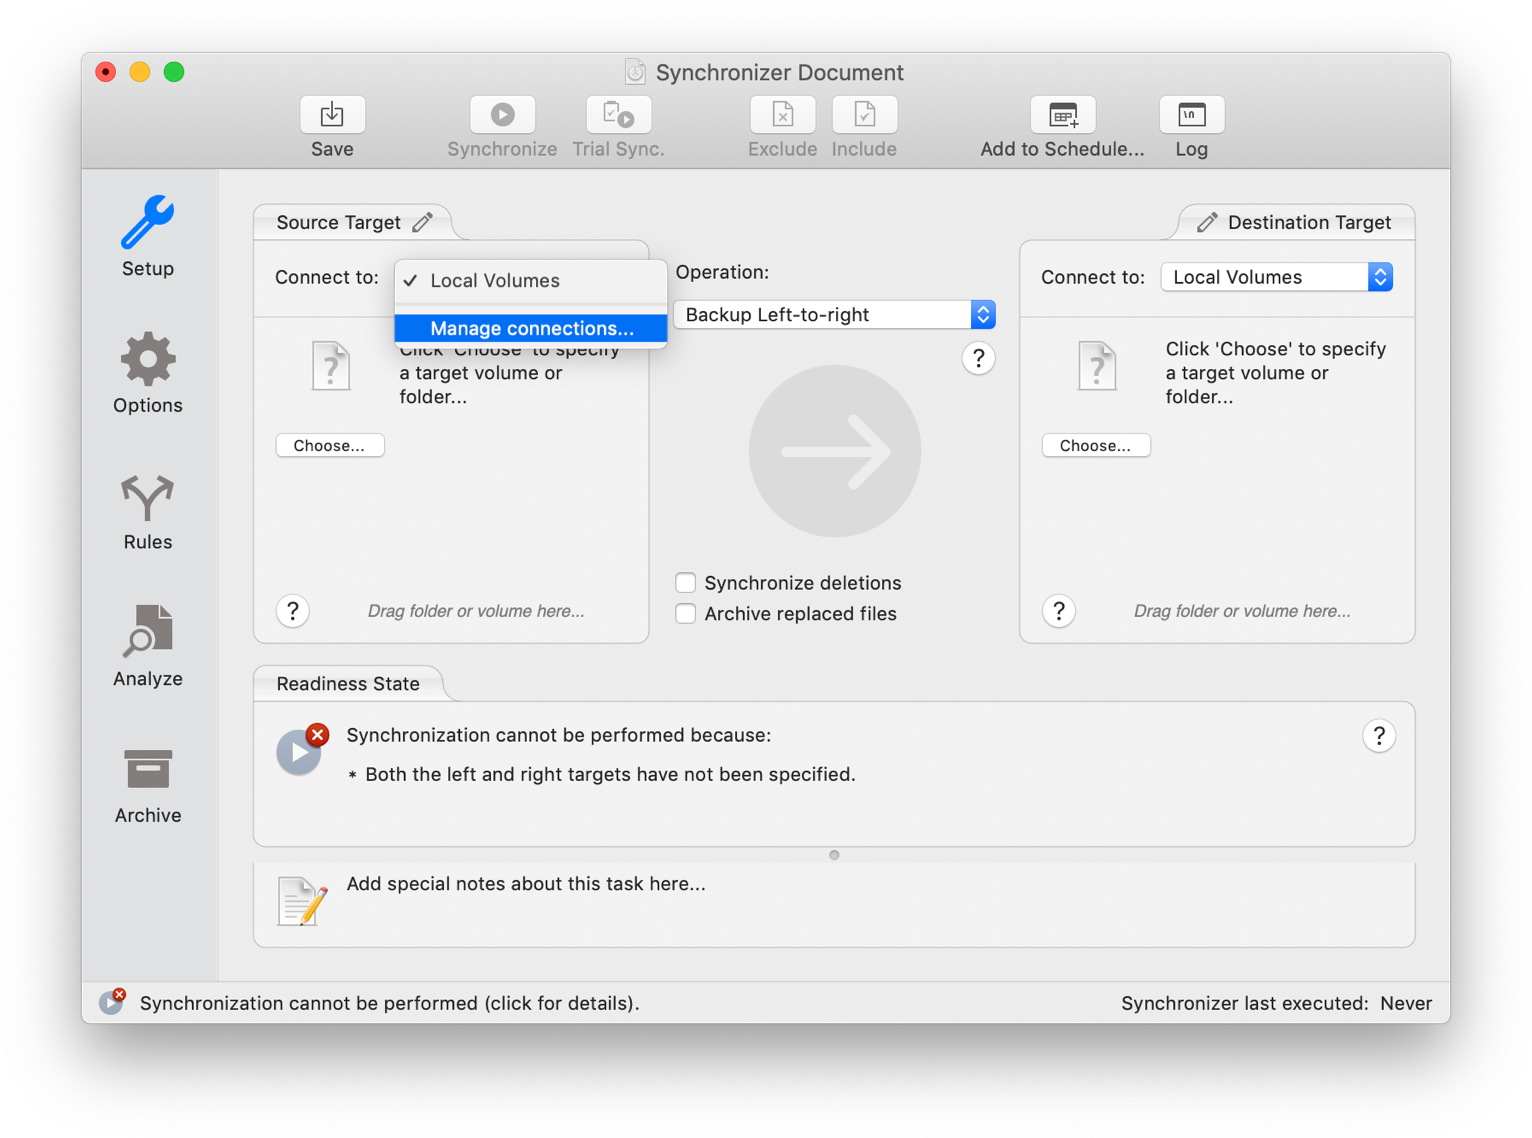
ChronoSync Express is a powerful tool for sharing and transferring files from Mac to Mac, or any other Apple device. With a feature called Synchronizer Document, you can select which files need to be automatically synchronized and shared between devices, just like that:
- Create a new synchronizer document for each folder synchronization you’d like to perform
- Name the synchronization
- Change the Operation to Synchronize Bidirectionally
- Select folders to sync on the left and right
- Test with a Trial Sync
Do you need to use a VPN (Virtual Private Network)?
Whether you are working on your Mac directly, logging into your Mac remotely, or sharing access with someone else, security should be on top of your mind.
As a rule of thumb, you should always use a VPN when connected to a public Wi-Fi network, as someone could log in and see the information you send just as easily as you do.
And with remote access — even in the View Only mode — someone can see every file and document on your Mac, except those that are password protected. Unfortunately, if you leave passwords in a visible document, you expose yourself to immense risks.
A secure VPN client for Mac like Shimo is well worth using to stop unwanted eyes from lurking around, especially if you are sharing sensitive files, financial records or customer data.
![]()
However, for extra peace of mind and security, consider firing up your VPN automatically on all networks you are not 100% sure about to keep your emails, bank accounts and personal documents safe.
To share your Mac with someone else, download a remote Virtual Network Computing (VNC) app like Jump Desktop. With full remote access and Mac remote control, the other person — or yourself connecting to another Mac — can have the same level of control as the person using that device. Except for Admin level access, since it’s password protected.
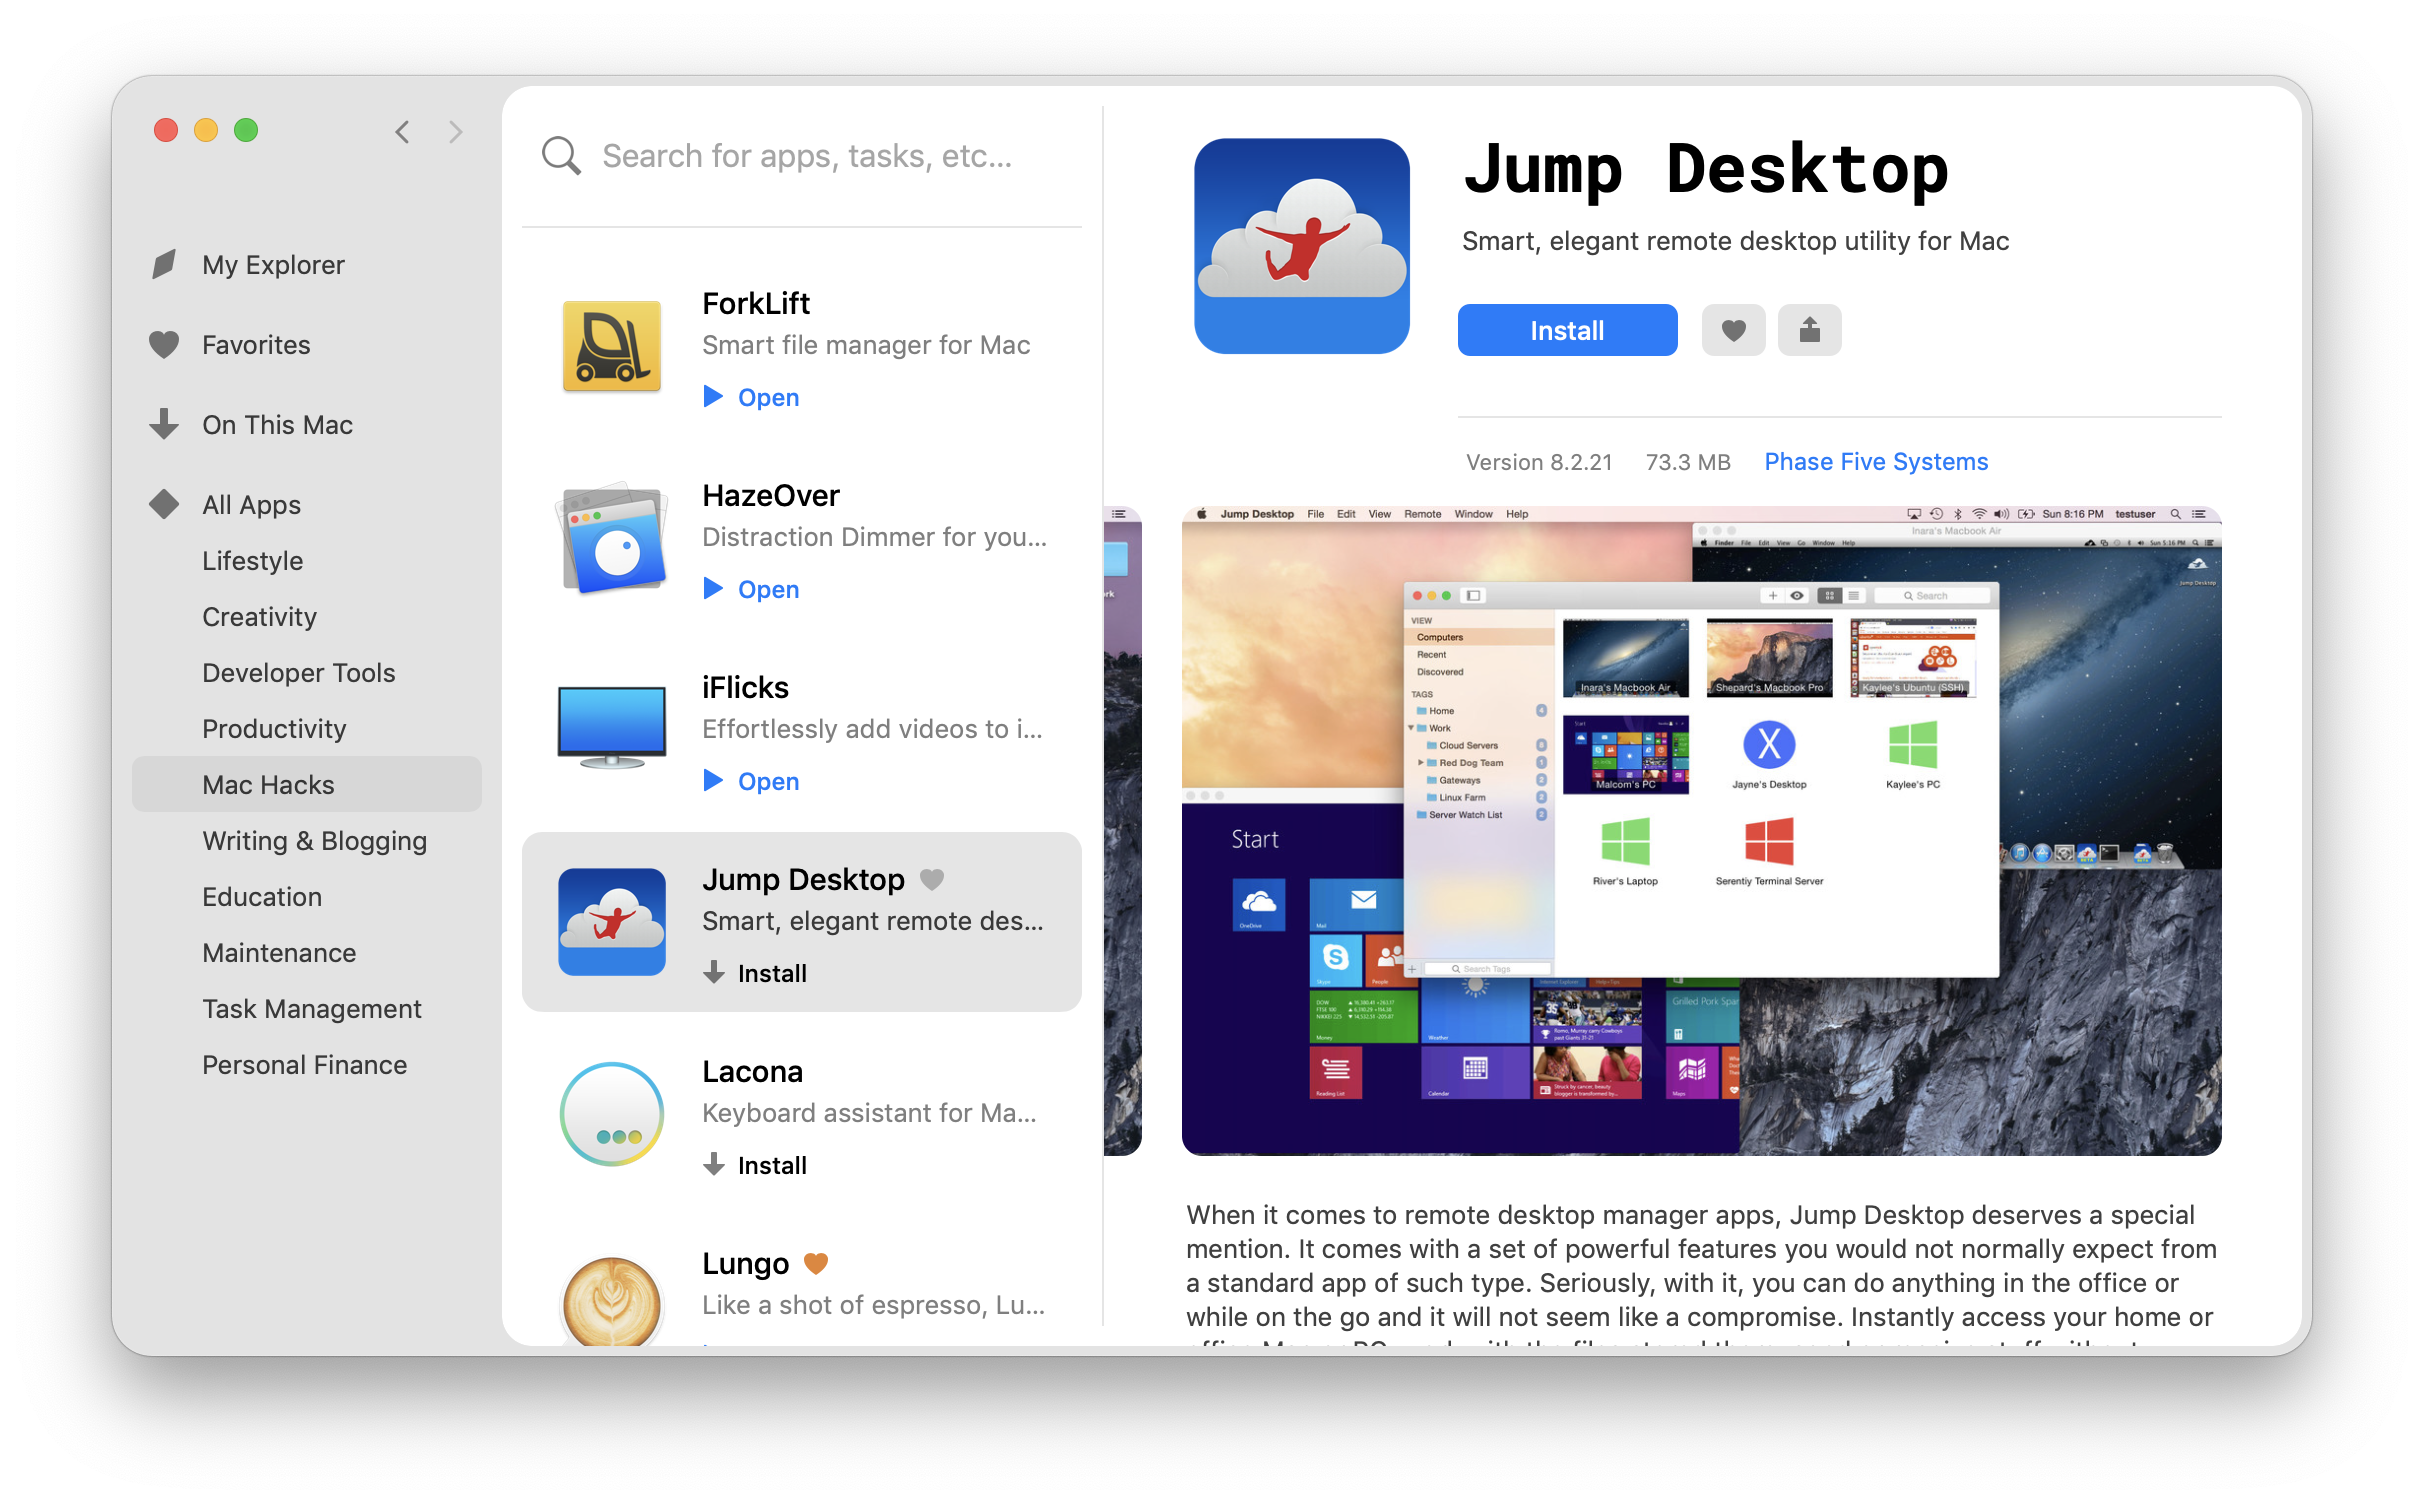
Starting with Jump Desktop is easy: either yourself (gaining access) or the person you are giving a remote view or control access to your Mac, needs to add details of the device and the password.
Get a VPN client for Mac to avoid privacy infringement while connecting remotely. It’s secure and free to try.
Once permission is granted at the other end, remote Mac screen sharing or control (whereby you can use the iOS device as a remote mouse) becomes possible.
How to use your iOS device as a remote mouse
If your remote work starts on a patio hammock somewhere in east Asia, you should note that Apple iOS devices, such as an iPhone or iPad, can be used to control a Mac remotely, much like a mouse can control a desktop or laptop. Apps that make this possible work on VNC.
Remote Mouse is the easiest, most effective way to turn your iOS device into a wireless remote control for your Mac.

Although remote access through a local network would be most effective, since the closer you are to the device the quicker the connection, it’s also possible from anywhere in the world, providing the network is secure and fast enough.
Setting up and granting access to the iOS device is the same process as when someone wants to access using a Mac. Except you need to give them a password. And make sure it is different from your primary Mac or iOS (App Store) one.
So working together or checking on your devices can be done from anywhere in the world and there are lots of ways to do that, from sharing screens and files to having complete access to a system set up far away. Setapp equips you with all the apps needed to remotely access any device you need and elevate your work to the global level.
FAQ on Mac remote access
We’ll finish up answering some of the most common questions you might have about remote Mac access.
How do I set up Microsoft remote desktop on Mac?
It’s possible to access Windows apps or any resources on a Windows computer from your Mac. Here’s how it works:
- Find Microsoft Remote Desktop client on the Mac App Store and install it on your Mac
- On a Windows computer, allow remote connections
- Add your remote desktop connection and enjoy quick access to the PC.
How do I send Ctrl+Alt+Del to a remote computer?
If you use a Mac to control a PC, one of the most essential commands you should get a grip of is Ctrl+Alt+Del. It will allow you to get access to Force Quit options. To Ctrl+Alt+Del, go to your Remote Desktop Client > Actions > Ctrl+Alt+Del.
How do I uninstall Microsoft Remote Desktop from Mac?
It’s not enough to just move the Microsoft Remote Desktop client to the Trash, you’ll have to get rid of all user names, passwords, and system files generated since you’ve been using the client for remote access. The easiest way is to completely uninstall Remote Desktop with CleanMyMac X — it will delete all the associated files, too.
Or, you can uninstall the client manually:
- Mote Remote Desktop client to the Trash
- In Finder > Go > Go to Folder > private/var/db/ and remove the RemoteManager folder
- In Finder > Go > Go to Folder > /Library/Containers/ and remove the com.apple.RemoteDesktop folder
- In Finder > Go > Go to Folder > /Library/Application Support/Apple/Remote Desktop/ and remove the client, settings, and task server folders
- In Finder > Go > Go to Folder > /Library/Preferences/ and remove the com.apple.RemoteDesktop.plist file
- In Finder > Go > Go to Folder > /Library/Widgets/ and remove the Remote Desktop.wdgt file.
How do I copy files from Windows Remote Desktop to Mac?
The easiest way is to copy from admin to client computers:
- Open Remote Desktop and choose your remote computer from the computer list in the left sidebar
- Choose Manage > Copy Items
- Add and remove items you want to copy using the plus and minus buttons
- Once you’re ready, click Copy.
If you want to learn about more ways to transfer files between Mac and PC — for example, you can do it with drag and drop — read this Apple Support article.
Источник


