- Remote registry service windows 10
- Default Settings
- Default Behavior
- Dependencies
- Restore Default Startup Configuration for Remote Registry
- Как подключиться к удаленному реестру в Windows 7 и 10
- Требования к удаленному реестру
- Подключиться к удаленному реестру Hive
- Как отключить удаленный доступ к системному реестру Windows 10
- Поисковая строка Первый вариант:
- Редактор реестра Второй метод:
- Командная строка Третий способ:
- Msconfig Четвертый способ:
- How to Connect to a Remote Registry
- Use Registry Editor to access a registry over your network
- Why Would You Edit the Windows Registry Remotely?
- How to Connect to a Remote Registry
- Why Am I Seeing an “Access Denied” Message?
- How to Enable the Remote Registry Service in Windows
Remote registry service windows 10
Enables remote users to modify registry settings on your computer. If this service is stopped, the registry can be modified only by users on your computer. If this service is disabled, any services that explicitly depend on it will fail to start.
Default Settings
| Startup type: | Disabled |
| Display name: | Remote Registry |
| Service name: | RemoteRegistry |
| Service type: | share |
| Error control: | normal |
| Object: | NT AUTHORITY\LocalService |
| Path: | %SystemRoot%\system32\svchost.exe -k localService -p |
| File: | %SystemRoot%\system32\regsvc.dll |
| Registry key: | HKEY_LOCAL_MACHINE\SYSTEM\CurrentControlSet\Services\RemoteRegistry |
| Privileges: |
|
Default Behavior
Remote Registry is a Win32 service. In Windows 10 it is disabled. When the Remote Registry service is started, it is running as NT AUTHORITY\LocalService in a shared process of svchost.exe along with other services. If Remote Registry fails to start, the failure details are being recorded into Event Log. Then Windows 10 will start up and notify the user that the RemoteRegistry service has failed to start due to the error.
Dependencies
Remote Registry cannot be started under any conditions, if the Remote Procedure Call (RPC) service is disabled.
Restore Default Startup Configuration for Remote Registry
1. Run the Command Prompt as an administrator.
2. Copy the commands below, paste them into the command window and press ENTER:
sc stop RemoteRegistry
sc config RemoteRegistry start= disabled
3. Close the command window and restart the computer.
Как подключиться к удаленному реестру в Windows 7 и 10
Если вы находитесь в среде малого бизнеса, это может стать действительно раздражающим, если вам придется выходить на каждый компьютер, который вам нужно починить. Вместо этого, если вы можете удаленно подключиться и исправить проблемы или изменить настройки, это делает вещи намного удобнее.
Хотя это не так часто, бывают случаи, когда вам может понадобиться подключиться к другому компьютеру, чтобы изменить, удалить или добавить ключи и значения реестра. Очевидно, что вы можете подключиться к компьютеру и сделать это, но если вы читаете эту статью, вы не идете по этому пути.
В этой статье я расскажу об удаленной службе реестра в Windows, которая позволяет напрямую подключаться к кустам реестра на другом компьютере с помощью regedit. Однако для того, чтобы это работало, есть несколько предпосылок.
Требования к удаленному реестру
Если вы надеетесь подключиться к удаленному компьютеру, к которому у вас нет доступа, вам не повезло. Чтобы использовать удаленный реестр, вам в основном необходим доступ администратора к обоим компьютерам. Итак, это в основном для удобства и не может быть использовано для взлома чужого реестра.
Есть несколько вещей, которые должны быть на месте, прежде чем удаленный реестр будет работать:
- Компьютер, к которому вы подключаетесь, должен иметь имя пользователя и пароль. Пароль не может быть пустым.
- На обоих компьютерах необходимо включить удаленное администрирование в брандмауэре.
- На обоих компьютерах должна быть запущена служба удаленного реестра.
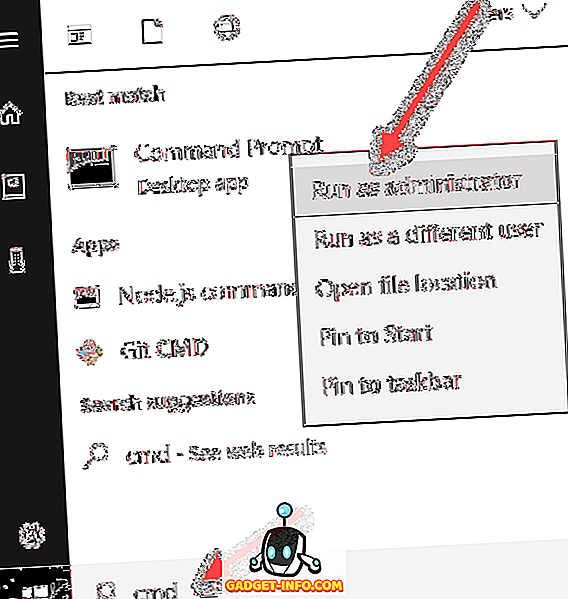
Первое требование легко выполнить. Просто зайдите и добавьте пароль к своей учетной записи, если у него его еще нет. Второе требование можно исправить с помощью командной строки. Чтобы открыть командную строку администратора, нажмите « Пуск», введите cmd, щелкните правой кнопкой мыши на cmd и выберите « Запуск от имени администратора» .
Теперь скопируйте и вставьте следующую команду в окно командной строки и нажмите Enter.
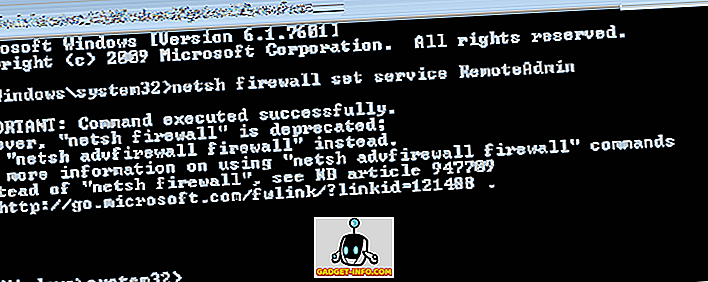
Вы получите предупреждение о том, что команда выполнена успешно, но команда netsh firewall устарела. Вы получите это сообщение в Windows 7, Windows 8 или Windows 10. Это не проблема, если она успешно завершена. Обратите внимание, что вы должны выполнить эту команду на обеих машинах.
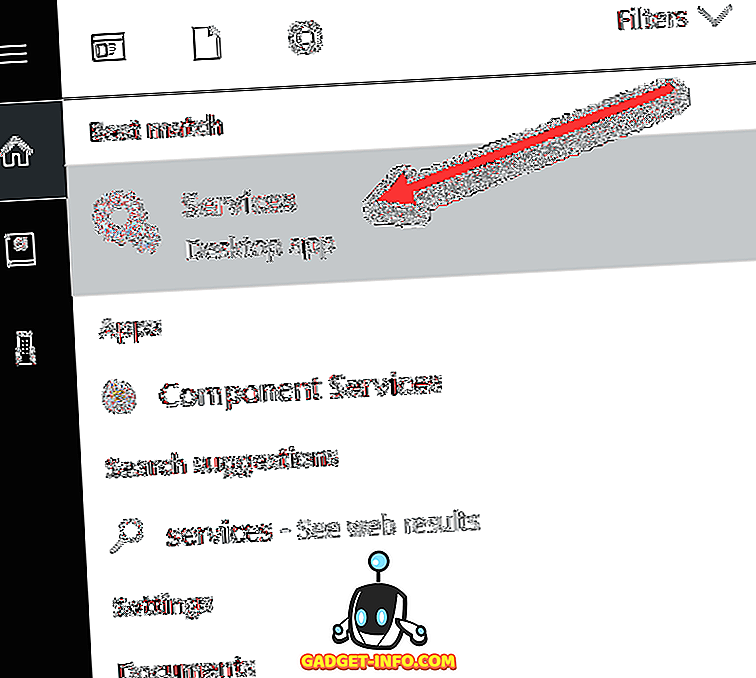
Для третьего требования вам нужно нажать « Пуск», ввести сервисы, а затем просто « Сервисы» с двумя значками шестеренок.
Прокрутите вниз, пока не увидите Удаленный реестр, и он не должен работать по умолчанию. В Windows 10 он будет по умолчанию отключен. В Windows 7 вы можете просто щелкнуть по нему правой кнопкой мыши и выбрать « Пуск» . В Windows 10 вам нужно будет щелкнуть правой кнопкой мыши и сначала выбрать « Свойства» .
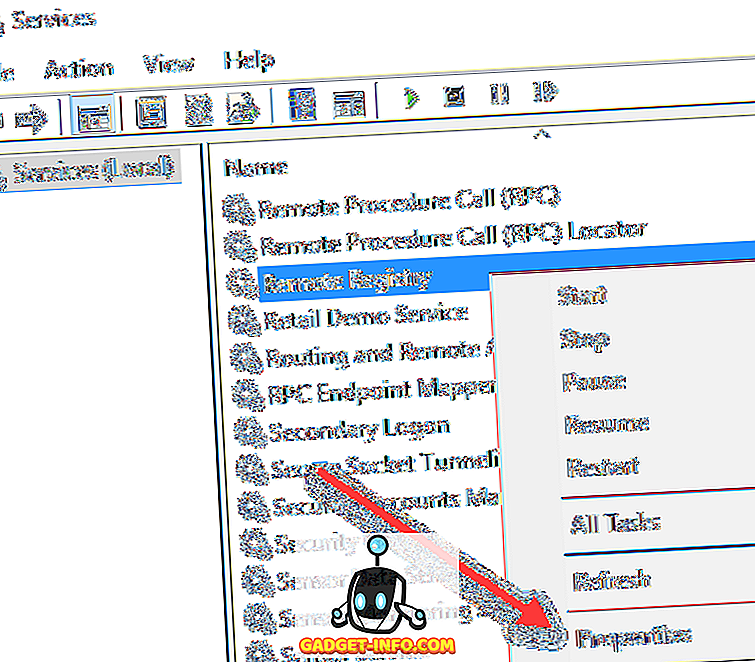
В диалоговом окне свойств вам нужно изменить тип запуска на что-то отличное от Disabled . Если вам нужно сделать это только один раз, измените его на Manual . Если вам часто требуется доступ к удаленному реестру, выберите « Автоматически» .
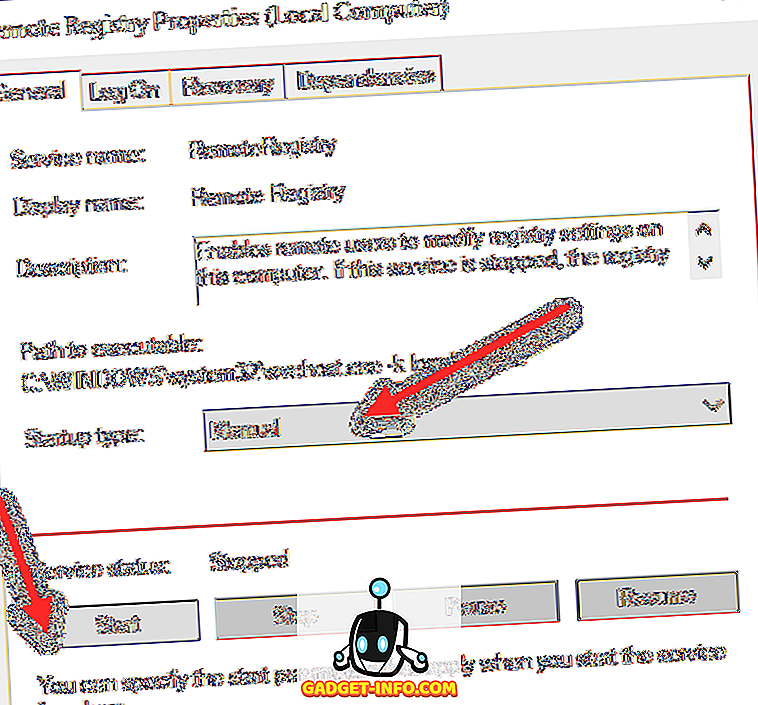
После выбора типа запуска нажмите кнопку « Применить», после чего кнопка « Пуск» больше не будет выделена серым цветом. Нажмите Пуск, чтобы запустить службу удаленного реестра. Опять же, это должно быть сделано на обеих машинах.
Подключиться к удаленному реестру Hive
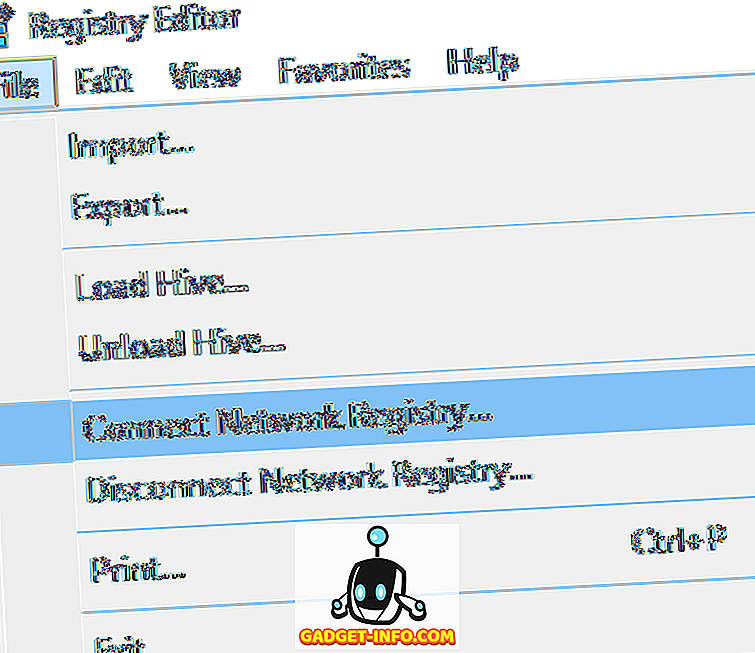
Выполнив все вышеперечисленные шаги, вы можете попытаться подключиться к удаленному реестру. Нажмите Пуск, введите regedit, чтобы открыть редактор реестра. Затем нажмите « Файл», а затем « Подключить сетевой реестр» .
Здесь вам нужно будет ввести NETBIOS-имя компьютера, к которому вы хотите подключиться.

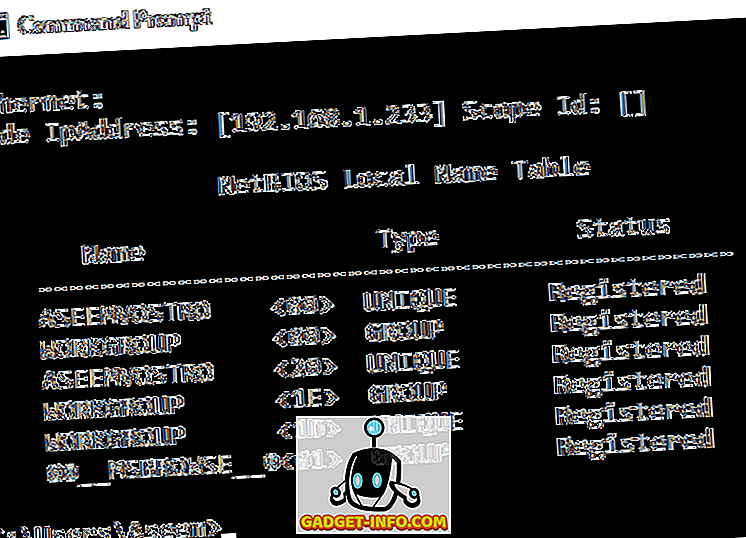
Обратите внимание, что вы можете быстро выполнить поиск всех компьютеров в сети, нажав « Дополнительно», а затем « Найти сейчас» . Если компьютер, к которому вы подключаетесь, имеет длинное имя, вам необходимо определить имя NETBIOS для этого компьютера. Вы можете сделать это, открыв командную строку на этом компьютере и введя nbtstat -n .
После того как вы введете имя и нажмете OK, вам будет предложено ввести имя пользователя и пароль для учетной записи администратора на удаленном компьютере.
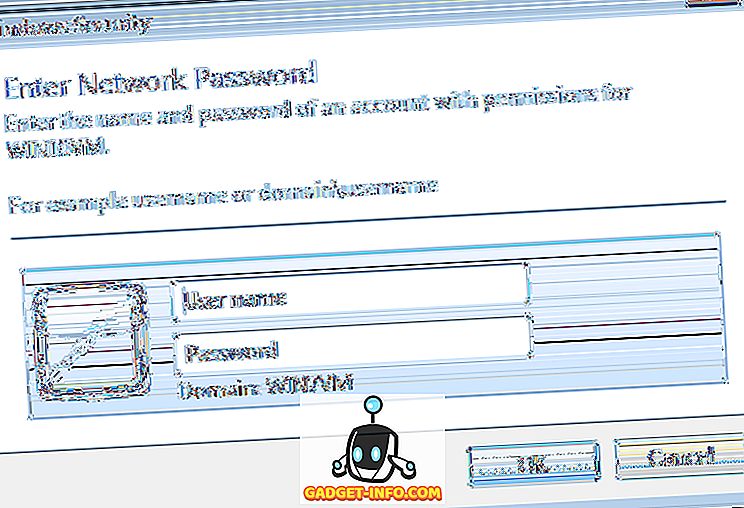
Обратите внимание, что если вы подключаетесь к компьютеру под управлением Windows 10 удаленно, и он вошел в систему с использованием вашей учетной записи Microsoft, вам необходимо ввести адрес электронной почты для имени пользователя и пароль, как обычно. Надеемся, вам следует подключиться к реестру на удаленном компьютере. Если вы получаете какое-либо сообщение «Отказано в доступе», это означает, что вы, возможно, ввели неверные учетные данные.

Как видно из приведенного выше, я подключился к машине с Windows 7 с помощью удаленного реестра с моего компьютера с Windows 10. Вы увидите только HKEY_LOCAL_MACHINE и HKEY_USERS при подключении к удаленному реестру. Если у вас есть какие-либо вопросы или возникнут проблемы, оставьте комментарий, и я постараюсь помочь. Наслаждайтесь!
Как отключить удаленный доступ к системному реестру Windows 10
Написал admin. Опубликовано в рубрике Операционные системы
 Добрый день, уважаемые читатели блога MyFirstComp.ru. Сегодня мы продолжим знакомство с операционной системой Windows 10. Ранее мы уже учились менять разрешение экрана и отключать автоматическое обновление в этой операционной системе. В этом уроке рассмотрим возможность отключения удаленного доступа к системному реестру.
Удаленный доступ к системному реестру Windows 10 управляется службой, которой присвоено название RemoteRegistry. Когда она функционирует, через остальные подключенные к сети компьютеры можно легко изменять параметры разнообразных разделов. Если упомянутая служба выключена, редактировать реестр разрешается только на локальной машине.
Поисковая строка
Первый вариант:
- – Нажмите «горячую» комбинацию клавиатурных клавиш Win+R, чтобы открылась утилита «Выполнить».
- – В поле для ввода поисковых запросов напечатайте слово services.msc.
- – В окне со списком существующих в системе служб выберите пункт RemoteRegistry.
- – В его настройках нажмите «Остановить» и в графе «Тип запуска» укажите «Отключить».
Редактор реестра
Второй метод:
- – Наберите в утилите «Выполнить» запрос regedit.
- – Перейдите в HKEY_LOCAL_MACHINE\ SYSTEM\ CurrentControlSet\ Services\ RemoteRegistry.
- – Зайдите в раздел RemoteRegistry, а затем откройте параметр под названием Start.
- – Замените существующее значение в окне опций на 4, подтвердив изменение кнопкой «OK».
Командная строка
Третий способ:
- – Нажмите открывающую меню «Пуск» кнопку.
- – Введите в поисковом поле запрос cmd, которая запускает консольную утилиту cmd.exe.
- – В запущенной программе наберите net stop RemoteRegistry, после чего щелкните Enter.
Msconfig
Четвертый способ:
- – Нажмите комбинацию кнопок Win+R, чтобы запустилось окно «Выполнить».
- – В поле запросов напечатайте команду msconfig и начните ее исполнение кнопкой Enter.
- – Откройте вкладку под названием «Службы» и уберите стоящую напротив пункта RemoteRegistry галку.
- – Подтвердите осуществленную операцию нажатием OK.
Подписывайся на канал MyFirstComp на YouTube!
How to Connect to a Remote Registry
Use Registry Editor to access a registry over your network
:max_bytes(150000):strip_icc()/tim-fisher-5820c8345f9b581c0b5a63cf.jpg)
Remotely connecting to another computer’s Windows Registry isn’t something you’ll do regularly, if ever, but Registry Editor does let you do it, assuming a number of things are in order.
Why Would You Edit the Windows Registry Remotely?
Remote registry editing is a much more common task for tech support and IT groups than the average computer user, but there are times when remotely editing a key or value can come in handy.
Maybe it’s something simple like faking a BSOD on April Fool’s Day without ever visiting the other computer, or maybe a task with a bit more value like checking the BIOS version on a PC two floors down.
:max_bytes(150000):strip_icc()/remote-registry-editor-windows-10-56a6fb113df78cf7729140f8.png)
How to Connect to a Remote Registry
Regardless of the reason, accessing a registry over your local network at home or at work is really simple.
Time Required: It should only take a minute or two, assuming the remote computer is working, connected to your network, and is running the necessary service (more on that below).
The steps outlined below work in all commonly used versions of Windows, including Windows 10 through Windows XP.
Open Registry Editor by executing regedit from any command line interface in Windows, like Command Prompt or the Run dialog box.
Go to File > Connect Network Registry.
Type into the large empty space the name of the computer you want to remotely access the registry for.
The «name» that’s being requested here is the hostname of the other computer, not the name of your computer or the name of the user on the remote one.
Most simple networks won’t require any change to the Object Types and Locations fields, which should default to Computer and whatever workgroup the computer you’re using is a member of. Feel free to adjust these settings if you have a more complex network and the computer you want to make remote registry edits to is a member of a different workgroup or domain.
Select Check Names.
After several seconds or more, depending on the speed and size of your network and computer, you’ll see the remote computer’s full path, shown as LOCATION\NAME.
:max_bytes(150000):strip_icc()/select-computer-remote-registry-06604faf652e438bb9349e039b9b40ed.png)
If you get a warning that says «An object (Computer) with the following name cannot be found: «NAME».», check that the remote computer is properly connected to the network and that you’ve entered its hostname correctly.
You might need to enter credentials for a user on the remote computer so that you can verify that you have access to connect to the registry.
Choose OK.
In what will probably only take seconds, Registry Editor will connect to the remote computer’s registry. You’ll see Computer (your computer), as well as the other computer you’re viewing the registry for, under [hostname].
If you get an «Unable to connect to [name].» error, you may need to enable the Remote Registry service. See the section below for help doing that.
Now that you’re connected, you can view whatever you like, and make whatever registry edits you need to make. See How to Add, Change, & Delete Registry Keys & Values for some overall help.
Why Am I Seeing an “Access Denied” Message?
As you’re working in whatever remote registry you’re connected to, you may notice two things: significantly fewer registry hives than on your computer, and a number of «Access is denied» messages when navigating around.
While your computer probably has at least five individual registry hives, you’ll notice immediately that the registry you’re connected to remotely only shows HKEY_LOCAL_MACHINE and HKEY_USERS.
The three remaining keys, HKEY_CLASSESS_ROOT, HKEY_CURRENT_USER, and HKEY_CURRENT_CONFIG, while not appearing like you may be used to, are all included in various subkeys within the two hives you do see.
The «Access is denied» messages that you’re probably getting on HKEY_LOCAL_MACHINE and various keys under the HKEY_USERS hive are likely due to the fact that you don’t have administrator privileges on the remote computer. Give your account administrator access on the remote computer and then try again.
How to Enable the Remote Registry Service in Windows
The RemoteRegistry Windows Service must be enabled on the remote computer you wish to view or edit the registry on.
Most Windows installations disable this service by default, so don’t be surprised if you run into this problem.
Here’s how to enable it:
Open Control Panel on the computer you want to connect to.
Go to Administrative Tools, and then Services.
You can also open Services via the Run dialog box with the services.msc command.
You won’t see this option in Control Panel if you’re viewing the items by category. Switch to the other view to see Administrative Tools.
Find Remote Registry from the list and double-click or double-tap it.
From the Startup type drop-down box, choose Manual.
:max_bytes(150000):strip_icc()/remote-registry-properties-manual-eec6749d62e64456aa316a58a36e0be5.png)
Choose Automatic instead of Manual if you want the RemoteRegistry service to run all the time, helpful if you know you’ll want to do this again in the future.
Choose Apply.
Select Start, followed by OK once the service is done starting.
Close the Services window, and any Control Panel windows you might still have open.
Now that the RemoteRegistry service is started on the remote computer you want to edit the registry on, head back to your computer and try connecting again.


