- Как удалить старые и ненужные драйвера в Windows 10/8.1/7
- 1. Как удалить предыдущую версию драйвера
- 2. Как удалить скрытые драйвера устройств в Windows
- 3. Как выявить скрытые драйвера устройств в диспетчере
- How to Remove Old and Useless Drivers in Windows 10
- For Graphics and Sound Drivers, Use DDU
- Force Old Drivers to Appear
- Uninstall Old Drivers in Windows
- Using Device Manager to Uninstall Devices and Driver Packages
- How to Uninstall Drivers in Windows
- Roll Back to a Previous Driver
- Uninstall a Driver
Как удалить старые и ненужные драйвера в Windows 10/8.1/7
Со временем Windows хранит множества резервных копий в системе, временные файлы, старые драйвера, которые постепенно будут занимать пространство на жестком диски. Конечно, можно почистить диск «C» от ненужных файлов , чтобы освободить место на вашем жестком диске, но что делать, если старые драйвера какого-либо устройства мешают установки новых версий? Особенно проблемы вызывают беспроводные мыши, клавиатуры и другие USB устройства, которые не хотят иногда работать, пока не удалим старые драйвера и не установим новые.
Драйвера это необходимые маленькие приложения, которые нужны, чтобы подключить любое устройство и заставить его работать. В системе Windows очень большая база драйверов для разных типов устройств: принтеры, мыши, звуковые карты, платы и т.п. Некоторые производители выпускают свои версии драйвера, которые необходимы для работы и не всегда в базе windows драйвера могут работать с тем или иным устройством. Для этого нам нужно удалить старые ненужные версии драйвера и установить новые от производителя.
1. Как удалить предыдущую версию драйвера
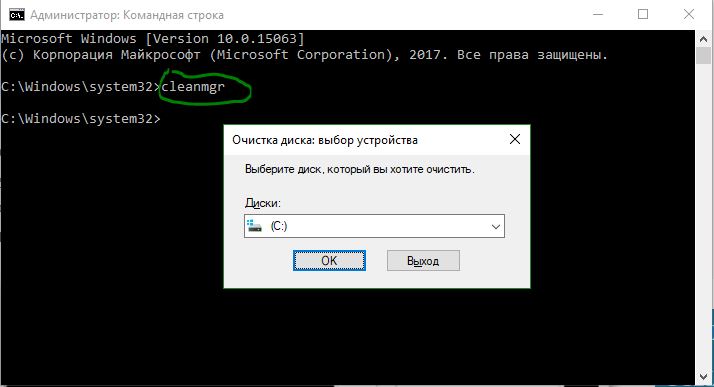
Каждый раз, когда драйвер обновляется раз за разом, то старые резервные копии драйверов остаются в системе, тем самым забивая жесткий диск и мешают установки новых версий драйвера. Для удаления предыдущих версий драйвера напишите в «Поиске» (около Пуск) Командная строка или CMD, нажмите на ней правой кнопкой мыши и запустите от имени администратора, далее в открывшимся окне задайте команду cleanmgr .
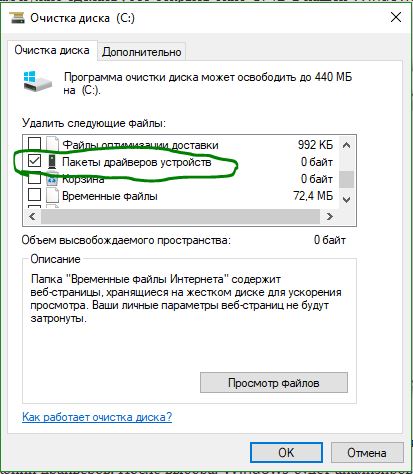
Поставьте галочку около пункта Пакеты драйверов устройств и нажмите OK. Будет выполнена очистка всех старых пакетов драйверов.
2. Как удалить скрытые драйвера устройств в Windows
Чаще всего остаются родные скрытые установленные драйвера, которые выше способ не удалит их. Скрытые драйвера остаются в системе и при обнаружении нового устройства и устанавливают старую версию драйвера, а не новую, что и вызывает различные ошибки при установки новых драйверов и неработоспособности устройств.
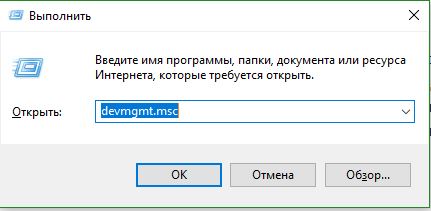
- Нажмите сочетание кнопок Win+R и введите следующую команду devmgmt.msc, чтобы открыть диспетчер устройств.
- В диспетчере устройств, нажмите Вид >Показать скрытые устройства.
Если по каким-либо причинам не отображаются, то смотрите ниже, как исправить скрытое отображение устройств.
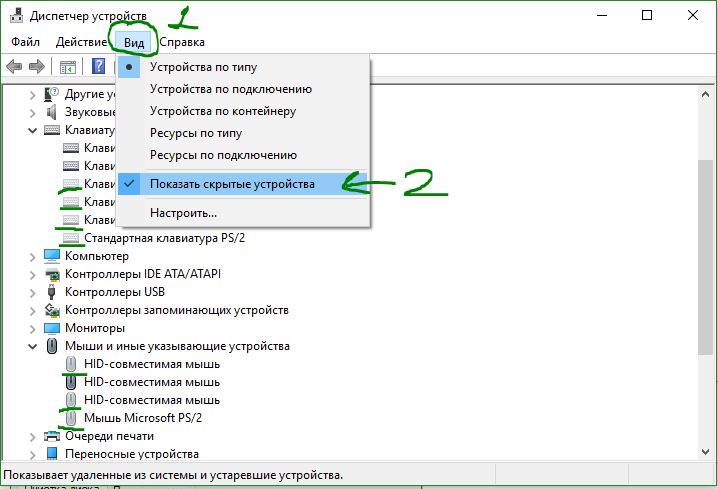
Мы видим на картинке выше слабо выделенные устройства, это и есть скрытые драйвера, которые иногда мешают нам.
- Для удаления старых скрытых драйверов, просто нажмите на нем правой кнопкой мыши и Удалить.
- Если будет возможность ставить галочку, то отметьте галочкой Удалить программы драйверов для этого устройства.

3. Как выявить скрытые драйвера устройств в диспетчере
Команда связана с тем, чтобы отобразить скрытые драйвера в диспетчере устройств, старых версиях Windows XP, 7.
Запустите Командную строку от имени администратора и введите команду:
- SET devmgr_show_nonpresent_devices = 1
Можете перейти в диспетчер устройств и попробовать отобразить скрытые.

How to Remove Old and Useless Drivers in Windows 10

For every device you have in your Windows PC, you will need a driver for that device to work properly. The problem with this is that as time passes, your Windows machine will be bogged down with lots of unnecessary and old drivers, which eventually may result in problems on your PC.
Surely, you can easily uninstall any device driver using Windows’s built-in tools. The problem is that Windows device manager only shows currently connected devices, and there is no option to see hidden or old drivers. Here we show you how to force hidden drivers to appear and how to remove old drivers in Windows 10.
Note: this article is based on Windows 10, but it should work with any other previous versions, like Windows 7 and Windows 8, as well.
For Graphics and Sound Drivers, Use DDU
Graphics cards are complex things, and if you’ve either bought a new graphics card or have updated your old one, then you may find that it doesn’t work properly due to driver conflicts. (It may not work altogether or may be prone to crashes and restarts.)
If that happens, you should use the free Guru 3D tool DDU (or Display Driver Uninstaller) to completely uninstall your old graphics card drivers before installing the new ones.

Once you’ve extracted the tool, you’ll need to open Windows 10 in Safe Mode, then open DDU and select your device type (GPU or Audio) from the drop-down menu. Once you’ve made your selection, click “Clean and restart” for your drivers to be completely uninstalled.
Once you’re back in regular Windows 10, you can install new GPU or audio drivers without any conflicts or interference from the old ones.
Force Old Drivers to Appear
Before uninstalling old drivers, we need to force the old drivers to show up in the list.
1. To do that, press Win + X and select “Command Prompt (Admin)” from the list of options.

2. Type the following command and press the Enter button to execute the command:

What the above command does is force all the non-present or old and invisible drivers to show up in the Device Manager list. Once you have done this, you can proceed with the uninstallation.
Uninstall Old Drivers in Windows
1. To uninstall the old drivers, press Win + X and select “Device Manager” from the list of options.

2. Go to “view” and select the option “show hidden devices” to reveal all the hidden and old drivers.

The good thing about this feature is that all the old drivers are faded out, so you can easily identify the old or non-present drivers from current drivers.
3. Select the old driver you want to uninstall, right-click and select the Uninstall option.

That’s all there is to do. Using this tip, you can easily find and uninstall any old and hidden drivers. Always be careful not to remove any current device driver, as this may cause problems with your connected hardware device. Also, always check twice before uninstalling any device driver.
If you still have problems that need solving with your Windows 10 graphics, see our guide on fixing a faulty graphics card or check out our list of the latest Windows 10 update problems to see if you’ve been affected.
Related:
Content Manager at Make Tech Easier. Enjoys Android, Windows, and tinkering with retro console emulation to breaking point.
Using Device Manager to Uninstall Devices and Driver Packages
This page describes how to uninstall a device or driver package on Windows 10. Before uninstalling a device, it is recommended that the device is unplugged from the system. If the device is uninstalled before it is unplugged, the operating system may rediscover the device and give it new settings in the time between the uninstall and unplugging the device.
First, open Settings (you can do this using the Windows+I keyboard shortcut) and type Remove. Select Add or remove programs. If the device or driver package that you wish to remove appears in the list of programs, select uninstall.
If your device or driver package does not appear in the list, then the device can be uninstalled via Device Manager. If that device is the only device using the driver package, then the driver package can also be removed via Device Manager. To launch Device Manager, click the Start button, type Device Manager, and press Enter.
Then follow these steps:
- Click on the View menu and turn on «Show Hidden Devices»
- Expand the node that represents the type of device that you want to uninstall, right-click the device entry for the device you want to uninstall, and select Uninstall.
- On the Confirm Device Removal dialog box, if you wish to remove the driver package in addition to uninstalling the device, select the Delete the driver software for this device option. When ready to complete the operation, select OK.
With some devices, if the device is still plugged in when it is uninstalled, the device might continue to function until the system has been restarted.
For more information about uninstalling driver and driver packages, see How Devices and Driver Packages are Uninstalled.
How to Uninstall Drivers in Windows


By Michael King
Today’s Best Tech Deals
Picked by PCWorld’s Editors
Top Deals On Great Products
Picked by Techconnect’s Editors
Installing drivers can be a hair-raising adventure, even on today’s modern operating systems. These finicky pieces of code act as the middleman between your PC’s hardware and its operating system. Although they install with ease just like any other software, they integrate deeply into the OS, sinking their teeth into areas most other software doesn’t go near. Most of the time the driver installation process is simple, seamless, and transparent to you, as it should be.
On those occasions when things go wrong, however, they can go really wrong, and even crash your entire computer. For example, when Microsoft’s Windows Vista came out in 2007, critics lambasted it for being slow and prone to crashing; Microsoft investigated the causes and found that a majority of crashes were due to driver issues.
Thankfully, when you prepare yourself for battle with a problematic driver, you have a couple of tricks that can help. Microsoft has introduced an easy way to roll back to a previous (and, you hope, more stable) version of the driver, or remove it from the system altogether, giving you a clean slate to try again or install a different version.
Roll Back to a Previous Driver
- Click Start, type Device Manager, and press Enter.
- Find and double-click the category of device causing the issue (for instance, the graphics card would be listed under Display Adapters).
- Double-click the problematic device to bring up the Properties window.
- Click the Driver tab.
- Click the Roll Back Driver button.
- A dialog box will ask you to confirm your decision to roll back to a previous driver. Click Yes to begin the roll-back process. Use the Properties menu to uninstall your driver software or roll back to a previous version.
At this point Windows will automatically remove the current driver for the device and reinstall the previous driver. You may then receive a notification that the system settings have changed, and Windows will ask you to reboot. If you see that message, you should reboot your computer as soon as possible.
Uninstall a Driver
When you need to uninstall a driver completely, the best and safest method is to use the device’s uninstaller program (if it has one). If you added the device to your system through an installer (as is the case with most graphics card and sound card drivers, for instance), you can uninstall it just as you would any other program.
- Click Start, type Uninstall Program, and press Enter.
- In the Uninstall window that appears, go through the list and find your device or drivers. Double-click the entry to begin the uninstallation process.
Sometimes devices won’t have an uninstaller, or the uninstaller will not appear in the list. In those instances, you can use the Device Manager to remove the driver completely.
- Click Start, type Device Manager, and press Enter.
- Find and double-click the category of device whose driver you wish to uninstall (for example, the graphics card would be listed under Display Adapters).
- Right-click the device, and click Uninstall.
- Windows will prompt you to confirm the device’s removal. Click OK to remove the driver.
- After the uninstallation is complete, reboot your computer as soon as possible. In a pinch you can use the Windows Device Manager to uninstall troublesome driver software.
After you roll back or uninstall a problematic driver, you can try downloading and installing the latest version from the manufacturer’s website, or try a specific version that previously worked to get your computer back on its feet.


