- Delete Downloaded Windows Update Files in Windows 10
- How to Delete Downloaded Windows Update Files in Windows 10
- Author: The MFTNEXT Team
- can i delete windows update folder after updating windows 7 ?
- Replies (7)
- Delete Downloaded Windows Update Files in Windows 10
- Run the built-in Windows Update troubleshooter.
- To Delete Downloaded Windows Update Files in Windows 10,
- Delete Downloaded Windows Update Files with a Batch File
- Here’s how does it work
- About Sergey Tkachenko
- 5 thoughts on “ Delete Downloaded Windows Update Files in Windows 10 ”
- How to Delete Windows 10 Update Files and Cached Data?
- How to delete downloaded Windows 10 Update files Correctly
- Delete Windows 10 Update Files
- Remove Windows Update Files and Cached Data
- How to delete downloaded Windows Update files
- Cleanup Windows 10 with third-party Software
Delete Downloaded Windows Update Files in Windows 10
This post explains how to delete downloaded Windows Update files in Windows 10. This is useful when you run into issues with updates.
Windows 10 is set to check for updates automatically unless you disable this feature manually. It includes Windows Update, an automated system that handles the downloading and installing of updates for the OS. The downloaded update files are stored on your system drive.
After an improper shutdown, crash, power failure or something gone wrong with your Registry, Windows Update can fail to work properly. It may fail to check for updates or fail to install them, or sometimes, it cannot be opened at all.
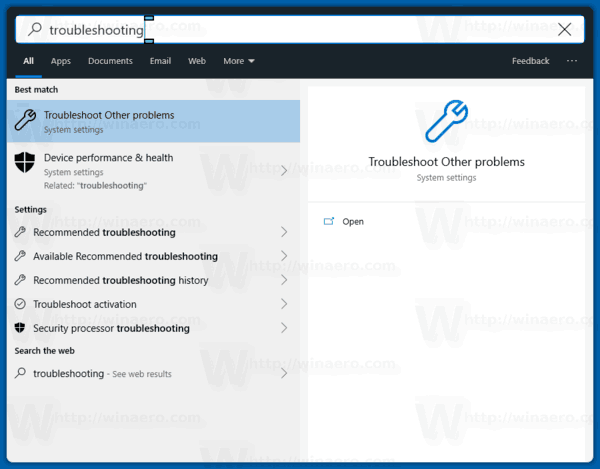
To fix most of the Windows Update issues in Windows 10, in most cases it is enough to run the built-in Windows Update troubleshooter.
- Open the Start menu and type: troubleshooting and press Enter.
- Click «Fix problems with Windows Update».
- Click «Run as administrator» in the Troubleshooter’s dialog and complete the Windows Update troubleshooter. See if Windows Update works properly.
When you run into issues though with updates, you may spend hours or even days figuring out what is going wrong. In such case, you can try to delete downloaded Windows Update files to start over. The SoftwareDistribution folder contains files related to updates obtained via Windows Update, it is present on all versions of Windows. It could have a couple of hundreds megabytes of size. But if this folder is much larger, this indicates that some updates are corrupted.
How to Delete Downloaded Windows Update Files in Windows 10
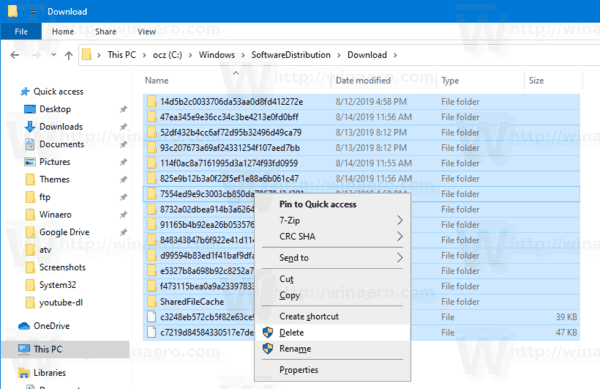
- Open File Explorer.
- Go to C:\WINDOWS\SoftwareDistribution\Download. Copy-paste this path to the explorer’s address bar.
- Select all files of the folder(press the Ctrl-A keys).
- Press the Delete key on the keyboard.

- Windows may request for administrator privileges to delete those files. Turn on the option «Do this for all current items» in the dialog and click on Continue.

Restart your computer and check for updates. See if this fixed your issues.
![]()
Author: The MFTNEXT Team
The MSFTNEXT project is a small team of authors who love to engage with the latest technology and gadgets. Being passionate Windows bloggers, we are happy to help others fix their system issues. View all posts by The MFTNEXT Team
can i delete windows update folder after updating windows 7 ?
Replies (7)
which windows update folder and how does this pertain to microsoft security essentials functionality? [1]
is system restore functioning properly now or. ?
[1] A Moderator has moved your thread from the Microsoft Security Essentials forum to the Win7-specific Windows Update forum.
Robear Dyer (PA Bear)
Microsoft MVP (Windows Client) since October 2002
1 person found this reply helpful
Was this reply helpful?
Sorry this didn’t help.
Great! Thanks for your feedback.
How satisfied are you with this reply?
Thanks for your feedback, it helps us improve the site.
How satisfied are you with this reply?
Thanks for your feedback.
Was this reply helpful?
Sorry this didn’t help.
Great! Thanks for your feedback.
How satisfied are you with this reply?
Thanks for your feedback, it helps us improve the site.
How satisfied are you with this reply?
Thanks for your feedback.
which windows update folder and how does this pertain to microsoft security essentials functionality? [1]
is system restore functioning properly now or. ?
[1] A Moderator has moved your thread from the Microsoft Security Essentials forum to the Win7-specific Windows Update forum.
Was this reply helpful?
Sorry this didn’t help.
Great! Thanks for your feedback.
How satisfied are you with this reply?
Thanks for your feedback, it helps us improve the site.
How satisfied are you with this reply?
Thanks for your feedback.
Was this reply helpful?
Sorry this didn’t help.
Great! Thanks for your feedback.
How satisfied are you with this reply?
Thanks for your feedback, it helps us improve the site.
How satisfied are you with this reply?
Thanks for your feedback.
when windows 7 update automatically then stored folder is too large.
what «stored folder?»
Robear Dyer (PA Bear)
Microsoft MVP (Windows Client) since October 2002
Was this reply helpful?
Sorry this didn’t help.
Great! Thanks for your feedback.
How satisfied are you with this reply?
Thanks for your feedback, it helps us improve the site.
How satisfied are you with this reply?
Thanks for your feedback.
![]()
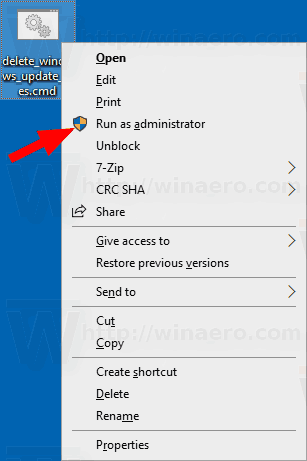
You can rename Windows Software Distribution Folder. It will recreate itself.
Start > Type CMD
Right click on CMD and select Run As Administrator
Before your rename the folder you must stop the Windows Update service. Here is how:
- type net stop wuauserv and press enter
- type rename c:\windows\SoftwareDistribution to softwaredistribution.oldand press enter
- type net start wuauserv and press enter
- type exitand press enter
Once you restarted Windows Update service, go back and verify the new folder was created
Delete Downloaded Windows Update Files in Windows 10
How to Delete Downloaded Windows Update Files in Windows 10
If you are running into issues with Updates, you can try to delete downloaded Windows Update files. When an update package is damaged or fails to install, Windows 10 may keep the corrupted file on the drive, so it will further cause issues with updates. Here is how to delete the downloaded Windows Update files that Windows 10 doesn’t delete itself.
Windows 10 checks for updates automatically unless you disable this feature manually. The operating system comes with the Windows Update service, which automatically downloads and installs the updates from Microsoft. The downloaded update files are stored on your system drive in the C:\Windows folder.
There are certain reasons for having corrupted Windows Update files. It can be an improper shutdown, OS crash, power failure, or something gone wrong with your Registry. After that, Windows Update may fail to do its job properly. The OS may fail to check for updates, or fail to install them. Sometimes, the Windows Update page in Settings cannot be opened!
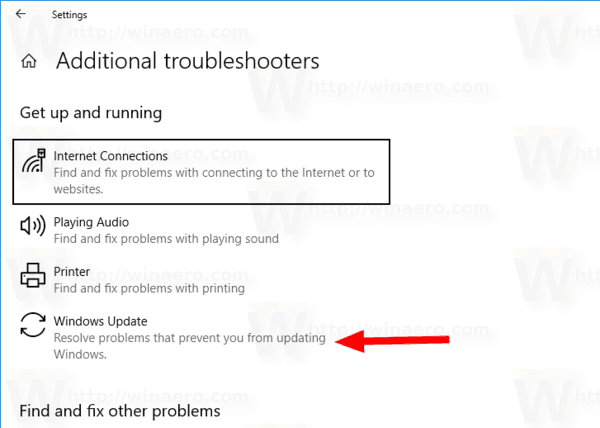
To fix most of the Windows Update issues in Windows 10, usually it is enough to run the built-in Windows Update troubleshooter.
Run the built-in Windows Update troubleshooter.
- Open the Start menu and type: troubleshooting and press Enter.
- Click «Windows Update».
- Click «Run as administrator» in the Troubleshooter’s dialog and complete the Windows Update troubleshooter. See if Windows Update works properly.
When you run into issues though with updates, you may spend hours or even days figuring out what is going wrong. In such case, you can try to delete downloaded Windows Update files to start over. The SoftwareDistribution folder contains files related to updates obtained via Windows Update, it is present on all versions of Windows. It could have a couple of hundreds megabytes of size. But if this folder is much larger, this indicates that some updates are corrupted.
To Delete Downloaded Windows Update Files in Windows 10,
- Press Win + R on the keyboard and type services.msc in the Run box.
- Stop the service named Windows Update.
- Open File Explorer .
- Go to C:\WINDOWS\SoftwareDistribution\Download. Copy-paste this path to the explorer’s address bar.
- Select all files of the folder(press the Ctrl-A keys).
- Press the Delete key on the keyboard.
- Windows may request for administrator privileges to delete those files. Turn on the option «Do this for all current items» in the dialog and click on Continue.
Restart Windows 10 and check for updates. See if this fixed your issues.
Alternatively, you can create a batch file to automate the process.
Delete Downloaded Windows Update Files with a Batch File
- Open Notepad.
- Paste the following text:
net stop wuauserv
cd /d %SystemRoot%\SoftwareDistribution
del /s /q /f Download
net start wuauserv - Save it to a file with a *.cmd extension. You can place it on the Desktop.
- Right-click the file you have created and start it as Administrator from the context menu.
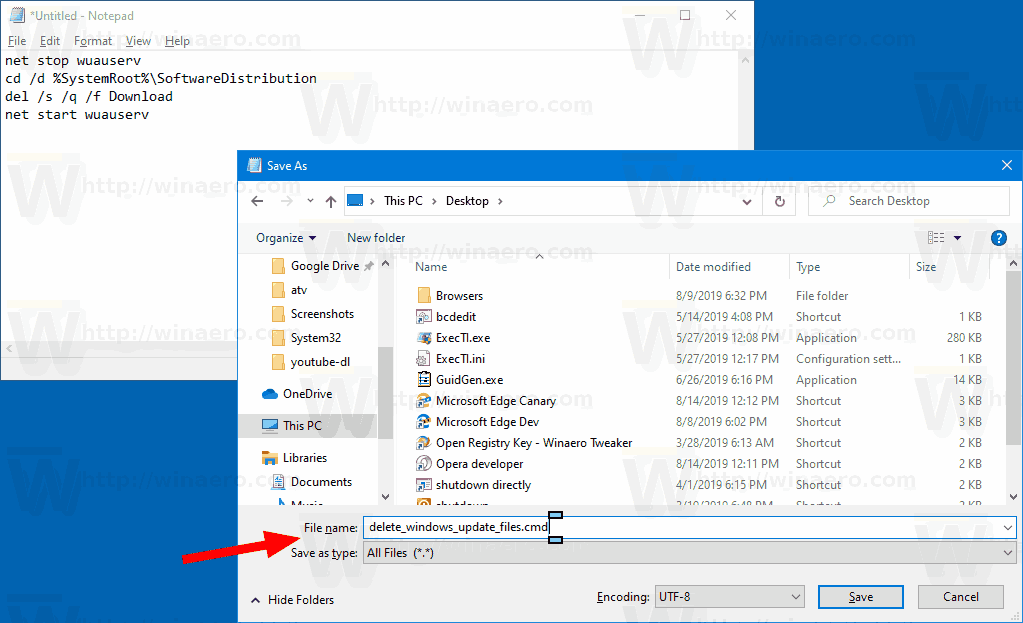
You are done. Now restart the PC and check for available updates.
Here’s how does it work
The command net stop wuauserv stops the Windows Update service. Next, the cd command switches the current folder to C:\Windows\SoftwareDistribution. The del command erases the contents of the Download folder and its subfolders. Finally, the last command, net start wuauserv , starts the Windows Update service again.
To save your time, you can download this ready-to-use batch file.
Articles of interest:
Winaero greatly relies on your support. You can help the site keep bringing you interesting and useful content and software by using these options:
Share this post
About Sergey Tkachenko
Sergey Tkachenko is a software developer from Russia who started Winaero back in 2011. On this blog, Sergey is writing about everything connected to Microsoft, Windows and popular software. Follow him on Telegram, Twitter, and YouTube.
5 thoughts on “ Delete Downloaded Windows Update Files in Windows 10 ”
i haven’t noticed this before but Also disk clean-up has an option to delete update files also,
AFAIK it cleans up WinSxS instead.
Hi Sergey, Is any chance to fix loop booting PC after Windows OS updates without reinstalling OS ?
How to Delete Windows 10 Update Files and Cached Data?
How to delete downloaded Windows 10 Update files Correctly
Remove or delete Windows 10 update files will free the system drive space and speed up your PC too. When you update your Windows, the update files will be cached on your Windows system drive. You must manually delete Windows 10 update files or use some third-party application. The built-in Disk Cleanup’s of Windows feature is great for deleting Windows temporary files. But for deleting Windows 10 update files, you can use the Windows 10 installed Update section.
Related Articles:
This is the most common problem user asked us about. Unless we had explained for previews Windows, like Windows 8.1 and Windows 7. Fortunately, it works the same for all Windows. So try to clean up your system temporary files to speed up the performance of your computer, specialty Windows 10.
Delete Windows 10 Update Files
There are two ways to delete Windows 10 update files. The first one is deleting from Windows update an installed update file which sometimes causes the issue. The second is delete the update cached files in Windows 10 using disk cleanup.
Delete Windows 10 update files and temporarily cached files:
- Check Windows 10 Update files.
- Delete an installed update file.
- Remove Windows 10 temporary files.
- Cleanup Windows 10 with Disk Cleanup
Follow the below step by step guide to delete Windows 10 update files, temporary files, and other cached files. Let’s begin with uninstalling an update file.
1. Press Windows+R to open the Run and type “appwiz.cpl” on the Windows Run to open Program and Features. On the programs and feature page, select View installed updates.
 Delete Windows 10 Update Files and Temporary Cached Files – Technig
2. To delete an installed update, select and right click the installed update you want to uninstall, then click Uninstall.
Note: Some Windows updates are not removable, you can’t simply uninstall it with Windows Programs and Features section.
Remove Windows Update Files and Cached Data
This is the second method to delete Windows update files and other cached data or temporary files. Just follow up the below guide.
1. Open your File Explorer (This PC or My Computer). Right-click the Windows system drive and click Properties to open the Local Disk (x) Properties. The system drive is where your Windows 10 has been installed currently.
 Windows 10 System Drive Properties – Technig
2. On the Properties of the system drive, click Disk Cleanup to open Disk Cleanup for the drive (C:). Then select all from Download Program files to Thumbnail files under Files to delete. When you have selected all of them, click Clean up system files.
 Delete Windows 10 Update Files
3. Now on the Disk Cleanup tab, select all options again, then click OK to delete all Windows 10 update files and temporary files.
If you want to delete System Restore and Shadow Copies, select More Options tab and click Clean up to remove system restore and shadow copies.
 Delete Windows 10 System Restore and Shadow Copies
Remember: This action will remove all system restore point, you will not be able to restore to preview point unless the system will create a new restore point.
4. Just click Delete Files to make sure that all files will remove successfully. Until it will not finish, don’t close the process window or shutting down your system.
 Are you sure you want to permanently delete the files
5. Now all Windows 10 update files and other cached files must be deleted. Close the System Properties window.
That’s it, easy and simple.
To do the same task or need to more about deleting system cached files or remove Windows update files, I recommend you to read the below articles.
How to delete downloaded Windows Update files
This is the manual task you can do to delete downloaded Windows update files. It is easy to delete all cached update files. This works on all supported versions of Windows, including Windows 7, Windows 8.1 and Windows 10.
 How to delete downloaded Windows 10 Update files – Technig
- Open the Run.
- Type services.msc.
- Right-click on the result, and select “run as administrator” from the context menu.
- Locate the Service Windows Update. The services listing is sorted alphabetically by default. Click on the name to revert the order so that you don’t need to scroll as much.
- Right-click on the service Windows Update and select Stop from the menu.
- Go to C:\WINDOWS\SoftwareDistribution\Download using Explorer or any third-party file browser. If you navigate to the folder manually, you may need to enable the showing of hidden files first.
- Do so with a click on File > Change folder and search options.
- Go to View, and scroll down until you find “Hidden files and folders” listed.
- Select “Show hidden files, folders and drives”.
- Remove the checkmark from “Hide protected operating system files (Recommended)”.
- Click Apply, then OK.
- Select all files of the folder. The easiest way to do that is to use Ctrl-A while the folder is active.
- Hit the Delete-key on the computer keyboard.
- Windows may need administrator privileges to delete certain files. Select “do this for all current items” and click continues to grant the permissions.
- Go back to the Services window.
- Right-click on the Windows Update service, and select Start from the list of options.
Cleanup Windows 10 with third-party Software
PC Scan & Repair by Reimage software is also a good tool to completely scan and repair your computer. Download and install it then start scanning. The below screenshot is the scan result’s of my Laptop.
 PC Scan & Repair by Reimage
Also, there are more third party apps will do this for your, but doing Windows task with built-in Windows app is better and free. It will let you discover your computer features and functions more.
Related Queries:
- Delete Windows 10 update cache
- Delete Windows update files Windows 7
- Delete Windows update files Windows 10
- Delete downloaded Windows 10 updates
- Windows update cache location Windows 10
- Windows 10 update files location
- How to delete downloaded but not installed Windows updates in Windows 10
- Clear Windows update cache and fix Windows updates


