- Uninstall / Delete Games from your Windows 7 computer
- Delete the Windows 7 games from your system
- Uninstall or remove apps and programs in Windows 10
- Disable or disable Windows 7 default games and Remove from Start menu
- Disable Windows 7 games
- April 2021 Update:
- Remove games from the Windows 7 Start menu
- How can I permanently delete games from accessories in XP
- Replies (2)
- How to Remove Pre-installed Windows 10 Apps & Games
- How to Remove Apps & Games
- How to Remove Microsoft Apps in Windows 10
- Dell Inspiron 15 3000 — $429.99
Uninstall / Delete Games from your Windows 7 computer
Windows 7 comes with over ten games pre-installed on your computer; unlike regular programs, which can be uninstalled the traditional way, these games are a part of the Windows operating system. You can uninstall them and temporarily remove them from your PC , as you’ll learn in this tutorial. Note that this Windows 7 tutorial only addresses the «built-in» Windows games; to uninstall another game that you installed yourself, just follow these instructions instead: uninstall programs in Windows 7. Lets now show you how to remove the games that come with Windows.
Delete the Windows 7 games from your system
Follow these steps to turn off the built-in Windows games feature on your computer:
Note: Windows 7 features can be turned on or off as needed. They are not permanently deleted from your computer, since they are part of the operating system. This means that you can safely remove the Windows games from your PC, and then re-install them later on!
- Open the start menu, and type » uninstall » in the search field.
- Then, click on the «Uninstall a program» link.
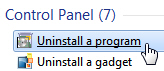
Windows 7 will open the Control Panel, with the «Uninstall or change a program» screen preselected. Since Windows will load all «uninstall-able» applications on your computer, it may take a few seconds to complete; to delete the Windows games, click on the «Turn Windows features on or off» link in the left pane as soon as you can (you may need to enter the Administrator’s password to access this) .

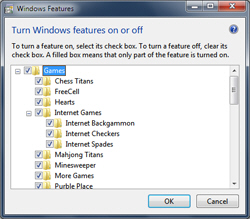
Tip: to re-install the built-in games on your Windows 7 computer, use the steps we explained above, but this time check the checkboxes of the games you want back on your system.
Uninstall or remove apps and programs in Windows 10
There are different ways to remove apps and programs, so if you can’t find the one you’re looking for, you can try another location. Note that some apps and programs are built into Windows and can’t be uninstalled. You can try to repair a program first, if it’s just not running correctly.
Uninstall from the Start menu
Select Start and look for the app or program in the list shown.
Press and hold (or right-click) on the app, then select Uninstall.
Uninstall from the Settings page
Select Start , then select Settings > Apps > Apps & features. Or just click the shortcut link at the bottom of this article.
Select the app you want to remove, and then select Uninstall.
Uninstall from the Control Panel (for programs)
In the search box on the taskbar, type Control Panel and select it from the results.
Select Programs > Programs and Features.
Press and hold (or right-click) on the program you want to remove and select Uninstall or Uninstall/ Change. Then follow the directions on the screen.
If you get an error message when you’re uninstalling, try the Program Install and Uninstall Troubleshooter.
If you’re trying to remove malware, see Stay protected with Windows Security to find out how to run a scan. Or if you use another antivirus software program, check their virus protection options.
Disable or disable Windows 7 default games and Remove from Start menu
The games are part of the Windows 7 operating system and are enabled by default (except in Windows 7 Pro Edition). There is no easy and safe way to completely remove or uninstall these standard built-in games, but what you can certainly do is disable them and remove access to these games when you have little or nothing to do.
This article shows you how to easily disable standard Windows 7 games and remove the Start menu entry. This is especially useful if you, your family members or your employees waste too much time with these games.
Disable Windows 7 games
April 2021 Update:
We now recommend using this tool for your error. Additionally, this tool fixes common computer errors, protects you against file loss, malware, hardware failures and optimizes your PC for maximum performance. You can fix your PC problems quickly and prevent others from happening with this software:
- Step 1 : Download PC Repair & Optimizer Tool (Windows 10, 8, 7, XP, Vista – Microsoft Gold Certified).
- Step 2 : Click “Start Scan” to find Windows registry issues that could be causing PC problems.
- Step 3 : Click “Repair All” to fix all issues.

To do this, click Start, type’Windows Functions’ in the search field and press Enter. This will open the’Windows Functions’ on your computer. The screen offers options to enable and disable certain Windows functions.
Look for the entry ‘Games’ in the window. Uncheck the box next to this folder.
Wait patiently for a few minutes while Windows makes the necessary changes to the functions.
When the task is complete, exit the program and try starting the games from the Start menu. You should not find any, and you will see the message: No games found.
We now have the task of turning off Windows 8 games, let’s continue and see how to remove the Games entry from the Windows 7 Start menu.
Remove games from the Windows 7 Start menu
The process is simple and straightforward. Simply right-click on the’Start’ menu and select’Properties’.
Then select’Start Menu’ from the 3 tabs displayed.
Then click’Customize’ and scroll down until you find’Games’ in the list. Simply check the’Do not show this item’ option and click’OK’.
Next time you open the Start menu, you should not find any games in the Start menu.
(16) If you don’t want someone to activate the games, make sure that you are the only user with administrator rights and that all other users are default users. You can also, to be doubly sure, change the group policy to remove the ability to add or remove Windows features and games from the Start menu.
There may be a way to completely delete games by deleting some entries in the following registry key, but we haven’t tried it and don’t recommend it, as it may not be safe:
Hope that helps!
How can I permanently delete games from accessories in XP
Replies (2)
— Why do you want to uninstall the games permanently?
As you have mentioned, you can remove it from the Windows Components list and restore it again. By doing this, the games will not appear in the All Programs list as well.
Follow these steps to do the same:
a. Click the Start button, click Control Panel, click Add or Remove Programs, and then click Add or Remove Windows Components in the left pane.
b. Now in the Windows Component Wizard select the check box for Accessories and Utilites->Click on Details->Clear the Games check box, and then click OK.
7 people found this reply helpful
Was this reply helpful?
Sorry this didn’t help.
Great! Thanks for your feedback.
How satisfied are you with this reply?
Thanks for your feedback, it helps us improve the site.
How satisfied are you with this reply?
Thanks for your feedback.
You can remove them with the Sysocmgr by running this command:
sysocmgr /i:%windir%\inf\sysoc.inf /u:c:\ocm.txt /q
You need an answer file for it (for the above command save the answer file as c:\ocm.txt):
[Components]
Freecell = off
Hearts = off
Minesweeper = off
Solitaire = off
Spider = off
ZoneGames = off
Pinball = off
The path to the answer file is specified in the /u: switch in the command,
sysocmgr /i:%windir%\inf\sysoc.inf /u: [path to Answerfile.txt] /q
You can also remove the games with Rundll32.exe and the Setup API InstallHinfSection entry-point function:
Rundll32.exe setupapi,InstallHinfSection FreecellUninstall 132 games.inf
Rundll32.exe setupapi,InstallHinfSection MinesweeperUninstall 132 games.inf
Rundll32.exe setupapi,InstallHinfSection SolitaireUninstall 132 games.inf
Rundll32.exe setupapi,InstallHinfSection HeartsUninstall 132 games.inf
Rundll32.exe setupapi,InstallHinfSection SpiderUninstall 132 games.inf
Rundll32.exe setupapi,InstallHinfSection Pinball.Remove 132 pinball.inf
You can script or use a batch file for both methods, this makes it easy to automate the removal of the games enterprise wide.
How to Remove Pre-installed Windows 10 Apps & Games
New Windows 10 laptops and desktops all have one thing in common with upgraded PCs. There are tons of pre-installed Windows 10 apps and games on them.
Every PC, no matter where you purchased it, has these pre-installed Windows 10 apps and games. A new PC comes filled with links to Candy Crush Soda Saga, Minecraft and Solitaire. Microsoft also tries to improve Windows with pre-installed apps of its own. The Mail, Calendar, Photos, Groove Music and Movies & TV apps are fine if you’re looking a new app to handle your files and manage your apps. If you aren’t, they’re just hogging storage space on your PC and acting as placeholders in your Start Menu.

How easy a pre-installed Windows 10 app or game is to remove depends on who installed it. Virus scanners and utilities installed by your PC’s maker take just a few clicks to delete. Deleting apps that Microsoft added to Windows 10, like Mail or Calendar, are a lot harder.
Here’s how to remove pre-installed Windows 10 apps and games from your laptop, desktop or tablet.
How to Remove Apps & Games
To remove pre-installed Windows 10 apps and games from your PC, press the Start key on your keyboard or click on the Start button at the bottom-left corner of your screen. This should open the Start area.
With the Start area open. Type Add or Remove programs in the search box and press the Enter key on your keyboard.

Now find any app or game that you want to remove from your PC in the list. Click on its icon.

Now click on the Uninstall button to delete it from your system.

Wait a few moments for Windows 10 to remove the app. Keep scrolling down the list and removing apps and games you don’t want or need. Though you can uninstall them without harming your PC, avoid removing utilities that your PC’s maker installed to keep your system running. Apps you should keep include programs that allow you to change your PC’s settings, get help from support and install the latest drivers.
With that done, go back to Start by pressing the Start button your keyboard again.
Some PC makers don’t install an entire app or game on your system. Instead, they fill Start with links that take you to the Microsoft Store. Right-click on any app or game that’s on Start that you don’t think you will use. Inside the menu, click on Uninstall if you see it there. If you don’t see it there, click on Unpin from Start.

How to Remove Microsoft Apps in Windows 10
Removing Microsoft’s and apps and games from Windows 10 is more complicated. They appear in the installed apps and games list, but you can’t remove them. This is because Microsoft says features inside Windows 10 depend on these apps, and removing them would break those features.
Luckily, 10AppsManager exists. This free program allows you to remove pre-installed Windows 10 apps. Just remember, you may not be able to get these apps working again unless you refresh Windows 10.
Before you go any further, use Gotta Be Mobile’s How to Make a Full Back Up of Windows 10 guide to save a copy of Windows and all your files. Restore those files if something goes wrong with Windows after you remove the preinstalled apps.
Download 10AppsManager here. Look for a pop-up at the button of your screen. Click on Open instead of Save.

Once the download has finished and the folder opens, drag the 10AppsManager file out of the folder and to your Desktop.

Open the 10AppsManager folder on your desktop. Now double-click on 10AppsManager app. Windows 10 will ask you to confirm that you opened the app.

Click on all the pre-installed Windows 10 apps you want to remove from your PC. If you don’t want any of these apps installed, click on the Remove All button. In general, if you plan to use any apps from the Microsoft Store or keep your PC updated, do not remove the Store app. Also, some features now depend on updates from the Microsoft Store.

To reinstall any of these apps, open 10AppsManager again and click the Reinstall button at the bottom of the tool. If this doesn’t get the apps back, use this How to Reset Your Windows 10 PC tutorial to restore your PC to factory settings.
Dell Inspiron 15 3000 — $429.99
One of Dell’s cheapest Windows laptops ever, the Dell Inspiron 15 3000 is for classic laptop lovers. Its 15-inch screen will never leave you wanting to connect an external display and it has plenty of ports and an all-too-rare DVD drive.
You get to choose whether you want the lowest possible price or a more well-balanced machine that costs a little more. The $299 model has 4GB of DDR3 RAM, a 500GB hard drive and an Intel Celeron Processor. Exchanging those for a more performance friendly Intel Core i3 processor, 6GB of RAM and 1TB of internal storage for photos, videos documents and videos brings the price to $429. The $499.99 model has an Intel Core i5 processor and 8GB of RAM.
Every Dell Inspiron 15 3000 has an SD card reader, headset jack, USB 2.0 port, lock slot, Ethernet port USB 3.0 port and a HDMI port. At 8 hours between charges, they should all last through a day of classes or casual browsing at your favorite coffee shop.


