- Ubuntu 18.04 remove all unused old kernels
- Ubuntu 18.04 remove kernel that is not used
- How to list all installed Linux kernel
- How to remove old kernel versions on Ubuntu 18.04 or above
- Dealing with Ubuntu 16.04 LTS and older
- How to delete old kernels in Ubuntu
- Result
- Removing old kernels using GUI software updater tool
- Conclusion
- Thread: Deleting Old Linux Headers?
- Deleting Old Linux Headers?
- Re: Deleting Old Linux Headers?
- Re: Deleting Old Linux Headers?
- Re: Deleting Old Linux Headers?
- Re: Deleting Old Linux Headers?
- Re: Deleting Old Linux Headers?
- How to Remove Old Kernels in Debian and Ubuntu
- Get current status
- Ubuntu Documentation
- Regular Maintenance
- Manual Maintenance
- Using Apt
- Other Methods
- Automatic Maintenance
- Enable Unattended Upgrades (Ubuntu 14.04)
- GUI Way
- Shell Way
- Configure Unattended Upgrades to Remove Unneeded Kernels Automatically
- Option for All Ubuntu Releases
- Options for Ubuntu 16.04 and Newer
- Problems
- Safely Removing Old Kernels
- Unmet Dependency Errors
- Oops, Removed All Kernels!
Ubuntu 18.04 remove all unused old kernels
H ow do I remove all unused old kernels in Ubuntu Linux 18.04/20.04 LTS using the command line?
Over time you get many Linux kernel packages installed on Ubuntu Linux 16.04 or 18.04 LTS server. All unused Linux kernel takes disk space on Ubuntu server, hence you must delete them from the system. This page shows you how to remove old kernels from an Ubuntu server install. The following commands works with Ubuntu 18.04 and 20.04 LTS server or desktop systems.
| Tutorial details | |
|---|---|
| Difficulty level | Easy |
| Root privileges | Yes |
| Requirements | Ubuntu 18.04 LTS |
| Est. reading time | 4 minutes |
Ubuntu 18.04 remove kernel that is not used
The procedure to delete all unused old kernels on Ubuntu Linux version 18.04 and 20.04 LTS is as follows:
- First, boot into a new kernel
- List all other older kernel using the dpkg command
- Note down system disk space usage by running the df -H command
- Delete all unused old kernels, run: sudo apt —purge autoremove
- Verify it by running the df -H
How to list all installed Linux kernel
Simply type the following dpkg command along with egrp command:
dpkg —list | egrep -i —color ‘linux-image|linux-headers’
# only installed #
dpkg —list | grep -i -E —color ‘linux-image|linux-kernel’ | grep ‘^ii’
Listing old kernel for removal purpose
Also note down the amount of disk space available on the file system by typing the following df command:
df -H
Total 9.3G disk space used on my cloud server
How to remove old kernel versions on Ubuntu 18.04 or above
Dealing with Ubuntu 16.04 LTS and older
First, get list of currently running Linux kernel, run:
v=»$(uname -r | awk -F ‘-virtual’ ‘< print $1>‘)»
echo «$v»
Sample outputs:
Next, I am going to create a list that tells not to delete currently running Linux kernel as follows:
i=»linux-headers-virtual|linux-image-virtual|linux-headers-generic-hwe-|linux-image-generic-hwe-|linux-headers-$
echo «$i»
Sample outputs (the following kernel I am going to keep on my systems):
Here is a list of the kernel that needs to be deleted:
dpkg —list | egrep -i ‘linux-image|linux-headers’ | awk ‘/ii/< print $2>‘ | egrep -v «$i»
Sample outputs:
How to delete old kernels in Ubuntu
Finally, I am going to delete all unwated and older Linux kernels on my Ubuntu Linux 16.04 LTS server, run:
$ sudo -i
# apt-get —purge remove $(dpkg —list | egrep -i ‘linux-image|linux-headers’ | awk ‘/ii/< print $2>‘ | egrep -v «$i»)
Result
Again run the df command:
df -H
Sample outputs:
- No ads and tracking
- In-depth guides for developers and sysadmins at Opensourceflare✨
- Join my Patreon to support independent content creators and start reading latest guides:
- How to set up Redis sentinel cluster on Ubuntu or Debian Linux
- How To Set Up SSH Keys With YubiKey as two-factor authentication (U2F/FIDO2)
- How to set up Mariadb Galera cluster on Ubuntu or Debian Linux
- A podman tutorial for beginners – part I (run Linux containers without Docker and in daemonless mode)
- How to protect Linux against rogue USB devices using USBGuard
Join Patreon ➔
Now I have used 6.7G disk space as compared 9.3G before deleting kernels. In other words, I gained 2G disk free space.
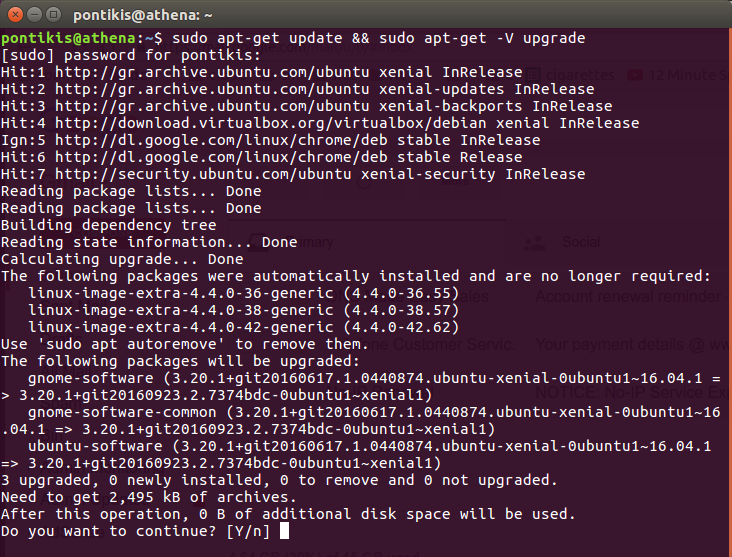
Removing old kernels using GUI software updater tool
Ubuntu comes with graphical management of software packages updates called update-manager. It is a frontend for the apt command package management system. Start update manger from GUI or open the terminal app, then type:
update-manager
Make sure you select an option called “Unused kernel updates to be removed” > click on the Install Now button:
Naturally, the GUI method works on the Ubuntu desktop. Server users need to stick with the CLI method.
Conclusion
And there you have it. You successfully removed old kernel and header packages from the Ubuntu Linux system. On really older Ubuntu system, we had a command named purge-old-kernels but t is now deprecated. Hence, you must use the apt/apt-get.
🐧 Get the latest tutorials on Linux, Open Source & DevOps via
Источник
Thread: Deleting Old Linux Headers?
Thread Tools
Display
Deleting Old Linux Headers?
I have 12.04 installed using WUBI, on a laptop with Win XP. Everything has been running fine for a year or so. Recently I tried to install some updates, and I received an error—/usr/src/linux headers 3.8.0-39 can’t be installed because of a disk full error. (My /usr is 99% used.) I’ve looked through a number of posts, and I’ve seen some indications that if you remove all of the previous linux headers from the /src folder—EXCEPT for the previous update, in my case it would be 3.0.0-38 and 3.8.0-38-generic—that it will free up the needed space. Some posts state that this is just ‘good housekeeping,’ and should be done regularly.
But—I don’t want to do this if the previous downloads are still needed. My thinking is that each download is ‘stand-alone,’ and replaces all the previous—but I don’t know for certain. Can anyone tell me for sure? Other posts say that it’s possible to use GPARTED to repartition or rearrange things. But, I’m not sure I’d be all that comfortable doing so. I’d appreciate any information about removing previous linux headers, or suggestions about a solution. Thanks!
![]()
Re: Deleting Old Linux Headers?
It’s generally safe to remove old headers. You would only need to keep them to preserve a build environment for a program that you compiled with a specific version—a custom kernel for instance. Since you are out of space, it doesn’t really matter. Your system will not function without freeing up space, so you have to start dumping. Old headers, even older, compiled kernels can go. Keep at least one older kernel for a backup.
Since you are running through XP, chances are high that your Windows partition will take a dump before Ubuntu balls up, so you might as well do some house cleaning and prepare for a dual-boot installation.
Unumquodque potest reparantur. Patientia sit virtus.
![]()
Re: Deleting Old Linux Headers?
I would gladly help you. The idea is delete/uninstall as much as possible, but keeping at least a couple of old kernels and headers.
Could you open a terminal, run these commands and post back the output (you can copy/paste the text)?
Re: Deleting Old Linux Headers?
Thanks, had a busy day so I couldn’t get back right away.
df -h
Filesystem Size Used Avail Use% Mounted on
/dev/loop0 3.8G 1.8G 1.9G 48% /
udev 929M 4.0K 929M 1% /dev
tmpfs 188M 816K 187M 1% /run
none 5.0M 0 5.0M 0% /run/lock
none 938M 152K 938M 1% /run/shm
/dev/sda3 45G 14G 31G 32% /host
/dev/loop1 3.8G 288M 3.4G 8% /home
/dev/loop2 3.8G 2.7G 923M 75% /usr
df -i
Filesystem Inodes IUsed IFree IUse% Mounted on
/dev/loop0 256000 41369 214631 17% /
udev 237651 502 237149 1% /dev
tmpfs 240043 420 239623 1% /run
none 240043 3 240040 1% /run/lock
none 240043 7 240036 1% /run/shm
/dev/sda3 0 0 0 — /host
/dev/loop1 256000 3950 252050 2% /home
/dev/loop2 256000 251090 4910 99% /usr
dpkg -l | grep linux-image | awk ‘
linux-image-3.8.0-29-generic
linux-image-3.8.0-35-generic
linux-image-3.8.0-36-generic
linux-image-3.8.0-37-generic
linux-image-3.8.0-38-generic
linux-image-3.8.0-39-generic
linux-image-generic-lts-raring
As near as I can tell, Update Manager gets hung up at trying to install the ‘second-half’ of «39»—if that’s the correct terminology? Do you think that if I trashed everything except 3.8.0-38 and 3.8.0-38 generic, that would do the trick? I appreciate your input. Thanks.
![]()
Re: Deleting Old Linux Headers?
So the latest kernel and headers are from 3.8.0-39. That’s is the one you are using right now and it shouldn’t be removed.
Also, I’d keep the previous one as safety practice (3.8.0-38).
Then run this command:
Let us know how it goes.
Regards.
Re: Deleting Old Linux Headers?
Hello again, I tried to do the command to purge the kernels, and I received the following reply. I did the suggested command (I’d done that many times yesterday), and I received the same error message that I saw yesterday. I’ll paste the messages below, but I had one question. Is there a way to go directly into the folder where these are located and remove them manually? I don’t think that I can simply pull them to trash because it needs a higher permission, and I don’t know how to «sudo» when I’m trying to do something manually. Anyway, I’d appreciate your comments, and I may not be staying online much more today, but I’ll be back on Saturday. (I spent about 8 hours today doing yard work for a couple charities, and the Arkansas sun has just about done me in, so I’ll be heading to bed soon!) Thanks.
sudo apt-get purge linux-image-3.8.0-29-generic linux-image-3.8.0-35-generic linux-image-3.8.0-36-generic linux-image-3.8.0-37-generic
[sudo] password for daveandjan:
Reading package lists. Done
Building dependency tree
Reading state information. Done
You might want to run ‘apt-get -f install’ to correct these:
The following packages have unmet dependencies:
linux-headers-generic-lts-raring : Depends: linux-headers-3.8.0-39-generic but it is not going to be installed
E: Unmet dependencies. Try ‘apt-get -f install’ with no packages (or specify a solution).
daveandjan@ubuntu:
$ sudo apt-get -f install
Reading package lists. Done
Building dependency tree
Reading state information. Done
Correcting dependencies. Done
The following packages were automatically installed and are no longer required:
gir1.2-ubuntuoneui-3.0 libubuntuoneui-3.0-1 thunderbird-globalmenu
Use ‘apt-get autoremove’ to remove them.
The following extra packages will be installed:
linux-headers-3.8.0-39-generic
The following NEW packages will be installed:
linux-headers-3.8.0-39-generic
0 upgraded, 1 newly installed, 0 to remove and 6 not upgraded.
2 not fully installed or removed.
Need to get 0 B/1,012 kB of archives.
After this operation, 12.0 MB of additional disk space will be used.
Do you want to continue [Y/n]? y
(Reading database . 278450 files and directories currently installed.)
Unpacking linux-headers-3.8.0-39-generic (from . /linux-headers-3.8.0-39-generic_3.8.0-39.57
precise1_amd64.deb) .
dpkg: error processing /var/cache/apt/archives/linux-headers-3.8.0-39-generic_3.8.0-39.57
precise1_amd64.deb (—unpack):
unable to create `/usr/src/linux-headers-3.8.0-39-generic/include/config/scsi/pm8001.h.dpkg-new’ (while processing `./usr/src/linux-headers-3.8.0-39-generic/include/config/scsi/pm8001.h’): No space left on device
No apport report written because the error message indicates a disk full error
dpkg-deb: error: subprocess paste was killed by signal (Broken pipe)
Errors were encountered while processing:
/var/cache/apt/archives/linux-headers-3.8.0-39-generic_3.8.0-39.57
precise1_amd64.deb
E: Sub-process /usr/bin/dpkg returned an error code (1)
Источник
How to Remove Old Kernels in Debian and Ubuntu

After installing a new Linux kernel, old kernels are not automatically deleted. They remain in your disk ( /boot partition). You have to delete them manually. Why?
The main reason is to save disk space, which occupied by old kernels. Some systems may become unusable if not enough disk space is available in /boot partition. However, disk space is not a problem in modern systems.
An other reason is to clean up Grub boot menu. In Ubuntu, Grub boot menu is hidden by default. You can display it by pressing “SHIFT” continuously at boot time. More details in this post.
You will never delete your current kernel, of course. It is recommended to keep at least one or two older kernels, so you can boot your system in an emergency situation (hardware or software compatibility issues with the current kernel).
After removing old kernels, new grub boot menu will be available in next reboot.
In a healthy Debian system, each time you install a package or update your system, you will be prompted that old kernels (if any) can ber removed. You will get the message “The following packages were automatically installed and are no longer required”. This message is no specific for kernel, but for any package which no longer required in your system:
In this case you may use:
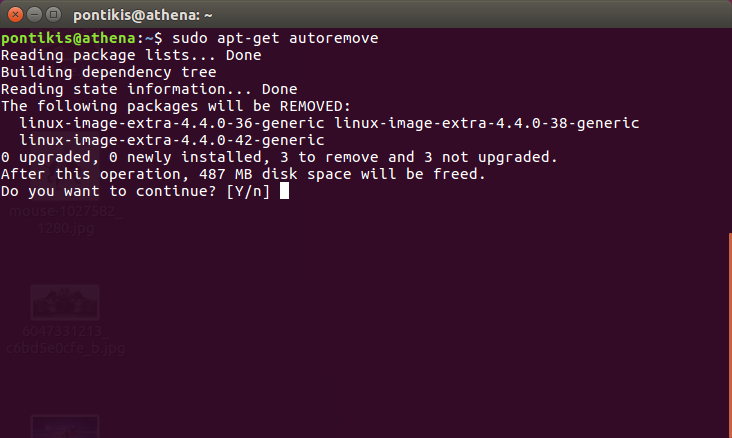
This would be enough to remove old kernels from your system. But, below, it is described a completed and more safe approach.
Get current status
First things first. Which is your current kernel?
Источник
Ubuntu Documentation
LVM installs and encrypted installs use a separate /boot partition. The partition by default is capable of holding only four or five kernels, and can fill to capacity quickly. To prevent your /boot partition from getting full, you need to configure automatic removal of old kernels, or manually remove old kernels regularly.
Changing the kernel providing packages on your system requires commands with root access, so please read RootSudo.
Regular Maintenance
Removing old kernels is easy to do on a system with sufficient free space in your root parition or separate boot partition. You can remove them manually, or configure unattended-upgrades to do it automatically. If you receive or have received an error from a package management tool, manual removal may not work until the problem is fixed. See Problems section.
Manual Maintenance
Using Apt
You can remove old kernels with a simple autoremove command in a terminal:
Note: In Ubuntu 14.04, because of Bug #1439769 this works only, if you have installed security updates automatically, and not manually by e.g. Software Updater, see in this section on how to configure it.
This just adds unnecessary complexity, replace instructions after 14.04 is EoL. In 16.04 and newer you could alternatively use
The packages to remove are determined based in part on whether the package is marked as manually or automatically installed. You can check if a kernel providing package is marked as automatically installed using this command in a terminal:
or to see if it is marked as manually installed:
In the event some kernel providing packages are marked as manual (possibly because they were installed via ‘apt-get’) and you want them autoremoved, you can change the status of the package using apt-mark auto and the package name. For example, to mark kernel 4.12.0-12-generic as autoremovable:
Note: apt-get autoremove will not remove all automatically installed old kernel providing packages as fallback versions are kept; the list of kept kernels is maintained and automatically updated in the file /etc/apt/apt.conf.d/01autoremove-kernels as a list of matching regular expressions.
Other Methods
If you want to purge one specific kernel providing package you can do so via the following command in a terminal:
This will also purge the corresponding linux-image-extra package if it is installed e.g. linux-image-extra-4.12.0-12-generic. It will not purge linux-headers-4.12.0-12, if there is another linux-headers-4.12.0-12 flavor installed besides -generic.
If you just need to purge kernels selectively, you may benefit from this answer with unofficial code, if the system is not already broken.
There is an unofficial script for purging kernels; it is called linux-purge. By it you can purge kernels selectively, or choose to keep given number of older kernels and remove other depending on options given. It can do do even some fixing (with —fix option), if system is already broken; that is a kind of scripted version of what is told in chapter Safely Removing Old Kernels.
Automatic Maintenance
The unattended-upgrades package, included with the default install of all Ubuntu flavors, includes a feature to remove unused packages automatically. Enabling this feature is a two-step process in Ubuntu 14.04.
Enable Unattended Upgrades (Ubuntu 14.04)
In Ubuntu 16.04 and later unattended-upgrades is enabled by default, however in Ubuntu 14.04 you will need to enable it either via the GUI or a command-line. Note: There is a separate documentation about setting up automatic security updates.
GUI Way
Enable unattended upgrades using Software & Updates application’s «Updates» tab:
- Check the box for *-security (and/or any other repositories you wish)
- Automatically check for updates: Set to any frequency (except ‘Never’)
- When there are security updates: Set to Download and Install Automatically
Shell Way
By default this installs available security updates every day. If you want to change which sort of packages it will upgrade (if any), or how often, see here for details.
Configure Unattended Upgrades to Remove Unneeded Kernels Automatically
Note: The following methods will only remove kernels that are marked as being automatically installed as described above. In Ubuntu 16.04 kernels installed by Software Updater are marked as being automatically installed. In Ubuntu 14.04 only kernels installed by unattended-upgrades are marked as being automatically installed. See bug #1439769 for details.
Note: This way will not remove all automatically installed old kernel providing packages as fallback versions are kept; the list of kept kernels is maintained and automatically updated in the file /etc/apt/apt.conf.d/01autoremove-kernels as a list of matching regular expressions.
The second step is to edit old configuration file to enable automatic removal, or preferably create an overriding new configuration file where you need to write only options that you change from the default or from the values defined in the shipped one, because updates to shipped configuration file may conflict with the local changes blocking updating unattended-upgrades itself.
The default configuration file is
/etc/apt/apt.conf.d/50unattended-upgrades
You could name the new one as /etc/apt/apt.conf.d/52unattended-upgrades-local
See here for reference.
Option for All Ubuntu Releases
The following setting configures unattended-upgrade to remove unused dependencies after an unattended upgrade.
Make sure the configuration file contains line
(and that it is not commented out; comments start with ‘//’.)
Thereafter unattended-upgrades will automatically remove packages providing old kernels as part of unattended upgrade. (It does not purge them, however.) It also removes other unneeded packages, as well, which is or is not what you want.
Options for Ubuntu 16.04 and Newer
Unattended-upgrades version 0.90 supports a new configuration variable called Unattended-Upgrade::Remove-New-Unused-Dependencies that makes possible to automatically remove only packages that become excessive during a run of unattended-upgrades. It is enabled i.e. «true» by default. The way this is designed, it is important that you let unattended-upgrades handle installation of security updates. Otherwise unattended-uprades will not remove old kernels and you may have to do some manual removing of kernels.
Version 1.1 that is also currently available for Ubuntu 16.04 adds yet another option called Unattended-Upgrade::Remove-Unused-Kernel-Packages. It removes unused kernel packages before installing new one (or even if nothing is installed). It is enabled by default, too.
Problems
If your package management is broken, or if regular maintenance above is not working, any of several problems may have occurred. You may be out of storage space, or you may have a package version mismatch, or you may have another problem.
Safely Removing Old Kernels
For users of LVM systems, encrypted systems or limited-storage systems, the most frequent problem is that the /boot partition is simply full. The package manager cannot install a pending upgrade due to lack of space. Addiitionally, apt-get can not remove a package due to broken dependency.
This problem can be fixed from the shell: by manually remvoing one or two old kernels, we can provide the package manager enough space to install the queued upgrade.
First remove any leftover temporary files from previous kernel updates.
Determine the version number of the currently running kernel, which you DO NOT want to remove.
List all the kernels, including the booted one (4.2.0-21-generic in this example), in the package database and their statuses.
To free space in /boot we’ll remove an initrd.img file for a suitable old kernel manually, this is necessary due to a kenel packaging bug.
Now we’ll use dpkg in order to TRY to purge the kernel package for the same old kernel:
NOTE: The previous command will probably fail, as there probably is a depending linux-image-extra package installed together with a ‘generic’ kernel package. In general, the output of the previous command will tell which package you need to remove first. In this example case you would run
Finally, we will fix the package installation process that previously failed.
If the last command fails due to insufficient disk space in /boot, you have to purge another kernel (e.g. linux-image-4.2.0-16-generic) same way. Otherwise you could continue to chapter Manual Maintenance to remove more kernels. Make sure the linux-headers packages respective to the kernels purged above will also be purged.
Unmet Dependency Errors
If you have ignored apt and dpkg errors for a while, then some packages may have upgraded while others did not. This is an expected follow-on effect. You will see mysterious, persistent version errors upon normal upgrades.
The simple way to fix most version mismatch errors is to update the package database, clean out the package cache, and download-and-reinstall the newer version of the offending package.
This is easier than it sounds. For example, if the ‘hello’ package is one of those unmet dependencies:
Oops, Removed All Kernels!
If you got a bit carried away and deleted all the kernels, you fall into the «You did WHAT. » class. You will be pleased to know that you are not the first, nor will be the last, person to do this. Get your LiveCD and head over to GRUB reports no operating system.
RemoveOldKernels (последним исправлял пользователь jarnos 2020-09-26 09:58:55)
The material on this wiki is available under a free license, see Copyright / License for details
You can contribute to this wiki, see Wiki Guide for details
Источник


