- Remove User Profile Correctly in Windows 10
- How to Delete User Account in Windows 10?
- How to Remove User Profile in Windows 10?
- How to Delete User Profile in Windows 10? – Video
- How to Delete Old User Profiles Using GPO and PowerShell?
- How to Delete a User Profile Manually in Windows?
- GPO: Delete User Profiles Older Than a Specified Number Days
- PowerShell Script to Delete Old User Profiles in Windows
- Удаление старых профилей пользователей Windows с помощью GPO или PowerShell
- Ручное удаление профиля пользователя в Windows
- Групповая политика автоматического удаления старых профилей
- Очистка сервера от старых профилей пользователей с помощью PowerShell
Remove User Profile Correctly in Windows 10
n Microsoft Windows operating system when you want to delete a user account, the user profile will remain in the root directory of Windows. If you want to remove user profile correctly and completely from your system, follow the step by step article until you have deleted the user account and removed a user profile from your system drive and get free your hard disk.
How to Delete User Account in Windows 10?
Delete Windows 10 user profile correctly:
- Backup user account files.
- Delete user account.
- Delete User Profile.
Note: Before deleting Windows 10 user profile, try to backup important data then apply the following article.
Step 1: In Windows press Windows +R to open the Run and type “lusrmgr.msc” for opening the windows Local user and group manager. The local users and groups manager let you create a user account, delete user account or remove user account and manage users and groups settings.
 Windows 10 Local Users and Groups Manager
2. Now select the Users to see the existing users on your computer. To delete a user account, right-click the user name and select Delete to delete a user account.
Note: you can’t remove the built-in administrator of your computer, but you can delete user accounts you have created.
 Delete User Account with Windows Local User and Group Manager
3. Finally, on the prompt screen, hit Yes button to complete the process to delete Windows 10 user account.
 Are you sure? Do you want to delete user account?
Now you have deleted user account only, and the user profile remains on the system drive. Let’s remove user profile completely from the system. If the profile remains on the system, it will use disk spaces.
How to Remove User Profile in Windows 10?
In step 2, try to delete the remain user account profile from the system drive. To remove a user account profile, you need to have administrator privilege.
Step 2: Remove User Profile. Type “sysdm.cpl” on Windows Run and press enter to open System Properties.
 Type Sysdm.cpl to open System Properties
- When the System Properties opened, select the Advanced tab.
- On Advanced tab click Setting under User Profiles. Don’t click Settings under Performance.
- Select the user account profile you want to delete it.
- Click Delete button and click Yes to accept and remove user profile completely from your system.
 Remove User Profile From Your System Drive
Now the user account has been deleted successfully and the user profile removed from your system also. Deleting user profile will prevent the system from keeping other deleted user account profiles on your computer.
How to Delete User Profile in Windows 10? – Video
This (delete user profile) is going to make us a bit crazy. Some users comment us that have a problem with deleting Windows 10 user profile with above method. I have tested again and created a video to delete a user account profile correctly in Windows 10. In this video tutorial, I have explained two methods to delete the user profile. The first method is the above but the second one is using a DelProf2 app. This app works perfectly in this tutorial.
Hope this video can help you to delete some corrupted or remove user profile without any issue.
Let us know if you still have any problem with deleting users profile in Windows 10 or other Windows.
How to Delete Old User Profiles Using GPO and PowerShell?
On Windows workstations and servers, especially on RDS (Remote Desktop Services) servers, there is a regular need to remove old (unused) user profiles from C:\Users. The main problem of any Remote Desktop server is the constant growth the size of user profile directories on a local drive. It is partially solved by enabling quotas on the maximum user profiles size (with FSRM or NTFS quotas). However, if there are a lot of terminal server users, with time the C:\Users directory will accumulate a huge number of directories with user profiles that are not longer needed.
How to Delete a User Profile Manually in Windows?
Many novice Windows admins try to manually delete a user profile folder from C:\Users. You can do it if after manually deleting the folder, you will delete the user profile section with the link to this folder from the registry key HKEY_LOCAL_MACHINE\SOFTWARE\Microsoft\Windows NT\ CurrentVersion\ProfileList.
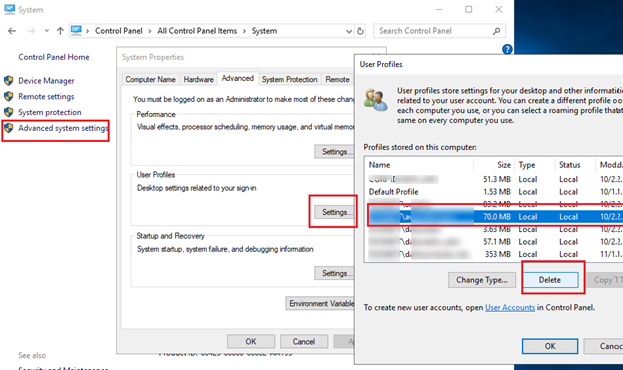
The correct way to manually delete a user profile in Windows is to open System Properties, go to Advanced System Settings -> User Profiles -> Settings, select a user in the list (the Size column shown the size of the profile on the local drive) and click the Delete button.
But this is a manual method, and you may want to automate it.
GPO: Delete User Profiles Older Than a Specified Number Days
In Windows, there is a built-in Group Policy to automatically delete user profiles older than xx days. You can find the policy Delete user profiles older than a specified number days on system restart in the GPO section Computer Configuration -> Administrative Templates -> System -> User Profiles. You can enable this policy in the Local Group Policy Editor (gpedit.msc) or using domain policies in GPMC.msc.
Enable the policy and specify the number of days a user profile is considered active. When this period is over, Windows user profile service will automatically delete the profile at the next restart. It is recommended to specify the period of 45-90 days here.

The main troubles associated with this automatic method of profile removal is waiting for the server restart and non-selectivity (you cannot prohibit deleting certain user profiles like local accounts, administrative accounts, etc.). Also, this policy may not work if some third-party software (most often it is an antivirus) accesses NTUSER.DAT file in user profiles and updates the date of last use.
PowerShell Script to Delete Old User Profiles in Windows
Instead of using the automatic cleanup profile policy described above, you can use a simple PowerShell script to find and remove profiles of disabled or inactive users.
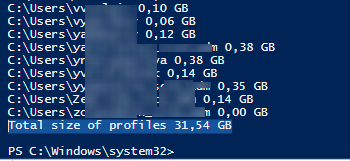
First of all, let’s try to count the size of all user profil folders in C:\Users using a simple script from the article Getting Directory Sizes in PowerShell:
gci -force ‘C:\Users’-ErrorAction SilentlyContinue | ? < $_ -is [io.directoryinfo] >| % <
$len = 0
gci -recurse -force $_.fullname -ErrorAction SilentlyContinue | % < $len += $_.length >
$_.fullname, ‘ <0:n2>GB’ -f ($len / 1Gb)
$sum = $sum + $len
>
“Total size of profiles”,’ <0:n2>GB’ -f ($sum / 1Gb)
The total size of all user profiles in C:\Users is 31,5 GB.
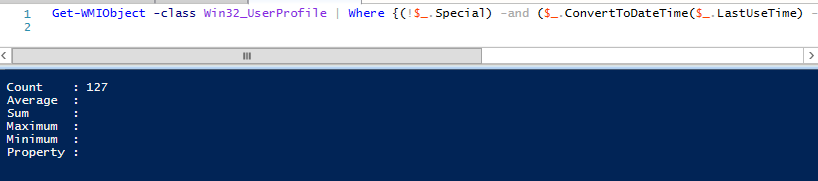
Let’s display the list of users, whose profiles has not been used for more than 60 days. To find them, you can use the value in the LastUseTime field of the profile.
It turned out that I had 127 inactive user accounts on my RDS host (with a profiles total size of about 18 GB).
To remove all these profiles, it is enough to redirect the user list to the Remove-WmiObject command (prior to running the script, it is recommended to double-check its output using the –WhatIf parameter):
In order not to delete profiles of some users, like System and Network Service accounts, a local administrator account, accounts of users having active sessions, account exception list), you can modify the script as follows:
#The list of accounts, which profiles must not be deleted
$ExcludedUsers =»Public»,»zabbix_agent»,»svc»,”user_1”,”user_2”
$LocalProfiles=Get-WMIObject -class Win32_UserProfile | Where <(!$_.Special) -and (!$_.Loaded) -and ($_.ConvertToDateTime($_.LastUseTime) -lt (Get-Date).AddDays(-60))>
foreach ($LocalProfile in $LocalProfiles)
<
if (!($ExcludedUsers -like $LocalProfile.LocalPath.Replace(«C:\Users\»,»»)))
<
$LocalProfile | Remove-WmiObject
Write-host $LocalProfile.LocalPath, «profile deleted” -ForegroundColor Magenta
>
>
You can modify the script to automatically remove all user profiles added to the specific AD group (for example, DisabledUsers group):
Удаление старых профилей пользователей Windows с помощью GPO или PowerShell
На рабочих станциях и серверах Windows, особенно на терминальных серверах RDS (Remote Desktop Services), периодически возникает необходимость очистки каталога C:\Users от старых профилей пользователей (уволенные пользователи, пользователи, которые долго не используют сервер и т.д.).
Основная проблема терминальных серверов – постоянный рост размеров каталогов профилей пользователей на диске. Частично эта проблема решается политиками квотирования размера профиля пользователя с помощью FSRM или NTFS квот, перемещаемыми папками и т.д. Но при большом количестве пользователей терминального сервера в папке C:\Users со временем накапливается огромное количество каталогов с ненужными профилями пользователей.
Ручное удаление профиля пользователя в Windows
Многие начинающиеся администраторы пытаются вручную удалить каталог с профилем пользователя из папки C:\Users. Так можно делать, если вы после удаления папки вручную удалите раздел профиля пользователя со ссылкой на каталог в ветке реестра HKEY_LOCAL_MACHINE\SOFTWARE\Microsoft\Windows NT\ CurrentVersion\ProfileList. Правильный ручной способ удаления профиля пользователя в Windows – открыть свойства системы, перейти в Advanced System Settings -> User Profiles -> Settings, выбрать в списке пользователя (в столбце Size указан размер профиля пользователя) и нажать кнопку Удалить.

Но это ручной способ, а хочется автоматизации.
Групповая политика автоматического удаления старых профилей
В Windows есть встроенная групповая политика для автоматического удаления старых профилей пользователей старше xx дней. Эта политика находится в разделе Конфигурация компьютера -> Административные шаблоны -> Система -> Профили пользователей (Computer Configuration -> Administrative Templates -> System -> User Profiles) и называется “Удалять при перезагрузке системы профили пользователей по истечении указанного числа дней” (Delete user profiles older than a specified number days on system restart). Вы можете включить этот параметр в локальном редакторе политик (gpedit.msc) или с помощью доменных политик из консоли GPMC.msc.
Включите политику и укажите через сколько дней профиль пользователя считается неактивным и “Служба профилей пользователей Windows” можно автоматически удалить такой профиль при следующей перезагрузке. Обычно тут стоит указать не менее 45-90 дней.

Основные проблемы такого способа автоматической очистки профилей – ожидание перезагрузки сервера и неизбирательность (вы не можете запретить удаление определенных профилей, например, локальных учетных записей, администраторов и т.д.). Также эта политика может не работать, если некоторое стороннее ПО (чаще всего это антивирус) обращается к файлу NTUSER.DAT в профилях пользователей и обновляет дату последнего использования.
Очистка сервера от старых профилей пользователей с помощью PowerShell
Вместо использования рассмотренной выше политики автоматической очистки профилей, вы можете использовать простой PowerShell скрипт для поиска и удаления профилей неактивных или заблокированных пользователей.
Сначала попробуем подсчитать размер профиля каждого пользователя в папке C:\Users c помощью простого скрипта из статьи “Вывести размер папок с помощью PowerShell”:
gci -force ‘C:\Users’-ErrorAction SilentlyContinue | ? < $_ -is [io.directoryinfo] >| % <
$len = 0
gci -recurse -force $_.fullname -ErrorAction SilentlyContinue | % < $len += $_.length >
$_.fullname, ‘ <0:n2>GB’ -f ($len / 1Gb)
$sum = $sum + $len
>
“Общий размер профилей”,’ <0:n2>GB’ -f ($sum / 1Gb)
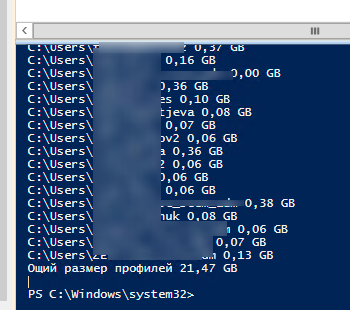
Итого суммарный размер всех профилей пользователей в каталоге C:\Users около 22 Гб.
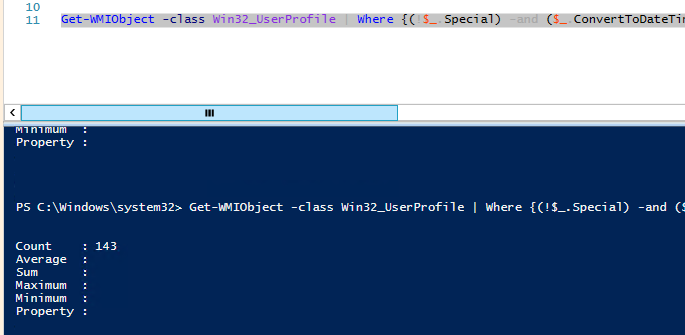
Теперь выведем список пользователей, профиль которых не использовался более 60 дней. Для поиска можно использовать значение поля профиля LastUseTime.
У меня на терминальном сервере оказалось 143 профиля неактивных пользователей (общим размером около 10 Гб).
Чтобы удалить все эти профили достаточно добавить перенаправить список на команду Remove-WmiObject (перед использование скрипта удаления желательно несколько раз перепроверить его вывод с помощью параметра –WhatIf ):
Чтобы не удалять профили некоторых пользователей, например, специальные аккаунты System и Network Service, учетную запись локального администратора, пользователей с активными сессиями, список аккаунтов-исключений), нужно модифицировать скрипт следующим образом:
#Список аккаунтов, чьи профили нельзя удалять
$ExcludedUsers =»Public»,»zenoss»,»svc»,”user_1”,”user_2”
$LocalProfiles=Get-WMIObject -class Win32_UserProfile | Where <(!$_.Special) -and (!$_.Loaded) -and ($_.ConvertToDateTime($_.LastUseTime) -lt (Get-Date).AddDays(-60))>
foreach ($LocalProfile in $LocalProfiles)
<
if (!($ExcludedUsers -like $LocalProfile.LocalPath.Replace(«C:\Users\»,»»)))
<
$LocalProfile | Remove-WmiObject
Write-host $LocalProfile.LocalPath, «профиль удален” -ForegroundColor Magenta
>
>
Вы можете настроить запуск этого скрипта через shutdown скрипт групповой политики или по расписанию заданием планировщика. (перед настройкой автоматического удаления профилей внимательно протестируйте скрипт в своей среде!).
Можно модифицировать скрипт, чтобы автоматически удалять пользователи всех пользователей, которые добавлены в определенную группу AD (например, группа DisabledUsers):


