- How to Delete Temporary Files in Windows
- Safely delete temp files in Windows 10, 8, 7, Vista and XP
- How to Delete Temporary Files in Windows
- Other Types of Temporary Files in Windows
- Check Your Browser Cache
- Handy Tools for Easy Removal
- FIX: Windows 10 temporary files will not delete
- Here’s how to delete Windows 10 temporary files
- 1. Use a third-party solution
- Ashampoo WinOptimizer
- 2. Delete the files manually
- 3. Use Disk Cleanup tool
- 4. Use Command Prompt
- How to remove temporary files on Windows 10
- Remove temporary files using Settings
- Delete temporary files on Windows 10 version 1903 and later
- Delete temporary files on Windows 10 version 1809 and earlier
- Automatically delete temporary files on Windows 10 version 1903 or later
- Automatically delete temporary files on Windows 10 version 1809 or earlier
- Remove temporary files using Disk Cleanup
How to Delete Temporary Files in Windows
Safely delete temp files in Windows 10, 8, 7, Vista and XP
:max_bytes(150000):strip_icc()/tim-fisher-5820c8345f9b581c0b5a63cf.jpg)
:max_bytes(150000):strip_icc()/ryanperiansquare-de5f69cde760457facb17deac949263e-180a645bf10845498a859fbbcda36d46.jpg)
One really easy way to free up some disk space in Windows is to delete temporary files, sometimes referred to as temp files. Temp files are exactly what they probably sound like: files that your operating system only needed to exist temporarily while in use, but are now just wasting space.
Most temporary files are stored in what’s called the Windows Temp folder, the location of which differs from computer to computer, and even user to user. The steps for that are below.
Manually cleaning out the Temp folder in Windows usually takes less than a minute but it could take longer depending on how large the collection of temporary files is.
You can delete temp files in the way outlined below in any version of Windows, including Windows 10, Windows 8, Windows 7, Windows Vista, and Windows XP.
How to Delete Temporary Files in Windows
Follow these simple steps to delete your temporary Windows files:
Windows 10: Select the Cortana search box just to the right of the Start button on the taskbar.
Windows 8.1: Right-click or tap-and-hold the Start button and then choose Run.
Windows 8.0: The easiest way to access Run is from the Apps screen.
In earlier versions of Windows, choose Start to bring up the search box or find Run.
Another way to open the Run dialog box is to enter the WIN+R keyboard shortcut.
In the Run window or search box, enter the following command exactly:
The q parameter suppresses confirmation prompts to delete the files and folders, and s is for deleting all the subfolders and files in the temp folder.
If the %temp% environment variable is for some reason not working, feel free to substitute in the actual folder location mentioned in Step 2 above, but make sure you type the correct folder path, and to be safe, surround the path in quotes like this:
Other Types of Temporary Files in Windows
The Windows Temp folder isn’t the only place that temporary files, and other no-longer-needed groups of files, are stored on Windows computers.
The Temp folder that you found in Step 2 above is where you’ll find some of the operating-system-created temporary files in Windows, but the C:\Windows\Temp\ folder contains a number of additional files that you no longer need to keep.
Feel free to open that Temp folder and delete anything you find in there.
Check Your Browser Cache
Your browser also keeps temporary files, usually in an attempt to speed up your browsing by loading cached versions of web pages when you revisit them. Review How to Clear Your Browser’s Cache for help deleting these types of temporary files.
:max_bytes(150000):strip_icc()/disk-cleanup-windows-10-5c3f45ddc9e77c000196fc5b.png)
Other, harder-to-find locations contain temporary files, too. Disk Cleanup, a utility included in all versions of Windows, can help remove the contents of some of those other temp folders for you automatically. You can open that in a Run dialog box (WIN+R) via the cleanmgr command.
Handy Tools for Easy Removal
Dedicated «system cleaners» like the free CCleaner program can make this, and similar jobs, really easy. Many free computer cleaner programs exist to choose from, too, including Wise Disk Cleaner and Baidu PC Faster.
Check how much free space your hard drive has, both before and after you delete temporary files, to see how much space you recovered.
FIX: Windows 10 temporary files will not delete

- Temporary files can take a lot of space on your PC, and according to users, sometimes you might have issues removing these files.
- If you are looking at how to delete Windows 10 temporary files, make sure to check out our article.
- For more guides and tutorials check out our Windows 10 Guides Hub.
- Visit our Removal Guides section to learn more.
- Download Restoro PC Repair Tool that comes with Patented Technologies (patent available here).
- Click Start Scan to find Windows issues that could be causing PC problems.
- Click Repair All to fix issues affecting your computer’s security and performance
- Restoro has been downloaded by 0 readers this month.
Temporary files are generated when users are creating a new file, and their role is to temporarily retain the information until the file users are working on is saved.
Temporary files should be deleted from time to time, otherwise, they unnecessarily load your computer’s drive, reducing your system’s overall performance.
However, there are situations when users cannot delete temporary files.
This is quite a complicated situation because temporary files can sometimes use even hundreds of gigabytes of your computer’s memory.
Here’s how users describe this issue:
here you can see in this snapshot that there is 5.49GB temporary files. but I’m unable to delete them I had tried this serval times but its not performing any deletion operation. it shows that we are cleaning up your temporary files come back in a bit to check out result. but no result I got.
kindly help me to solve this issue. my c driver is getting full day by day.
Users tried various methods to clean temporary files: ranging from running the Disk CleanupWizard to performing clean boots and drive error searches, but nothing worked.
If you’re having trouble deleting temporary files on your Windows 10 computer, follow the steps listed below to solve this problem.
Here’s how to delete Windows 10 temporary files
Temporary files can take a lot of space on your PC, and according to users, sometimes you might have issues removing these files. Speaking of issues, these are some problems that users reported:
- Can’t delete temporary Internet files Windows 10″ href=’https://windowsreport.com/windows-10-windows-7-user-base/’ data-id=»http://data.windowsreport.com/windowsreport/post/windows_10_hits_35_user_base__windows_7_takes_the_crown_with_43;http://data.windowsreport.com/windowsreport/entity/windows_10_2″>Windows 10 – If you’re unable to delete temporary Internet files, you might be able to do that using DiskCleanup tool.
- Delete temporary files Windows 10 manually – Advanced users prefer solving issues on their own, and if you’re an advanced user, you can delete the temporary files manually. There are several locations that hold your temporary files, so you can delete them with ease.
- Disk Cleanup won’t delete temporary Internet files – If you can’t delete temporary Internet files with Disk Cleanup tool, you might be able to fix the problem by using a third-party application.
- Unable to delete temporary files Windows 10 – Issues while removing temporary files can appear, but if you encounter any issues, you might be able to solve the problem by using one of our solutions.
- Temporary files not deleting – According to users, sometimes your temporary files can’t be deleted. This is a strange issue, but you can solve it by removing those files from Safe Mode.
1. Use a third-party solution

If you have problems with temporary files on your PC, you might be able to remove them using a third-party application.
There are many great tools that can help you remove junk files, but our recommendation is Ashampoo Win Optimizer .
Its interface is user friendly and all you need to do is can select the Drive Cleaner function from the Maintain system option and get rid of all junk files.
If you don’t want to clean temporary files manually or if you have any issues with removing these files, be sure to try this tool.

Ashampoo WinOptimizer
2. Delete the files manually
- Press Windows key + R.
- Type temp > click OK.

- Press Ctrl + A > click Delete.
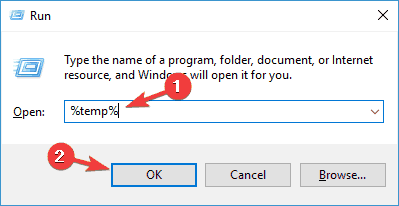
- Press Windows key + R.
- Type %temp% > click OK.
- Press Ctrl + A > click Delete.
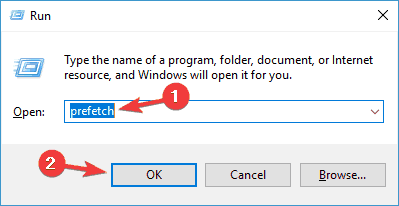
- Press Windows key + R.
- Type prefetch > click OK.
- Select all > click Delete.

When using the delete option, you can also press Shift+Del, instead of a regular delete, to permanently delete files, and not just send them to the recycle bin.
This issue related to temporary files has been plaguing users for more than a year, yet Microsoft hasn’t rolled out any official fixes to solve this problem, as users well remark:
This forum is a year old now with many followers all with the same problem and no one from Microsoft has stepped forward with a solution that actually works. So I do not believe you when you say “We will be glad to assist you.”
If I am wrong and Microsoft is working on solving this problem, then enlighten me regarding what is being done and I will gladly stand cotterted.
3. Use Disk Cleanup tool
According to users, if you can’t delete temporary files on Windows 10, you might want to try using Disk Cleanup tool.
If you’re not familiar, Disk Cleanup is a built-in application that will scan the selected drive and show you which temporary files are using most of your space.
Thanks to this application, you can easily free up space and remove temporary files. To use Disk Cleanup, you need to follow these steps:
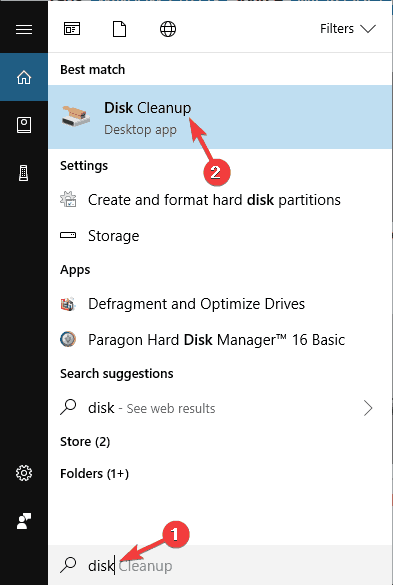
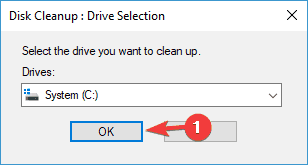
- Press Windows Key + S and enter disk. Select Disk Cleanup from the menu.
- Make sure that your System drive, by default C, is selected and click OK.
- Wait while your PC scans the C drive.
- Select the files you want to remove and click OK. If you want, you can click Clean system files button in order to remove additional files.
After doing that, the temporary files should be removed and you’ll free up some space on your system drive.
4. Use Command Prompt
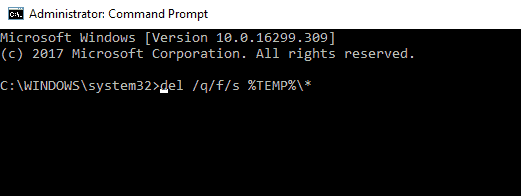
According to users, if you can’t delete temporary files, you might be able to do so by using Command Prompt. To do that, you need to follow these steps:
- Press Windows Key + X to open Win + X menu.
- Now choose Command Prompt (Admin) or PowerShell (Admin) from the list.
- When Command Prompt opens, enter del /q/f/s %TEMP%* and press Enter to run this command.
How to remove temporary files on Windows 10
Are you running out of storage space? Windows 10 has a few ways to remove those temporary files, and emptying recycle bin, wasting space on your PC.

Temporary files are usually referred to those files that apps store on your computer to hold information temporarily. However, Windows 10 has many other temporary file types, including those leftover files after installing a new version, upgrade logs, error reporting, temporary Windows installation files, and more.
Usually, these files won’t cause any issues. However, they can grow rapidly using valuable space on the hard drive, which can be the reason preventing you from installing a new version of Windows 10, or they can be the reason that you’re running out of space.
If you’re using Windows 10, then you have a few ways to safely remove temporary files on your machine using the Settings app and the Disk Cleanup tool.
In this guide, you’ll learn the steps to quickly delete temporary files on Windows 10 to free up space or reclaim storage space after installing a feature update.
Remove temporary files using Settings
On Windows 10, you can use the Settings app to remove temporary files manually or automatically, but the steps will be slightly different depending on the release you have.
Delete temporary files on Windows 10 version 1903 and later
To remove temporary files on Windows 10 version 1903, 1909, 2004, 20H2, and later, use these steps:
Open Settings on Windows 10.
Click on System.
Click on Storage.
Under the “Local Disk” section, click the Temporary files option.
 Storage Settings (20H2)
Select the temporary files you want to remove.
Click the Remove files button.
 Remove temporary files options
After you complete the steps, junk files will be removed from your computer, freeing up space for more important files.
Delete temporary files on Windows 10 version 1809 and earlier
To manually remove temporary files using the Settings app on version 1809 and older releases, use these steps:
Open Settings.
Click on System.
Click on Storage.
Click the Free up space now option.
 Storage settings on Windows 10
Select the files you want to delete, including:
- Windows upgrade log files.
- System created Windows Error Reporting files.
- Windows Defender Antivirus.
- Windows Update Cleanup.
- Thumbnails.
- Temporary files.
- Recycle Bin.
- Temporary Internet Files.
- Delivery Optimization Files.
- DirectX Shader Cache.
- Previous Windows Installation(s).
Click the Remove files button.
 Delete temporary files on Windows 10
Once you complete the steps, those selected files will be permanently deleted from your computer freeing up space for more valuable files.
If you are deleting a previous version of Windows 10, consider that you won’t be able to roll back to an earlier version without these files. However, after a feature update installs on your device, the operating system automatically removes these files anyway after 10 days.
Automatically delete temporary files on Windows 10 version 1903 or later
Alternatively, you can use “Storage sense” to automatically free up space by removing those temporary files and content from the recycle bin.
To delete files wasting space automatically using Storage Sense on Windows 10 version 1903 or later releases:
Open Settings.
Click on System.
Click on Storage.
Under the “Storage” section, turn on the toggle switch.
 Storage Sense enable option (20H2)
(Optional) Click the “Configure Storage Sense or run it now” option to adjust the cleanup settings or run Storage Sense on-demand.
 Storage Sense settings (20H2)
After you complete the steps, Storage sense will delete most temporary files as well as those files that have been in the recycle bin for more than 30 days.
Automatically delete temporary files on Windows 10 version 1809 or earlier
To delete files wasting space automatically using Storage Sense on Windows 10 version 1809 or earlier releases:
Open Settings.
Click on System.
Click on Storage.
Turn on the Storage sense toggle switch.
 Enable Storage sense on Windows 10
(Optional) Click the “Change how we free up space” option to schedule automatic cleanup or run Storage sense on-demand to free up space on Windows 10.
 Storage sense settings on Windows 10
After completing the steps, Windows 10 will automatically delete temporary files and those files that have been in the recycle bin for over 30 days.
Remove temporary files using Disk Cleanup
If you are getting a message about your device running out of space, you can also use the Disk Cleanup tool to delete temporary files to free up space on your device.
To remove temporary files using Disk Cleanup, use these steps:
Open File Explorer on Windows 10.
Click on This PC.
Right-click the drive with the Windows 10 installation and select the Properties option.
Click the Disk Cleanup button.
 Windows 10 hard drive properties
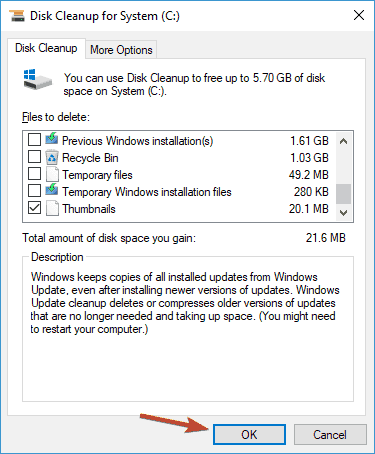
Click the Clean up system files button.
Check the items you want to delete. For example, Temporary Windows Installation Files, Windows upgrade log files, Recycle Bin, Temporary Files, and System created Windows Error Reporting.
 Disk cleanup system files
Click the OK button.
Click the Delete Files button.
Once you complete the steps, temporary files will permanently be deleted from your computer, making room for new files.
Update January 20, 2021: This guide has been updated to reflect the new changes available on Windows 10 since these instructions were originally published in 2017.
We may earn commission for purchases using our links to help keep offering the free content. Privacy policy info.
All content on this site is provided with no warranties, express or implied. Use any information at your own risk. Always backup of your device and files before making any changes. Privacy policy info.


