- How to delete apps on your Mac
- Use Launchpad to delete an app
- Use the Finder to delete an app
- Learn more
- Установка и удаление приложений, установленных на Mac из Интернета или с диска
- Установка приложений
- Удаление приложений
- Free up storage space on your Mac
- Find out how much storage is available on your Mac
- Manage storage on your Mac
- Store in iCloud
- Optimize Storage
- Empty Trash Automatically
- Reduce Clutter
- Where to find the settings for each feature
- Other ways that macOS helps automatically save space
- How to free up storage space manually
- Microsoft Remote Desktop 4+
- Microsoft Corporation
- Снимки экрана
- Описание
- Что нового
How to delete apps on your Mac
Deleting an app removes it from your Mac hard drive and makes the storage space it was using available for other items. You can delete apps from Launchpad or the Finder.
Use Launchpad to delete an app
Launchpad offers a convenient way to delete apps that were downloaded from the App Store.
- To open Launchpad, click it in the Dock or open it from your Applications folder. You can also pinch closed with your thumb and three fingers on your trackpad.
- If you don’t see the app in Launchpad, type its name in the search field at the top of the screen. Or swipe right or left with two fingers on your trackpad to show the next or previous page.
- Press and hold the Option (⌥) key, or click and hold any app until the apps jiggle.
- Click next to the app that you want to delete, then click Delete to confirm. The app is deleted immediately. Apps that don’t show either didn’t come from the App Store or are required by your Mac. To delete an app that didn’t come from the App Store, use the Finder instead.

Deleting an app doesn’t cancel any subscription you may have purchased with that app. Learn how to cancel subscriptions for apps that were downloaded from the App Store.
Use the Finder to delete an app
- Locate the app in the Finder. Most apps are in your Applications folder, which you can open by clicking Applications in the sidebar of any Finder window. Or use Spotlight to find the app, then press and hold the Command (⌘) key while double-clicking the app in Spotlight.
- Drag the app to the Trash, or select the app and choose File > Move to Trash.

- If you’re asked for a user name and password, enter the name and password of an administrator account on your Mac. This is probably the name and password you use to log in to your Mac.
- To delete the app, choose Finder > Empty Trash.

Learn more
To use an app again after deleting it, either reinstall it or restore it from a backup.
- To reinstall apps that were installed as part of macOS, reinstall macOS. This applies to apps such as Safari, iTunes, Books, Messages, Mail, Calendar, Photos, and FaceTime.
- You can also redownload apps, music, movies, TV shows, and books that were installed from the App Store, iTunes Store, or Apple Books.
Источник
Установка и удаление приложений, установленных на Mac из Интернета или с диска
Вы можете загружать и устанавливать приложения из Интернета или с диска. Если приложение больше не нужно, его можно удалить.
Установка приложений
На Mac можно сделать следующее.
Если приложение загружено из Интернета. В папке «Загрузки» дважды нажмите образ диска или файл пакета (значок в виде открытой коробки). Если установщик поставщика не открывается автоматически, откройте его, затем следуйте инструкциям на экране.
Примечание. Если Вы видите диалоговое окно предупреждения об установке приложения неустановленного разработчика, см. Открытие приложения от неустановленного разработчика на Mac.
Если приложение поставляется на диске. Вставьте диск в оптический дисковод, который встроен в Mac или подключен к нему.
Для переустановки приложений, загруженных из App Store, используйте App Store. См. раздел Установка покупок из App Store на Mac.
Удаление приложений
Вы можете удалять приложения, которые были загружены и установлены из Интернета или с диска.
На Mac нажмите значок Finder  в Dock, затем нажмите «Программы» в боковом меню Finder.
Для этого выполните следующее:
Если приложение хранится в папке, откройте папку приложения и посмотрите, нет ли в ней деинсталлятора. Если Вы видите «Удалить [Приложение]» или «Программа удаления [Приложение]», дважды нажмите его и следуйте инструкциям на экране.
Если приложение хранится не в папке или у него нет деинсталлятора, перетяните приложение из папки «Программы» в Корзину (находится в конце панели Dock).
ПРЕДУПРЕЖДЕНИЕ. Приложение будет навсегда удалено с компьютера Mac, когда Finder очистит Корзину. Если у Вас остались файлы, созданные в этом приложении, возможно, Вы не сможете их открыть. Если Вы передумали удалять приложение, выберите его в Корзине (до того как Корзина будет очищена) и выберите «Файл» > «Восстановить».
Для удаления приложений, загруженных из App Store, используйте Launchpad.
Источник
Free up storage space on your Mac
Save space by storing your content in iCloud or using built-in tools to find and remove large or unneeded files.
The Optimized Storage features of your Mac help you save storage space by storing your content in iCloud and making it available on demand:
- When storage space is needed, files, photos, movies, email attachments, and other files that you seldom use are stored in iCloud automatically.
- Each file stays right where you last saved it, and downloads when you open it.
- Files that you’ve used recently remain on your Mac, along with optimized versions of your photos.
If you haven’t yet upgraded to macOS Sierra or later, learn about other ways to free up storage space.
Find out how much storage is available on your Mac
Choose Apple menu > About This Mac, then click Storage. Each segment of the bar is an estimate of the storage space used by a category of files. Move your pointer over each segment for more detail.
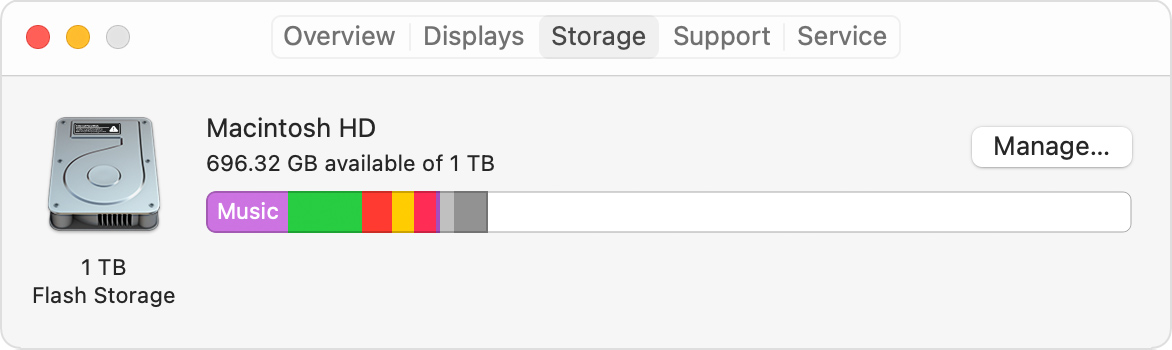
Click the Manage button to open the Storage Management window, pictured below.
Manage storage on your Mac
The Storage Management window offers recommendations for optimizing your storage. If some recommendations are already turned on, you will see fewer recommendations.
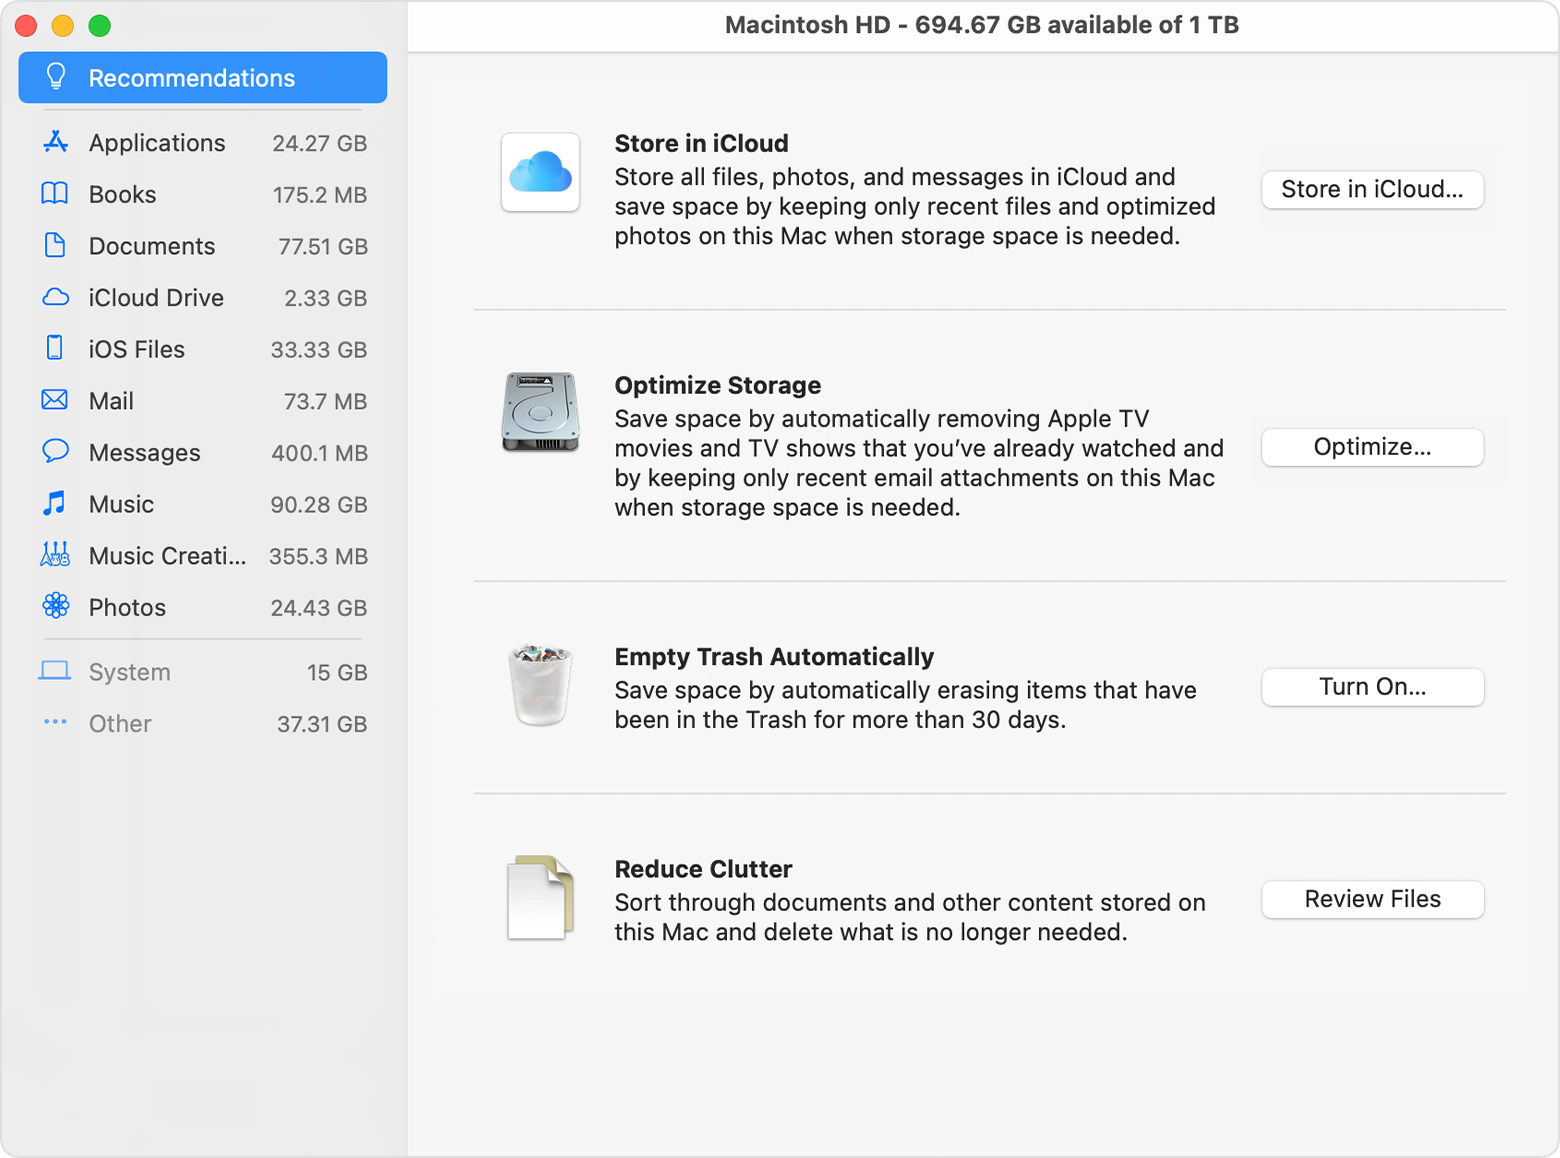
Store in iCloud
Click the Store in iCloud button, then choose from these options:
- Desktop and Documents. Store all files from these two locations in iCloud Drive. When storage space is needed, only the files you recently opened are kept on your Mac, so that you can easily work offline. Files stored only in iCloud show a download icon , which you can double-click to download the original file. Learn more about this feature.
- Photos. Store all original, full-resolution photos and videos in iCloud Photos. When storage space is needed, only space-saving (optimized) versions of photos are kept on your Mac. To download the original photo or video, just open it.
- Messages. Store all messages and attachments in iCloud. When storage space is needed, only the messages and attachments you recently opened are kept on your Mac. Learn more about Messages in iCloud.
Storing files in iCloud uses the storage space in your iCloud storage plan. If you reach or exceed your iCloud storage limit, you can either buy more iCloud storage or make more iCloud storage available. iCloud storage starts at 50GB for $0.99 (USD) a month, and you can purchase additional storage directly from your Apple device. Learn more about prices in your region.
Optimize Storage
Click the Optimize button to save space by automatically removing watched movies and TV shows. When storage space is needed, movies or TV shows that you purchased from Apple and already watched are removed from your Mac. Click the download icon next to a movie or TV show to download it again.
Your Mac will also save space by keeping only recent email attachments on this Mac when storage space is needed. You can manually download any attachments at any time by opening the email or attachment, or saving the attachment to your Mac.
Optimizing storage for movies, TV shows, and email attachments doesn’t require iCloud storage space.
Empty Trash Automatically
Empty Trash Automatically permanently deletes files that have been in the Trash for more than 30 days.
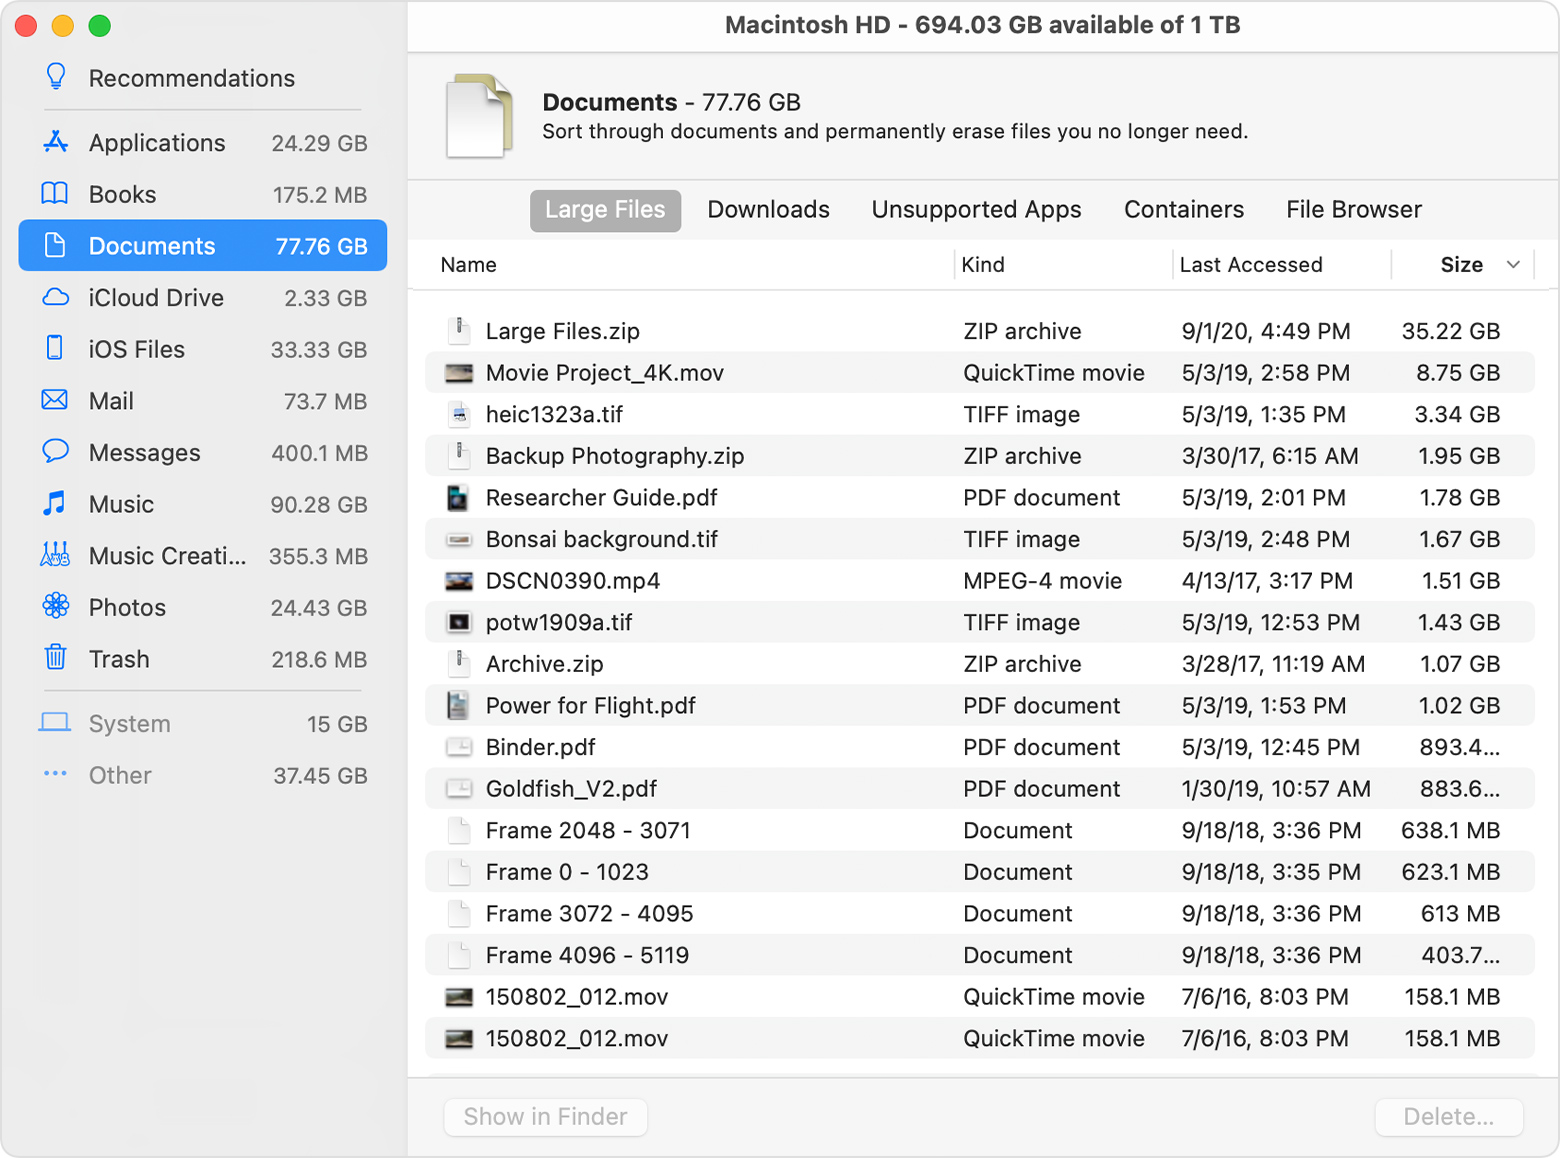
Reduce Clutter
Reduce Clutter helps you identify large files and files you might no longer need. Click the Review Files button, then choose any of the file categories in the sidebar, such as Applications, Documents, Music Creation, or Trash.
You can delete the files in some categories directly from this window. Other categories show the total storage space used by the files in each app. You can then open the app and decide whether to delete files from within it.
Where to find the settings for each feature
The button for each recommendation in the Storage Management window affects one or more settings in other apps. You can also control those settings directly within each app.
- If you’re using macOS Catalina or later, choose Apple menu > System Preferences, click Apple ID, then select iCloud in the sidebar: Store in iCloud turns on the Optimize Mac Storage setting on the right. To turn off iCloud Drive entirely, deselect iCloud Drive.
- If you’re using macOS Mojave or earlier, choose Apple menu > System Preferences, click iCloud, then click Options next to iCloud Drive. Store in iCloud turns on the Desktop & Documents Folders and Optimize Mac Storage settings.
- In Photos, choose Photos > Preferences, then click iCloud. Store in iCloud selects iCloud Photos and Optimize Mac Storage.
- In Messages, choose Messages > Preferences, then click iMessage. Store in iCloud selects Enable Messages in iCloud.
- If you’re using macOS Catalina or later, open the Apple TV app, choose TV > Preferences from the menu bar, then click Files. Optimize Storage selects “Automatically delete watched movies and TV shows.”
- In you’re using macOS Mojave or earlier, open iTunes, choose iTunes > Preferences from the menu bar, then click Advanced. Optimize Storage selects “Automatically delete watched movies and TV shows.”
- In Mail, choose Mail > Preferences from the menu bar, then click Accounts. In the Account Information section on the right, Optimize Storage sets the Download Attachments menu to either Recent or None.
Empty Trash Automatically: From the Finder, choose Finder > Preferences, then click Advanced. Empty Trash Automatically selects “Remove items from the Trash after 30 days.”
Other ways that macOS helps automatically save space
With macOS Sierra or later, your Mac automatically takes these additional steps to save storage space:
- Detects duplicate downloads in Safari, keeping only the most recent version of the download
- Reminds you to delete used app installers
- Removes old fonts, languages, and dictionaries that aren’t being used
- Clears caches, logs, and other unnecessary data when storage space is needed
How to free up storage space manually
Even without using the Optimized Storage features described in this article, you can take other steps to make more storage space available:
- Music, movies, and other media can use a lot of storage space. Learn how to delete music, movies, and TV shows from your device.
- Delete other files that you no longer need by moving them to the Trash, then emptying the Trash. The Downloads folder is good place to look for files that you might no longer need.
- Move files to an external storage device.
- Compress files.
- Delete unneeded email: In the Mail app, choose Mailbox > Erase Junk Mail. If you no longer need the email in your Trash mailbox, choose Mailbox > Erase Deleted Items.
Источник
Microsoft Remote Desktop 4+
Microsoft Corporation
-
- 4,7 • Оценок: 8,8 тыс.
-
- Бесплатно
Снимки экрана
![]()
![]()
![]()
![]()
![]()
Описание
Use Microsoft Remote Desktop for Mac to connect to a remote PC or virtual apps and desktops made available by your admin. With Microsoft Remote Desktop, you can be productive no matter where you are.
Configure your PC for remote access using the information at https://aka.ms/rdsetup.
Learn about our other Remote Desktop clients at https://aka.ms/rdclients.
• Access remote PCs running Windows Professional or Enterprise and Windows Server.
• Access managed resources published by your admin.
• Connect through a Remote Desktop Gateway.
• Secure connection to your data and applications.
• Simple management of your connections and user account from the Connection Center.
• Audio and video streaming.
• Redirect folders, your clipboard, and local devices such as microphones and cameras.
Submit feedback at https://aka.ms/rdmacfbk.
Что нового
In this release we’ve worked through some bugs that were hanging around in our backlog. Some items we addressed include:
• Added background refresh for subscribed workspaces.
• Fixed an issue where the session window may jump to another monitor when auto-reconnect kicks in.
• Fixed an issue where the session window would sometimes be enlarged after connecting.
• Addressed an issue where the name of a redirected folder would be incorrect in the remote session.
• Fixed a bug that made it difficult to resize remote app windows.
• Improved the error messages that are displayed when user accounts fail to update.
• Fixed an issue where window titles in the list of connected remote apps were blank.
• Addressed a multimon issue where the mouse cursor shape would not update correctly when dragging between monitors.
• Added a checkbox to General Preferences to enable/disable Microsoft Teams optimizations.
• Added UI to report if a remote app could not be launched on the server due to not being on the system allow list.
• Fixed an issue where the session window could not be made wider when placed at the top or bottom of the screen.
• Addressed scenarios where the mouse cursor would disappear while connected to a remote PC.
• Deletion of an Azure Virtual Desktop workspace now correctly removes all associated workspaces.
• Fixed an issue where adding a folder to redirect to a bookmark would enable the «Add» button with an empty PC name.
• Addressed an issue where double-clicking the title bar incorrectly stretched the session window.
• Updated the mouse to change to a hand glyph when hovering over a red input error indicator.
• Fixed an issue where the session window would flash rapidly in the «Mission Control» or «Application windows» view.
In addition, we have continued to make updates to improve connectivity and performance metrics when connecting to Azure Virtual Desktop.
Note that by default subscribed workspaces are refreshed every six hours. This interval can be changed using the ClientSettings.WorkspaceAutoRefreshInterval user default (minimum is 30 minutes and maximum is 24 hours).
Thanks to everyone who reported bugs and worked with us to diagnose and fix issues. If you encounter any errors, you can contact us via Help > Report an Issue.
Источник


