- How To Delete Files & Folders – From The Windows Command Line (CMD, DOS)
- Jump Right In:
- Navigating To The File Using CMD.
- Deleting Folders / Directories Using CMD.
- Deleting Files Using CMD.
- Creating a dummy file with a specific size.
- Delete Many Files Or Folders At Once.
- Delete Files Or Folders From Any Directory.
- What We’ll Learn:
- Navigating To The File Using CMD:
- Deleting Folders / Directories Using CMD
- Deleting Files Using CMD
- Delete Many Files Or Folders At Once — From CMD
- Delete Files Or Folders From Any Directory (CMD)
- Summary:
- That’s It!
- cmd Delete Folder – How to Remove Files and Folders in Windows
- Kris Koishigawa
- How to open Command Prompt
- How to delete files with the del command
- How to force delete files with the del command
- How to delete folders with the rmdir command
- How to use the /s flag with rmdir
- Kris Koishigawa
- Recover personal files from the Windows.old Folder such as Documents Pictures and Windows Live Mail Emails in Windows 10
How To Delete Files & Folders – From The Windows Command Line (CMD, DOS)
Jump Right In:
Navigating To The File Using CMD.
Deleting Folders / Directories Using CMD.
Deleting Files Using CMD.
Creating a dummy file with a specific size.
Delete Many Files Or Folders At Once.
Delete Files Or Folders From Any Directory.
What We’ll Learn:
Welcome!
This guide is all about deleting files and folders from the windows command line.
- We’ll start by learning, how to navigate the file or folder we want to delete form the command prompt.
- How to use the Del and Rmdir commands to remove files and folders respectively.
- How to take advantage of wildcards to perform an operation on multiple files or directories.
- And finally, we’ll learn how to delete files and folders without navigating to the directory in which they are located.
Lets get started!
Navigating To The File Using CMD:
To delete a file or folder using the command prompt we must first navigate to the location of our file.
By default the command line is located at a folder named after your computers username (C:\Users\MyPC). This folder contains your documents, downloads and desktop directories, among others.
To view all the files in this directory use the “Dir” command, which stands for directory.

Every file in this directory will be displayed at once.
If the file or directory you want to delete is located at your desktop for example use the “Cd” command to change the command prompts directory.
Simply type “Cd” followed by the folder you want to navigate into within quotes.
You will at once navigate into the desktop directory and from here you can use the “Dir” command once again to locate the file or folder you want to delete.
If you navigated to the wrong directory by mistake, type:
You will immediately be navigated into the previous directory.
In a similar way you can use a combination of the “Dir” and “Cd” commands to navigate to any directory and locate any file or folder.
Deleting Folders / Directories Using CMD
To delete a folder use the “Rmdir” command, which stands for “Remove Directory”.
Keep in mind that as the name suggests, “Rmdir” only deletes directories. Trying to delete a file using “Rmdir” will constitute in an error.
You might be wondering why we surrounded the name of our folder in quotes. The quotes tell the command line that the spaces separating the words do not constitute an additional parameter and that they are simply a part of the name of our folder.
“Rmdir” without any parameters only removes folders that are empty, to delete a folder along with the files or folders within it you need to use the /S parameter.
The command would look like this:
After entering the command the command line will ask if you are sure you want to delete this file. Simply press “ y ” to confirm.
If you want to delete a folder in a directory other than your users folder you would need to start the command prompt as an administrator. Be careful when deleting folders with administration privileges, the wrong command can very easily break your computer.
Deleting Files Using CMD
The command for deleting files using the cmd is “Del“. Unlike “ Rmdir “, “ Del “can only delete files. Using “ Del ” to delete a folder will constitute in an error .
To delete a file simply type “Del” followed by the name of your file along with its extension in quotes.
Your file should be immediately deleted.
Once again if you file is not located in the users folder or within any of its sub-directories you would need to start the command prompt as an administrator.
Be very careful however , the wrong command in an administrator command prompt can very easily break your computer.
To delete more than one file at once simply enter all the names of your files one after the other.
Delete Many Files Or Folders At Once — From CMD
Entering the name of every file or folder you want to delete is not always practical.
Work smarter not harder.
You can delete every file that begins with a set of characters by using a wildcard.
Wildcards are special symbols that take the place of characters or words.
The most commonly used wildcard is the asterix.
Typing “Del” followed by a set of characters that is shared among the names of the files we want to delete and an asterix, will delete all of them.
Every file that begins with the word “File” will be deleted.
To delete a set of folders instead, simply replace the Del command with Rmdir.
Similarly you can delete only files of a specific type by specifying its extension before a wildcard. With the following command for example, we can delete every text file in our current directory.
We can even delete every file or folder by using a wildcard, all by itself.
Here is an example using the Rmdir command:
Every folder in your current directory will be deleted along with any contents within it.
Be careful when deleting files and folders, the wrong command can easily delete important files and folders.
Delete Files Or Folders From Any Directory (CMD)
While you can use the “Rmdir” and “Del” commands to delete files and folders in your current directory, what if you want to delete a folder or file that’s located in a different directory without having to navigate there yourself?
You would have to enter your command as usual but instead of typing the name of the file or folder you want to delete directly you would have to enter the location of the target directory followed by a backward slash and then name of your folder or file.
It should look something like this:
In the same way you can replace “Rmdir” with any command to complete any task from any directory.
Summary:
- Navigate to the directory the file you want to delete is located with the “CD” and “Dir” commands.
- Use “Rmdir” to delete folders and “Del” to delete files. Don’t forget to surround the name of your folder in quotes if it contains a space.
- Use wildcards to delete many files or folders at once.
That’s It!
You now know how to delete files and folders directly from the command prompt.
If you liked this short guide take a look at a few of our other posts related to the windows command line, or if you really liked it consider enrolling in our video course where you will learn the ins and outs of the Windows command Line.
cmd Delete Folder – How to Remove Files and Folders in Windows

Kris Koishigawa

Sometimes it’s just faster to do things with the command line.
In this quick tutorial we’ll go over how to open Command Prompt, some basic commands and flags, and how to delete files and folders in Command Prompt.
If you’re already familiar with basic DOS commands, feel free to skip ahead.
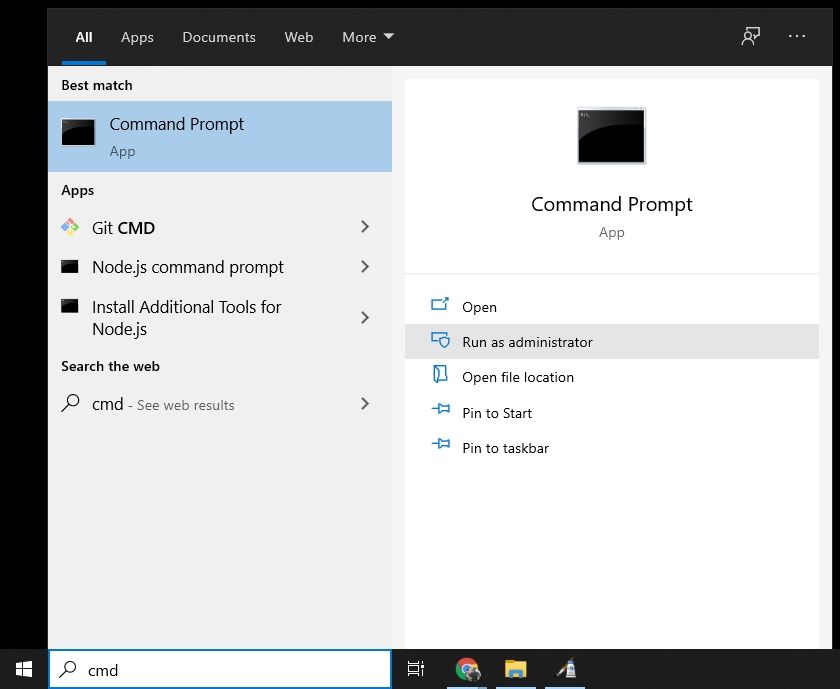
How to open Command Prompt
To open Command Prompt, press the Windows key, and type in «cmd».
Then, click on «Run as Administrator»:
After that, you’ll see a Command Prompt window with administrative privileges:
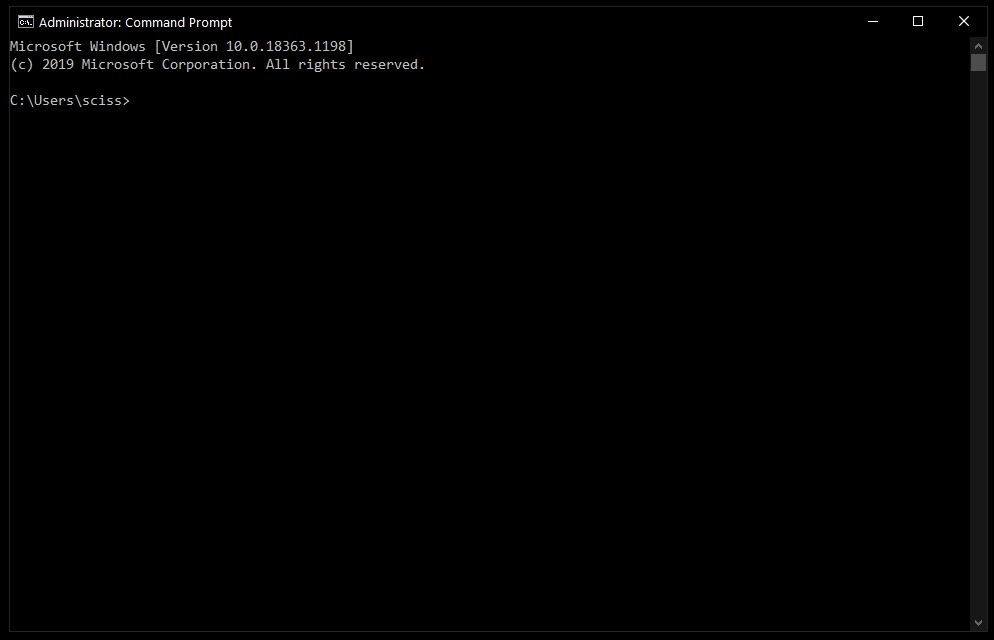 Screenshot of Command Prompt window
If you can’t open Command Prompt as an administrator, no worries. You can open a normal Command Prompt window by clicking «Open» instead of «Run as Administrator».
The only difference is that you may not be able to delete some protected files, which shouldn’t be a problem in most cases.
How to delete files with the del command
Now that Command Prompt is open, use cd to change directories to where your files are.
I’ve prepared a directory on the desktop called Test Folder. You can use the command tree /f to see a, well, tree, of all the nested files and folders:
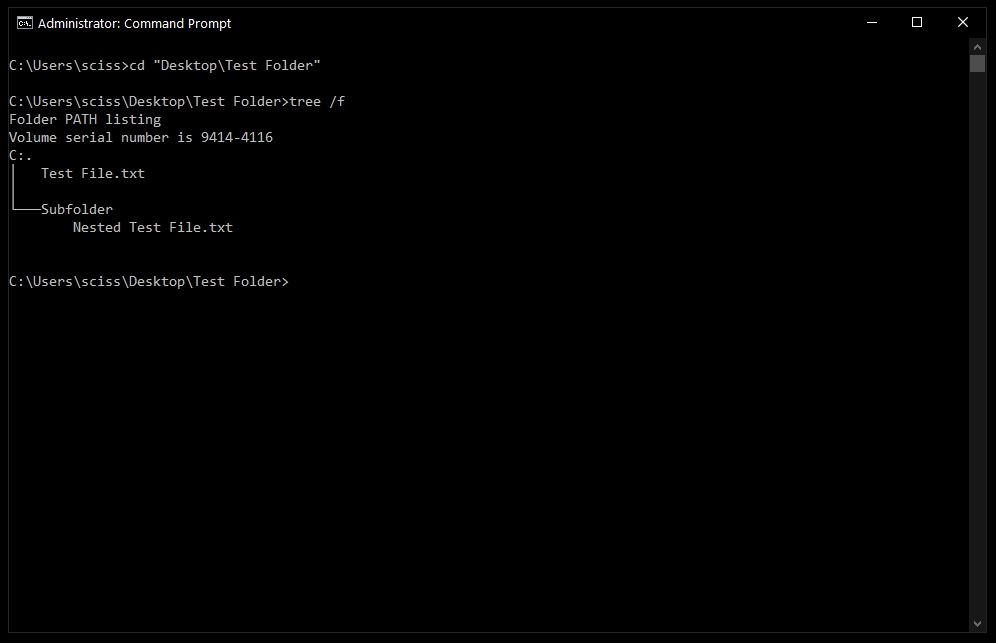
To delete a file, use the following command: del » » .
For example, to delete Test file.txt , just run del «Test File.txt» .
There may be a prompt asking if you want to delete the file. If so, type «y» and hit enter.
Note: Any files deleted with the del command cannot be recovered. Be very careful where and how you use this command.
After that, you can run tree /f to confirm that your file was deleted:

Also, bonus tip – Command Prompt has basic autocompletion. So you could just type in del test , press the tab key, and Command Prompt will change it to del «Test File.txt» .
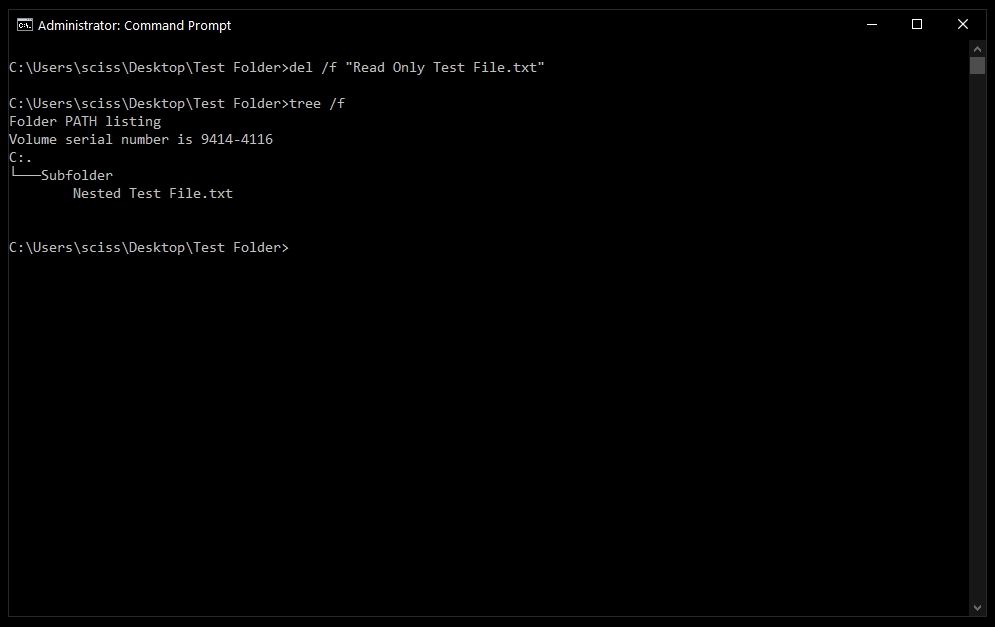
How to force delete files with the del command
Sometimes files are marked as read only, and you’ll see the following error when you try to use the del command:
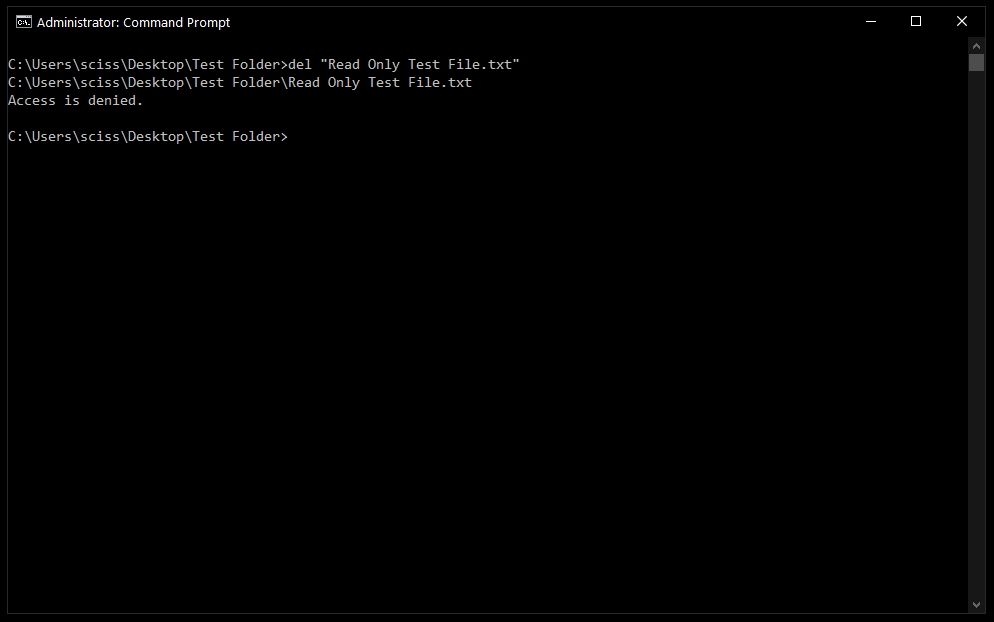
To get around this, use the /f flag to force delete the file. For example, del /f «Read Only Test File.txt» :
How to delete folders with the rmdir command
To delete directories/folders, you’ll need to use the rmdir or rd command. Both commands work the same way, but let’s stick with rmdir since it’s a bit more expressive.
Also, I’ll use the terms directory and folder interchangeably for the rest of the tutorial. «Folder» is a newer term that became popular with early desktop GUIs, but folder and directory basically mean the same thing.
To remove a directory, just use the command rmdir .
Note: Any directories deleted with the rmdir command cannot be recovered. Be very careful where and how you use this command.
In this case I want to remove a directory named Subfolder, so I’ll use the command rmdir Subfolder :
![]()
But, if you remember earlier, Subfolder has a file in it named Nested Test File.
You could cd into the Subfolder directory and remove the file, then come back with cd .. and run the rmdir Subfolder command again, but that would get tedious. And just imagine if there were a bunch of other nested files and directories!
Like with the del command, there’s a helpful flag we can use to make things much faster and easier.
How to use the /s flag with rmdir
To remove a directory, including all nested files and subdirectories, just use the /s flag:
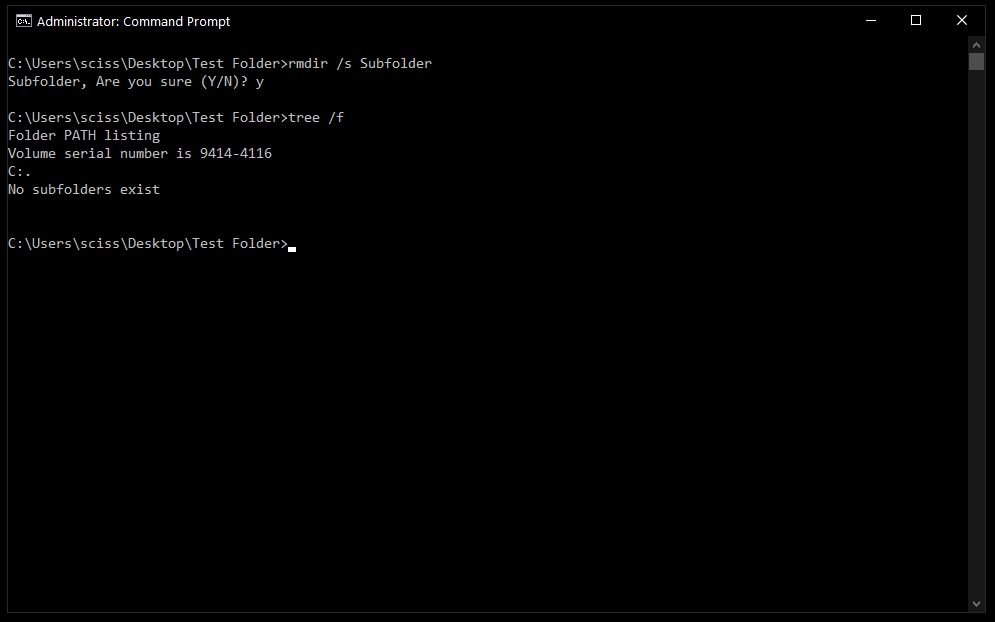
There will probably be a prompt asking if you want to remove that directory. If so, just type «y» and hit enter.
And that’s it! That should be everything you need to know to remove files and folders in the Windows Command Prompt.
All of these commands should work in PowerShell, which is basically Command Prompt version 2.0. Also, PowerShell has a bunch of cool aliases like ls and clear that should feel right at home if you’re familiar with the Mac/Linux command line.
Did these commands help you? Are there any other commands that you find useful? Either way, let me know over on Twitter.
Kris Koishigawa
Read more posts by this author.
If you read this far, tweet to the author to show them you care. Tweet a thanks
Learn to code for free. freeCodeCamp’s open source curriculum has helped more than 40,000 people get jobs as developers. Get started
freeCodeCamp is a donor-supported tax-exempt 501(c)(3) nonprofit organization (United States Federal Tax Identification Number: 82-0779546)
Our mission: to help people learn to code for free. We accomplish this by creating thousands of videos, articles, and interactive coding lessons — all freely available to the public. We also have thousands of freeCodeCamp study groups around the world.
Donations to freeCodeCamp go toward our education initiatives, and help pay for servers, services, and staff.
Recover personal files from the Windows.old Folder such as Documents Pictures and Windows Live Mail Emails in Windows 10
Technical Level : Intermediate
If you performed a custom install of Windows 10 intentionally or not and you are looking for your personal files after Windows is installed, then you might need to recover them manually. A custom install is similar to a clean install, but instead of wiping the hard disk clean, your previous Windows installation is moved to a folder called Windows.old. Windows.old is an archive of your old Windows installation. It is created by setup for a number of reasons depending on how the upgrade was initiated, including recovery of personal data or to facilitate the rollback to that previous version of Windows if you performed an in place upgrade. A custom install is sometimes initiated by booting from the Windows 10 install media (DVD or USB thumbdrive) or if you start the installation from within a previous running version of Windows at the desktop then select the option ‘Keep Nothing’. In this article, we take a look at how to recover your files if they are still there.
To recover your personal files, click Start > File Explorer
Click This PC
Open the system drive where Windows 10 is installed represented by the Windows logo.
Open the folder Windows.old
Open the Users folder
Open your old account folder which should contain your files. In my case, its Andre.
Open each personal folder which will contain your files.
Press Control + A or click Select All then click Copy or Cut
Launch a new File Explorer window (press Windows key + E or click Start > File Explorer) then navigate to the respective personal folder (Documents, Pictures, Music, Videos) then paste the files there.
Repeat the same steps for other folders containing files such as Music, Pictures, Videos and Downloads.
Import your Windows Live Mail messages from the Windows.old folder
Windows 10 comes built in with a new Mail app which is incompatible with older mail desktop apps such as Windows Live Mail and Outlook Express. This means, you won’t be able to import email messages into it from other mail programs. If you were previously running one of those mail programs, you will need to download then install the latest version which is Windows Live Mail 2012. It is included with the Windows Essentials 2012 suite which you can download for free at the following link.
Once you have downloaded Windows Essentials 2012, proceed to install it. You will need to ensure the .NET Framework 3.5 is installed, the Windows Essentials 2012 setup program will guide you through the installation.
Enable Show Hidden Files and Folders
Click Start > File Explorer > This PC > click the View tab then click Options
Click View tab again then select the Show hidden files, folders and drives radio box. Click Apply then OK
Launch Windows Live Mail 2012
Once Windows Live Mail 2012 is installed, launch the program from Start > All Apps > Windows Live Mail
You will be prompted to add an email account, click Cancel.
Click the File menu then click Import messages
Select the appropriate email program you were previously running. In this case, we will use Windows Live Mail. Click Next.
Click Browse
Expand This PC > Local Disk (where Windows 10 is installed) > Windows.old > Users > Your Old Account Folder (represented by the username) > expand AppData
Expand Local > Microsoft then select Windows Live Mail then click OK
Click Next
Make sure All folders is selected then click Next
Wait while your emails are imported.
Expand Storage folders > Imported folders > then click Inbox
Should you did delete the Windows.old folder?
It depends, I would wait 30 days before deleting it unless you are pressed for disk space. In which case you can do so. If an issue occurs where you might need to rollback to your previous version of Windows, you will have to do so using reinstall media.
Applications will need to be reinstalled for certain programs.
You will notice that application files are blank; you will need to reinstall the appropriate applications in order to view and edit them, examples include Microsoft Office. If you copied over your iTunes folder from the Music folder under your old account in Windows.old, simply reinstall iTunes and it should automatically import your audio files and playlist.
What about Microsoft Outlook?
Your old mail data is stored in C:\Windows.old\Users\AccountName\AppData\Local\Microsoft\Outlook
Copy the Outlook folder to Documents, launch Outlook then perform the import.


