- Can’t rename folders in Windows 10 [Full Fix]
- What can I do if I can’t rename folders in Windows 10?
- 1. Change the Windows Defender settings
- Vipre Antivirus Plus
- 2. Make sure you have ownership of the folder
- 3. Use registry tweak
- 4. Remove certain values from the registry
- How to rename Files and Folders in Windows 10
- How to rename Files and Folders in Windows 10
- 1] Using Context Menu – Right-clicking on the item
- 2] Using Properties
- 3] Using Keyboard Shortcut – Alt+Enter
- 4] Using Keyboard Shortcut – F2
- 5] Using Home Menu in File Explorer
- 6] By Two Single Clicks
- 7] Using Command Prompt
- 8] Using PowerShell
- Related Posts
- This file came from another computer and might be blocked to help protect this computer
- How to open and a view a JSON file on the web and in Windows 10
- How to convert OXPS File to PDF
- [email protected]
- How to Rename User Profile Folder in Windows 10
- Steps to Rename User Profile Folder
- 1.1 Create a New Local Administrator Account
- 1.2 Rename Old User Account
- 1.3 Rename Windows Home Folder
- 1.4 Map the Renamed Folder via Registry Editor
Can’t rename folders in Windows 10 [Full Fix]

- Many users reported that they can’t rename folders in Windows 10.
- This is an ongoing issue, that has been present in the previous versions of Windows , and remains an issue in Windows 10 , as well.
- Check out our Windows 10 Hub for more helpful guides created and recommended by our experts.
- Take a look at our Fix section for tech tutorials, as well as various tips and tricks.

- Download Restoro PC Repair Tool that comes with Patented Technologies (patent available here).
- Click Start Scan to find Windows issues that could be causing PC problems.
- Click Repair All to fix issues affecting your computer’s security and performance
- Restoro has been downloaded by 0 readers this month.
There are some Windows problems that don’t look so serious at first, but can turn into a nightmare if there’s no solution.
One of these problems is a bug in Windows 10 that prevents users from renaming folders.
In case you’ve recently encountered this issue, and can’t rename a single folder in your computer, we’ve gathered a few possible solutions, that might be of some help.
Not being able to rename folders can be a big issue for many users, and speaking of folder issues, here are some problems that users reported:
- Can’t rename folder Windows 10 in use – If that’s the case be sure to disable all background applications that might be using the folder you’re trying to rename.
- Windows 10 rename folder can’t find the specified file – This problem can occur due to your antivirus or its settings. To fix it, check your antivirus settings or consider switching to a different antivirus solution.
- Can’t rename folder because it’s open in another program Windows 10 – This is another common problem with folders that can occur on Windows 10. However, you should be able to fix this issue with one of our solutions.
- Can’t rename folder Windows 8.1, 7 – Even if you don’t use Windows 10, you should know that most of our solutions can be applied to older versions of Windows.
What can I do if I can’t rename folders in Windows 10?
1. Change the Windows Defender settings
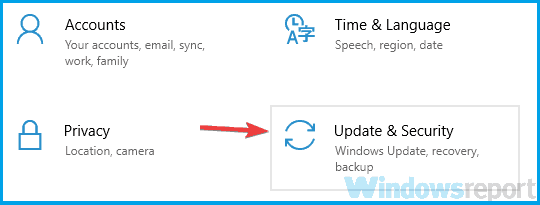
- Press the Windows Key + I to open the Settings app.
- Go to the Update & Security section.

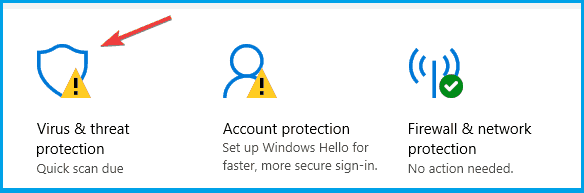
- Select Windows Security from the left panel.
- In the right panel, click on Open Windows Defender Security Center.
- Select the Virus & threatprotection, and click on the Virus & threat protection settings.
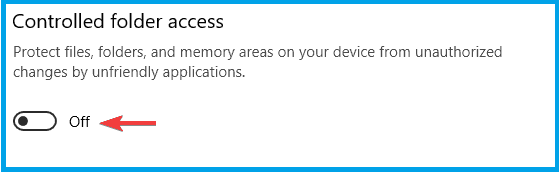
- Scroll down and select Manage Controlled folder access.
- Set the Controlled folder access to Off.
Windows Defender is a built-in antivirus software in Windows 10, but sometimes certain features of this tool can interfere with your system, therefore you might have to disable them in order to fix this problem.
Keep in mind that disabling this feature might make your system more vulnerable.
If you don’t want to disable this feature, you might want to consider switching a third-party antivirus.
There are many great antivirus tools on the market, but if you’re looking for a security solution that won’t interfere with your system, you might want to consider using Vipre Antivirus Plus.
This antivirus software is a next generation security solution that is designed to be fast, stay out of the way, and keep your digital life safe.

Vipre Antivirus Plus
2. Make sure you have ownership of the folder
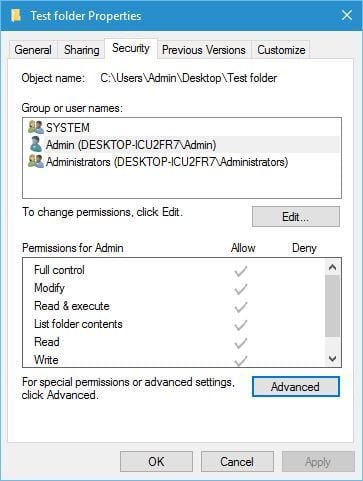
- Right-click the folder you want to gain access to and choose Properties.
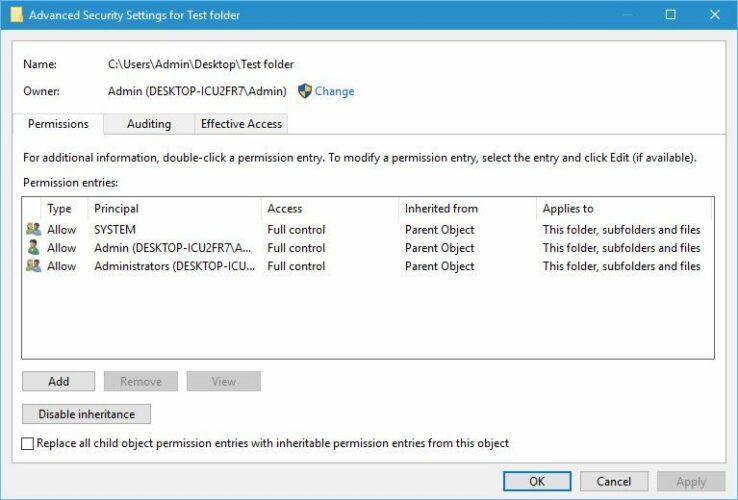
- Navigate to the Security tab, and click on the Advanced button.
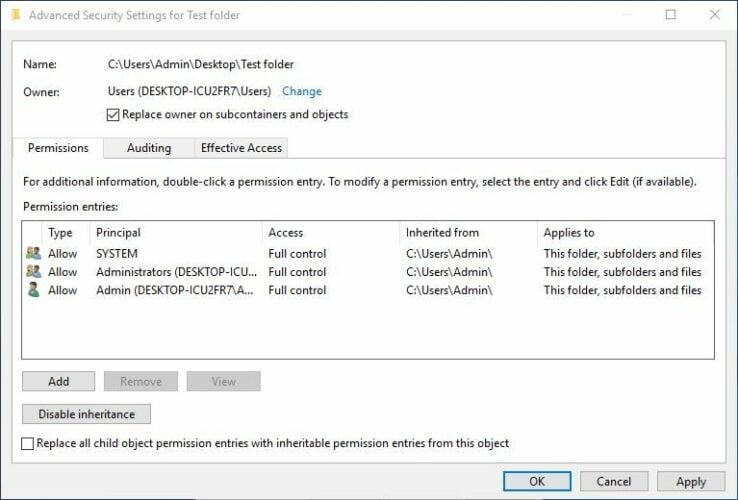
- Check the Owner section at the top, and click Change.
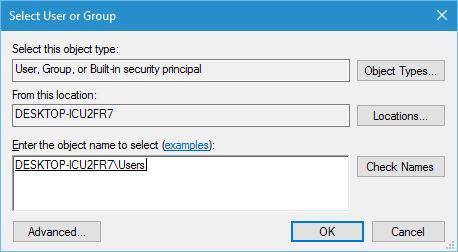
- Enter the desired username or group into the Enter the object name to select field.
- Click Check Names and OK.
- Check Replace owner on subcontainers and objects.
- Click OK to save changes.
In order to do anything (rename, delete, move, etc.) with a folder in Windows 10, you need to have the ownership of it.
If you have just one User Account, ownership of the majority of folders is granted to you automatically.
However, if there are more User Accounts on a single PC, users without administrator privileges may have problems managing folders.
Once you’ve got a full ownership of the folder you want to rename, try to change its name once again. If it fails, move on to the solution from below.
3. Use registry tweak
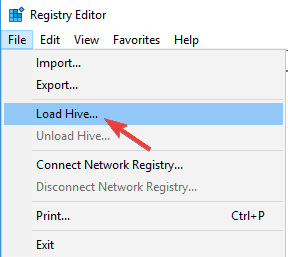
- Press Windows Key + R, and enter regedit to open Registry Editor.
- Click (don’t double-click) HKEY_LOCAL_MACHINE.
- Go to Fil e , and select Load Hive.
- Find your SOFTWARE hive, name it differently, and load it.
- Wen the hive is loaded, open: HKEY_LOCAL_MACHINEyour hive nameMicrosoftWindowsCurrentVersionExplorerFolderTypes
- Highlight Folder Types, right-click it, and choose Export.
- Choose a name, and save.
- Go back to your hive name, and close it.
- Open the File Menu, click on Unload Hive, and select Yes.
- Close the Registry Editor.
- Find the registry file you’ve just exported, double-click it to import it back to the registry.
- Restart your PC.

For this solution, you’re going to need either one of these:
- Your own registry backup(SOFTWARE hive) which is known to be before this issue started.
- The SOFTWARE hive from C:WindowsSystem32configRegBack
- The SOFTWARE hive from WindowsSystem32config from the installationdvd/usb install.wim
After you’ve performed this, try renaming your folder again. If you’re not sure in what you’re doing, it’s best to ask someone more experienced for help.
4. Remove certain values from the registry

- Press Windows Key + R, and enter regedit to open Registry Editor.
- Navigate to: HKLMSoftwareMicrosoftCurrentVersionExplorerFolderDescriptions
- Now you need to delete the following keys:
After removing these entries, the issue should be resolved and you’ll be able to rename folders without any issues.
How to rename Files and Folders in Windows 10
A file name is described as the title of the file and the file extension. When you rename a file, only the first part of the file name is changed. The file extension remains the same and usually, is not to be changed. In case, you need to change the file extension as well, select the entire file and change the name and the extension as desired. In this post, we will learn how to rename a file or a folder in Windows 10 and the various ways to do so.
How to rename Files and Folders in Windows 10
There are multiple ways to rename a file or folder in Windows 10. They are as mentioned below:
- Using Context Menu – Right clicking on the item
- Using Properties
- Using Keyboard Shortcut – Alt+Enter
- Using Keyboard Shortcut – F2
- Using Home Menu in File Explorer
- By Two Single Clicks
- Using Command Prompt
- Using PowerShell.
1] Using Context Menu – Right-clicking on the item
Select the file or folder you want to rename and right-click on that item. The Context Menu will open.
Click on the ‘Rename’ option and enter the new name of the file or folder, and then hit Enter or click anywhere else on the screen.
2] Using Properties
Right-click on the file or folder and select ‘Properties’.
The Properties window will open. In the General tab, enter the new file name and then click OK.
3] Using Keyboard Shortcut – Alt+Enter
Select the file you want to rename and simply press Alt+Enter.
The File Properties pop-up will open. Type in the new name of the file and click OK.
4] Using Keyboard Shortcut – F2
Select the file or folder and simply press F2 to rename the item.
5] Using Home Menu in File Explorer
To rename using File Explorer, select the item and click on ‘Home’.
Further, click on the ‘Rename’ option and follow the same steps.
6] By Two Single Clicks
Click on the file or folder two single times. The file or folder name will get highlighted.
Enter the new name for the file and press the Enter key to save it.
7] Using Command Prompt
Command Prompt allows you to rename the files or folders using the ren command. Open the File Explorer and go to the destination file or folder. Next, click on the address bar and type “cmd”, and then press Enter. Use the following syntax:
For example, this will rename the document named fileA located on D drive to fileB.
8] Using PowerShell
Open the file or folder location and open a PowerShell window there
Use the rename-item command:
The command below renames the folder fileA to fileB on Drive.
These are the various ways in which we can rename a file or a folder in Windows 10.
Date: May 27, 2020 Tags: Files, Folder
Related Posts
This file came from another computer and might be blocked to help protect this computer
How to open and a view a JSON file on the web and in Windows 10
How to convert OXPS File to PDF
[email protected]
Disha is an MBA who loves to dabble with computers. Her love for Windows and Office has now compelled her to start blogging here with us.
How to Rename User Profile Folder in Windows 10
Windows automatically creates a dedicated home/profile folder for every user account you create. By default, the name of the user profile folder is the same as the username. Since the home folder contains all the user-specific folders like pictures, documents, downloads, etc., Windows won’t allow you to easily change the folder name as you wish. If you ever want to, here’s follow the below steps to rename user profile folder in Windows 10.

Basically, there are four major things you need to do. That is, create a local administrator account, rename the user account, rename the user profile folder, and finally, map the renamed folder to the user account using the registry editor.
Just follow the below steps as is and the folder will be renamed in just a couple of minutes.
Caution: Before proceeding, create a system restore point. This helps you restore Windows if you mess up anything.
Steps to Rename User Profile Folder
Though the process of renaming the home folder is pretty simple, there are quite a few steps. So, to make things easier for you, I’ve divided the steps into four major sections.
1.1 Create a New Local Administrator Account
While you are logged into your user account, you cannot rename your own user profile folder. This is true even if you are the administrator. As such, we need to create another local administrator account. Once created, we will use that account to make all the necessary changes. Of course, you can enable hidden administrator account too but the below method is recommended.
Note: If you already have another local user account with administrator privileges then you can skip this section.
- Open the settings app and go to “Accounts -> Family & other users” page. On the right panel, click on the “Add someone else to this PC” button.
- If your PC has an active internet connection, Windows 10 will ask you to log into Microsoft account. Since we want to create a local account, click on the “I don’t have this person’s sign-in information” link.
- In the next screen, click on the “Add a user without Microsoft account” link.
- Now, enter a new username and password. Setup the security questions and click on the “Next” button.
- The new user account will be created as a standard user. So, click on the user account in the settings app and then click on the “Change account type” button.
- Select “Administrator” from the dropdown menu. Click “Ok” to save changes.
- This is how it should look like in the settings app after changing the account type.
- Reboot Windows.


1.2 Rename Old User Account
The user account name and the home folder should have the same name. So, if you want to rename the home folder, you need to change the user account name too.
- Log into the new user account.
- In the new user account, press Win + R , type lusrmgr.msc and click on the “Ok” button.
- The above action will open the Local Users and Group tool. Here, go to the “Users” folder, find your user account, right-click on it and select “Rename“.
- Type the new user name you’d like to give the user account. In my case, I’m changing “WindowsLoop” to “WindowsLoopCOM”.


1.3 Rename Windows Home Folder
- Now, open file explorer and go to C:\Users . RIght-click on your user profile folder and select “Rename“.
- Type in the same name you used in step 11. In my case, the new name is “WindowsLoopCOM”.


1.4 Map the Renamed Folder via Registry Editor
- Next, press Win + R , type regedit and click on the “Ok” button. This action will open the registry editor.
- In the registry editor, copy the below path, paste it in the address bar and press Enter . On the left panel, you will see folders with long SID Strings.


Just to test if everything is OK, I’ve downloaded a single file from the internet. Since everything worked great, the downloaded file is saved in the Downloads folder of the renamed home folder.

Once everything is working fine, you can delete Windows user account you created earlier.
That is all. It is that simple to rename user profile folder in Windows.


