- Changing the Friendly Name of a Boot Entry
- Using BCDEdit
- Using Bootcfg
- Editing the Boot.ini File
- Переименуйте или измените имя ОС в Windows Boot Manager
- Изменить имя ОС в Windows Boot Manager
- Как переименовать записи о загрузке «Windows Boot Manager» в BIOS UEFI, если их несколько на разных жёстких дисках
- 1. О программе
- 2. Переименование загрузочных записей
- Rename windows boot manager
- Answered by:
- Question
- Answers
- How to Fix Windows 10 Boot Errors
- What is Windows Boot Manager?
- How to Edit Windows 10 Boot Manager
- Edit Windows Boot Manager from Advanced System Settings
- Edit Windows Boot Manager With BCDEdit
- Change OS Name in Windows Boot Manager Using BCDEdit
- Use BCDEdit to Change Boot Order
- Backup Windows Boot Manager with BCDEdit
- Edit Windows Boot Manager With MSConfig.exe
- MSConfig Advanced Troubleshooting Settings
- Causes of Boot Manager Errors and How to Fix It
- How to Repair Boot Codes in Windows 10
- How to Fix BCD Errors in Windows 10
- How to Fix Error Code “Inaccessible Boot Device (Stop error 0x7b)”
- Windows Boot Manager: Frequently Asked Questions
Changing the Friendly Name of a Boot Entry
In Windows, the items that appear in the Windows Boot Manager are the descriptions of each boot entry.
Typically, after you copy a boot entry, you change the friendly name of the newly created entry to distinguish it from the original.
You can also change the friendly name to make it easier to recognize customized boot entries. A string that precisely describes the entry can save significant time and effort.
For example, the following friendly name strings add little value.
However, more precise strings, such as the ones that follow, make the boot choice much easier.
NoteВ В When a boot entry is configured for debugging (/debug /debugport) or for Emergency Management Services (EMS) (/redirect) on an x86- or an x64-based system, the boot loader appends a bracketed phrase ([debugger enabled] or [ems enabled]) to the friendly name that appears in the boot menu. However, the boot loader omits the bracketed phrase from the boot menu when the friendly name and the bracketed phrase together exceed 70 characters. To restore the bracketed phrase, shorten the friendly name.
To change the friendly name of a boot entry in a Boot.ini file, you can use Bootcfg or edit the Boot.ini file in Notepad. On systems that store boot options in EFI NVRAM, use Bootcfg.
To change the friendly name of a boot entry for Windows, use BCDEdit.
Administrative privileges are required to update the boot configuration. Changing some boot entry options could render your computer inoperable.
Using BCDEdit
To change the description of a boot entry as it appears on the boot menu, you can use the /set IDdescription option. The command uses the following syntax. The ID is the GUID that is associated with the boot entry (or one of the well-known identifiers, for example,
If you are using Windows PowerShell, you must use quotes around the boot entry identifier, for example: «<49916baf-0e08-11db-9af4-000bdbd316a0>« or «
To change the description of the boot entry that corresponds to the operating system that is currently running, use the following example:
You can also change the description when you copy an existing boot entry using the /d option.
Using Bootcfg
With Bootcfg, you can change the friendly name of a boot entry only while copying the entry. Use the Bootcfg /copy switch to copy the entry and change its friendly name.
The following Bootcfg command copies the first boot entry to create a new entry. The /ID switch specifies the line number of the entry being copied. The /d (description) switch specifies the friendly name of the newly-created entry.
For complete instructions for using Bootcfg, see Help and Support Services. For examples, see Using Boot Parameters.
Editing the Boot.ini File
In the Boot.ini file, the friendly name of a boot entry appears in the boot entry in quotation marks.
For example, the following sample from a Boot.ini file has duplicate boot entries for Microsoft Windows 10 Professional.
To change the friendly name of a boot entry, type over the quoted string in the boot entry. In the following example, because the first entry will be customized for debugging, the name is changed to Windows 10 Debug.
Переименуйте или измените имя ОС в Windows Boot Manager
Несмотря на то, что мой ПК с Windows 8.1 был успешно обновлен до Windows 10, моя операционная система все еще определялась как Windows 8. Более того, при каждом запуске мне показывали экран выбора загрузки/ОС и предлагали Windows 8 и Windows 8, как будто это было система с двойной загрузкой! Если вы тоже столкнулись с подобной проблемой, когда неправильная версия Windows отображается на вкладке загрузки msconfig, возможно, вы захотите следовать этому руководству.
Сначала я удалил запись Windows 8 OS, которая ни к чему не привела, и оставил только рабочую запись Windows 8, которая загрузилась в Windows 10. Сделав это, я переименовал запись Windows 8 в Windows 10.
Изменить имя ОС в Windows Boot Manager

Откройте меню WinX и выберите «Выполнить». В поле «Выполнить» введите msconfig и нажмите Enter, чтобы открыть программу настройки системы. Здесь, на вкладке Boot , я мог видеть, что моя операционная система все еще идентифицировалась как Windows 8, несмотря на то, что Windows 10 была установлена. Фактически, я мог видеть 2 записи Windows 8. Я удалил одну, используя этот инструмент, который был мертвой записью.
Теперь, когда вы убедились, что ваша ОС неправильно идентифицируется, и это происходит и в вашем случае, я предлагаю вам легко исправить эту проблему, скачав бесплатный инструмент под названием EasyBCD .
Этот портативный инструмент позволяет вам контролировать свой загрузчик. Вам не нужно устанавливать его. Просто запустите его исполняемый файл, чтобы увидеть следующий интерфейс.
Нажмите на Редактировать меню загрузки. Теперь выберите операционную систему, которую вы хотите переименовать, и нажмите кнопку Rename . Теперь вы можете переименовать запись там сама.
Здесь вы также можете выбрать Пропустить меню загрузки , если оно еще не выбрано – как и в случае со мной. После этого нажмите «Сохранить настройки» и перезагрузите компьютер.
Теперь снова откройте msconfig и проверьте,
Вы сможете увидеть имя, которое вы дали. В моем случае я переименовал его в Windows 10, и это было то, что я мог видеть.
Надеюсь, этот небольшой совет поможет вам.
Этот пост покажет вам, что делать, если Использовать исходную конфигурацию загрузки неактивно.
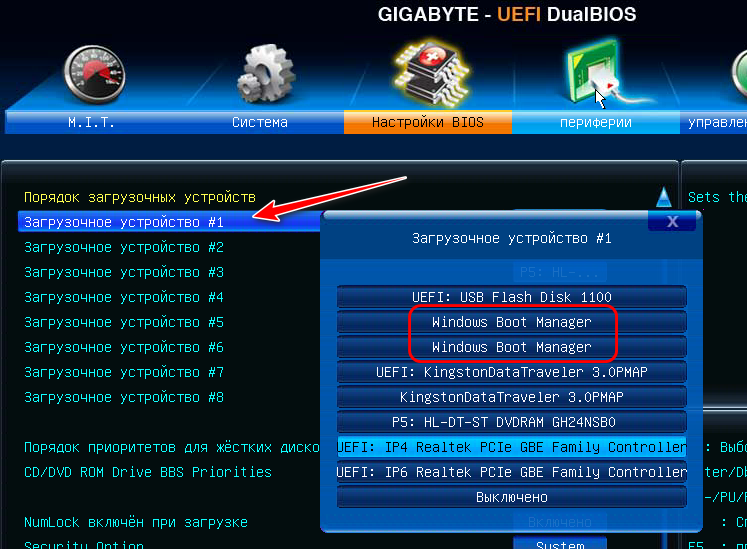
Как переименовать записи о загрузке «Windows Boot Manager» в BIOS UEFI, если их несколько на разных жёстких дисках

Многие из тех, у кого на компьютере установлено две или более EFI -системы Windows на разных жёстких дисках, и все они со своими автономными загрузчиками, наверняка сталкивались с проблемой путаницы в перечне выбора устройств загрузки BIOS UEFI из-за одинаково назначенной всем дискам записи «Windows Boot Manager». Когда UEFI -загрузка дисков значится именно так, а не по названиям носителей информации. И приходится наугад выбирать запись, а вместе с ней и диск загрузки.
Как решить такую проблему? Если функционал самой прошивки UEFI позволяет редактировать наименование позиций загрузки, это, соответственно, можно сделать в среде UEFI . Если же нет, записи «Windows Boot Manager» можно переименовать с использованием программы EasyUEFI.
Как это делается?
Итак, на компьютере установлено две Windows на разных жёстких дисках. Это две операционные системы с автономными загрузочными EFI -разделами, их запуск определяется приоритетом загрузки в BIOS . Но, увы, в нём имеем неразбериху – оба жёстких значатся под записью «Windows Boot Manager».
Хотя в идеале как минимум один из дисков должен отображаться как UEFI -устройство по своему названию.
Как с помощью EasyUEFI навести порядок в перечне выбора устройств загрузки?
1. О программе
EasyUEFI – это редактор загрузчика для EFI -систем на GPT -дисках от компании Hasleo Software. Программа может пересоздавать EFI -загрузчик, переносить его на другой раздел, делать его бэкап, реанимировать из бэкапа. А также предлагает доступ к управлению параметрами загрузки установленных на компьютере EFI операционных систем.
Программа платная, но у неё есть полнофункциональная 15-дневная триал-версия, с помощью которой можно провести предложенные ниже операции.
Скачать триалку можно на официальном сайте Hasleo Software:
Ну а теперь к делу.
Устанавливаем программу в любую Windows, запускаем.
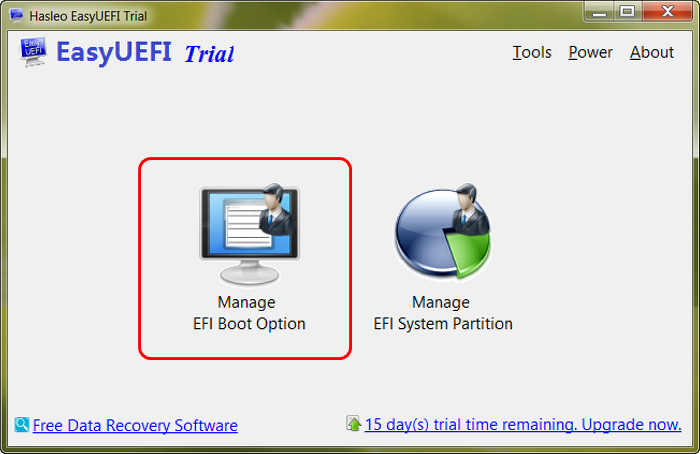
2. Переименование загрузочных записей
В главном окне программы выбираем «Manage EFI Boot Option».
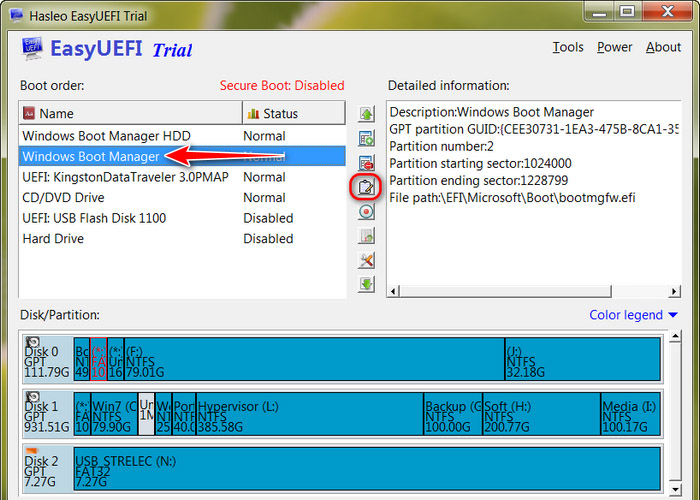
Перед нами откроется перечень записей UEFI -устройств загрузки – всех жёстких дисков, флешек, DVD-дисков и т.п. Коль имеем обозначенную выше проблему, диски, соответственно, будут значиться под записями «Windows Boot Manager». Где из них какая от какого жёсткого, можем кликнуть её и увидеть внизу на карте дисков, как подсветится красным EFI -раздел загрузчика. Где этот раздел находится, такому диску, соответственно, и будет принадлежать запись.
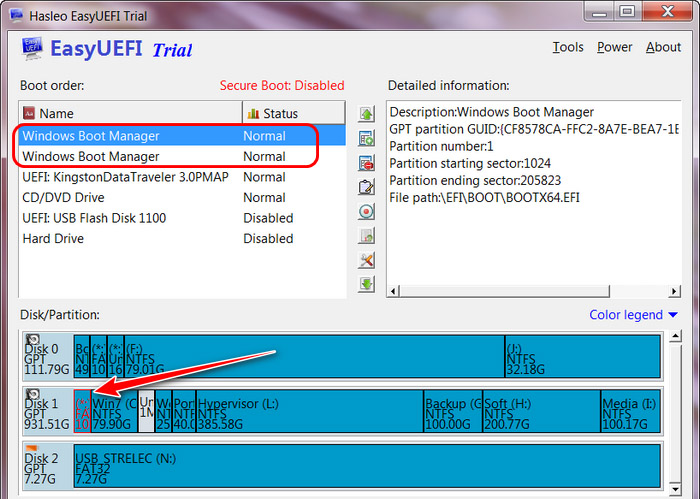
Как переименовать запись «Windows Boot Manager»? Кликаем любую, жмём кнопку редактирования на панели посередине окна EasyUEFI.

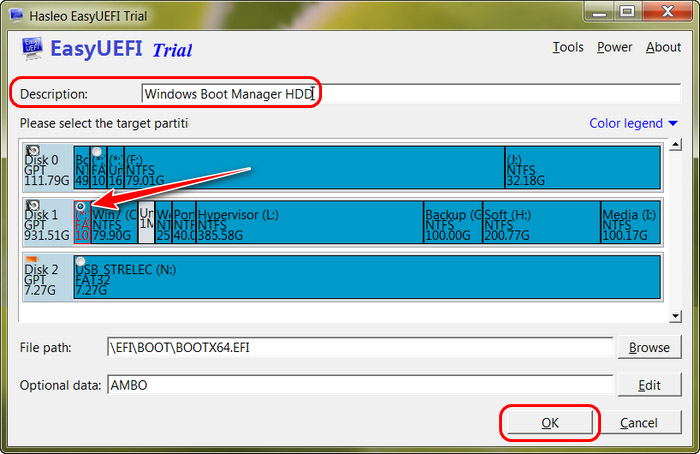
В окне редактирования также будем видеть карту дисков, и также EFI -раздел загрузчика, которому принадлежит запись, будет подсвечен красным. Переименовываем запись: вверху в графе «Description» удаляем старое название и вводим своё. Или, как в нашем случае, делаем понятную нам дописку, что это загрузчик диска HDD. Поскольку другой диск компьютера – это SSD.
По итогу жмём внизу «Ок».
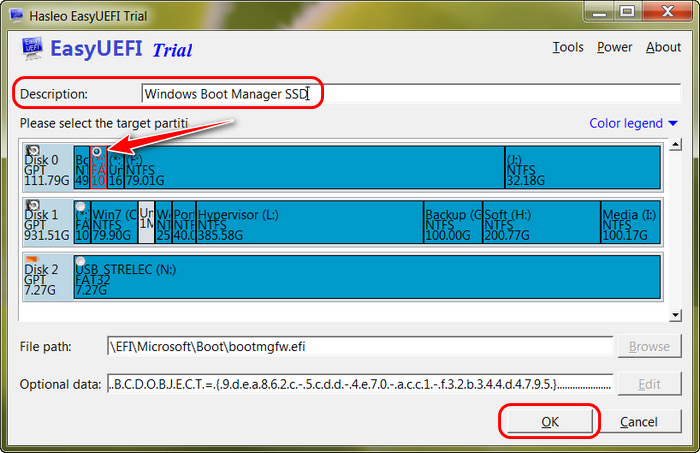
Аналогично поступаем со второй записью. Выделяем её, жмём кнопку редактирования.
Вводим в графу «Description» дописку «SSD». Жмём «Ок».
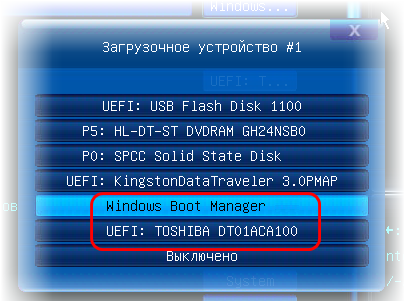
Заходим в BIOS и смотрим результат.
Обе записи или как минимум одна из них должны быть переименованы. Если переименована только одна, вторая запись должна преобразоваться в отображение названия жёсткого диска как UEFI -устройства.
Rename windows boot manager
This forum has migrated to Microsoft Q&A. Visit Microsoft Q&A to post new questions.
Answered by:
![]()
Question
![]()
![]()
Answers
![]()
![]()
Yes, bcdedit will do it. bcdedit /set
Do this from an elevated command prompt. It does not work from a PowerShell shell.
bcdedit /? will give you the details about bcdedit.
![]()
![]()
Tim is correct, you can do it in BCDedit. See below:
a. Start the Operating System (ex: Windows 7) that you want to change the name of in the Windows Boot Manager screen.
b. Click Start and type cmd in the start search box. From the programs list right click on cmd and select Run as Administrator.
c. In the command prompt, type bcdedit and press enter.
NOTE: This will let you see what the name of the operating system name is. This will be the operating system that you are currently in (ex: Windows 7).
d. Now type the following command and press enter.
bcdedit /set
e. In the elevated command prompt, type bcdedit and press enter.
NOTE: This will let you see and verify the new name of the operating system.
How to Fix Windows 10 Boot Errors

Browse Post Topics
What is Windows Boot Manager?

Windows Boot Manager (Bootmgr.exe) is a component of the new Windows Boot Loading Architecture designed to boot and load Windows fast and securely.
The new Windows Boot Architecture (Bootmgr.exe) replaced NTLDR. NTLDR was the previous Microsoft’s Windows NT boot loader.
Bootmgr is made of three components:
- Bootmgr.exe (Windows Boot Manager)
- Winload.exe (Windows operating system loader )
- Winresume.exe (Windows resume loader)
This guide will focus on the first: how to edit Bootmgr and fix common Windows 10 boot problems.
How to Edit Windows 10 Boot Manager
You can make changes to boot manager in 3 ways:
- Via Advanced Systems Settings
- Using BCDEdit Command Line Tool
- MSConfig.exe Tool
Edit Windows Boot Manager from Advanced System Settings
Follow the steps below:
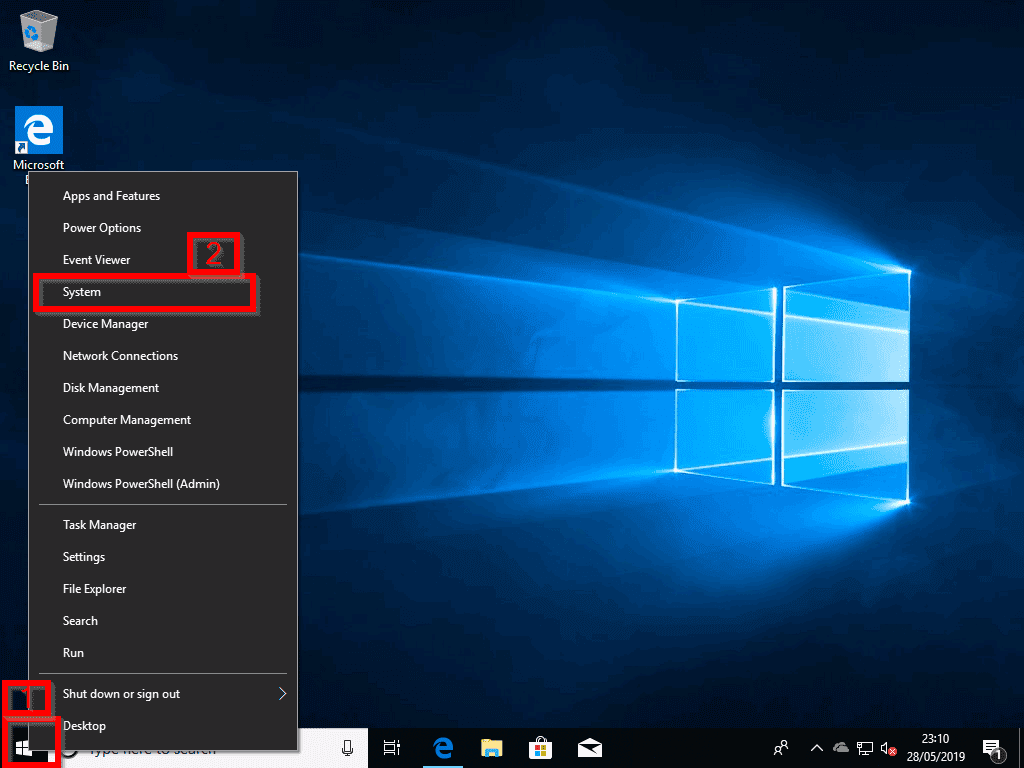
- Right-click the Windows logo on the left of your task bar [1]. Then click System [2].
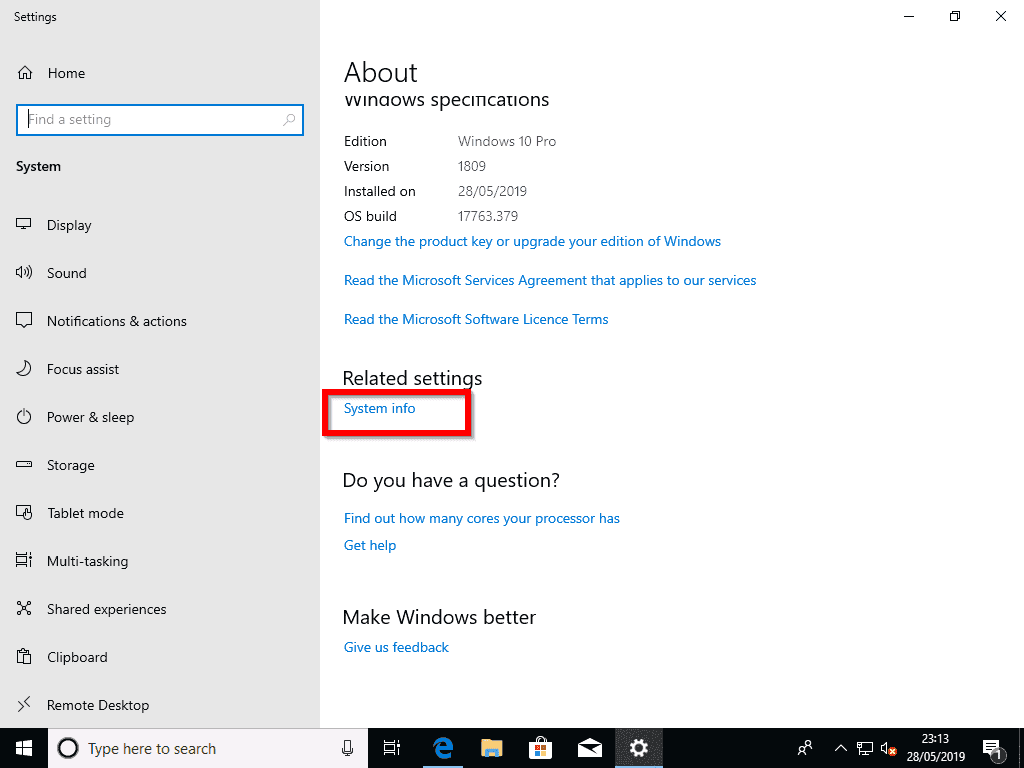
- On the Settings page, click System info.
- Then click Advanced system settings.

- On the Advanced system properties, in the Start-up and Recovery section, click Settings. This will open Start-up and Recovery configuration option.
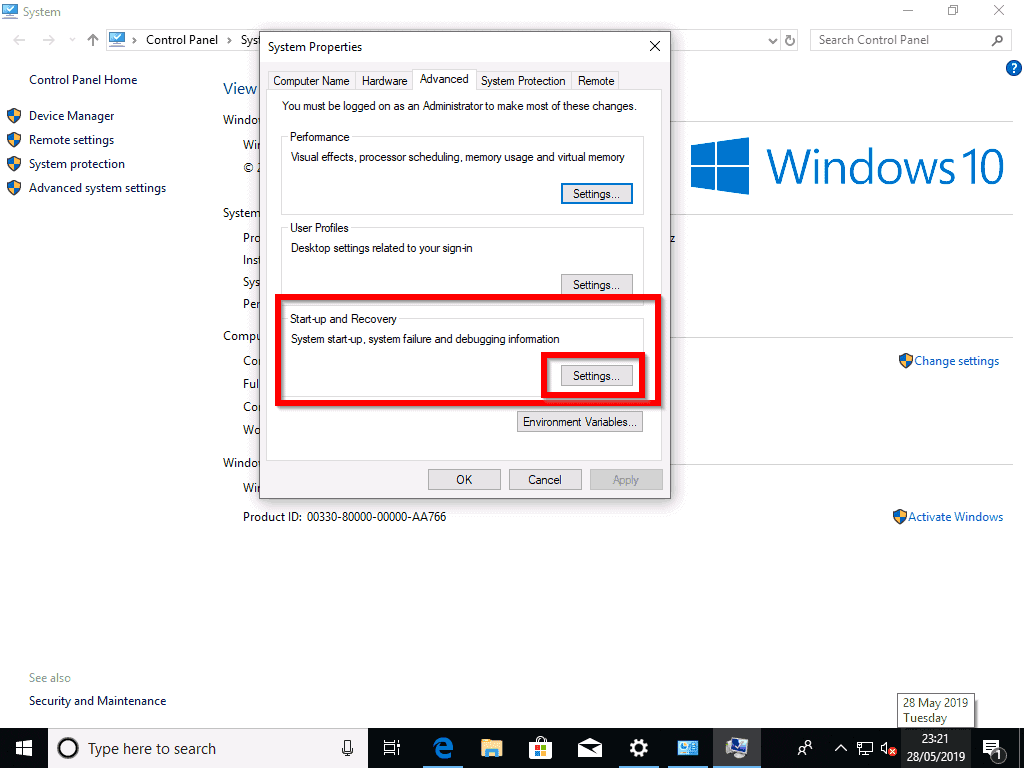
- In section [1] of the image, you can modify the default Operating system. If you are dual-booting, you will have the Operating systems in the drop-down. In section labelled [2], you can configure system recovery options.

Edit Windows Boot Manager With BCDEdit
BCDEdit.exe is a Windows command line tool used to modify boot configuration data. BCDEdit.exe can add, delete, edit and append entries in the boot configuration data store.
Before you can use BCDEdit, you need to know available parameters. To get available BCDEdit parameters, follow the steps below:
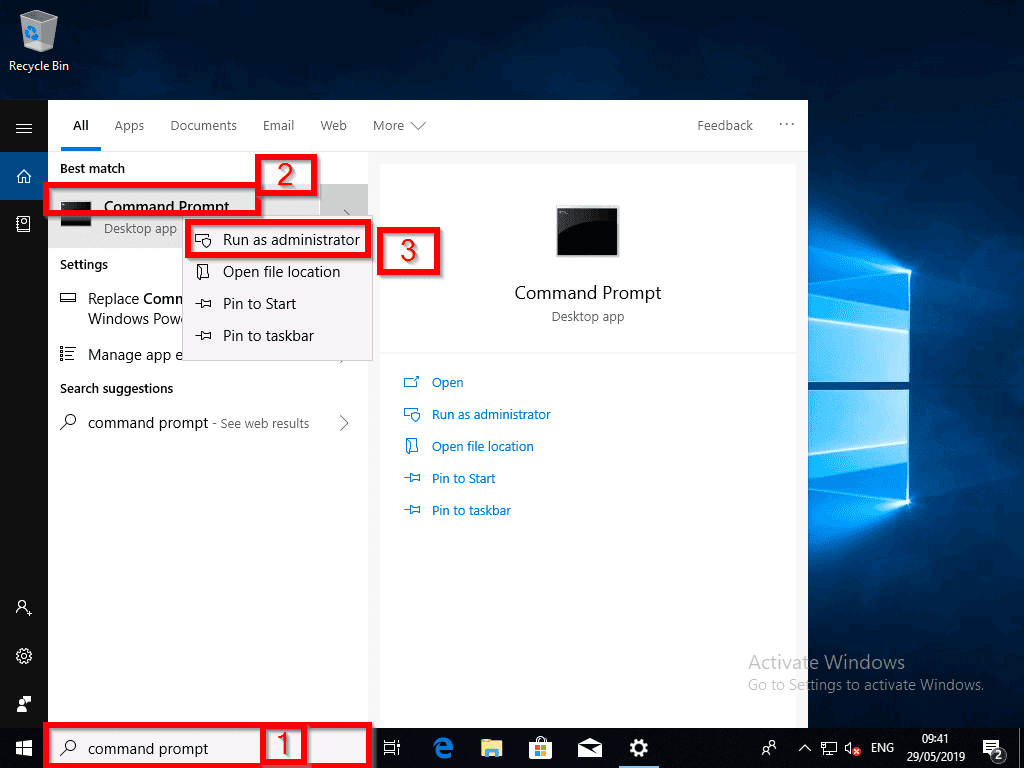
- Open command prompt as administrator. To do this, type command prompt in the search box [1]. Then right-click Command Prompt [2] and select Run as administrator [3].
- On the User Account Control, click Yes.

- On the command prompt, enter the command below.

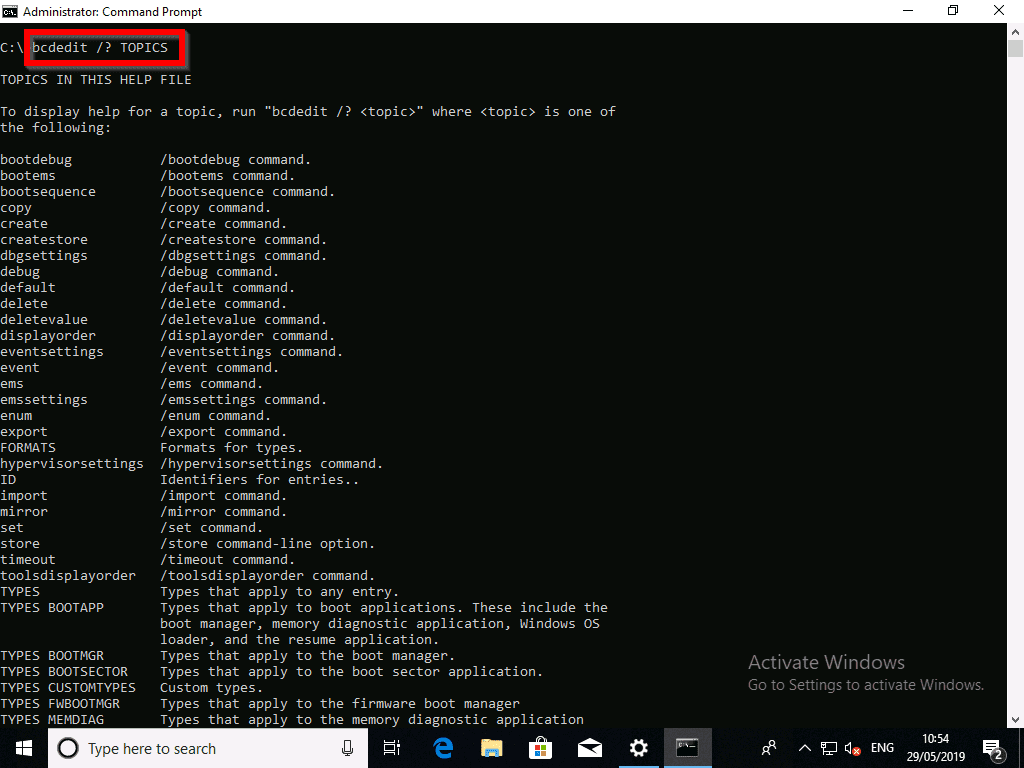
- To list BCDEdit command switches in alphabetical order, execute the command below:
See result below
To get details of how to use a particular switch, the syntax of the command is shown below:
As an example, to determine how to set the default Operating system in Boot Manager, type the command below. Then press Enter.
The result of the command is shown below:

Here are some examples of tasks you can perform with BCDEdit
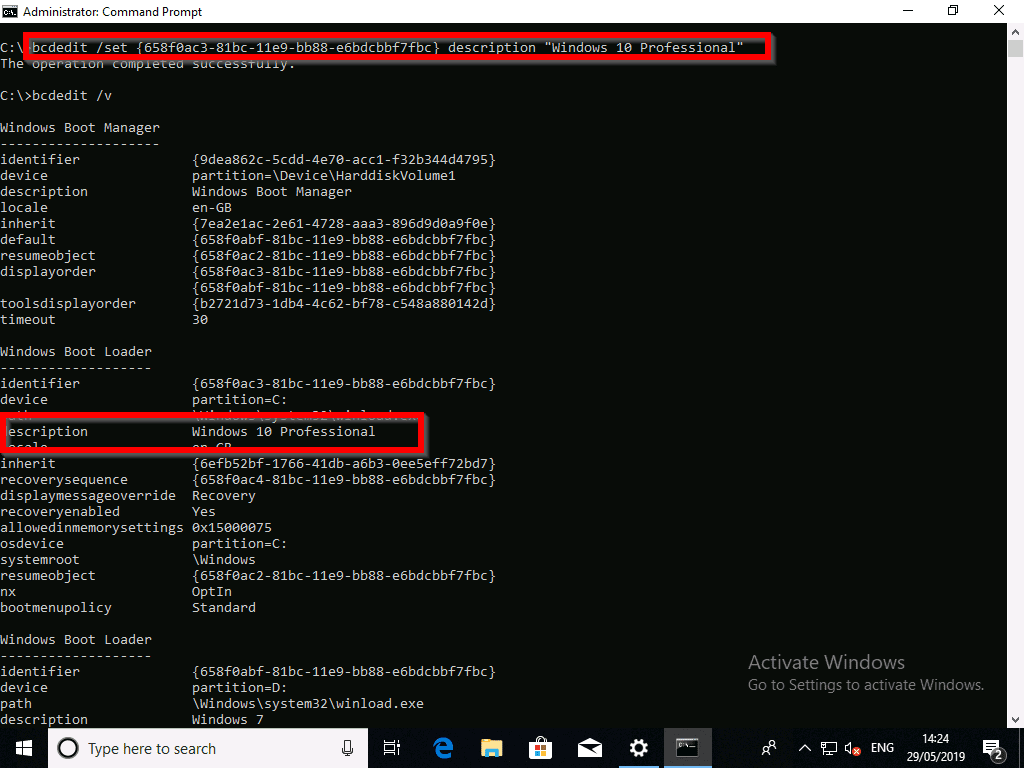
Change OS Name in Windows Boot Manager Using BCDEdit
Before you can change the name (description) of an OS entry in the boot loader, you need to get the ID. To list all the entries in the boot loader, type the command below and press Enter.
Result of the command is show below:

The Windows Boot Loader sections contains the Operating System details, including the identifier (ID).
The syntax of the command to change the name of an OS in the boot entry is:
In this example, I will change the description (name) of “Windows 10” to “Windows 10 Professional”. The command below will do the job:
Below is the result of the command. Notice that the name of the OS has changed from “Windows 10” to “Windows 10 Professional”.
Use BCDEdit to Change Boot Order
You can change the default boot order in Windows Boot Manager using the following command syntax:
Following on from the previous example, I want to change the default Operating System to from Window 7 to Windows 10 Professional. The command below will make the change.
Backup Windows Boot Manager with BCDEdit
My last example is to show you how you can backup Windows Boot Manager using BCDEdit.
Below is the BCDEdit syntax for this command.
To export (backup) my current BOOTMGR to a file called “BCD Backup”, I will run the command below:
I now have a backup copy of my Windows Boot Manager. See the image below:

You can restore your Windows Boot Manager from the backup using the bcdedit /import command.
Below is the syntax of the bcdedit /import command
To restore the previous backup into the system store, execute the command below:
Edit Windows Boot Manager With MSConfig.exe
Another tool you can use to edit Windows Boot Manager is MSConfig.exe. Most importantly, MSConfig.exe can be used to troubleshot and resolve boot errors.
To edit BOOTMGR with MSConfig, follow the steps outlined below:
- Right-click the Windows logo on the left of taskbar and select Run.

- When Run opens, enter MSConfig.exe then click Ok. System configuration option will open (see the second image below).


- To change the default Operating System, highlight Windows 7 (D:\Windows), then click Set as default.
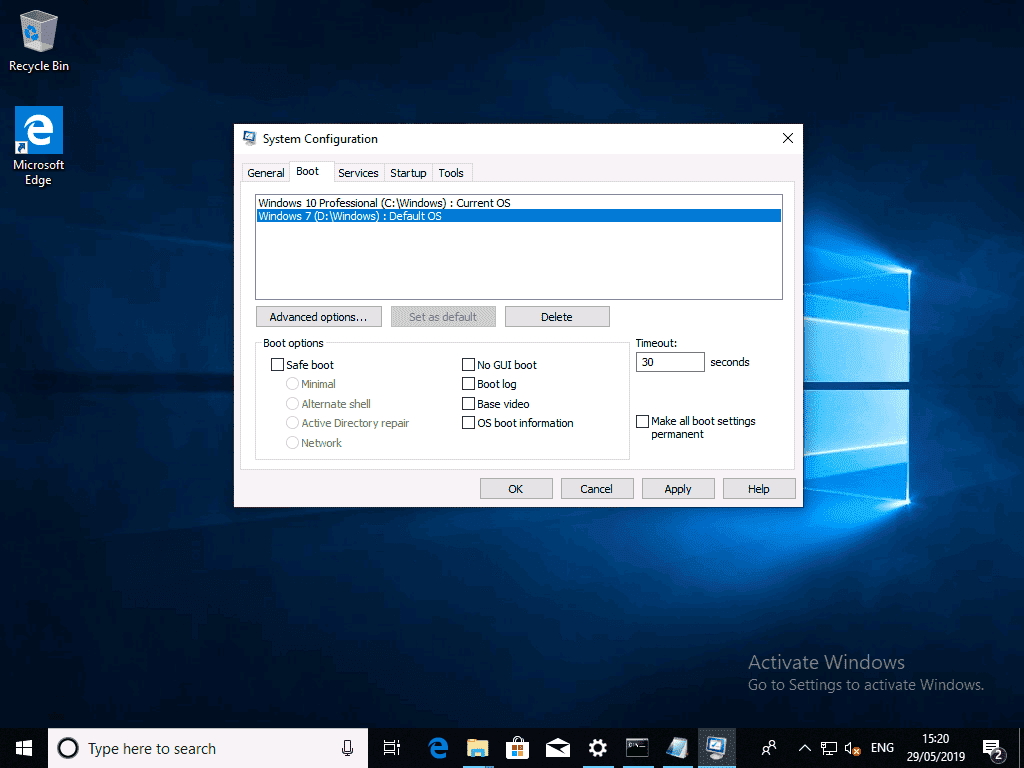
MSConfig Advanced Troubleshooting Settings
MSConfig provides other boot troubleshooting options. Refer to the previous image. For instance if you check the box beside safe boot, you could chose any of the boot options available beneath it.
You could also set boot manager to No GUI boot. This is useful if you are testing whether the boot problem is caused by GUI. Other troubleshooting options you could enable are:
Boot log
Base video
OS boot information
While troubleshooting, you should play around with each of the configuration, one at a time. Then see what resolves your boot problem.
More on boot problem resolutions in the next section.
Causes of Boot Manager Errors and How to Fix It
In this section I will cover how to fix some common Windows 10 boot errors.
How to Repair Boot Codes in Windows 10
If your Windows 10 computer screen is blank with jut the cursor, it could indicate that the boot process is stuck.
You may also receive the following error messages:
- Boot Configuration Data (BCD) missing or corrupted
- Boot file or MBR corrupted
- Operating system Missing
- Boot sector missing or corrupted
- Bootmgr missing or corrupted
- Unable to boot due to system hive missing or corrupted
To resolve boot code related problem, try running the following commands:
If your boot sector is corrupt, running the command below may fix it.
How to Fix BCD Errors in Windows 10
If you receive “Boot Configuration Data (BCD) missing or corrupted” or other BCD errors, execute the command below:
When the command completes, reboot your computer to see if the boot problem is resolved. If the problem is not resolved, try the command below:
How to Fix Error Code “Inaccessible Boot Device (Stop error 0x7b)”
Sometimes Windows Boot Manager may throw “Error code INACCESSIBLE_BOOT_DEVICE (STOP 0x7B)” during boot. Take the steps below to fix the problem:
- Load Windows 10 Operating System installation DVD. Set the boot sequence to CD first. Then reboot the computer.
- When the computer boots, wait for the prompt below. Then hit any key to boot from the DVD.
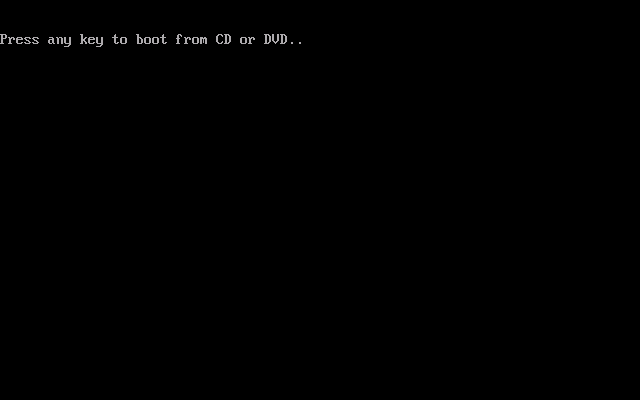
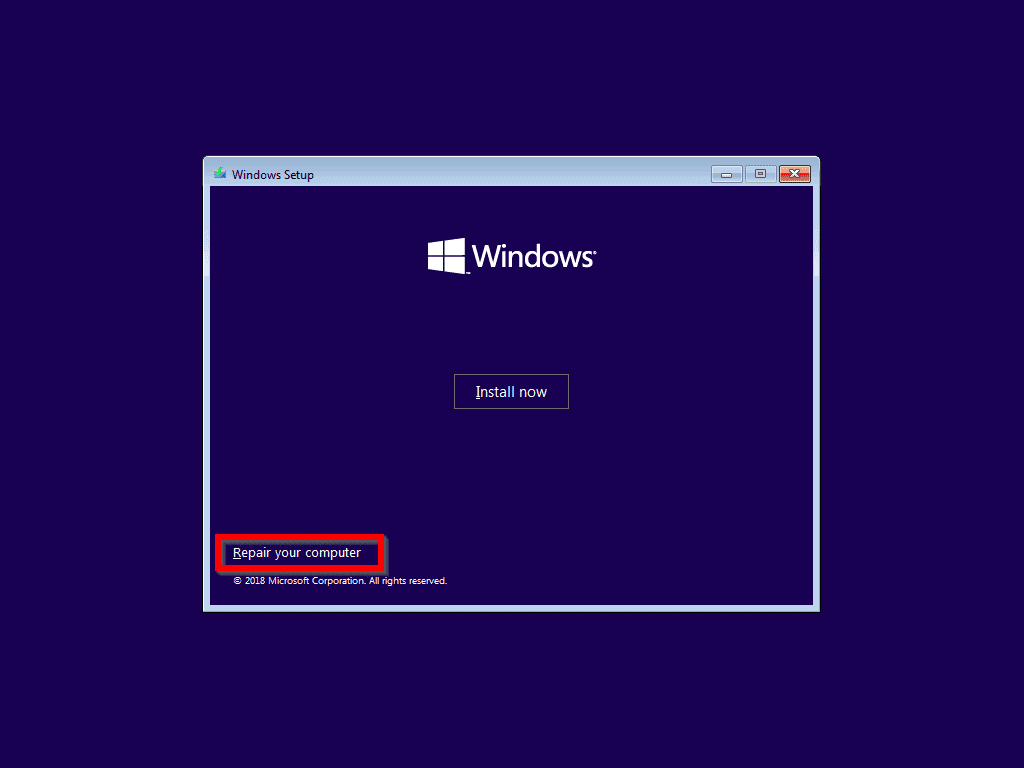
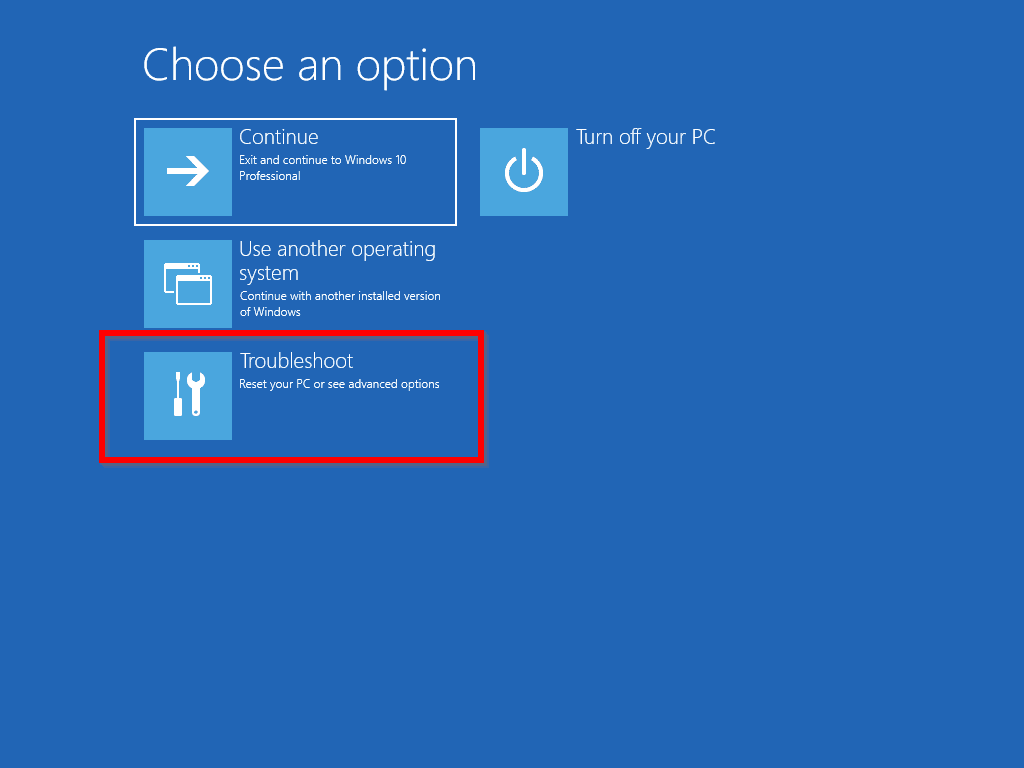
- On the windows setup screen click Next. Then on the next screen, click Repair your computer.

- Then click Troubleshoot.
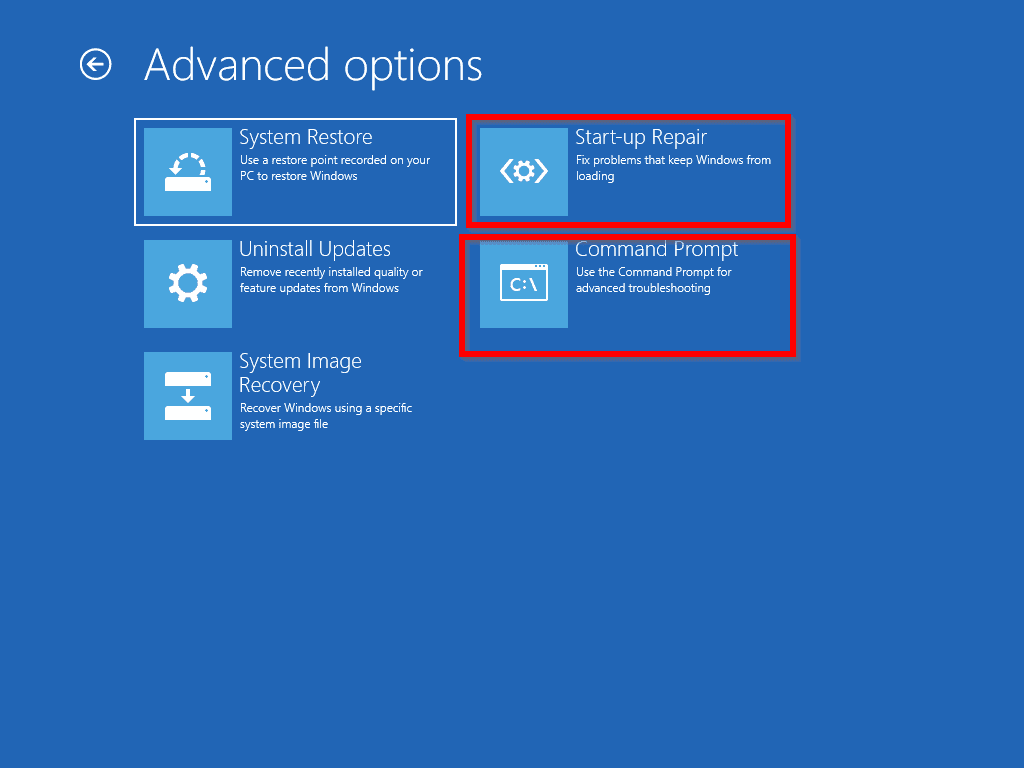
- Next, click Command Prompt. Command Prompt will load as shown in the second image below.

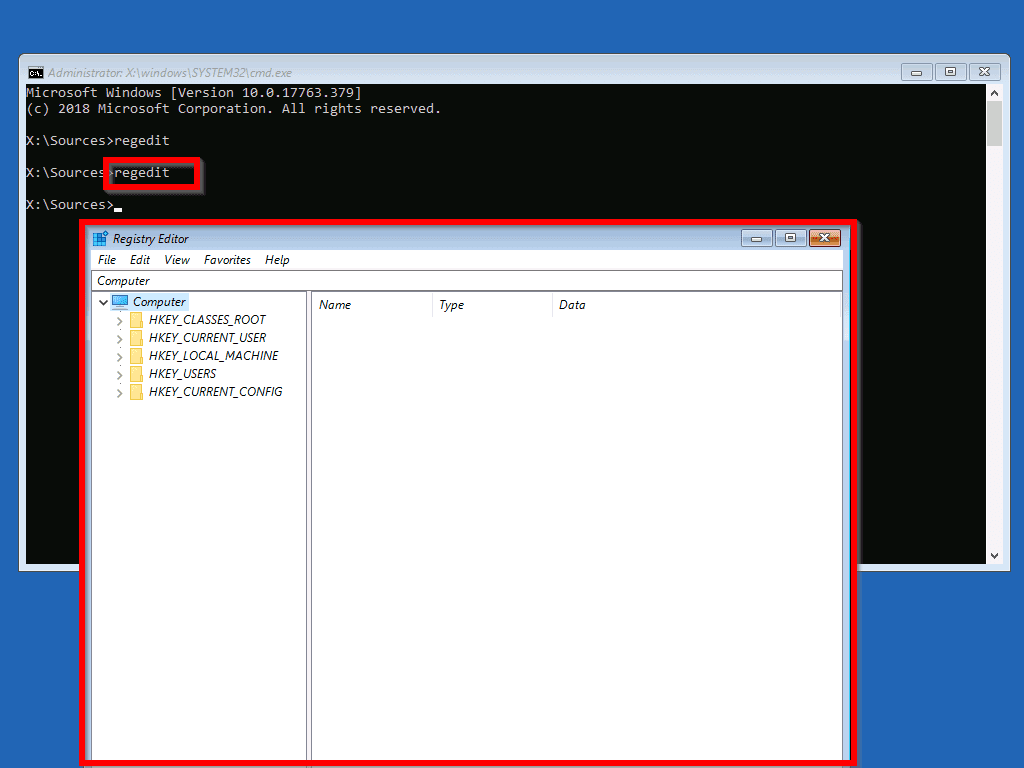
- On the cmd prompt, enter regedit and press Enter. Registry editor will load.
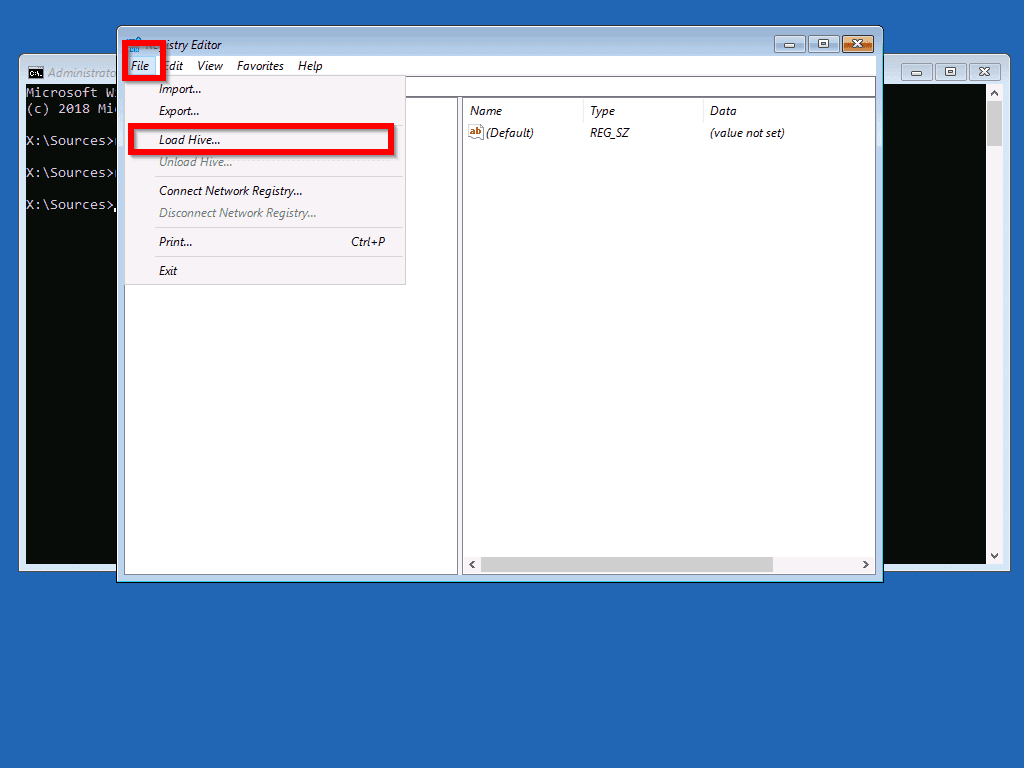
- In the registry editor, Select HKEY_LOCAL_MACHINE. Then select File -> Load Hive from the dropdown menu.
- Navigate to %windir%/system32/config. Then elect SYSTEM and click Open.
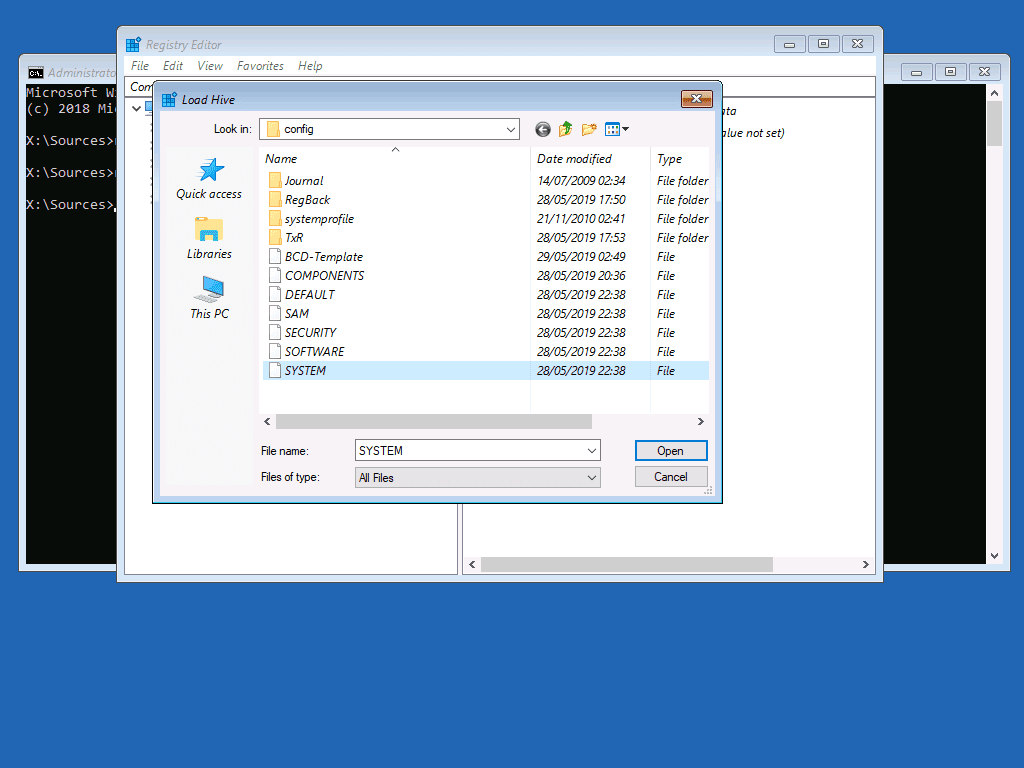
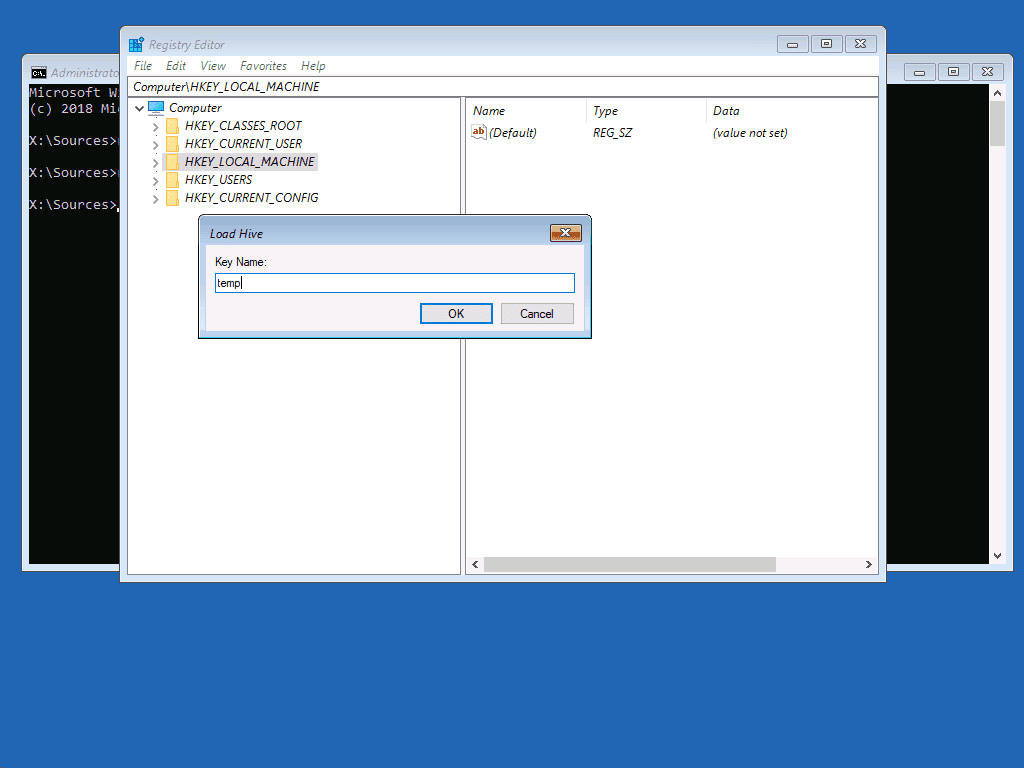
- Enter the name of the hive as temp. Then click Ok.
- Open HKEY_LOCAL_MACHINE\temp\ControlSet001\Control\Class.

- In the path, check for Non-Microsoft Drivers: Click the GUID of the driver [1]. If it is a Non-Microsoft Driver with an UpperFilters and/or LowerFilters [3], double-click the UpperFilters or LowerFilters key. Then delete the value data if it exists. See the second image below.


- When you finish deleting Value data for all third-party (non-Microsoft drivers), reboot your computer in normal mode.
Windows Boot Manager: Frequently Asked Questions

The Windows Boot Manager (BOOTMGR) is the Windows tool that starts Windows Operating Systems (OS). If there are multiple Windows OS, the Boot Manager displays the list for selection. Then, it hands over boot parameters to the boot loader.
If your Windows 10 PC displays a boot problem, follow the steps below to fix it:
1. Boot Windows 10 to recovery mode. Then, click Advanced options -> Troubleshoot -> Advanced options -> Command Prompt. When the command prompt opens, type the following commands, one at a time, and press enter:
BOOTREC /FIXMBR
BOOTREC /FIXBOOT
BOOTREC /ScanOS
BOOTREC /rebuildbcd
Yes, absolutely! Without the Windows Boot Manager, Windows will not be able to display a list of Operating Systems for selection. Most importantly, the OS will not be able to initiate boot because the boot loader will not load.
You cannot disable Windows Boot Manager. However, you can delete an entry in the boot manager OS list. To do that, while logged in to Windows 10, search MSCONFIG and open System Configuration. Finally, click the Boot tab, select the OS entry you like to remove, and click Delete.
No, you should not disable Secure Boot. Secure Boot is a feature of UEFI that protects your PC from boot sector viruses. However, if you need to dual-boot Windows 10 and Linux, you should disable Secure Boot to allow the installation of Linux. Otherwise, the Linux installation will fail.
The Windows Boot Manager (BOOTMGR) is a very important tool for managing Windows 10 boot menu. It also comes in handy when your computer runs into boot problems.
I hope you found this Itechguide helpful.
If this guide helped you resolve your boot problem, let me know by completing the “Leave a Reply” form at the end of the guide. You could also ask a question or share your experience to benefit other readers.


