- badblocks
- Contents
- Installation
- Storage device fidelity
- Comparisons with other programs
- Testing for bad sectors
- Read-write test (warning: destructive)
- Define specific test pattern
- Read-write test (non-destructive)
- Have filesystem incorporate bad sectors
- During filesystem check
- Before filesystem creation
- Block size
- Finding bad sectors
- How to Repair Bad Blocks on Linux
- Method 1: Checking SMART Data
- Method 2: Checking for the Correct Superblock
- Method 3: Checking for Bad Blocks on NTFS Volumes
- Самотестирование диска с помощью smartctl
- Утилиты sg_verify и sg_reasign
- Переназначение секторов для дисков с интерфейсом SATA
- Аналог MHDD под Linux
badblocks
badblocks is a program to test storage devices for bad blocks.
S.M.A.R.T. (Self-Monitoring, Analysis, and Reporting Technology) is featured in almost every HDD still in use nowadays, and in some cases it can automatically retire defective HDD sectors. However, S.M.A.R.T. only passively waits for errors while badblocks can actively write simple patterns to every block of a device and then check them, searching for damaged areas (Just like memtest86* does with RAM).
This can be done in a destructive write-mode that effectively wipes the device (do backup!) or in non-destructive read-write (backup advisable as well!) and read-only modes.
Contents
Installation
See badblocks(8) for the usage.
Storage device fidelity
Although there is no firm rule, it is common thinking that a new drive should have zero bad sectors. Over time, bad sectors will develop and although they are able to be defined to the file system so that they are avoided, continual use of the drive will usually result in additional bad sectors forming and it is usually the harbinger of its eventual death. Replacing the device is recommended.
Comparisons with other programs
Typical recommended practice for testing a storage device for bad sectors is to use the manufacturer’s testing program. Most manufacturers have programs that do this. The main reasoning for this is that manufacturers usually have their standards built into the test programs that will tell you if the drive needs to be replaced or not. The caveat here being is that some manufacturers testing programs do not print full test results and allow a certain number of bad sectors saying only if they pass or not. Manufacturer programs, however, are generally quicker than badblocks sometimes a fair amount so.
Testing for bad sectors
To test for bad sectors in Linux the program badblocks is typically used. badblocks has several different modes to be able to detect bad sectors.
Read-write test (warning: destructive)
This test is primarily for testing new drives and is a read-write test. As the pattern is written to every accessible block, the device effectively gets wiped. The default is an extensive test with four passes using four different patterns: 0xaa (10101010), 0x55 (01010101), 0xff (11111111) and 0x00 (00000000). For some devices this will take a couple of days to complete.
-w : do a destructive write test -s : show progress -v : be «verbose» and output bad sectors detected to stdout
Additional options you might consider:
-b number : specify the block size of the hard disk which can significantly improve testing time. ( tune2fs -l partition as the root user) -p number : run through the extensive four pass test number of sequent iterations -o /path/to/output-file : print bad sectors to output-file instead of stdout -t test_pattern : Specify a pattern. See below.
Define specific test pattern
From the manpage: «The test_pattern may either be a numeric value between 0 and ULONG_MAX-1 inclusive [. ].»
 This article or section needs expansion.
Random pattern
Badblocks can be made to repeatedly write a single «random pattern» with the -t random option.
Read-write test (non-destructive)
This test is designed for devices with data already on them. A non-destructive read-write test makes a backup of the original content of a sector before testing with a single random pattern and then restoring the content from the backup. This is a single pass test and is useful as a general maintenance test.
The -n option signifies a non-destructive read-write test.
Have filesystem incorporate bad sectors
To not use bad sectors they have to be known by the filesystem.
During filesystem check
Incorporating bad sectors can be done using the filesystem check utility ( fsck ). fsck can be told to use badblocks during a check. To do a read-write (non-destructive) test and have the bad sectors made known to the filesystem run:
The -cc option tells run fsck in non-destructive test mode, the -v tells fsck to show its output, and the -k option preserves old bad sectors that were detected.
To do a read-only test (not recommended):
Before filesystem creation
Alternately, this can be done before filesystem creation.
If badblocks is run without the -o option bad sectors will only be printed to stdout.
Example output for read errors in the beginning of the disk:
For comfortably passing badblocks error output to the filesystem it has to be written to a file.
Then (re-)create the file system with the information:
From the mke2fs(8) manual page:
Note that the block numbers in the bad block list must be generated using the same block size as used by mke2fs. As a result, the -c option to mke2fs is a much simpler and less error-prone method of checking a disk for bad blocks before formatting it.
So the recommended method is to use:
Use -cc to do a read-write bad block test.
Block size
 This article or section is a candidate for merging with Securely wipe disk#Block size.
First find the file systems block size. For example for ext# filesystems:
Feed this to badblocks:
Finding bad sectors
You can use badblock to find bad sectors. Note that badblocks calls sectors «blocks». It supports a few scan modes. There is read-only mode (default) which is the least accurate. There is the destructive write-mode ( -w option) which is the most accurate but takes longer and will (obviously) destroy all data on the drive, thus making it quite useless for matching sectors up to files. There is finally the non-destructive read-write mode which is probably as accurate as the destructive mode, with the only real downside that it is probably the slowest. However, if a drive is known to be failing then read-only mode is probably still the safest.
To do a verbose ( -v option), read-only scan, run one of these commands (with x being the drive letter and y being partition number you want to scan):
Whole disk scan:
Single partition scan:
The downside to scanning the drive as a whole is that each filesystem is going to start its block count relative to the partition it is on. This means that if you have a bad block that happens to be on, let us say, the second partition, and that partition starts on block 1000, then you will have to subtract 1000 from your block number in order to get the number you want. So if a scan from the beginning of the disk results in block number 1005 being bad, then block 5 of the second partition is what you will actually be using.
Otherwise, if you have found bad blocks after doing a full scan, you can simply figure out which partitions they are on, and rescan those in order to get the block number, rather than do any block math.
Another thing to note is that badblocks defaults to 1024 byte blocks so you will either have to change the default size with the -b option in order to match your filesystem or manually convert the block number(s) later.
If you need to figure out where your partitions start and end run fdisk.
Make sure to note the block size fdisk is using so that you can convert the block counts to match your scan.
After all this, you should have the block number(s) of your bad block(s), relative to the partition they exist on.
Источник
How to Repair Bad Blocks on Linux
Users who dual boot some distribution of Linux with a version of Microsoft Windows might occasionally try to shrink or grow certain partitions to leave more space for one operating system or the other. You may ultimately get a warning from GParted in Linux or chkdsk in Windows that there were bad sectors. Individual users of Linux might occasionally get the same. In spite of this, users might actually receive notices about two different types of bad sector masquerading as the same. One is the traditional notification of bad sectors that indicate a problem with the physical geometry of a disc platter or a NAND memory cell. This is what most people mean when they complain about a bad block, though there is a minor but very technical difference between a bad sector and a bad block. However, machines seldom incorrectly flag sectors as bad.
These are known as soft bad sectors or software bad blocks, and can be corrected merely through a simple file system operation. Considering the danger of writing to bad blocks, however, it’s always a good idea to start your investigation with a SMART data inspection when dealing with a fixed volume. This is non-destructive, and can weed out geometry problems before you proceed. If you’re not working with a fixed volume, then you might want to start your investigation with the next following method.
Method 1: Checking SMART Data
It’s easy to believe that these bad sectors are merely a software error, but there’s a way to check to see if that’s so. Using SMART data, it’s easy to inspect the disk’s own firmware and know for sure. Open the GNOME Disks Utility from the Dash in Unity, the Whisker menu in Xfce4, the Accessories menu in LXDE or from the GNOME Applications menu in KDE. You could also start it by typing gnome-disks at the terminal and pushing the enter key. Click on the menu next to the right-hand side window controls after highlighting your hard disk with the pointer in the left-hand column. On most GNU/Linux installs, the Disks utility will default to your primary hard disk.
Select SMART Data & Self-Tests from the menu. You could also hold CTRL and push S to open this window. This will show you the current health of your drive. If the values are blank, then click on the Start Self-test button to force your disk to run a self-check. The Overall Assessment line at the top will tell you what GNOME Disks Utility thinks of your drive.
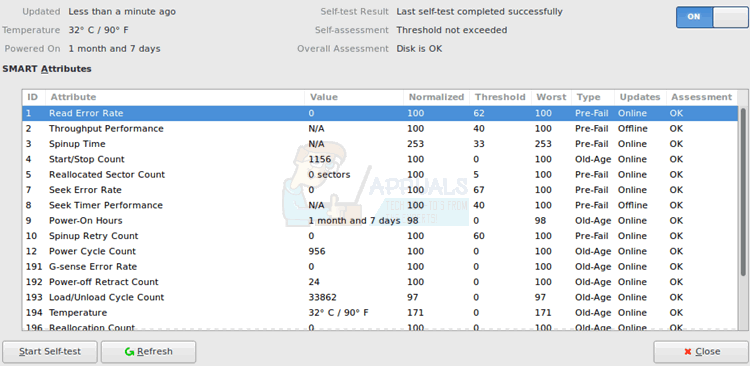
You may have to scroll through the SMART Attributes even on a full-screen display. Pay special attention to an option called Reallocation Count. This shows you how many sectors have already been reallocated. If there are many bad sectors, then it’s probably a good idea to replace the drive before it completely fails.
Method 2: Checking for the Correct Superblock
Sometimes you might find that SMART data showed everything in order, but you may have gotten a “Bad Superblock” error from certain disk utilities. If you were working with SD cards, USB memory sticks or other such memory, then you wouldn’t be able to read SMART data and yet still may have some errors. This very well could be a software problem. Consider the issue of running a command such as:
This more than likely will indicate you have a bad superblock, which refers to the master block in your file system. This is the result of a CLI error, and not a genuine bad block. Since /dev/sdb refers to a drive and not a parition, your fsck command will look for a superblock where there isn’t one and incorrectly think something was wrong. Fortunately, this wasn’t a destructive command. Run:
It may tell you now that your file system is clean. Make sure that the number that comes after ext matches your volume’s ext version.
You may also get this error if you were to try to run ext2/3/4 fsck on a FAT12/16/32, NTFS or HFS/HFS+ volume. The consistency checker gets confused and thinks that something is awry, when in reality the file structure type doesn’t match what’s expected. Run fsck.vfat or dosfsck on FAT volumes regardless of what bit version you’re using. You can use the -t switch after dosfsck or fsck.vfat (fsck.msdos on some versions of Linux) to mark out unreadable clusters as bad blocks.
Method 3: Checking for Bad Blocks on NTFS Volumes
Assuming that you’re dual-booting Microsoft Windows and Linux and you have superblock or other bad sector errors on an NTFS volume, then restart into Windows and from the command line run chkdsk /r c:, replacing c: with the drive letter of the NTFS volume in question. Windows will more than likely have to reboot to complete the surface scan. This can take some time, so if it appears that your operating system isn’t responding, then it’s merely because of the length of time in question. If you received an error about not having the right privileges, then right-click command prompt in the Start Menu and select Run as administrator before proceeding.
If you’re working with an NTFS volume exclusively under Linux, then you don’t have this much of a recourse, but if the bad blocks error was merely from a type mismatch you have a way of correcting it. Run sudo ntfsfix /dev/sdb1, replacing the letter and number after /dev/sd with the correct device and partition identifier. Remember that you can always run sudo fdisk-l or head back to the GNOME Disks Utility if its installed to check the names of every volume connected to your system. You can run it as sudo ntfsfix -d /dev/sdb1 if you’re sure that you want the dirty bit to be cleared.
If you’re sure that an NTFS volume has soft bad blocks that are not due to physical hardware geometry, such as when you cloned an old disk with bad sectors to a new volume, then run sudo ntfsfix -bd /dev/sdb1 on whatever volume you’d like. This resets the bad block marker list.
Источник
Самотестирование диска с помощью smartctl
Устанавливаем необходимый пакет smartmontools
Существуют два вида тестов — foreground (когда диск в ответ на все команды имеет статус CHECK CONDITION) и background — когда диск остается работоспособным.
Тесты бывают short и long.
Short — ограничен по времени и тестирует только часть диска.
Long — аналогичен финальному тестированию на производстве, не ограничен по времени и тестирует весь диск.
Запускаем “длинный” тест, который можно запускать прямо во время работы системы:
Узнать сколько времени займет тот или иной тест можно командой:
После того как он закончится смотрим результат с помощью команды smartctl -l selftest /dev/sdb:
Также можно протестировать только часть диска. Команда:
протестирует сектора с 10 по 20 включительно.
Кроме того, можно одной командой протестировать несколько диапазонов:
Запустить foreground тест можно, указав опцию -C:
Короткий foreground тест, который принудительно обновит значения параметров SMART можно запустить так:
Утилиты sg_verify и sg_reasign
Утилита sg_verify предназначена для работы с дисками, поддерживающими полный набор команд SCSI. В настоящее время — это диски с интерфейсом SAS (но не SATA). Обнаружить нечитающийся сектор можно, например, с помощью команды dd:
Затем, когда dd сообщит об ошибке, с помощью sg_verify можно удостовериться, что проблема именно в том секторе:
Зетем можно проверить, что размер GLIST не очень велик и там есть место:
Теперь можно выполнить переназначкение сектора и проверить, что размер GLIST изменился:
Размер GLIST изменился на 1 — чего и следовало ожидать. В результате в переназначаемом секторе будет записан заданный производителем паттерн (либо — если сектор все-же удалось прочесть — его содержимое не изменится).
Также утилита sg_reassign может выполнить переназначение группы секторов.
Для дисков с интерфейсами SAS и SATA наборы команд для работы с переназначаемыми секторами различны. Диск с интерфейсом SAS (неважно подключен он к SATA или SAS контроллеру) способен безусловно переназначить группу секторов в резервную область независимо от того, читаемы сектора или нет. Использование sg_reasign для диска SATA скорее всего никакого эффекта не даст.
Переназначение секторов для дисков с интерфейсом SATA
Для переназначения секторов на дисках с интерфейсом SATA можно просто дать команду на перезапись этого сектора, либо воспользоваться hdparm:
Принципиальная разница между дисками SAS и SATA в том, что случае SAS можно принудительно переназначить даже хороший сектор, а в случае SATA переназначение при записи принимает контроллер диска. При этом,этот вариант годится для обоих интерфейсов:
или для группы секторов:
Аналог MHDD под Linux
С удивлением обнаружил наличие под Linux некоторого аналога (по крайней мере визуально) популярной программы под DOS — MHDD.
Речь идет об утилите, входящей в состав SystemRescueCd — whdd.
Источник


