- Лучшие программы для восстановления BAD-блоков жесткого диска
- Можно ли восстановить BAD-блоки жесткого диска?
- Victoria HDD
- HDD Regenerator
- Disk Revival
- DiskGenius
- Bad Sector Repair: How to Fix Bad Sectors on HDD in Windows 10/8/7
- HDD Bad Sector OverviewВ
- What Is Bad Sector
- Two types of Bad Sectors
- How to Check Bad Sectors in Hard Disk on Windows 10/8/7
- How to Fix BadВ Bad Sectors on HDD inВ Windows 10
- First Thing to Do: Back Up and Clone HDD to a Good Hard Drive (Skip Bad Sectors)
- Repair Soft/Logical Bad Sectors in WindowsВ
- Hard/Physical Bad SectorsВ Repair
- Summary of Bad Sector Repair
- More Information About Bad Sectors
- 1. What are the symptoms of bad sectors?
- 2. What are the causes of hard bad sectors?
- 3. What are the causes of soft bad sectors
- 4. How to avoid bad sectors?
Лучшие программы для восстановления BAD-блоков жесткого диска
BAD-блоки — логически или физически неисправные сектора жестких дисков, чтение или запись информации на которые невозможна или затруднена. Возникают бэд блоки по различным причинам — из-за неосторожной транспортировки винчестера, сбоев подачи электроэнергии на устройство, внутренних ошибок управляющей платы/программы, естественного износа поверхности диска и т.д.
Более подробная эта проблема описана на сайте NoDevice.com .
Можно ли восстановить BAD-блоки жесткого диска?
В некоторых случаях BAD-блоки могут быть восстановлены специализированными утилитами. Если же сектора повреждены физически, то восстановить их программно невозможно. В этом случае применяется метод переназначения адреса сектора. На каждом винчестере имеется специально выделенная область для подобных мероприятий. Пока эта область остается свободной, ее можно использовать вместо поврежденных секторов.
Таким образом, для восстановления BAD-блоков должно быть соблюдено одно из двух условий — либо неисправность носит логический характер, либо на диске имеется служебное пространство для переназначения бэд-блока. Но следует иметь в виду, что не всегда удается «вылечить» бэд-блоки, т.к. многое зависит от конструктивных особенностей винчестера, функциональности его встроенного программного обеспечения и множества других факторов.
Рассмотрим наиболее распространенные утилиты, позволяющие с некоторой вероятностью восстановить битые сектора жестких дисков.
Victoria HDD
Эту утилиту от белорусского программиста Сергея Казанского знает, наверное, весь мир. Программа Victoria HDD является очень мощным средством диагностики и восстановления жестких дисков. Одной из ключевых функций утилиты является посекторальное сканирование всей поверхности диска с целью обнаружения поврежденных секторов.

В качестве опций такого сканирования в Victoria HDD предусмотрена возможность восстановления (Refresh), полного стирания (Erase) или перераспределения (Remap) битого сектора. Первая опция помогает устранить логические ошибки, вторая и третья — физические и не устраняемые (без уничтожения информации) программные неисправности.

Пользоваться программой достаточно просто:
- Перейти во вкладку «Tests».
- В блоке опций действий при обнаружении ошибок (нижняя правая часть окна) перевести переключатель на «Refresh», «Erase» или «Remap» (рекомендуется задействовать сначала первую, потом вторую опцию).
- Нажать на кнопку «Scan».
- Ожидать окончание процедуры сканирования, которая может занять несколько часов в зависимости от объема диска.

Среди плюсов и особенностей программы Victoria HDD выделим:
- Программа бесплатная.
- Высокая эффективность работы с любыми моделями винчестеров от любых производителей.
- Наличие большого количества дополнительных опций и настроек сканирования.
- Встроенный HEX-редактор позволяет редактировать 16-ричные данные любой пустой или заполненной области жесткого диска.
- Возможность чтения паспортных сведений и SMART-атрибутов винчестера.
- Поддержка USB-накопителей и многое другое.
- Программа Victoria HDD рассчитана на опытных пользователей, потому управление ею может вызвать трудности.
- Отсутствует поддержка русского языка в официальной версии.
HDD Regenerator
HDD Regenerator достаточно узкоспециализированная утилита, решающая одну единственную задачу — обнаружение и исправление BAD-блоков.

Пользоваться программой относительно просто:
- Сразу после запуска из выпадающего меню «Regeneration» выбрать пункт «Start Process under Windows».
- В блоке «Choose Drive to Process» выбрать сканируемый диск, после чего кликнуть «Start Process»
- Откроется консоль с вариантами запуска функции восстановления.
- Ввести с клавиатуры «2», нажать клавишу ввода.
- Ввести «1», нажать клавишу ввода.
- Снова ввести «1» и затем «Enter».
- Дождаться окончания процедуры.

Приведенная выше инструкция запускает сканирование поверхности жесткого диска с опцией восстановления бэд-блоков, начиная с самого первого сектора. Доступны и другие режимы работы.

- Относительно простое использование.
- Возможность создания прямо из программы загрузочной флешки/диска с загрузочной версией HDD Regenerator на борту.
- Просмотр SMART-атрибутов винчестеров.
Минусы программы HDD Regenerator:
- Программа платная. Free-версия позволяет восстановить всего 1 поврежденный блок. Таких ограничений нет для загрузочной версии HDD Regenerator.
- Для запуска сканирования жесткий диск должен быть полностью свободен от каких-либо задач. К примеру, если открыть какой-либо файл на винчестере, программа работать не будет. Т.е. сканирование винчестера, где хранится система Windows, в принципе невозможно.
- Отсутствует поддержка русского языка.
Disk Revival
Программа Disk Revival позиционируется автором как инструмент для блокировки «почти» битых и/или медленных секторов жесткого диска. Т.е., по сути, утилита не восстанавливает бед-блоки, а «консервирует» их. Сразу отметим, что утилита не справляется с физическими неисправностями секторов, потому выше и было использовано выражение «почти битые» блоки. Тем не менее, подобные секторы зачастую помечаются (той же Victoria, например) как битые. И именно с такими — «не совсем» битыми — блоками и работает Disk Revival.

В целом процесс исправления программой медленных секторов можно считать восстановлением жесткого диска, т.к. имеющиеся на нем неисправные участки более не будут использоваться, а, значит, и исчезнут все связанные с наличием таких блоков проблемы.

Пользоваться программой Disk Revival достаточно просто:
- В меню «Диски» выбираем сканируемый раздел диска.
- Нажимаем на кнопку «Старт».
- Ожидаем окончания процедуры.
Утилита Disk Revival обнаружит все медленные сектора на диске и заполнит их произвольными данными. Другими словами, бэд-блоки блокируются на уровне файловой системы.

Плюсы программы Disk Revival:
- Простота эксплуатации, русскоязычный интерфейс со встроенной инструкцией и пояснениями по использованию программы.
- Возможность ускорения работы винчестера за счет блокировки медленных секторов.
- По заявлению разработчика, Disk Revival может справляться с ситуациями, с которыми часто не может справиться даже Victoria.
Минусы Disk Revival:
- Программа платная. Бесплатная версия позволяет обработать только 10 Гб дискового пространства.
- Нет функции перераспределения секторов.
- При форматировании или дефрагментации раздела диска результат работ сбрасывается, т.е. медленные сектора вновь становятся доступными для обработки. Для обхода этой ситуации программу следует запускать повторно после форматирования/дефрагментации.
DiskGenius
DiskGenius — многофункциональная программа для работы с накопителями информации и хранящихся на них данных. В приложении также реализована функция проверки поверхности диска на предмет наличия плохо читаемых и бэд-блоков.

- После запуска программы в левой части окна отобразится список с подключенными к ПК носителями информации.
- Для запуска модуля сканирования нужно кликнуть правой кнопкой мыши по выбранному диску, а затем выбрать пункт «Verify Of Repair Bad Sectors».
- Во вновь открывшемся окне кликнуть по кнопке «Repair».
- Дождаться окончания процесса.
Исправление проблем с бэд-блоками производится программой DiskGenius примерно также, как это делает утилита Disk Revival.
Положительные качества DiskGenius:
- Достаточно простая эксплуатация даже неопытными пользователями — никаких настроек производить не придется.
- Наличие множества функций по восстановлению данных с дисков и утраченных разделов.
- Поддержка множества файловых систем.
- Возможность создания загрузочной флешки/диска с DiskGenius.
К минусам DiskGenius можно отнести:
- Программа платная. Однако функция исправления бэд-секторов работает и в бесплатной версии DiskGenius без ограничений.
- Не поддерживает технологию перераспределения секторов.
- Отсутствует русский язык.
Все рассмотренные выше программы предназначены для работы в среде Windows (если не брать в расчет загрузочные версии Victoria и DiskGenius). Утилита MHDD не работает из операционной системы (Windows-версия хоть и существует, но с ее запуском обычно возникают всевозможные проблемы). Программа первоначально создавалась и в данный момент развивается в качестве загрузочного ПО для тестирования, диагностики и восстановления жестких дисков.

Наибольшую сложность у новичков вызывает процесс запуска MHDD, всегда начинающийся с создания загрузочной флешки или диска. Здесь этот процесс мы не будем рассматривать, а приведем ссылки для скачивания необходимых файлов:

Далее останется загрузить компьютер с вновь созданной флешки и выполнить несколько простых шагов по восстановлению BAD-блоков винчестера:
- Нажать F2 для построения программой списка жестких дисков.
- Ввести цифру, соответствующую номеру винчестера в списке, нажать Enter.
- В небольшом окне переместиться стрелками на клавиатуре к пункту «Remap», установить «ON», затем к пункту «Erase Delays», также установить «ON». Первая опция включает режим переназначения неисправимых бэд-блоков, вторая опция помогает восстановить программно битые секторы путем их полной перезаписи.
- Нажать Enter и ожидать завершения процедуры.

О плюсах и минусах MHDD судить сложно, т.к. программа в одном случае идеально справляется со своей задачей, в других — даже не определяет жесткий диск. Здесь многое зависит от модели винчестера и конфигурации материнской платы.
То, что в процессе работы с винчестерами не используются всевозможные системные драйверы и прочее посредническое программное обеспечение (т.е. работа с накопителем происходит практически напрямую), делает MHDD очень быстрым и безошибочным средством, чего нельзя сказать о любых утилитах, запускающихся из-под Windows.
Остались вопросы, предложения или замечания? Свяжитесь с нами и задайте вопрос.
Bad Sector Repair: How to Fix Bad Sectors on HDD in Windows 10/8/7
What to do when aВ hard disk hasВ bad sectors? This guide includes the best solutions to repair bad sectors on hardВ drive and protect your data effectively.
Occasionally, when one or more bad sectors come upon aВ hard disk, the disk will go bad. When this happens, the data in those bad sectors may be lost, but the data on the rest of the disk will be unaffected and the disk is still completely usable. In order to help you performВ bad sectors repair on hard drive and rescue your data as soon as possible, we suggest you follow through with the tips below before you take action to repair bad sectors.
HDD Bad Sector OverviewВ
Before you start, learn the basic information of bad sectors to pick a better solution and remove bad sectors from your drive.
What Is Bad Sector
According to Wikipedia and professional IT sites, the bad sector is defied a permanently managed storage unit on a hard disk. Once the sector gets damaged, all saved information in that section is lost. Usually, the operating system like Windows 10/8/7 will skip the bad sector once it’s found and marked.
Two types of Bad Sectors
Basically, there are two types of bad sectors — Hard bad sector (also called Physical bad sector) and Soft bad sector (also known as the Logical bad sector).
Hard bad sector is mainly caused by physical damage (in 1,2 causes), such as manufacturing error, physical broken, etc. While the soft bad sector is usually related to software issues (in the 3rd cause) such as improper operations on hard drive, file system error, etc.
Due to the different causes of bad sectors, the ways to repairing bad sectors are also varied. Continue reading, you will find the best solutions to repair bad sectors on your hard drive in Windows 10/8/7.
How to Check Bad Sectors in Hard Disk on Windows 10/8/7
Although we have explained that bad sectors can be defined as physical and logical bad sectors, you may still don’t know how to distinguish them. Here is a simple rule for you to tell the difference: whether you can check bad sectors on your drive.
If you can run a disk checking andВ get the basic information about bad sectors, it’s highly possible that your drive is having soft bad sectors. If not, the situation will become worse and it could be the hard bad sectors.
To know about the amount of the bad sectors clearly, a professional and free disk managementВ tool is recommended — EaseUS Partition Master Free. It can check for bad sectors on a hard disk on Windows 10/8/7 for free with one click.
Besides, it has comprehensive hard drive partitioning options, such as resize/move partitions, create, merge, format, and wipe partitions. You can also use it to convert FAT32 to NTFS without losing data,В convert MBR disk to GPT disk, or vice versa.В
Step 1. Download EaseUS Partition Master and install it. Right-click the disk that you want to check, and then click «Surface test».
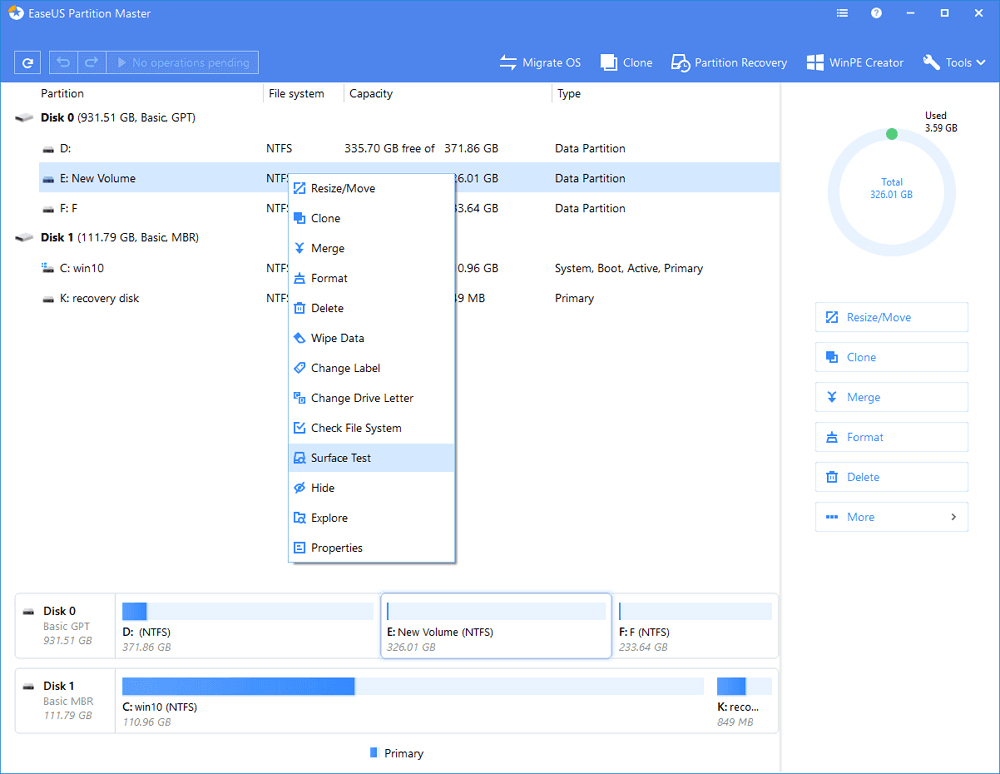
Step 2.В The operation will be immediately performed. Bad sectors will be marked as red.
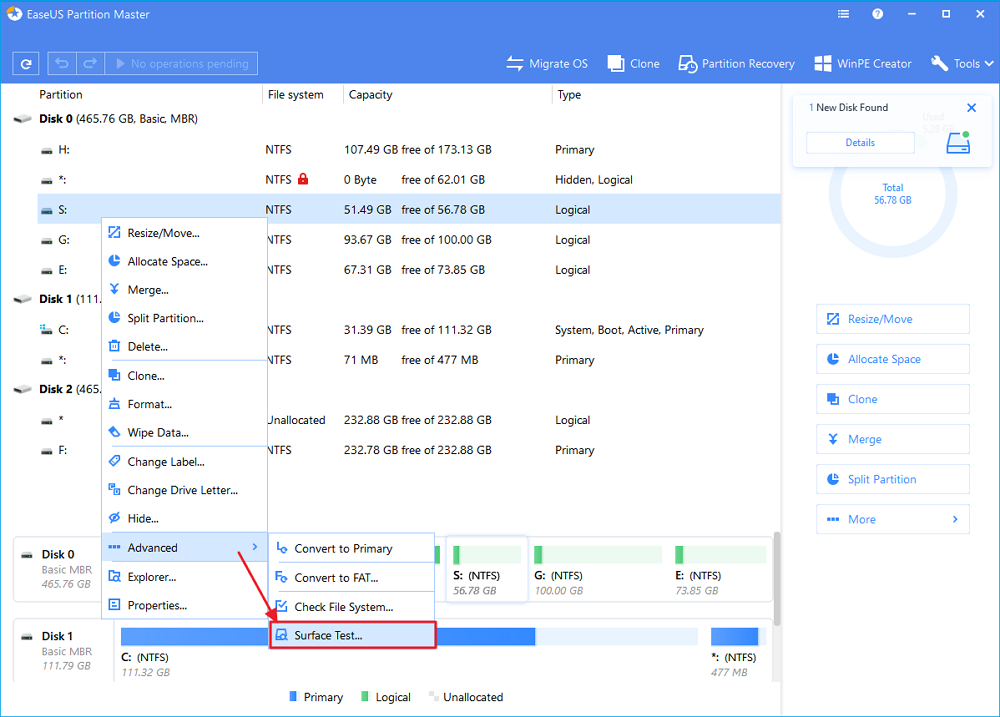
When there are too many bad sectors, the scanning process will be stuck. Wait patiently. After the process, you could know exactly how many bad sectors are there.
How to Fix BadВ Bad Sectors on HDD inВ Windows 10
As youВ know that when the operating system detects bad sectors, it would mark them as unusable no matter it’s logical or physical bad sectors. As a result, data loss and the loss of disk capacity are unavoidable.В Then, how to fix and remove bad sectors from the hard disk? Read on forВ in-depth tutorials.В
First Thing to Do: Back Up and Clone HDD to a Good Hard Drive (Skip Bad Sectors)
If the disk contains many soft bad sectors, always stuck or slow to load data on the computer, or the drive is failing due to physical bad sectors, it is impossible to repairВ bad sectors.В The wise choice is to back up and save your data at first. But how to copy a hard drive with bad sectors?
EaseUS Disk Copy,В a powerful disk cloning software,В can skip the bad sectors and cloneВ disk toВ make a full copy of your hard drive.
Support Windows 10/8.1/8/7/Vista/XP
Some key features of EaseUS disk cloning software:
- Transfer OS to new hard drive without reinstalling Windows and applications
- Clone a larger HDD to a smaller SSD
- Clone hard drive to USB flash drive easily
Download and apply this disk copy software to upgrade and clone HDDВ withВ bad sectors to a healthy hard drive without effort.
EaseUS Disk Copy
Replace the Disk with a Good one
If your computer can’t boot into your operating system,В create a bootable USBВ in advance, and then followВ the steps below to copy your data.В Remember to connect theВ new hard drive to the computer as a storage device.
Step 1: Choose «Disk mode» and select the smaller hard drive as the source disk.

Step 2: Choose the bigger hard drive to save the data and then click «Next».
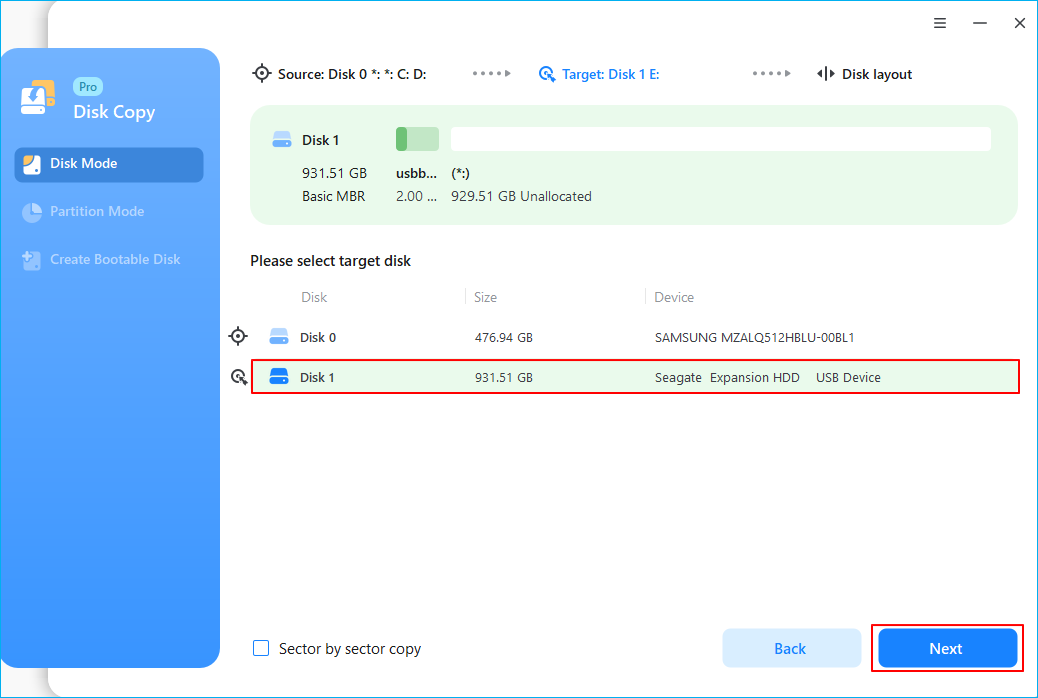
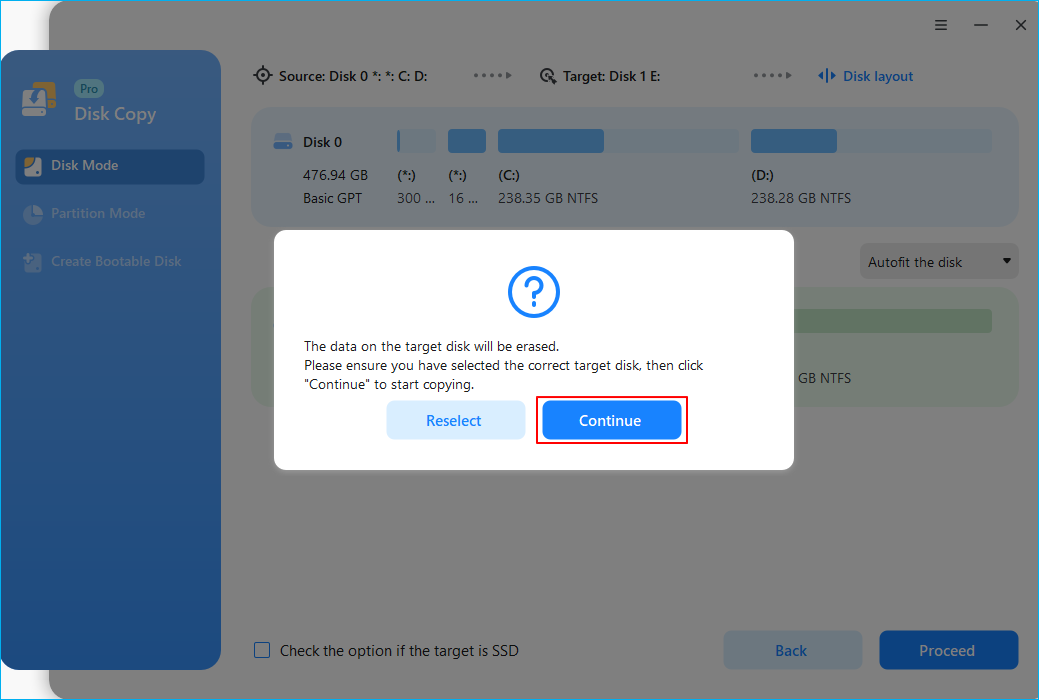
Step 3: A warning message tells you that the data on the destination disk will be overwritten. Click “OK” to continue if you do not have important data on the destination disk.
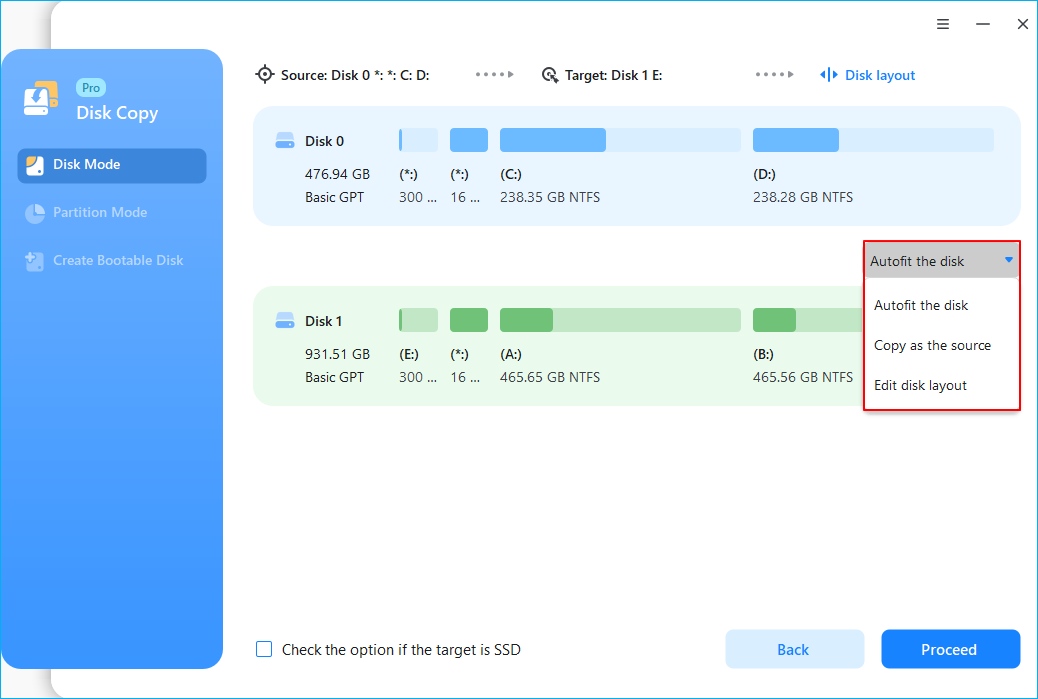
Step 4: Edit the disk layout and then click «Proceed» to continue.
- «Autofit the disk» resize the layout on destination disk according to the size of it to make the disk as the best status.
- «Copy as the source» doesn’t change anything on destination disk and the layout is same as source disk.
- «Edit disk layout» allows you to manually resize/move partition layout on this destination disk.
Step 5: Wait for the process to complete.
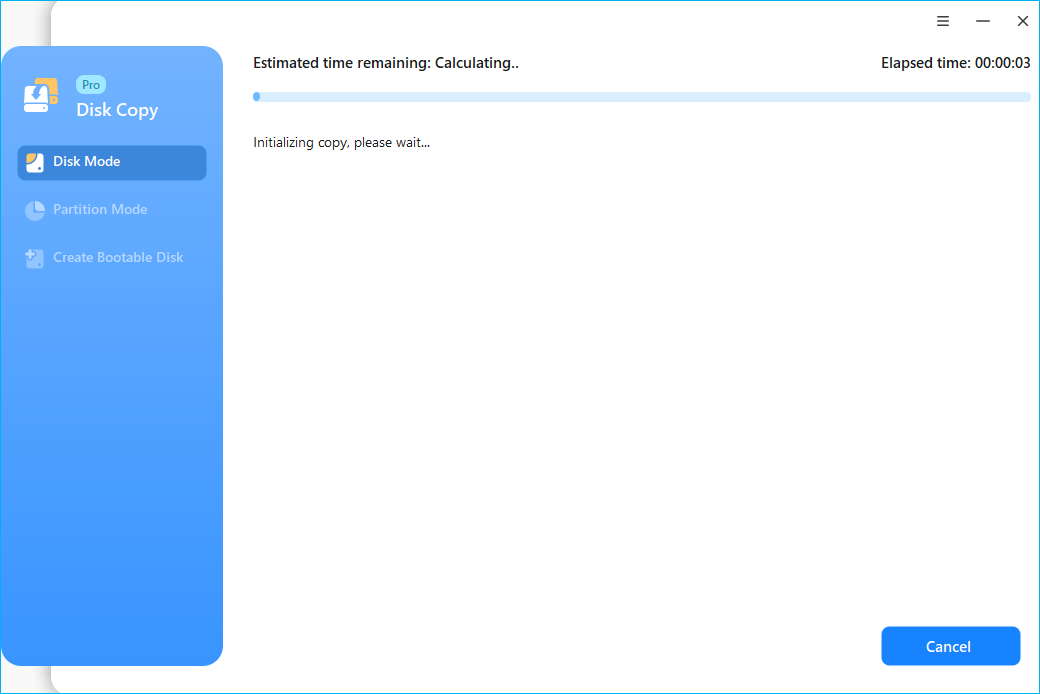
When the cloning process finishes, shut down your computer, insert the newly upgrade hard drive into your computer and replace the old drive. If it’s a system drive, set the computer to boot from a new hard drive instead of the old one in BIOS.
Support Windows 10/8.1/8/7/Vista/XP
Repair Soft/Logical Bad Sectors in WindowsВ
If your hard drive is experiencing one or more bad sectors, still accessible, follow our instructions to fix yourВ problem and remove bad sectorsВ permanently fromВ hard disk with bad sectors repair tools.В
В 1. Run CHKDSK Command and Format Hard Drive
If there only a few bad sectors on your drive, you can run CHKDSK command and format the drive to repair those bad sectors:
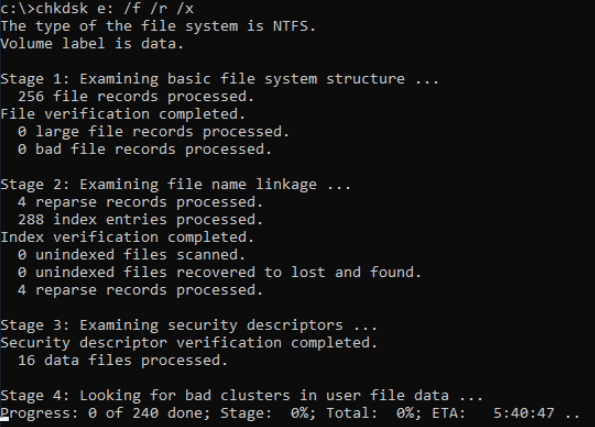
Step 1. Run the CHKDSK command to fix soft bad sectors.
1. Press the Windows key and type cmd.
2. Right-clickВ «CommandВ Prompt»В andВ chooseВ «RunВ asВ administrator».
3. Type chkdsk E: /f /r /x and hit Enter. (Replace E with the drive letter of your hard drive.)
Step 2. Format hard drive to usable again
1. Open Windows File Explorer, locate and right-click on your hard drive.
2. Select «Format», reset the file system as NTFS, tick «Quick Format» and click «Start».
After this, you can save your data back to your hard drive and use it again.
2. Use a free disk check and repair tool to fix bad sectorsВ
EaseUS partition management software offers the simplest methodВ to check and fixВ hard drive errors. You can apply its Check File System option to checkВ and repair hard disk partition errors in Windows 10.
В in Windows 10, 8, or other Windows OS with one-click. Just download and start EaseUS partition management software, locate the hard disk, then run the check file system.
Hard/Physical Bad SectorsВ Repair
Mostly, when your hard drive contains hard bad sectors, you cannot repair bad sectors by using normal solutions. The only possible way is to low-level format the drive, resetting the hard drive blocks, clusters, and sectors.
A low-level format is also called a physical format. Modern hard drives are low-level formatted at the factory for the life of the drive. A PC cannot perform an LLF on a modern IDE/ATA or SCSI hard disk, and doing so would destroy the hard disk. That is to say, you can’t repair a bad sector.
To resolve this issue, you have two choices:
1. Send your hard drive to the manufacturer or a local repair center, customize for low-level format.
2. Choose to clone the disk with bad sectors to a good hard driveВ to avoid the hard disk getting worse with more bad sectors.
Summary of Bad Sector Repair
This page provides the complete guide to help youВ fix bad sectors on HDD. To removeВ bad sectors from hard disk permanently, you can use the Windows CHKDSK command or EaseUS free partitioning software. With theВ two bad sector repair tools, you can efficientlyВ fix and repair bad sectors on the hard drive, external storage devices.
In contrast to logical bad sectors, if there are physical bad sectors on your hard drive, it’s almost impossible to repair your hard disk. You need to replace it with a new hard HDD. So, to avoid data loss,В when you find bad sectors on your disk, be sure to use EaseUS disk clone software to copy and make a backup of your data.В
Support Windows 10/8.1/8/7/Vista/XP
More Information About Bad Sectors
Some people may also have questions about diagnosing if bad sectors are on your drive. You may judge from the following two factors:
1. What are the symptoms of bad sectors?
When you meet one of the following symptoms, your hard drive or external storage devices may contain bad sectors:
- Strange friction sound when booting or running hard drive.
- System pops up an error message, like «Sector not found» or «General error in reading drive C», etc.
- Disk won’t format, getting an error.
- Scandisk (a diagnostic utility) automatically runs when the system is booted.
- Some operations are stuck or become random to a certain process.
2. What are the causes of hard bad sectors?
1. Hard drive was shipped from the factory with bad sectors. (e.g. SSD disk)
2. Physical damage, like:
- Manufacturing error
- Accidental drop, break, etc.
- The touch of the hard drive header to the platter
- Dust
3. What are the causes of soft bad sectors
- Software issue, like:
- Sudden shutdown of the computer
- Sectors that contain data don’t match the error-correction code
- Viruses, malware messes computers, cause bad sectors.
4. How to avoid bad sectors?
Some of you may also want to know how to protect the drive from bad sector errors. Here are some tips:
- Run Disk Check or CHKDSK command on your drive regularly to remove soft bad sectors.
- Run virus cleaner software to remove viruses and malware.
- Execute proper operations on your drive, for example: close all running programs before shutting down the computer.


