- Восстановление загрузчика GRUB через Boot-Repair в Ubuntu
- Восстанавливаем загрузчик GRUB через Boot-Repair в Ubuntu
- Шаг 1: Установка Boot-Repair
- Шаг 2: Запуск Boot-Repair
- Шаг 3: Исправление найденных ошибок
- Ubuntu Documentation
- How to fix the Ubuntu GRUB bootloader
- How to fully fix the Windows bootloader using a Windows disk
- Windows Vista or 7 or 8
- How to partially fix the Windows bootloader using an Ubuntu CD
- Via the Boot-Repair graphical tool
- Via command lines
- See also
- Ubuntu Documentation
- Getting Boot-Repair
- 1st option : get a disk including Boot-Repair
- 2nd option : install Boot-Repair in Ubuntu
- Using Boot-Repair
- Recommended repair
- Advanced options
- External Links
Восстановление загрузчика GRUB через Boot-Repair в Ubuntu

Достаточно частой практикой у пользователей является установка двух операционных систем рядом. Чаще всего это Windows и один из дистрибутивов, основанных на ядре Linux. Иногда при такой инсталляции возникают проблемы с работой загрузчика, то есть загрузка второй ОС не производится. Тогда его нужно восстановить собственными силами, изменив системные параметры на правильные. В рамках данной статьи мы бы хотели обсудить восстановление GRUB через утилиту Boot-Repair в Ubuntu.
Восстанавливаем загрузчик GRUB через Boot-Repair в Ubuntu
Сразу хочется отметить, что дальнейшие инструкции будут приведены на примере загрузки из LiveCD с Ubuntu. Процедура создания такого образа имеет свои нюансы и сложности. Однако разработчики операционной системы максимально детально описали эту процедуру в своей официальной документации. Поэтому мы настоятельно рекомендуем ознакомиться с ней, создать LiveCD и загрузиться с него, а уже потом переходить к выполнению руководств.
Шаг 1: Установка Boot-Repair
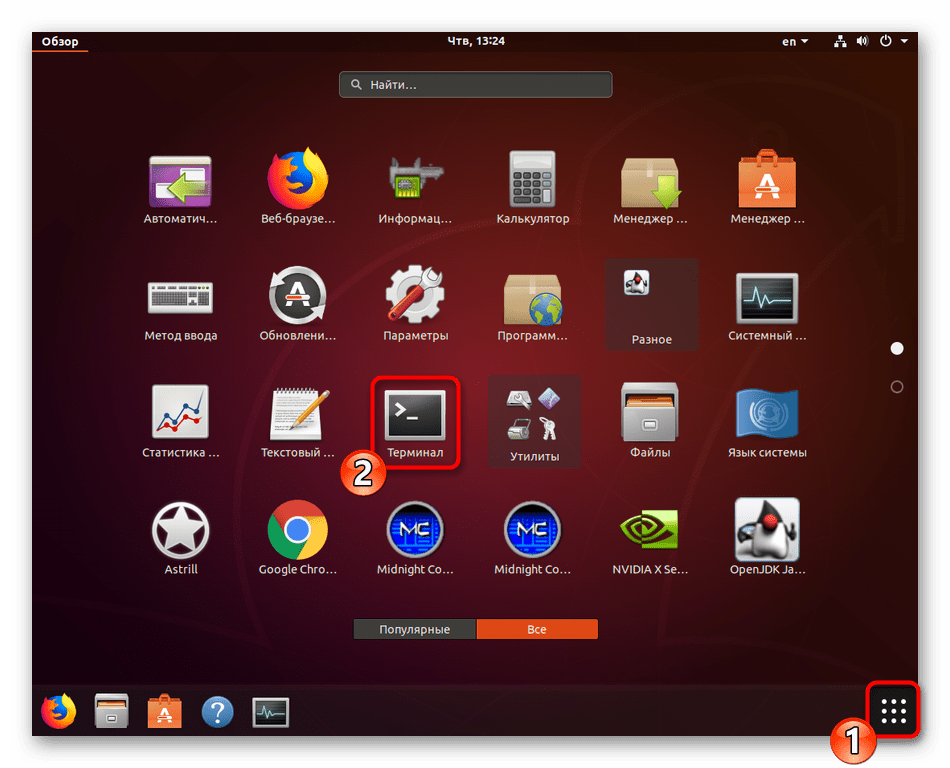
Рассматриваемая утилита не входит в стандартный набор инструментов ОС, поэтому ее придется установить самостоятельно, воспользовавшись пользовательским репозиторием. Все действия осуществляются через стандартный «Терминал».
- Запустите консоль любым удобным способом, например, через меню или зажатие горячей клавиши Ctrl + Alt + T.
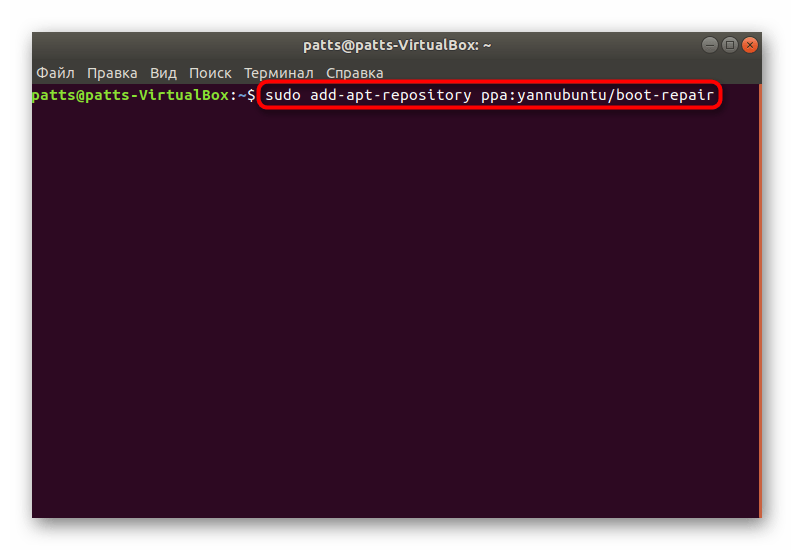
Загрузите необходимые файлы в систему, прописав команду sudo add-apt-repository ppa:yannubuntu/boot-repair .
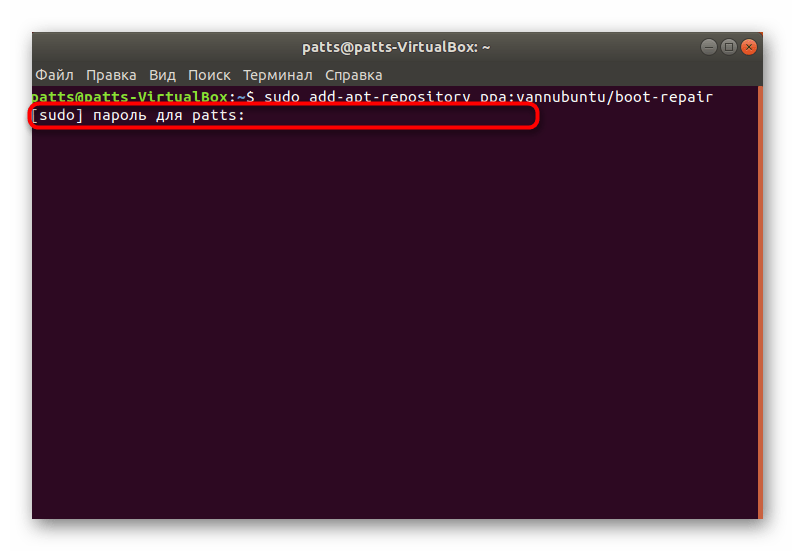
Ожидайте завершения загрузки всех необходимых пакетов. Для этого должно иметься активное подключение к интернету.
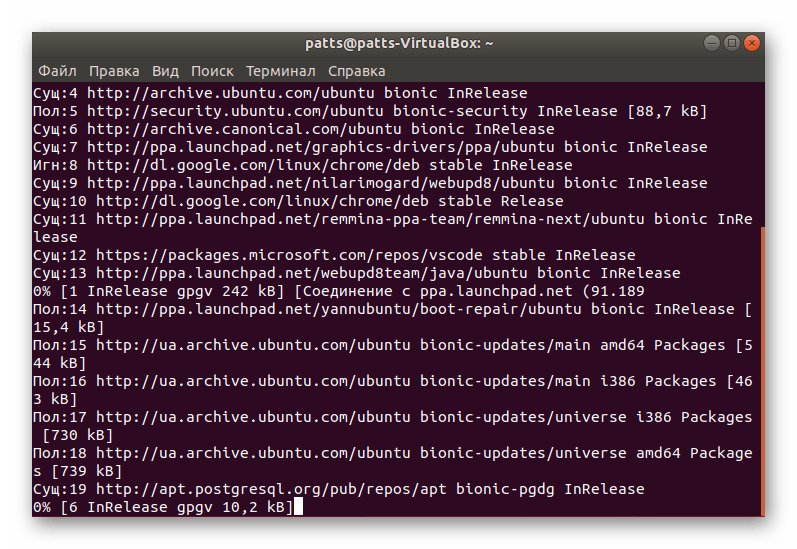
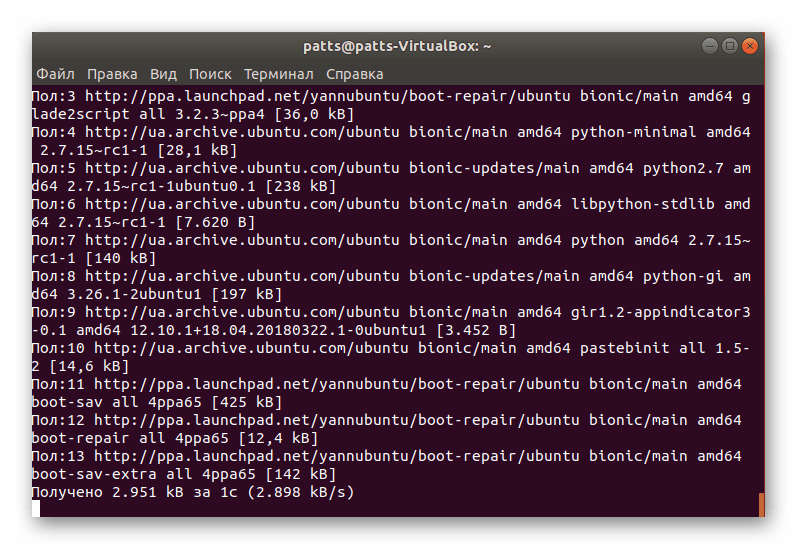
Обновите системные библиотеки через sudo apt-get update .
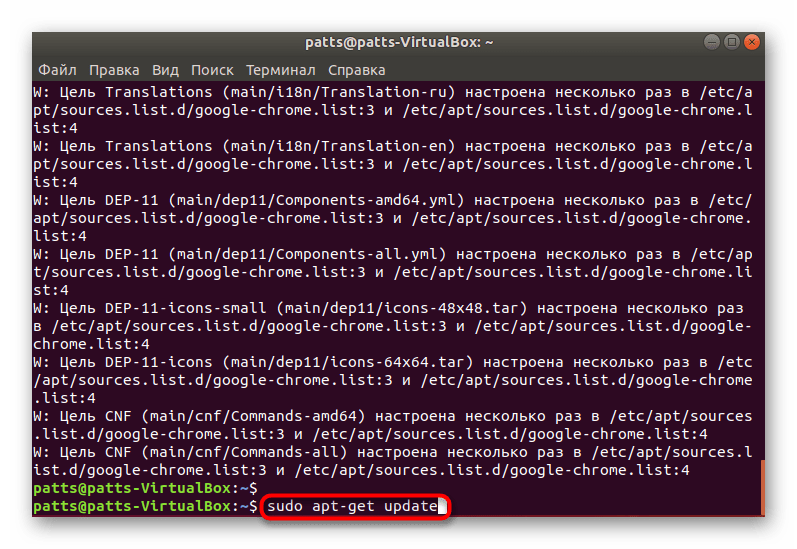
Запустите процесс инсталляции новых файлов, вписав строку sudo apt-get install -y boot-repair .

Когда вся процедура прошла успешно, можно смело переходить к запуску Boot-Repair и сканированию загрузчика на наличие ошибок.
Шаг 2: Запуск Boot-Repair
Для запуска установленной утилиты вы можете использовать иконку, которая была добавлена в меню. Однако не всегда получается работать в графической оболочке, поэтому достаточно просто ввести в терминале boot-repair .

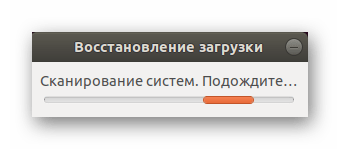
Будет произведен процесс сканирования системы и восстановления загрузки. Во время этого не делайте ничего на компьютере, а также не завершайте принудительно функционирование инструмента.
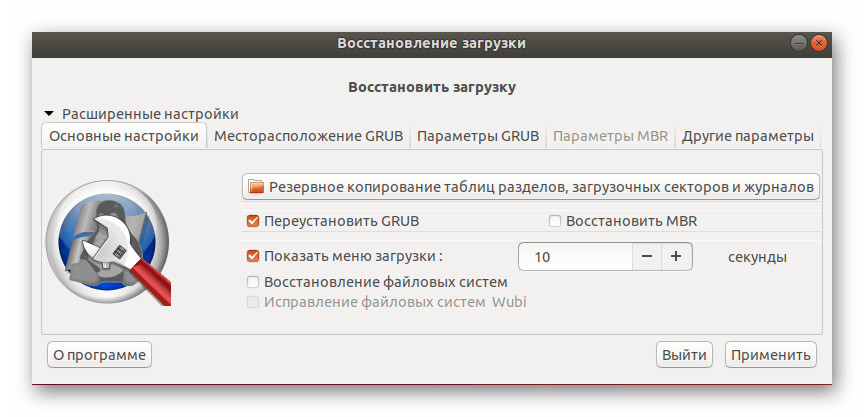
Шаг 3: Исправление найденных ошибок
После окончания анализа системы программа сама предложит вам рекомендованный вариант восстановления загрузки. Обычно он исправляет самые часто встречающиеся проблемы. Для его запуска просто потребуется нажать на соответствующую кнопку в графическом окне.
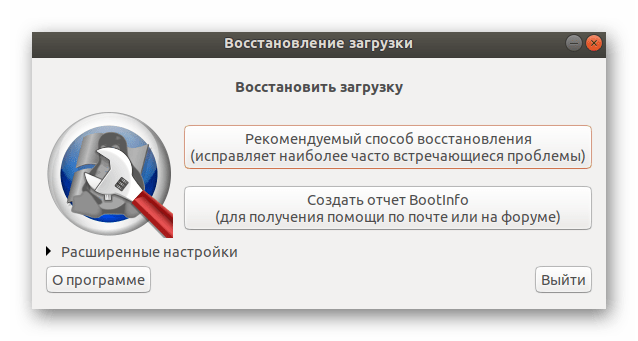
Если вы уже сталкивались с работой Boot-Repair или прочитали официальную документацию, в разделе «Расширенные настройки» можете применить собственные параметры восстановления, чтобы обеспечить стопроцентный результат.
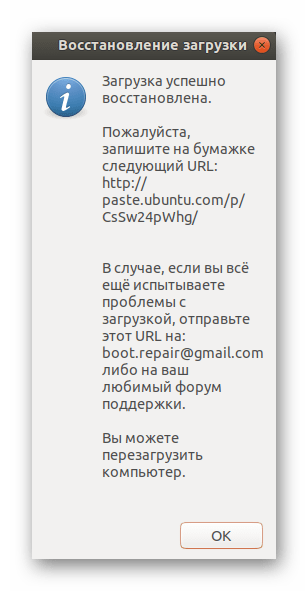
По окончании восстановления перед вами откроется новое меню, где будет видно адрес с сохраненными логами, а также отобразится дополнительная информация касаемо результатов исправления ошибок GRUB.
В случае когда у вас нет возможности использовать LiveCD, потребуется загрузить образ программы из официального сайта и записать его на загрузочную флешку. При ее запуске на экране сразу отобразятся инструкции, и потребуется выполнить их все, чтобы решить возникшую проблему.
Обычно с возникновением неполадок GRUB сталкиваются юзеры, которые поставили Ubuntu рядом с Windows, поэтому следующие материалы по теме создания загрузочного накопителя будут максимально полезны, советуем детально ознакомиться с ними.
В большинстве случаев применение простой утилиты Boot-Repair помогает быстро справиться с наладкой работоспособности загрузчика Ubuntu. Однако если вы и дальше сталкиваетесь с различными ошибками, рекомендуем запомнить их код и описание, а после обратиться к документации Убунту для поиска доступных решений.
Ubuntu Documentation
Discussion of this wiki can be found here
- This wiki is for Windows dual booters who reinstall an operating system only to find that it has taken away access to their other operating system.
Whether you want to restore the XP, Vista, 7 or Ubuntu (Grub) bootloader, this guide will walk you through it.
All four parts of this tutorial require that you boot from a CD or DVD. If you don’t know how to do this, check here.
If you have made a mistake and want to revert the changes, simply follow the instructions for reinstalling the previous bootloader. For example, if you have installed vista over ubuntu, try to get the ubuntu bootloader back, but want to get the vista bootloader back, simply follow the instructions for installing the vista bootloader.
How to fix the Ubuntu GRUB bootloader
How to fully fix the Windows bootloader using a Windows disk
Boot on your Windows XP installation CD or XP Recovery console. You will get to a part where it asks if you want to repair or recover. To do so, press «r». If prompted, enter your Windows XP administrator password. This will leave you at at a command line, so type in the following two commands:
- Then remove your XP cd. If everything has gone well, you should come to your XP bootloader.
Windows Vista or 7 or 8
- First boot on your Windows Vista/7/8 installation DVD.
If you have one of the many OEM computers that didn’t come with a Windows installation disk, you can get the same effect with a Windows repair disk, which you can download (eg Win7-32bit, Win7 64bit) or create from another Windows Vista/7/8 computer (see this page for Win7 and Make your own Windows repairCD, and Windows 8 UEFI repair USB must be FAT32, other Win8 guide). When you get to the Regional settings, select your Location/Keyboard setting then click next. On the next page, click on «Repair your computer.» On the next page, if it finds your Windows installation, make sure it is UNSELECTED before clicking next. Then click on «Command prompt». From there, type in the following 2 commands:
- Now close the two windows and click «Restart.» Take out your Windows DVD and hopefully, you will be left with your Windows bootloader.
How to partially fix the Windows bootloader using an Ubuntu CD
Note: these methods will work on Legacy firmwares (not UEFI), if Windows boot files are not broken, and if the boot sector of the Windows boot partition is healthy. In other cases, you will need a Windows installation or repair disc as described above.
Via the Boot-Repair graphical tool
Run Boot-Repair from a liveCD, click «Advanced options», tick «Restore MBR», click «Apply».

This will automatically restore a generic syslinux MBR, and set the boot flag on the Windows boot partition. This will also tell you if the Windows bootsector needs repair (see this tutorial).
Via command lines
1. Boot from the live CD (or live USB) of any recent version of Ubuntu and choose “Try Ubuntu” to get to the live desktop
2. Check that the partition from which Windows boots has the ‘boot’ flag. For XP and Vista, this is normally the main C: partition. Windows 7 usually (but not always) has a separate boot partition of 100-200 MB in size with the partition label “SYSTEM”. There are also more exotic configurations where two versions of Windows have been installed to the same hard drive, or where the main Windows partition is a logical one. In these cases there will be a single primary partition with the Windows boot files which needs to be marked as active, and you will need to identify which this is. Once you have done so, open Gparted and see if “boot” is listed under the flags column for that partition. If not, highlight the partition and go to Partition menu → Manage Flags, tick the tick-box for “boot” and then close that window and close Gparted.
3. Both methods below assume that the boot drive is designated /dev/sda in Ubuntu. This is almost always so, but with some unusual BIOS configurations where there is more than one hard drive, the boot drive may be other than /dev/sda. In such cases you will need to adjust the command appropriately.
If internet connectivity available, open a terminal and run these commands:
If no Internet connection: recent versions of Ubuntu include the file /usr/lib/syslinux/mbr.bin which is 440 bytes in length and simply needs to be written to the beginning of the mbr with this terminal command. WARNING! Be very careful with this command and check for typos before running it.
4. Now reboot, remove the Ubuntu CD and you should reboot straight into Windows.
See also
RestoreUbuntu/XP/Vista/7Bootloader (последним исправлял пользователь yannubuntu 2013-07-31 19:14:01)
The material on this wiki is available under a free license, see Copyright / License for details
You can contribute to this wiki, see Wiki Guide for details
Ubuntu Documentation
Warning: This software is able to share information about your device for diagnostic purposes. You can chose to opt out in advanced settings. Please read this page fully. The log is quite helpful especially for the novice users.
Boot-Repair is a simple tool to repair frequent boot issues you may encounter in Ubuntu like when you can’t boot Ubuntu after installing Windows or another Linux distribution, or when you can’t boot Windows after installing Ubuntu, or when GRUB is not displayed anymore, some upgrade breaks GRUB, etc.
Boot-Repair lets you fix these issues with a simple click, which (generally reinstalls GRUB and) restores access to the operating systems you had installed before the issue.
Boot-Repair also has advanced options to back up table partitions, back up bootsectors, create a Boot-Info (to get help by email or forum), or change the default repair parameters: configure GRUB, add kernel options (acpi=off . ), purge GRUB, change the default OS, restore a Windows-compatible MBR, repair a broken filesystem, specify the disk where GRUB should be installed, etc.
For the purpose of helping the forum and IRC members help you diagnose issues with your boot setup, Boot-Repair (provided it has a network connection) will create a Ubuntu pastebin link for you to share that allows experienced members to see what’s wrong with your boot. Ubuntu’s Pastebin is not easily indexable or searchable, and purpose of the tool which creates this page (Boot-Info) is meant to be a very benign and helpful solution to the problem. The intention is not violate your privacy, nor is it meant to make you a target. This tool is aimed entirely at those new to Ubuntu who want to get past their booting issues and enjoy using Linux. If you’d like to, you may completely opt out of all internet usage including pastebin link generation by looking at the Advanced Options section below. Please do not use this software if this is a problem for you.
Boot-Repair is a free software, licensed under GNU-GPL.

Getting Boot-Repair
1st option : get a disk including Boot-Repair
The easiest way to use Boot-Repair is to create a disk containing the tool (eg Boot-Repair-Disk, a disk starting Boot-Repair automatically), and boot on it.
Remark : it is recommended to install the ISO on a live-USB (eg via UnetBootin or LiliUSB or Universal USB Installer). Do not burn it on a DVD if your computer has Windows8 pre-installed, or if your boot is in EFI mode.
2nd option : install Boot-Repair in Ubuntu
— either from an Ubuntu live-session (boot your computer on a Ubuntu live-CD or live-USB then choose «Try Ubuntu») or from your installed Ubuntu session (if you can access it)
— connect to the Internet
— open a new Terminal, then type the following commands (press Enter after each line):
Using Boot-Repair
Recommended repair
- launch Boot-Repair from either :
- the Dash (the Ubuntu logo at the top-left of the screen)
- or by typing ‘boot-repair’ in a terminal
-
Then click the «Recommended repair» button. When repair is finished, note the URL (paste.ubuntu.com/XXXXX) that appeared on a paper, then reboot and check if you recovered access to your OSs.
- If the repair did not succeed, indicate the URL to people who help you by email or forum.
Warning: the default settings are the ones used by the «Recommended Repair». Changing them may worsen your problem. Don’t modify them before creating a BootInfo URL, and asking for advice on Ubuntu Forums Absolute Beginners Section or in Installation and Upgrades.
Advanced options
* If you would like to opt-out of the paste.ubuntu.com link creation (Not recommended for inexperienced users who are seeking help from a forum or IRC member), you can. Simple click on the Advanced Options, and find the «Other Options» tab. Uncheck «Upload the report to a pastebin».
* The log may include UUIDs, LUKS headers, hex dump of your first sectors of your drives, device serial numbers, your username and more.

External Links
Boot-Repair (последним исправлял пользователь arunesh90 2015-12-03 20:42:26)
The material on this wiki is available under a free license, see Copyright / License for details
You can contribute to this wiki, see Wiki Guide for details


