- Что делает Microsoft Software Repair Tool для Windows 10
- Как работает Software Repair Tool
- Под капотом
- [SOLVED] How to Revive Windows 10 With Recovery Drive | Easy Fix [MiniTool Tips]
- Summary :
- Quick Navigation :
- Windows 10 Repair Disc vs. Windows 10 Recovery Drive vs. System Image
- How to Create a Windows 10 Recovery USB Drive in 4 Steps?
- Step 1. Plug in a USB to Windows 10 PC
- Step 2. Open Windows 10 Recovery Drive Tool
- Step 3. Select the USB Flash Dive
- Step 4. Create the Recovery Dive
- How to Create a Windows 10 Repair Disk in 3 Steps?
- Step 1. Insert CD/DVD
- Step 2. Open create a system repair disc window
- Step 3. Create a repair disk for Windows 10
- How to Create a System Image in Windows 10?
- How to Repair and Restore Windows 10 – 5 Fixes
- Fix 1. Try Windows Startup Repair
- Fix 2. Try System Restore
- Fix 3. Use sfc /scannow
- Fix 4. Reset Windows 10 PC
- Fix 5. Repair Windows 10 from USB without Data Loss
- Bottom Line
- Windows 10 Repair Disk FAQ
- ABOUT THE AUTHOR
Что делает Microsoft Software Repair Tool для Windows 10

Фото: @futurecomputers
Инструмент Microsoft Software Repair Tool (или Windows Self-Healing Tool) стал доступен сравнительно недавно. При этом пока нет официальной страницы с описанием утилиты, и сама программа предоставляет мало информации о своей работе.
Как работает Software Repair Tool
Попробуем вместе с порталами Ghacks и Winhelponline разобраться, что она делает.
Первый экран является практически бесполезным с точки зрения информации о функциональности — на нем выводится сообщение: “Появились проблемы с вашим устройством Surface? Данный инструмент позволит обновить устройство и устранить программные проблемы”. Тем не менее, запускать инструмент устранения неполадок можно на любых устройствах Windows 10, а не только на планшетных компьютерах Surface.

После того, как вы примите лицензионное соглашение (конечно, после его детального прочтения) и нажмете кнопку “Proceed to scan and fix”, если в системе отключена функция восстановление системы, утилита предложит включить ее. Таким образом, вы сможете восстановить состояние операционной системы, если инструмент устранения неполадок не сможет справиться с проблемами.

Далее процесс устранения неполадок запустится автоматически без возможности остановить его с помощью элементов интерфейса.
Открывшийся экран сообщает о некоторых операциях, которые будут выполнены программой:

- 1. Восстановление системных компонентов и обнаружение поврежденных файлов (Repair System Components and detect corrupt files)
- Создание точки восстановления системы (Create System Restore Point)
- b. Принудительная синхронизация системного времени и даты (Resync System Date and Time)
- с. Сброс системных настроек (Reset System Settings)
- d. Переустановка системных приложений (Reinstall System Applications)
- 2. Восстановление поврежденных компонентов системы (Repair system corruption)
- 3. Обновление Windows (Windows Update)
Предоставляемая информация дает общее представление о работе Software Repair Tool, но не содержит подробной информации, а сама утилита не позволяет запускать только отдельные опции восстановления.
Очевидно, что многие пользователи могут не захотеть переустанавливать все системные приложения или сбрасывать все настройки системы, например, если ранее в конфигурацию вносились изменения.
Под капотом
На сайте Winhelponline сделали подробный анализ выполняемых Software Repair Tool операций. Среди действий, не упомянутых на стартовом экране утилиты, можно отметить:
- Сброс Winsock, настроек прокси и фаервола.
- Переустановка всех встроенных приложений с помощью PowerShell.
- Очистка куки и файлов авторизации WSUS.
- Сброс Магазина Windows с помощью wsreset.exe.
- Запуск заданий обновления Windows и автоматического обновления приложений.
- Регистрация нескольких dll файлов.
- Очистка компонентов с помощью DISM.
- Восстановление образа Windows с помощью PowerShell/DISM.
- Восстановления стандартной схемы электропитания.
Software Repair Tool выполняет что-то среднее между полным сбросом системы и ручным запуском отдельных операций восстановления и устранения неполадок.
Несмотря на то, что утилита может быть привлекательной для пользователей из-за своей простоты, ее использование может быть лишним, в зависимости от испытываемой проблемы. Однако, если вы не можете определить зависимость проблемы от определенного компонента Windows 10, тогда имеет смысл выполнить задачи восстановления для возвращения нормальной функциональности системы.
Отметим, что если вы вносили изменения в настройки системы или удаляли встроенные приложения (например, изменяли настройки конфиденциальности Windows 10), то вам придется повторить эти действия после работы Software Repair Tool.
Нами была проверена работа Microsoft Software Repair Tool на системах Windows 64-bit версий 1511 (Threshold 2) и 1607 (Anniversary Update), при этом не было выявлено каких-либо проблем после применения.
[SOLVED] How to Revive Windows 10 With Recovery Drive | Easy Fix [MiniTool Tips]
By Alisa | Follow | Last Updated October 26, 2020
Summary :
It’s frustrating if your Windows 10 PC refuses to boot due to sudden system crash, hard drive errors or virus infection. By creating a Windows 10 repair disk, recovery (USB) drive, system backup image, you can easily repair and recover Windows 10 system when computer becomes inaccessible. Data recovery solutions are also provided.
Quick Navigation :
Data loss is a common issue if your Windows 10 operating system suddenly breaks down or the internal hard drive has some severe errors like bad sectors or physical damage. Always having a recovery or backup plan would be a good rescue in case your Windows 10 PC is unable to boot.
This post mainly illustrates how to create Windows 10 repair disk, recovery drive, system image, and how to repair Windows 10 with 5 fixes. The best easy-to-use data recovery software for Windows (10) is also provided to help you easily retrieve lost or wrongly deleted data.
Windows 10 Repair Disc vs. Windows 10 Recovery Drive vs. System Image
Windows 10 has two operating system recovery/repair options: Recovery Drive and System Repair Disc. Some of you may be confused with these two Windows 10 OS repair solutions, and wonder which one to choose. Check their differences below.
Windows 10 repair disc: The system repair disc has existed since Windows 7. It’s a bootable CD/DVD disc which includes Windows troubleshoot tools to help you fix “computer can’t boot correctly” issues. It also contains tools to allow you to restore PC from a previously created System Image Backup. The system repair disc brings your computer back to the same condition in which you created the repair disc.
Windows 10 recovery drive: The recovery drive is added into Windows 10 and 8. You can create a bootable USB recovery drive that contains the same troubleshooting tools as the system repair disk. Additionally, it will copy the necessary system reinstallation files based on the current PC and allow you to reinstall Windows 10 when needed. The recovery drive will bring your system back to factory default status.
Windows system image: You can choose to restore computer from a recovery system backup image. This method creates an image of the entire Windows environment incl. personal files and applications. You need to regularly create the system image to keep the current Windows.
The recovery image is stored on a special recovery partition on your PC. It is 3-6GB. If you’ve created a recovery drive, you can optionally delete the system backup image or delete the recovery partition to save space of your PC. The System Image Backup utility is suspended in Windows 10. You can check below how to easily create a system backup image in Windows 10 with another easy method.
Choice:
- Windows 10 repair disk and recovery drive are almost the same. Both can repair your Windows 10 operating system corruption or boot problems. Therefore, you don’t need to create both the system disc and recovery drive of Windows 10.
- USB drive is small and portable, and less likely to be damaged than a DVD/CD disc. The data transfer speed of USB is much faster than a DVD reader. Besides, many new PCs or laptops don’t have internal DVD drives anymore. You can just create a Windows 10 recovery USB drive.
- However, if your PC is unable to boot from USB, you still need to create a Windows 10 system repair CD/DVD disk to help you repair Windows 10 startup issues.
- Windows 10 recovery drive and repair disk don’t back up your personal files/data and installed programs. If you have some important data fearing to be lost one day, or need to reinstall Windows 10, it’s strongly suggested that you make a data backup.
How to Create a Windows 10 Recovery USB Drive in 4 Steps?
Most people choose to create a recovery USB drive for Windows 10 to troubleshoot system errors, reset computer or reinstall Windows in the event of a PC disaster. Check the step-by-step guide below on how to create a recovery drive.
Step 1. Plug in a USB to Windows 10 PC
At first, you should plug in a USB (larger than 8GB) to your Windows 10 computer, and make it well-connected. (Related: Fix USB Flash Drive Not Recognized)
Step 2. Open Windows 10 Recovery Drive Tool
In Windows 10 search box next to Start, you can type recovery drive in it. Click the best match result Create a recovery drive to open the Windows 10 Recovery Drive utility. Click Next.

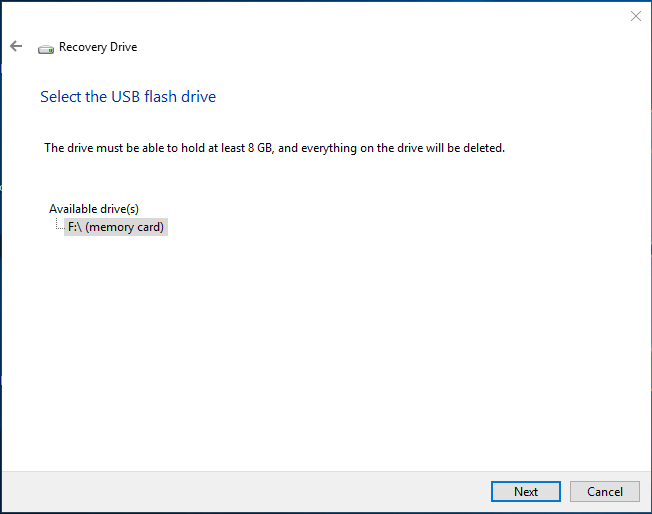
Step 3. Select the USB Flash Dive
Then you can choose the target USB drive and click Next.
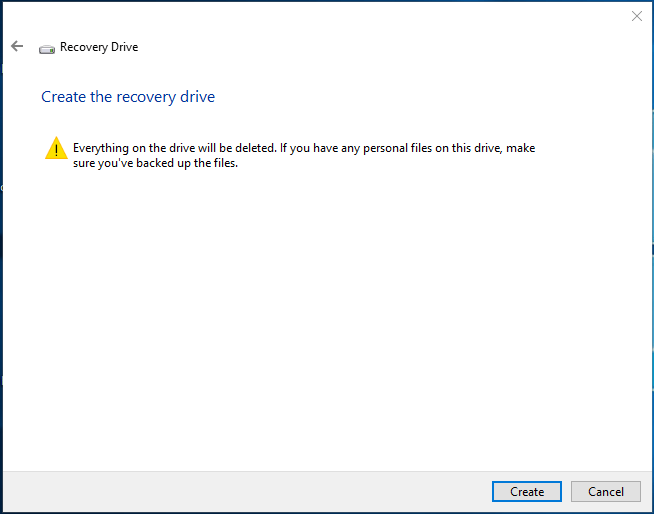
Step 4. Create the Recovery Dive
Finally tap Create button to start creating a Windows 10 recovery USB drive. The whole process may take some time. After it’s completed, click Finish.
If your computer doesn’t work or is unable to boot in future, you can plug in the recovery USB drive, and reboot your Windows 10 computer from USB.
When you see the Troubleshoot window, you can choose Recover from a drive or Advanced options.
Recover from a drive option is a clean reinstallation of Windows, and all your data, installed applications will be lost.
Advanced options option provides you several recovery/repair methods: System Restore, System Image Recovery, Startup Repair, Command Prompt, Go Back to the Previous Build.
How to Create a Windows 10 Repair Disk in 3 Steps?
Below is the guide on how to create a Windows 10 CD/DVD-based system repair disk.
Step 1. Insert CD/DVD
You can insert a blank CD/DVD into DVD-ROM or connected external DVD drive.
Step 2. Open create a system repair disc window
Click Control Panel on computer screen, then click Backup and Restore (Windows 7).
Next you can click Create a system repair disc from the left column to open the repair disc creation window.

Step 3. Create a repair disk for Windows 10
Choose the target blank DVD/CD disc you just inserted, and click Create disc icon to start creating a Windows 10 system repair disk.
You can then use the system repair disc to boot your Windows 10 computer, access the Windows system recovery tools to help you recover Windows from serious errors or restore your computer from a system image.
Continue to check how to create a Windows 10 system backup image.
How to Create a System Image in Windows 10?
Although the System Backup Image feature is discontinued in Windows 10, you can still use it to create system image for now. You can check the guide below.
- Enter into computer Control Panel window
- Click System and Security
- Click Backup and Restore (Windows 7)
- Choose Create a system image
- Choose a destination to save the backup under On a hard disk option
- Add other drives you’d like to contain the system back image
- Click Start Backup button to set off creating a system image backup of your Windows 10 PC

However, the Windows 10 System Image Backup feature may be unable to use in the future.
If the system backup image creation and restore is failed with Windows built-in tool, you have some alternative ways to easily create a Windows 10 system backup image to make a full backup of your Windows 10 PC and restore your PC with ease.
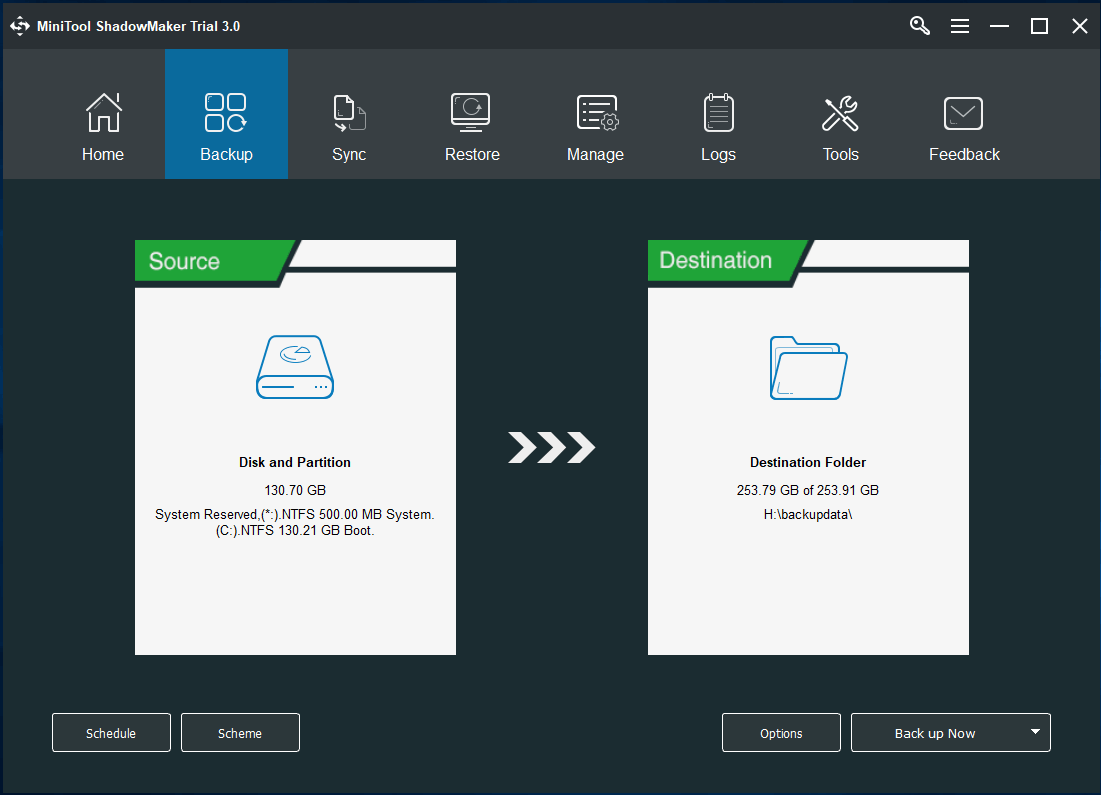
MiniTool ShadowMaker is the ideal choice. Aside from perfectly making an OS, files and folders, disks and partitions backup, this program also enables you to create a bootable Windows 10 recovery disk (CD/DVD disk or USB drive) to smoothly boot your computer and help you restore Windows 10 under WinPE mode.
What if the PC is unbootable? Worse still, you don’t create a Windows 10 repair disk, recovery drive or system back image in advance. You can continue to check how to create Windows 10 installation media or download and burn ISO Windows 10 to USB for another PC.
How to Repair and Restore Windows 10 – 5 Fixes
If your computer won’t be booted successfully, you can follow the steps below to fix and restore Windows 10. Fix 5 allows you to reboot your Windows 10 PC and recover all your data and files on computer.
Fix 1. Try Windows Startup Repair
The first action you can take to fix Windows 10 won’t boot issue is using the Startup Repair. You can check how to do it below.
Reboot your computer and normally you can press F11 key on the keyboard to enter WinPE. If you can’t enter WinPE window, then you need to use the Windows 10 repair disk or Windows 10 recovery USB drive you created above to access Windows 10 Advanced Options window.
Then you can select Troubleshoot -> Advanced Options -> Startup Repair to diagnose your PC and fix the startup issue.

Fix 2. Try System Restore
If Startup Repair can’t fix Windows 10 boot problem, you may further try Windows 10 System Restore.
You can click System Restore in the Advanced Options window, then the computer will reboot.
Next choose your account and enter your password. Select a restore point on your PC to restore Windows 10.
Fix 3. Use sfc /scannow
Windows 10 problem may be also caused by file corruption. You can use Windows Command Prompt to scan and fix corrupt files.
Press Windows + R key on the keyboard -> Type cmd to open Windows cmd utility -> Type sfc /scannow, and press Enter, and it will begin to scan and fix the corrupted files.

Fix 4. Reset Windows 10 PC
If your computer can’t run well due to malware infection or other sorts of issues, you can reset your Windows 10 computer.
Click Start -> Settings -> Update & Security -> Recovery -> Click Get Started under Reset this PC -> Choose Keep my files or Remove everything based on your need -> Click Reset and Continue.

Fix 5. Repair Windows 10 from USB without Data Loss
Windows 10 repair disk/recovery drive and some fixes listed above may be able to restore your computer. However, even if you repair the Windows 10 system, you may still suffer data loss because of previous system or disk error.
Luckily, you can easily recover lost data on PC with MiniTool Power Data Recovery before you perform a clean reinstallation of your Windows 10 PC.
Moreover, if your computer can’t boot and you can’t access your data, you can also use MiniTool Power Data Recovery to create a bootable media to USB drive, so as to boot your Windows 10 PC from USB and recover your needed data. Below the step-by-step guide.
Best Data Recovery Software for Windows 10/8/7 PC
MiniTool Power Data Recovery is a top-rated data recovery tool for Windows 10/8/7. You can use it to easily recover deleted/lost files under these situations: system crash, mistakenly files deletion, virus attack, hard drive error, formatted drive, lost partition, etc.
It allows you to recover data from various devices incl. HDD, SSD, external hard drives, USB flash drives, SD cards, CD/DVD, digital cameras/camcorders, and more.
Get this 100% clean and safe Windows 10 recovery tool — MiniTool Power Data Recovery – on your Windows 10 PC (Windows 8/8.1/7 are also supported).
>> Get MiniTool Power Data Recovery Personal Deluxe to have a lifetime license with free upgrade and support service.
Step 1 – Create WinPE bootable media
If your computer can’t be booted, you need to create a bootable media first. If your computer can boot, then jump to Step 3.
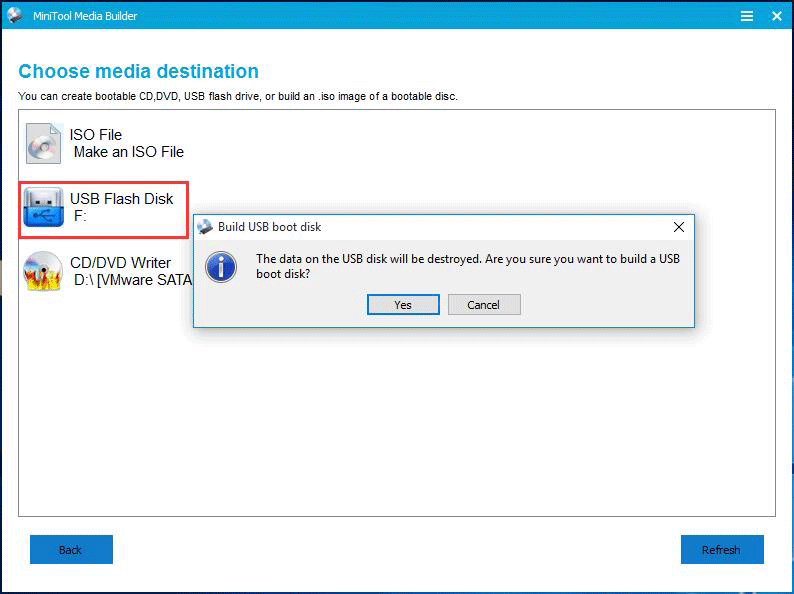
- Prepare a USB and plug it into another Windows 10 PC USB port. (The USB should better be a blank USB since all data on it will be deleted after you create bootable media to it.)
- Launch MiniTool Power Data Recovery and click Bootable Media icon at the bottom-left on the main UI.
- Select WinPE-based media with MiniTool plug-in.
- Choose the connected USB flash drive to save the bootable media. And click Yes.
- Click Finish after it completes building the USB bootable disk.
Step 2 – Boot Windows 10 PC from USB
Plug in the USB to your Windows 10 computer and boot PC from the USB drive. Launch MiniTool Power Data Recovery bootable version.
Step 3 – Choose a drive to scan
You can click This PC, and then choose the target partition which contains your lost data, and click Scan.

Step 4 – Find and save the recovered files
When the scan is finished, you can open the folders from the left column and check the items you needed and click Save button. You can view the scan result by Path or Type, and preview the recovered files.
Optionally you can click Show Lost Files to only list the recovered lost files, click Find to input file name to search certain file, or click Filter to scan some types of files.
It’s recommended to save the recovered data to another drive to avoid data overwriting.

With MiniTool Power Data Recovery, you can easily recover data when Windows 10 PC won’t boot.
Bottom Line
Windows 10 PC is not working well or won’t boot can bring you much inconvenience. By checking how to create Windows 10 repair disk/recovery drive/system image, as well as the fixes and guides for repairing Windows 10, hope your Windows 10 PC revives and works well now, and your lost data is already back.
If you still have problems about Windows 10 recovery, repair, reboot, restore and reinstall, please contact [email protected] .
Windows 10 Repair Disk FAQ
ABOUT THE AUTHOR

Position: Columnist
Alisa is a professional English editor with 4-year experience. She loves writing and focuses on sharing detailed solutions and thoughts for computer problems, data recovery & backup, digital gadgets, tech news, etc. Through her articles, users can always easily get related problems solved and find what they want. In spare time, she likes basketball, badminton, tennis, cycling, running, and singing. She is very funny and energetic in life, and always brings friends lots of laughs.


