- Create a system repair disc
- Create a recovery drive
- Windows 10 Boot Repair: Fix UEFI Boot Issue on Windows 10/8/7
- Method 1. Use Startup Repair forВ Windows 10 Boot Repair
- 1. Boot Up Windows from Installation Media
- 2. Enable Automatic Repair Option
- Method 2. Use Diskpart to Fix UEFI Boot Error in Windows 10
- 1. Enter Command Prompt from Advanced Options
- 2. Run Diskpart to Set Partition ID and Assign a Drive Letter
- 3. Repair the Boot Record
- 4. Rebuild the BCD Store
- Method 3. Change BIOS SettingsВ
- Method 4. Add Disk Driver toВ Repair Windows 10 Boot
- Method 5. Change the SATA Mode for Windows 10 Startup Repair
- To Sum Up
- Windows 10 Boot RepairВ FAQs
Create a system repair disc
System recovery options can help you repair Windows if a serious error occurs. To use system recovery options, you’ll need a Windows installation disc or access to the recovery options provided by your computer manufacturer. If you don’t have either of those choices, you can create a system repair disc to access system recovery options.
Open Backup and Restore by clicking the Start button, clicking Control Panel, clicking System and Maintenance, and then clicking Backup and Restore.
In the left pane, click Create a system repair disc, and then follow the steps.  If you’re prompted for an administrator password or confirmation, type the password or provide confirmation.
Note: If you’re prompted to insert a Windows installation disc, it means that the files needed to create the system repair disc can’t be found on your computer. Insert a Windows 7 installation disc.
Insert the system repair disc into your CD or DVD drive.
Restart your computer using the computer’s power button.
If prompted, press any key to start the computer from the system repair disc.
If your computer isn’t configured to start from a CD or DVD, check the information that came with your computer. You might need to change your computer’s BIOS settings.
Choose your language settings, and then click Next.
Select a recovery option, and then click Next.
Tip: Print these instructions and keep them in a safe location with your system repair disc.
Start your computer from a Windows 7 installation disc or USB flash drive
You might need to start, or boot, your computer using the Windows 7 installation disc or a USB flash drive if you want to:
Install or reinstall Windows 7.
Recover Windows 7 from a serious error. If your computer won’t start Windows at all, you can access Startup Repair and other tools in the System Recovery Options menu from the Windows 7 installation disc or USB flash drive. These tools can help you get Windows 7 running again.
Note: If you use a Tablet PC or other computer with a touchscreen, you might need to attach a keyboard and mouse in order to use Startup Repair and other tools in the System Recovery Options menu.
Turn on your computer, insert the Windows 7 installation disc or USB flash drive, and then turn off your computer.
Restart your computer.
Press any key when prompted to do so, and then follow any instructions that appear.
When the Install Windows page appears, click Install now to begin the installation process or click Repair your computer to access system recovery options.
Follow the instructions.
If the Install Windows page doesn’t appear, and you aren’t asked to press any key, you might have to specify that your computer uses its DVD drive or a USB flash drive as the first startup device. To do this, you need to change settings in the computer’s basic input/output system (BIOS).
Note: Most newer computers can start from a USB device, but some older computers might not have this capability. For more information, check the documentation that came with your computer or go to the manufacturer’s website.
Before you change BIOS settings, check the information that came with your computer or go to the computer manufacturer’s website. Specific procedures for accessing the BIOS and changing settings can differ depending on your computer’s manufacturer, or you might be able to choose which startup device your computer uses without changing BIOS settings.
Warning: Be careful when changing BIOS settings. The BIOS interface is designed for advanced users, and it’s possible to change a setting that could prevent your computer from starting correctly.
Turn on your computer, insert the Windows 7 installation disc or USB flash drive, and then restart your computer.
Newer computers often display a startup (or boot) menu. On the startup menu, choose «BIOS setup,» or «BIOS settings,» or something similar.
Procedures vary depending on the BIOS manufacturer. Usually, you must press a key (such as F2, F12, Delete, Esc) or a key combination immediately after you turn on your computer but before Windows starts. If the Windows logo appears, you need to try again by waiting until the Windows logon prompt appears, and then shutting down and restarting your computer again.
The BIOS setup screen appears. On the BIOS setup screen, choose the option called «Boot order,» or something similar. Boot order settings might also be listed under «Advanced settings» or something similar.
Select your DVD drive or USB flash drive as the first startup device. (The USB flash drive might be listed under «Removable devices» or something similar.)
Save the setting changes, and then exit the BIOS.
Restart your computer, and then start Windows 7 from the installation disc or USB flash drive as previously described.
Create a recovery drive
It’s a good idea to create a recovery drive. That way, if your PC ever experiences a major issue such as hardware failure, you’ll be able to use the recovery drive to reinstall Windows 10. Windows updates to improve security and PC performance periodically so it is recommended to recreate the recovery drive annually. Personal files and any applications that did not come with your PC will not be backed up. You’ll need a USB drive that’s at least 16 gigabytes.
Warning: Use an empty USB drive because this process will erase any data that’s already stored on the drive.
To create a recovery drive in Windows 10:
In the search box next to the Start button, search for Create a recovery drive and then select it. You might be asked to enter an admin password or confirm your choice.
When the tool opens, make sure Back up system files to the recovery drive is selected and then select Next.
Connect a USB drive to your PC, select it, and then select Next.
Select Create. Many files need to be copied to the recovery drive, so this might take a while.
If you ever need to use the recovery drive to reinstall Windows 10 on your PC, see Recovery options in Windows 10 for further instructions. It’s a good idea to back up your files frequently because the recovery drive isn’t a system image. It doesn’t contain your personal files, settings, or programs.
Need more options for creating a recovery drive?
To download Windows 10 installation media, see Recovery options in Windows 10.
Windows 10 Boot Repair: Fix UEFI Boot Issue on Windows 10/8/7
How to do Windows 10 boot repair? What are the most useful ways? Read this tutorial and see how to troubleshoot.
| Workable Solutions | Step-by-step Troubleshooting |
|---|---|
| Fix 1. Use Startup Repair | You can fix most Windows 10 UEFI boot problems using the Startup Repair tool. Boot Up Windows. Full steps |
| Fix 2. Use Command Prompt | If you are unable to perform a startup repair, then you can try using Windows 10 installation. Full steps |
| Fix 3. Change BIOS Settings | Windows 8, 8.1, and 10 were designed to install on the UEFI BIOS using the EFI bootloader and GPT. Full steps |
| Fix4. Add Disk Driver | Manually installing and adding the driver to the restored Windows image can repair UEFI boot. Full steps |
| Fix 5. Change the SATA Mode | You can change different SATA modes in different cases for Windows 10 boot repair. Full steps |
Sometimes, Windows 10 fails to boot because there is a problem with the master boot record. In these cases, the master boot record needs to be repaired to restart and run. When you want to do Windows 10 startup repair, you can use the Windows 10 recovery environment includes an automatic option to accomplish this task. If this does not work, you can do it manually with Diskpart command prompt and other effective solutions. In this article, you’ll find step-by-step methods to guide you to fix computer UEFI boot errors in Windows 10/8/7.В Read on to find out how.В Before you start, you can clone your boot drive to another drive with EaseUS Partition Master. Then, follow these steps to fixВ Windows 10 boot repair.
Method 1. Use Startup Repair forВ Windows 10 Boot Repair
Windows Automatic Repair is a built-in tool for users to apply and try to fix some normal errors on Windows PC. And you may also try this method to repair Windows 10, 8 or 7 UEFI/EFI boot error:
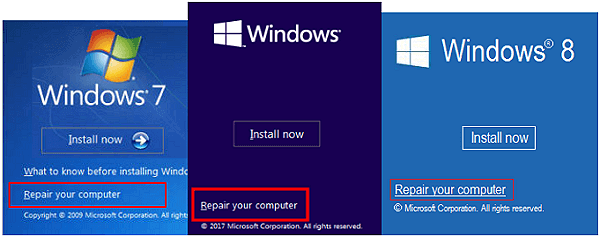
1. Boot Up Windows from Installation Media
Step 1. Insert Windows 10/8/7 installation disk or USB to your PC.
Step 2. Restart PC and boot from the disk or USB.
2. Enable Automatic Repair Option
Step 1. Click «Repair your computer» at the Install now screen.
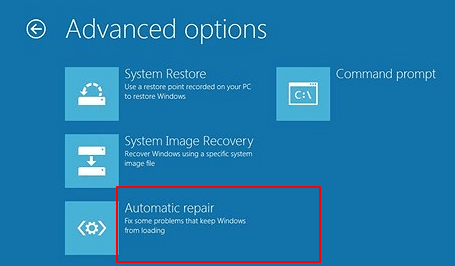
Step 2. Click «Troubleshoot» at choosing an option screen > click «Automatic repair».
Step 3. Choose an account from the list to continue at the Automatic Repair screen and wait for the process to finish.
When the process completes, you can restart your PC, and then you should be able to use your computer without any problems again.
Method 2. Use Diskpart to Fix UEFI Boot Error in Windows 10
If you are a Windows 10 or 8 user and you prefer free methods to fix UEFI boot error, you may follow below two solutions to solve this issue now:
1. Enter Command Prompt from Advanced Options
Step 1. Insert Windows 10/8/7 installation disk or installation USB into PC > boot from the disk or USB.
Step 2. Click «Repair your computer» or hit F8 at the install now screen.
Step 3. Click «Troubleshoot» > «Advanced options» > «Command Prompt».
2. Run Diskpart to Set Partition ID and Assign a Drive Letter
Step 1. Type below command and hit Enter each time:
- diskpart
- list disk
- sel disk 0
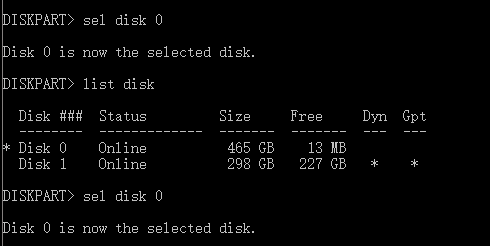
Step 2.В When the message «Disk 0 is now the selected disk» shows up, type list volВ and hit Enter.

Diskpart will now show the full list of volumes on your PC, find UEFI volume from the list: UEFI partition will be on Volume 2.
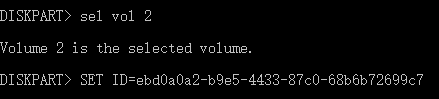
Step 3. Type below command and hit Enter each time:В
- sel vol 2
- set >

Step 4. Assign the drive letter by typing below command and click Enter:
- assign letter=G:В (Note: G shall be a unique drive letter which cannot be already used.)

3. Repair the Boot Record
- Step 1. Open Command Prompt as an administrator, enter below command:
- cd /d G:\EFI\Microsoft\Boot\ (Note: G is the drive letter you signed to UEFI partition and remember to replace G with UEFI’s partition letter)

- Enter exit when the process completes.
- Step 2.В To repair the Boot Record, open CMD and enter below command line:
- bootrec /fixboot

- Enter exit when the repair process completes.
4. Rebuild the BCD Store
Step 1. Type each command line and hit Enter each time:
- ren BCD BCD.old
- bcdboot C:\Windows /1 en-us /s G: /f ALLВ (Note: c:\ is the drive where Windows 10/8.1/8 is installed on.)
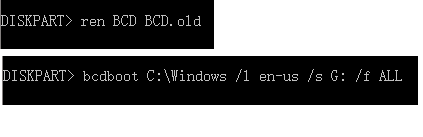
Step 2. Type exit in Command Prompt when the process completes and then restart your PC.
Now UEFI boot is fixed, and Windows 10/8/7 can be boot up on your PC again.
Method 3. Change BIOS SettingsВ
You need to select the boot mode according to the type of disk on your system.В If you want to start an MBR system disk, you can select Legacy support instead of UEFI in boot mode.В To start a GPT system disk, you need to select UEFI.
How to access BIOS:В Common keys to enter the BIOS are F1, F2, F10, Delete, Esc, as well as key combinations like Ctrl + Alt + Esc or Ctrl + Alt + Delete, which are more common on older machines.В You can enter the BIOS interface by holding down any of these keys while booting up on your computer.
Method 4. Add Disk Driver toВ Repair Windows 10 Boot
When you replace the RAID with a different machine or replace the original SATA or IDE disk with a newer NVMe SSD, you may encounter problems starting up. You can use the following Windows command line to add the driver to the restored Windows image manually.
Dism /Image:X: /Add-Driver /Driver:»y:\z.inf»
Note: X: is the disk character of the restored Windows boot partition, and in double-quotes is the location of the driver. Inf file.
Method 5. Change the SATA Mode for Windows 10 Startup Repair
After the older XP system restores, a blue screen or cycle start may occur, you can change to IDE mode to try to start.
If you run into boot problems after upgrading from an older HDD to a newer SSD, check to see if the BIOS is set to boot for AHCI. If you set it up for RAID mode, make sure the correct RAID driver is added to the cloned system.
To Sum Up
Windows 10 boot repairВ is a rather complicated problem. There are different solutions for different causes and problems. The above approaches only apply to common UEFI boot issues. If none of them can repair UEFI boot error in Windows 10, you can contact our technical support team to get specialized services for system boot issues.
If you don’t want to risk losing or overwriting your important data during the fixes for Windows 10 boot repair, you can recover data from a PC/laptop hard drive that won’t bootВ with EaseUS Data Recovery Wizard, a renowned data recovery tool on the market.
Windows 10 Boot RepairВ FAQs
The following four questions are highly relevant to UEFI boot repair. Check the answers to get you through.
1.В How do you repair Windows 10 if it does not boot?
For Windows 10 UEFI boot repair, you can perform an automatic startup repair or using command prompt to complete. The step-by-step instructions are given each part, check the guides carefully.
2. How do I repair Win10?
To repair Windows 10 boot, you can use the Startup Repair tool. To access Windows 10 recovery environment, turn your computer on and off three times. While booting, ensure you turn off the computer when you see the Windows logo. After the third time, Windows 10 will boot into diagnostics mode. Click «Advanced options»В when the recovery screen appears. Then, choose «Startup Repair» and follow the on-screen institutions to do it.
3. How can I repair the Windows 10 UEFI bootloader?
To fix Windows 10 UEFI boot problem:
- Insert the Media (DVD/USB) in your PC and restart
- Boot from the media
- Select Repair Your Computer
- Select «Troubleshoot»В >В «Advanced Options»
- Choose Command Prompt from the menuВ and use the dispart command lines: Type and run the command: diskpart. Type and run the command: sel disk 0. Type and run the command: list vol
4. How do I fix a boot startup problem?
There are many effective solutions to fix Windows 10 startup issue and repair your EFI Bootloader. You can:
- Use the Startup Repair tool
- Use Diskpart in Command Prompt
- Fix BCD errors
- Add startup item
- Change BIOS settings
- Add disk driver
- Change SATA mode
- Fix MBR
- Restore and repair system partitions
- more fixes.


