- Create a system repair disc
- Create a recovery drive
- How to Create Windows 7 Recovery USB Drive Effortlessly? (2 Ways)
- Need to create Windows 7 recovery USB
- Create Windows 7 recovery USB drive from ISO
- Alternative way to create Windows 7 recovery USB drive
- Boot from Windows 7 recovery USB drive
- Conclusion
- Fix/Repair Corrupted USB Drive Without Formatting
- Overview of Corrupted USB Drive Repair
- Case 1. The USB Device Can Be Recognized
- Method 1. Windows Utility — Check and Fix the Error on the Damaged USB
- Method 2. CHKDSK CMD — Fix Corrupted File System Error on USB
- Method 3. Third-party Fixing Tool — Repair Corrupted File System Error on USB
- Supplementary: How to Recover Data from Inaccessible or Unreadable USB Drive
- Case 2. Windows Cannot Recognize the Corrupted USB Drive
- Method 1. Reinstall driver
- Method 2. Manually Repair the USB Drive
Create a system repair disc
System recovery options can help you repair Windows if a serious error occurs. To use system recovery options, you’ll need a Windows installation disc or access to the recovery options provided by your computer manufacturer. If you don’t have either of those choices, you can create a system repair disc to access system recovery options.
Open Backup and Restore by clicking the Start button, clicking Control Panel, clicking System and Maintenance, and then clicking Backup and Restore.
In the left pane, click Create a system repair disc, and then follow the steps.  If you’re prompted for an administrator password or confirmation, type the password or provide confirmation.
Note: If you’re prompted to insert a Windows installation disc, it means that the files needed to create the system repair disc can’t be found on your computer. Insert a Windows 7 installation disc.
Insert the system repair disc into your CD or DVD drive.
Restart your computer using the computer’s power button.
If prompted, press any key to start the computer from the system repair disc.
If your computer isn’t configured to start from a CD or DVD, check the information that came with your computer. You might need to change your computer’s BIOS settings.
Choose your language settings, and then click Next.
Select a recovery option, and then click Next.
Tip: Print these instructions and keep them in a safe location with your system repair disc.
Start your computer from a Windows 7 installation disc or USB flash drive
You might need to start, or boot, your computer using the Windows 7 installation disc or a USB flash drive if you want to:
Install or reinstall Windows 7.
Recover Windows 7 from a serious error. If your computer won’t start Windows at all, you can access Startup Repair and other tools in the System Recovery Options menu from the Windows 7 installation disc or USB flash drive. These tools can help you get Windows 7 running again.
Note: If you use a Tablet PC or other computer with a touchscreen, you might need to attach a keyboard and mouse in order to use Startup Repair and other tools in the System Recovery Options menu.
Turn on your computer, insert the Windows 7 installation disc or USB flash drive, and then turn off your computer.
Restart your computer.
Press any key when prompted to do so, and then follow any instructions that appear.
When the Install Windows page appears, click Install now to begin the installation process or click Repair your computer to access system recovery options.
Follow the instructions.
If the Install Windows page doesn’t appear, and you aren’t asked to press any key, you might have to specify that your computer uses its DVD drive or a USB flash drive as the first startup device. To do this, you need to change settings in the computer’s basic input/output system (BIOS).
Note: Most newer computers can start from a USB device, but some older computers might not have this capability. For more information, check the documentation that came with your computer or go to the manufacturer’s website.
Before you change BIOS settings, check the information that came with your computer or go to the computer manufacturer’s website. Specific procedures for accessing the BIOS and changing settings can differ depending on your computer’s manufacturer, or you might be able to choose which startup device your computer uses without changing BIOS settings.
Warning: Be careful when changing BIOS settings. The BIOS interface is designed for advanced users, and it’s possible to change a setting that could prevent your computer from starting correctly.
Turn on your computer, insert the Windows 7 installation disc or USB flash drive, and then restart your computer.
Newer computers often display a startup (or boot) menu. On the startup menu, choose «BIOS setup,» or «BIOS settings,» or something similar.
Procedures vary depending on the BIOS manufacturer. Usually, you must press a key (such as F2, F12, Delete, Esc) or a key combination immediately after you turn on your computer but before Windows starts. If the Windows logo appears, you need to try again by waiting until the Windows logon prompt appears, and then shutting down and restarting your computer again.
The BIOS setup screen appears. On the BIOS setup screen, choose the option called «Boot order,» or something similar. Boot order settings might also be listed under «Advanced settings» or something similar.
Select your DVD drive or USB flash drive as the first startup device. (The USB flash drive might be listed under «Removable devices» or something similar.)
Save the setting changes, and then exit the BIOS.
Restart your computer, and then start Windows 7 from the installation disc or USB flash drive as previously described.
Create a recovery drive
It’s a good idea to create a recovery drive. That way, if your PC ever experiences a major issue such as hardware failure, you’ll be able to use the recovery drive to reinstall Windows 10. Windows updates to improve security and PC performance periodically so it is recommended to recreate the recovery drive annually. Personal files and any applications that did not come with your PC will not be backed up. You’ll need a USB drive that’s at least 16 gigabytes.
Warning: Use an empty USB drive because this process will erase any data that’s already stored on the drive.
To create a recovery drive in Windows 10:
In the search box next to the Start button, search for Create a recovery drive and then select it. You might be asked to enter an admin password or confirm your choice.
When the tool opens, make sure Back up system files to the recovery drive is selected and then select Next.
Connect a USB drive to your PC, select it, and then select Next.
Select Create. Many files need to be copied to the recovery drive, so this might take a while.
If you ever need to use the recovery drive to reinstall Windows 10 on your PC, see Recovery options in Windows 10 for further instructions. It’s a good idea to back up your files frequently because the recovery drive isn’t a system image. It doesn’t contain your personal files, settings, or programs.
Need more options for creating a recovery drive?
To download Windows 10 installation media, see Recovery options in Windows 10.
How to Create Windows 7 Recovery USB Drive Effortlessly? (2 Ways)
It’s wise to learn to create Windows 7 recovery USB drive, which can help you to repair or restore your system if your computer fails to boot.

By Bryce  / Last Updated January 4, 2021
Quick Navigation:
Need to create Windows 7 recovery USB
If you encountered with serious events like system crashes during using Windows 7 computer, you can use system repair disc to fix these problems or reinstall system. Thus, it is reasonable to create a system repair disc via Windows Backup and Restore utility at first. But in this method, the media can only be CD or DVD. Obviously, this way is not suitable for users without CD/DVD.
At this point, you can create Windows 7 recovery USB drive. If you don’t have created recovery USB before your system running into problems, you can make a recovery USB drive from another computer.
Create Windows 7 recovery USB drive from ISO
Before starting creating recovery USB via ISO, make sure that the following things are at your hand: ISO image file, USB drive and Windows 7 USB/DVD Download Tool. Then, have a closer look at how to create Windows 7 recovery USB drive.
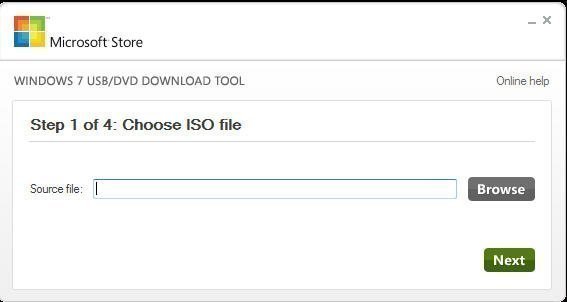
Step 1. Plug your USB flash drive and run Windows 7 USB DVD Download Tool, click “Browse” button to choose your source file. Then, click “Next».
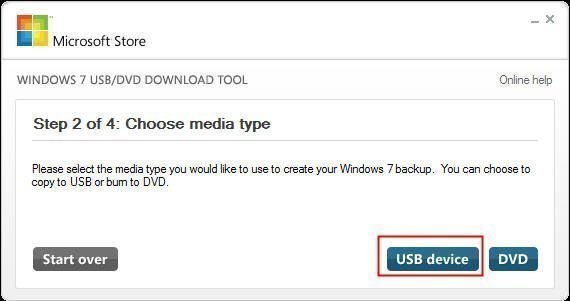
Step 2. Choose USB device as your media type.
Step 3. Insert your USB drive to the working computer and select it. Then, click “Begin copying”. When the whole process finishes, you can get a recovery USB drive.
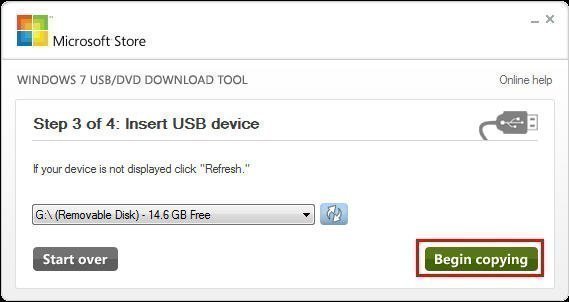
PS: Your USB will be formatted during this process. It is recommended to backup important files on it.
Alternative way to create Windows 7 recovery USB drive
It’s not hard to create a Windows 7 repair USB drive from ISO. However, this drive can’t be used for Windows versions that are different from the Windows version of the Windows ISO file. In other words, a Windows 7 recovery USB cannot be used to repair a computer running Windows 10 and a recovery USB from Windows 7 64bit is unable to repair Windows 7 32bit operating system.
To boot any version of Windows 10/8/7, you can turn to third party software like AOMEI Backupper Standard to create bootable media with USB drive. Apart from creating bootable media, AOMEI Backupper can:
в—‰ Backup and restore Windows system, disks, partitions, or specific files.
в—‰ You are allowed to save backup images on a local disk, external hard drive, network share, or cloud service, etc.
в—‰ It offers you various schedule modes including Daily, Weekly, Monthly, Event triggers and USB plug in to make a backup. To use the Event triggers and USB plug in modes, you need to use AOMEI Backupper Professional version.
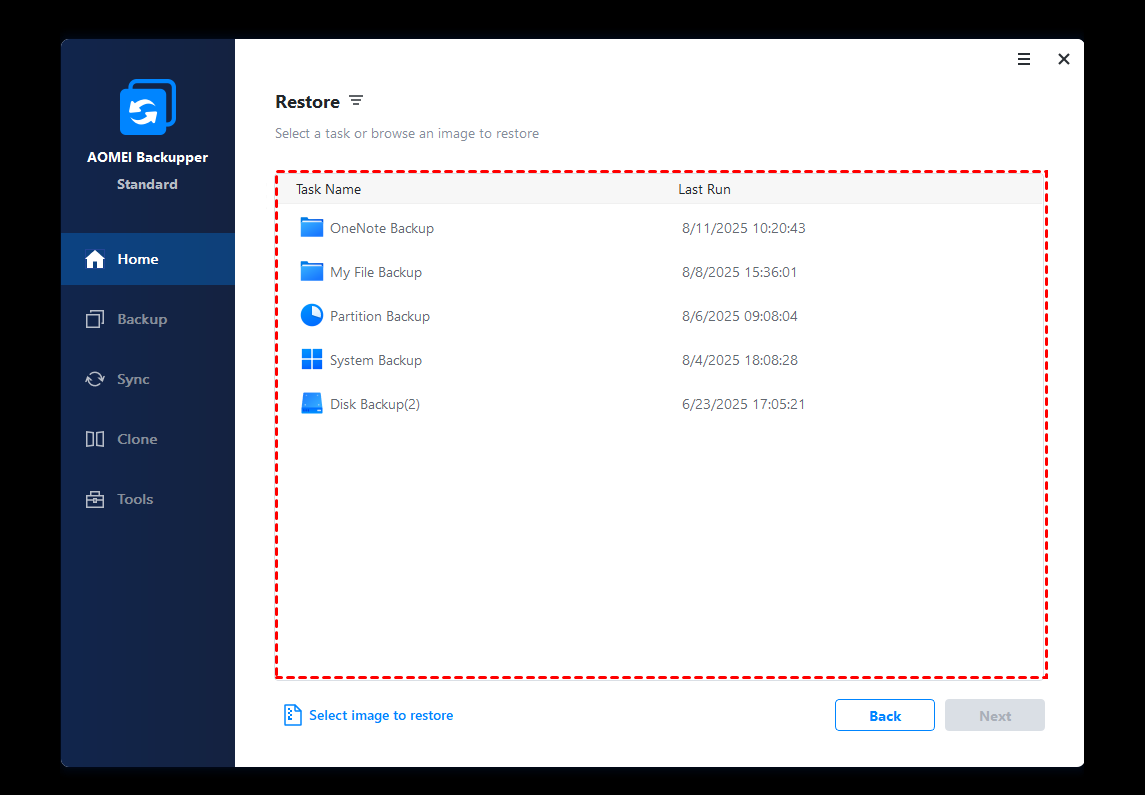
If your system is unable to boot, you can boot your computer from created bootable device and restore system to normal status using system backup file. Have a look at how it works.
Step 1. Connect USB drive to your working computer and make sure that it can be detected by the operating system. Download AOMEI Backupper Standard.
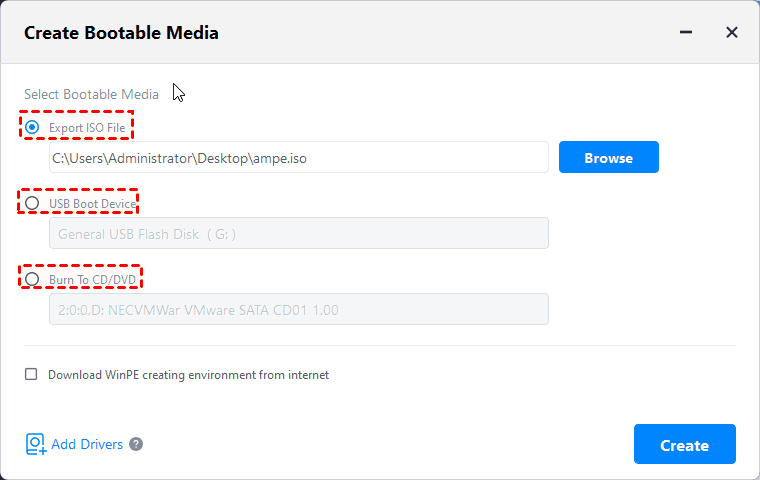
Step 2. Install and launch it. In the main interface, go to “Tools” > “Create Bootable Media”.

Step 3. Choose one between two bootable disc types. (Here Windows PE based bootable media is selected).

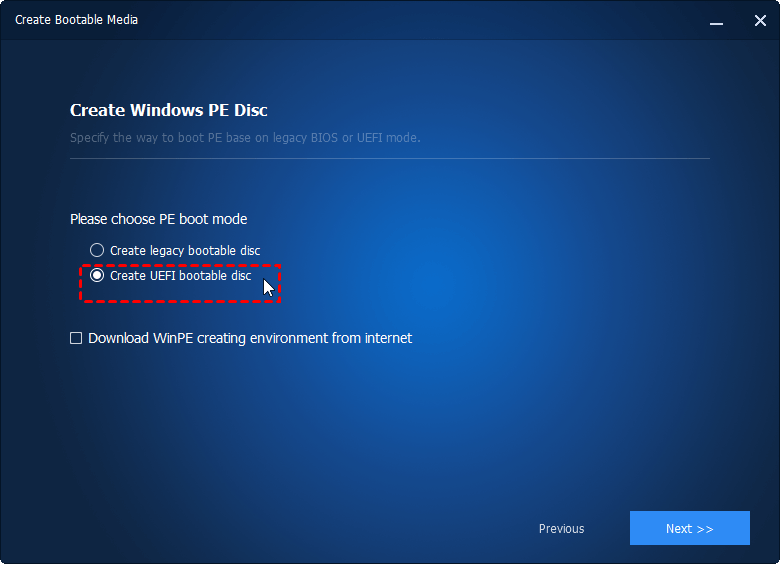
Step 4. If your system is UEFI boot mode, there are two options for you.
Create legacy bootable disc
Create UEFI bootable disc (Recommended)
Step 5. Select a bootable media among three options. Here choose USB Boot Device. Then click “Next” to perform this operation. When the progress reaches 100%, click “Finish” icon.
Notes:
For Step 3: Linux based bootable media allows you to apply basic functions like of AOMEI Backupper; Windows PE based bootable media allows you to access all functions.
For Step 4: Legacy BIOS-based and Unified Extensible Firmware Interface (UFEI) are two different boot modes. Now, UEFI is replacing Legacy BIOS.
Besides, you could enable AOMEI Backupper recovery environment in Windows boot options menu like this: Tools > Recovery Environemnt, and enable it, then you could boot from AOMEI Backupper recovery environment to restore data if system failed to boot.
Boot from Windows 7 recovery USB drive
After creating bootable USB drive successfully, you may want to know how to boot computer from it.
Firstly, you need to insert the USB drive to the computer that you need to restore system.
Secondly, Press certain key to enter BIOS while booting computer (For different computer models, the key can be different. In general, Del key for desktops and F2 for laptops. If you don’t know which key to press, you can refer to the PC’s manual or website).
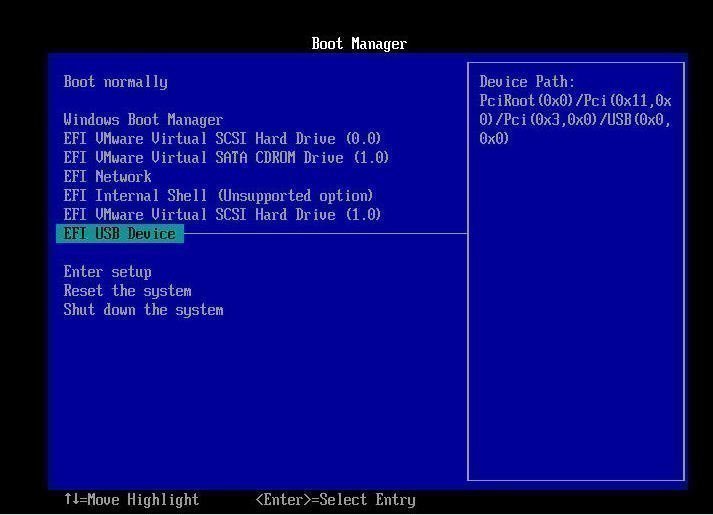
Finally, choose the USB device and press “Enter” key to boot form the bootable USB drive. Then, you’ll enter the main interface of AOMEI Backupper. Here you can restore system.
Conclusion
It is possible that your system stuck in troubles. To protect your Windows 7 computer, it is a good idea to create Windows 7 recovery USB drive. If you own computers run different Windows systems, you can choose to create bootable media via free backup software AOMEI Backupper. Just create one Windows 7 boot USB drive and it can be applied to Windows 7/8/10 computer.
AOMEI Backupper also allows you to backup disk, partition and file. If you don’t want to make a backup, it is also available to clone disk or system using AOMEI Backupper. All in all, it is a great backup and restore software to protect your data and system security.
If you want to protect unlimited computers within your company, you can pick AOMEI Backupper Technician. With the inbuilt AOMEI Image Deploy tool, you are also allowed to deploy/restore system image file on server-side computer to multiple client-side computers over network.
Fix/Repair Corrupted USB Drive Without Formatting
On this page, you can learn how to repair a damaged USB flash drive or pen drive without losing data. If your computer can recognize the corrupted USB, please refer to [1]. If your USB cannot be detected, refer to [2]. Test these USB flash drives repair solutions one by one and fix your USB flash drive without formatting. EaseUS data recovery software comes in handy when you need to recover lost data after fixing the USB.
Table of Contents
About the Author
Reviews and Awards
Overview of Corrupted USB Drive Repair
A USB flash drive, pen drive, or hard drive is a portable storage drive that stores data in its memory space. It’s convenient for people to carry their data anywhere, using it across multiple devices. Hence, the more frequently you use one USB drive on different devices, the more likely it arises problems, like USB corruption, which can lead to consequences beyond repair.
In fact, over 90% of computer users who report a USB drive issue is able to fix it aright, all by themselves. Following are some conventional symptoms of a repairable USB drive in Windows.
- Connect a USB flash drive to Windows 10/8.1/8/7, it is not showing up in Explorer.
- Windows detects the USB flash drive but it cannot open, reporting drive is not accessible.
- Windows asks you to format the removable disk before you can use it when double-clicking on the drive.
- Other unfamiliar errors like RAW, no media, etc.
In conclusion, when a USB removable disk or external hard drive shows signs of corruption, we can divide it into two scenarios: Windows can or cannot recognize the connected USB drive, and the solutions vary.
Case 1. The USB Device Can Be Recognized
If your USB can still be detected or recognized by your computer, you can try to fix the logical error by using the native Windows tool, CMD or third-party fixing tool. Then you will be able to access your USB.
Method 1. Windows Utility — Check and Fix the Error on the Damaged USB
If your flash drive is not actually PHYSICALLY broken, your computer can recognize it, and your computer assigns it a drive letter, follow the methods below to check and fix the logical error. Theoretically speaking, the provided methods won’t cause data loss.
Step 1: Connect the USB to your PC
Step 2:В Go to My Computer>The USB Drive.
Step 3:В Right-click the USB drive and open its Properties.
Step 4:В Click on the Tools tab.
Step 5:В Click the «Check» button.
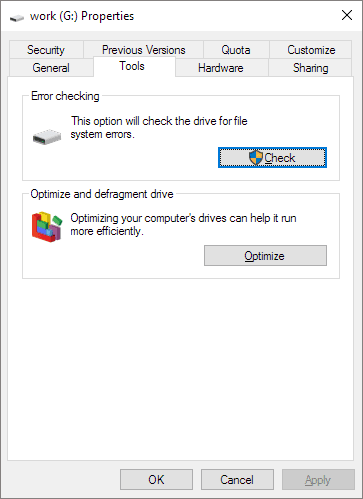
Step 6: Let the scan process complete, then close the scan window.В
Step 7:В Right-click the icon of the USB flash drive on the desktop and click «Eject». Then remove the drive from the USB port.
Method 2. CHKDSK CMD — Fix Corrupted File System Error on USB
This is essentially the same process as above, but it will provide you with more feedback in the end that will help you determine whether the problem has been fixed or not.
Step 1: Plug in your USB flash drive or pen drive to your computer.
Step 2: Go to the start menu, type in «cmd» in the search bar, hit enter and then you can see something named «cmd. exe» in a list of programs.В
Step 3: Right-click «cmd. exe», run as administrator, and type «chkdsk /X /f G:» or «chkdsk G: /f» (replace G: with the drive letter corresponding to your USB drive). The chkdsk operation will then start to repair the damaged USB drive.

This operation will make Windows check and fix the file system on the flash drive. If the repair process works properly, it will show you, «Windows has made corrections to the file system» in the command window. This suggests that the corrupted USB pen drive has been successfully fixed and can be accessed again.
Method 3. Third-party Fixing Tool — Repair Corrupted File System Error on USB
If you don’t have any technical know-how and want to minimize data risks, using third-party software could be a better choice. The Command line is suitable for computer professionals since wrong commands can cause severe problems. Therefore, we strongly recommend you try an automatic command line alternative.
EaseUS Tools M is a practical computer fixing tool that is safe and light-weighted. It’s a perfect alternative to CHKDSK command. Use this one-click tool to solve your computer issues.
To fix file system error or disk error:
Step 1: оњљ DOWNLOADВ EaseUS Tools M forВ Free and install it.
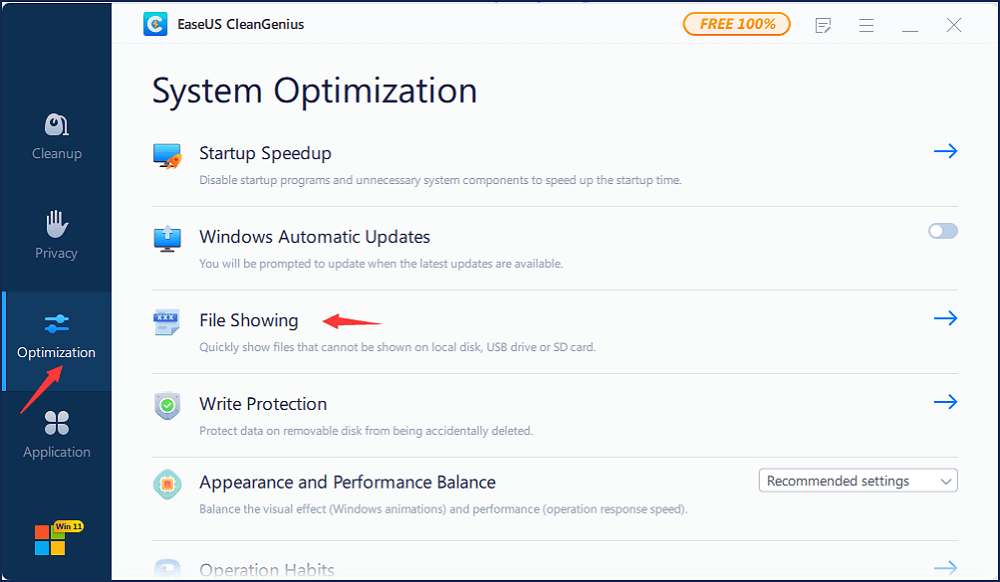
Step 2: Open the software and select the «File showing» option.В
Step 3: Choose the drive and wait for repairing. After the operation completes, click the «View» button to check the drive.В
Supplementary: How to Recover Data from Inaccessible or Unreadable USB Drive
After you have checked and fixed the logical error on the pen drive, you can scan your device to see if any data was lost in the process. EaseUSВ file recovery software can search for any lost files on the device and, if there are any, recover them.В
The program is capable to conduct USB data recovery for all data loss cases. Before purchasing the full version, you can download the free version first to scan the device and check what files it can recover. If you don’t think you can get a satisfactory result, just don’t pay for it! You have nothing to lose. So, you can try it without hesitation whenever you are faced with data loss after repairing a corrupted USB pen drive.
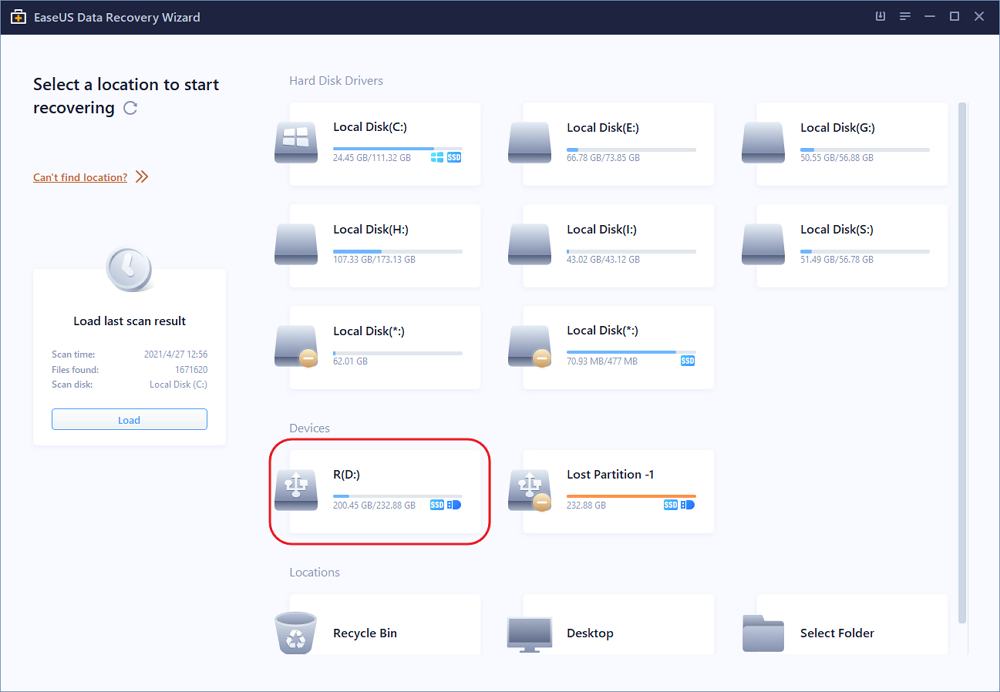
Step 1.В Run USB data recovery software.
Connect the USB flash drive to your computer and launchВ EaseUS USB data recovery software on your PC. Select your USB drive which marks as a removable disk, and click «Scan» to start finding your lost files.
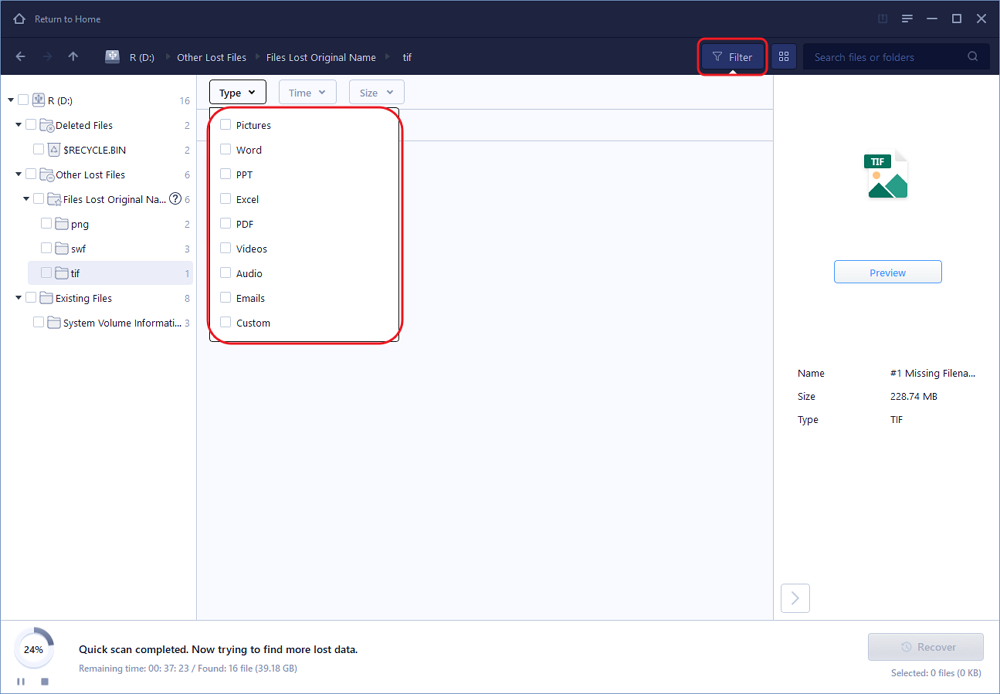
Step 2.В Scan all lost files from USB.
EaseUS Data Recovery Wizard will thoroughly scan your USB flash drive and find all your lost data on it. After the scanning process,В use the Filter feature to filter a specific file type. You can check and preview found USB files in this program.
Step 3.В Restore all lost files from USB.
A double-click will allow you to preview the file results. Choose the target files and click «Recover» to save them to aВ secure location on your PC or other external storage devices.

Case 2. Windows Cannot Recognize the Corrupted USB Drive
If your USB drive is physically damaged and cannot be detected or recognized, follow the directions of reinstalling USB driver or fix a broken USB drive on your own.
Method 1. Reinstall driver
Most unrecognized USB issue results from a corrupted driver. You need to reinstall a new driver by following the steps.
Step 1: Press Win + X keys and click Device Manager.
Step 2: Expand Disk Drives, right-click on the name of your removable disk, and click Uninstall.

Step 3: Click OK. Disconnect the SD card from your computer.
Step 4: Restart your computer. After a while, connect the SD card to your computer again. Windows will install the latest driver automatically and make the SD card detectable.
Method 2. Manually Repair the USB Drive
Here is some information you need to get to know before taking this measure to fix a broken USB flash drive on your own.
- Physically repairing a flash drive is unlikely to work unless you have professional experience in repairing physically damaged flash drives.
- If the flash drive’s internal storage is damaged, your only viable option is to take the drive to manual repair service.
- The prices for data recovery can vary from $20 — $850 based on the severity of damage done to the drive, and the type of recovery required.В
If you decide to have a try on your own, you can follow the details below.
Preparations:
- Soldering iron with solder and flux
- An old USB cable
- Wire cutters/strippers
- A small flathead screwdriver
- A magnifying glass or jeweler’s loop
Now, follow the details to repair the flash drive.
Step 1: Remove the flash drive’s casing. Do so with your flathead screwdriver.
Step 2: Use the magnifying glass to inspect the circuit board (PCB) and solder pads. If the PCB (the green circuit board) itself is damaged or the solder pads are lifted, you will probably need the help of a professional.
Solder pads are the 4 bits of solder that connect the prongs of the USB connector to the copper lines in the circuit board. If the connector has broken away without causing damage to the PCB or solder pads, continue to the next step.
Step 3: Set the flash drive on a hard surface. Do so with the connector end facing toward you and the solder pads facing up.
Step 4: Use wire cutters to cut one end off of the USB cable. Make sure you cut the USB end if the flash drive cable is an adapter.
Step 5: Strip away a section of the USB cable’s wire. Try to expose about 0.25 inch (0.6 cm) of each of the four wires inside the cable that’s attached to the USB cable.
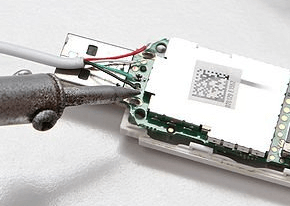
Step 6: Solder each of the four wires to the four solder pads. Take your time while doing this, since failing to adequately secure the connection will most likely render your flash drive inoperable.
Step 7: Plug the other end of the USB cable into a computer. It should fit into one of the rectangular slots on your computer’s housing.
Step 8: Then you are able to open your USB drive. If your flash drive is recognizable by the computer, open it and move your files to a safe place as soon as possible. If the files are missing you can move to Step 2.
Great! I applied the solution provided by EaseUS andВ repaired corrupted and damaged USB flashВ without losing anything important. Come on, you can give it a try. «


