- Repair a Windows Image
- Repairing images during servicing
- Configure a Windows Repair Source
- Choose a Repair Source
- Use WindowsВ Update to restore optional features and repair Windows images
- Use a network location to restore optional features and repair Windows images
- Set Group Policy
- Configure Group Policy for Feature on Demand
- Maintaining a Repair Source
- Servicing updates
- Multilingual images
- DISM: проверка и восстановление системных компонентов образа Windows 10
- SFC /scannow: Проверка и восстановление системных файлов Windows
- DISM /RestoreHealth: Восстановление хранилища компонентов образа Windows
- Восстановление поврежденного хранилища компонентов Windows 10/Server 2016 с помощью PowerShell
- Восстановление хранилища компонентов оффлайн если Windows не загружается
Repair a Windows Image
Repair a Windows image using DISM. You can repair offline Windows image in a WIM or VHD file, or an online Windows image. An online Windows image will also attempt to repair itself if it becomes unserviceable. The repair source for this operation is the same source that is used for Features on Demand and is determined by Group Policy settings. For more information, see Configure a Windows Repair Source. When you use the DISM tool to repair an online or offline image, you can use the /Source argument with the /RestoreHealth argument to specify additional repair source locations to use to search for the required files.
For a quick check of an online image, you may be able to use the command: sfc /scannow to scan and repair files.
For a more extensive check that can repair issues with the store, use DISM /Cleanup-Image .
To check if an image is repairable
Scan the image to check for corruption. This operation will take several minutes. For example, at a command prompt, type the following command:
Check the image to see whether any corruption has been detected. For example, at a command prompt, type:
When you use the /CheckHealth sfc argument, the DISM tool will report whether the image is healthy, repairable, or non-repairable. If the image is non-repairable, you should discard the image and start again. If the image is repairable, you can use the /RestoreHealth argument to repair the image.
To repair an image
Use the /RestoreHealth argument to repair the image. For example, to repair an offline image using a mounted image as a repair source, at a command prompt, type the following command:
Or to repair an online image using some of your own sources instead of Windows Update, type:
If you do not specify a /Source for the repair files, the default location for Features on Demand is used. For more information, see Configure a Windows Repair Source. If you specify more than one /Source, the files are copied from the first location where they are found and the rest of the locations are ignored. You can use /LimitAccess to prevent the DISM tool from using Windows Update as a repair source or as a backup repair source for online images.
Repairing images during servicing
In some cases, an image can be corrupted while modifying it with DISM. Use /Cleanup-MountPoints to repair it. This command will not unmount images that are already mounted, nor will it delete images that can be recovered using the /Remount-Image command.
Configure a Windows Repair Source
A repair source is a location that has files that are used to restore or enable Windows optional features or repair a corrupted Windows image. You can use Windows Update or files on your network as a repair source. For more information, see Repair a Windows Image.
Choose a Repair Source
Windows Update is the default repair source, but you can configure Group policy to specify one or more network locations that have the files required to restore a Windows feature or repair a corrupted operating system.
Use WindowsВ Update to restore optional features and repair Windows images
Windows Update is used by default if it’s allowed by the policy settings on the computer.
You can configure Windows Update as a backup repair source. If you’re using Windows Update as a primary or backup repair source, make sure your firewall is configured to allow access to Windows Update.
Use a network location to restore optional features and repair Windows images
You can use a mounted Windows image from a WIM file as a source to restore optional features and repair a corrupted operating system. For example, c:\test\mount\Windows. For more information about capturing a Windows image as a WIM file, see Capture Images of Hard Disk Partitions Using DISM.
You can use a running Windows installation as a source to restore optional features by sharing the c:\Windows folder on your network.
You can use a Windows side-by-side folder from a network share or from a removable media, such as the Windows DVD, as the source of the files. For example, z:\sources\SxS.
You can use a Windows image (.wim) file on a network share as a source to restore optional features. You must specify the index of the Windows image in the .wim file that you want to use and you must use a Wim: prefix in the path to identify this file format. For example, to specify index 3 in a file named contoso.wim, type: Wim:\\network\images\contoso.wim:3.
When specifying a source:
- Only use RTM media regardless of whether the source is a WIM or a mounted Windows image. Refresh media has older file versions excluded from the media and the target operating system may need these files.
- Make sure the source is patched to the latest Cumulative Update. If the target OS is patched to a higher level than the source, adding features or repairing Operating Systems may fail because the target OS needs updated files that are not present in the source.
Set Group Policy
You can use Group Policy to configure your preferred repair souce.
Configure Group Policy for Feature on Demand
Open the group policy editor. For example, on a computer that is running WindowsВ 10, from the Start screen, type Edit Group Policy, and then select Edit Group Policy to open the Group Policy Editor.
Click Computer Configuration, click Administrative Templates, click System, and then double-click the Specify settings for optional component installation and component repair setting.
Select the settings that you want to use for Features on Demand.
Maintaining a Repair Source
If you don’t use Windows Update as the repair source for features and automatic corruption repair, consider the following guidelines for maintaining a repair source.
Servicing updates
Keep any repair source current with the latest servicing updates. If you’re using an image from a WIM file for features, you can use DISM to service the image. For more information, see Mount and Modify a Windows Image Using DISM. If you’re using an online Windows installation shared on your local network as a repair image, make sure that the computer has access to Windows Update.
Multilingual images
You must include all of the relevant language packs with your repair source files for the locales your image supports. If you try to restore a feature without all of the language components that the Windows installation requires for that feature, the installation will fail.
You can install additional language packs after a feature is restored.
DISM: проверка и восстановление системных компонентов образа Windows 10
Для проверки целостности системных файлов и восстановления поврежденных файлов (библиотек) компонентов в Windows (Windows Server) можно использовать команды SFC и DISM (Deployment Image Servicing and Management). Данные утилиты могут быть крайне полезными, если операционная система Windows работает нестабильно, появляются ошибки при запуске стандартных приложений или служб, после вирусного заражения и т.д.
Утилита DISM включена в состав Windows, начиная с Vista и может быть использована во всех поддерживаемых версиях начиная с Windows 7/Windows Server 2008 R2 (есть ограничения) заканчивая последними билдами Windows 10 / Windows Server 2019. В этой статье мы рассмотрим, как использовать утилиты DISM и SFC для проверки и восстановления целостности образа и системных файлов Windows 10.
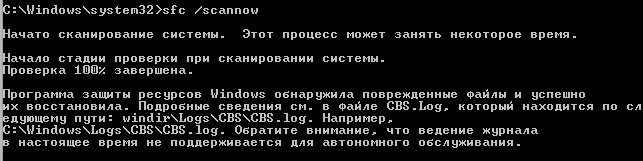
SFC /scannow: Проверка и восстановление системных файлов Windows
Утилиту DISM для восстановления Windows обычно рекомендуется использовать после утилиты проверки целостности системных файлов SFC (System File Checker). Команда sfc /scannow сканирует защищенные системные файлы Windows, и, если они отсутствуют или повреждены, попробует восстановить их оригинальные копии из хранилища системных компонентов Windows (каталог C:\Windows\WinSxS).
Если команда sfc /scannow возвращает ошибку “ Программа защиты ресурсов Windows обнаружила повреждённые файлы, но не может восстановить некоторые из них / Windows Resource Protection found corrupt files but was unable to fix some of them ”, скорее всего утилита не смогла получить необходимые файла из хранилища компонентов (образа) Windows.
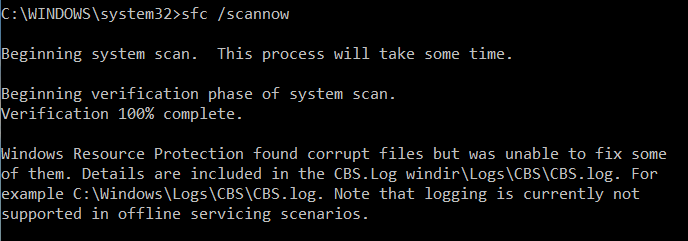
В этом случае вам нужно попробовать восстановить хранилище компонентов (ваш образ Windows) с помощью DISM.
После восстановления образа вы можете повторно использовать утилиту SFC для восстановления системных файлов.
DISM /RestoreHealth: Восстановление хранилища компонентов образа Windows
Для сканирования образа Windows на наличие ошибок и их исправления используется параметр DISM /Cleanup-image . Рассмотренные ниже команды выполняются в командной строке, запущенной с правами администратора.
Чтобы проверить наличие признака повреждения хранилища компонентов образа Windows (флага CBS) , который выставил один из системных процессов, выполните следующую команду (не применимо к Windows 7/Server 2008R2):
DISM /Online /Cleanup-Image /CheckHealth
При запуске этой команды не выполняется сканирование хранилища, проверяются лишь записанные ранее значения и события в журнале Windows. Изменения не вносятся. Команда проверит, не помечен ли образ как поврежденный и возможно ли устранить данное повреждение.
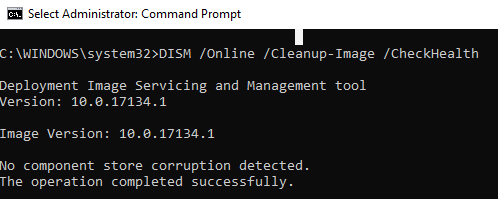
В этом примере команда вернула, что с образом все хорошо:
No component store corruption detected.
The operation completed successfully.
DISM /Online /Cleanup-Image /ScanHealth – выполнить полное сканирование хранилища компонентов на наличие повреждений в системных образа Windows (выполняется довольно долго от 10 до 30 минут).
Если команда /ScanHealth возвращает ошибки:
- Хранилище компонентов подлежит восстановлению (The component sore is repairable);
- Ошибка: 1726. Сбой при удалённом вызове процедуры;
- Ошибка: 1910. Не найден указанный источник экспорта объекта.
Это однозначно говорит о том, что ваш образ Windows 10 поврежден и его нужно восстановить.
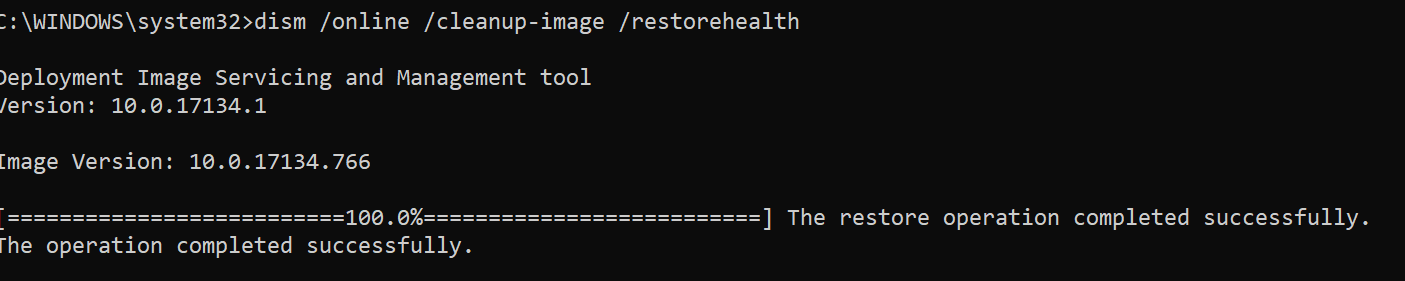
Чтобы исправить ошибки, автоматически скачать и заменить файлы повреждённых или отсутствующих компонентов эталонными версиями файлов (библиотек) из центра обновлений Windows (на компьютере должен быть доступ в Интернет), выполните:
DISM /Online /Cleanup-Image /RestoreHealth
Процесс сканирования и восстановления компонентов может быть довольно длительным (30 минут или более).
Если восстановление выполнится успешно, появится сообщение:
Восстановление выполнено успешно. Операция успешно завершена.
The restore operation completed successfully. The operation completed successfully.
Если на компьютере (сервере) отсутствует доступ в Интернет или отключена служба Windows Update, то при восстановлении хранилища компонентов появляются ошибки вида:
- 0x800f0906 — Не удалось скачать исходные файлы. Укажите расположение файлов, необходимых для восстановления компонента, с помощью параметра Источник (0x800f0906 — The source files could not be downloaded. Use the source option to specify the location of the files that are required to restore the feature);
- Ошибка: 0x800f0950 — Сбой DISM. Операция не выполнена (0x800f0950 — DISM failed. No operation was performed);
- Ошибка: 0x800F081F. Не удалось найти исходные файлы. Укажите расположение файлов, необходимых для восстановления компонента, с помощью параметра Источник (Error 0x800f081f, The source files could not be found. Use the «Source» option to specify the location of the files that are required to restore the feature).

Вы можете указать WIM или ESD файл с оригинальным установочным образом Windows, который нужно использовать в качестве источника для восстановления файлов компонентов системы. Предположим, вы смонтировали установочный ISO образ Windows 10 в виртуальный привод E:. Для восстановления хранилища компонентов из образа используйте одну из команд:
DISM /online /cleanup-image /restorehealth /source:E:\sources\install.wim
Или:
DISM /online /cleanup-image /restorehealth /source:E:\sources\install.esd
Чтобы запретить использовать центр обновлений Windows в Интернете, и выполнять сканирование и восстановление образа Windows только из локального WIM/ESD файла:
DISM /online /cleanup-image /restorehealth /source:E:\sources\install.wim /limitaccess
Или:
DISM /online /cleanup-image /restorehealth /source:E:\sources\install.esd /limitaccess
dism /online /cleanup-image /restorehealth /limitaccess
Журнал сканирования и восстановления системных файлов утилиты DISM можно найти здесь: C:\Windows\Logs\CBS.log .
После восстановления хранилища компонентов вы можете запустить утилиту проверки системных файлов sfc /scannow . Скорее всего она успешно восстановит поврежденные файлы (Программа защиты ресурсов Windows обнаружила поврежденные файлы и успешно их восстановила).
Восстановление поврежденного хранилища компонентов Windows 10/Server 2016 с помощью PowerShell
В версии PowerShell в Windows 10 и Windows Server 2016/2019 есть аналоги рассмотренных выше команд DISM. Для сканирования хранилища компонентов и поиска повреждений в образе выполните:
Repair-WindowsImage -Online –ScanHealth
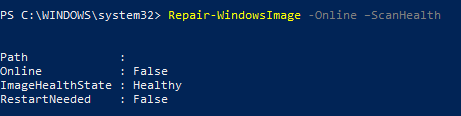
Если ошибок в хранилище компонентов не обнаружено, появится сообщение:
ImageHealth State: Healthy
Для запуска восстановления системных компонентов и файлов наберите:
Repair-WindowsImage -Online -RestoreHealth
Repair-WindowsImage -Online -RestoreHealth -Source E:\sources\install.wim:1
Где, 1 – индекс используемой у вас редакции Windows из WIM или ESD файла (список редакций Windows в WIM файле можно вывести так: Get-WindowsImage -ImagePath «E:\sources\install.wim» ).
Восстановление хранилища компонентов оффлайн если Windows не загружается
Если Windows не загружается корректно, вы можете выполнить проверку и исправление системных файлов в оффлайн режиме.
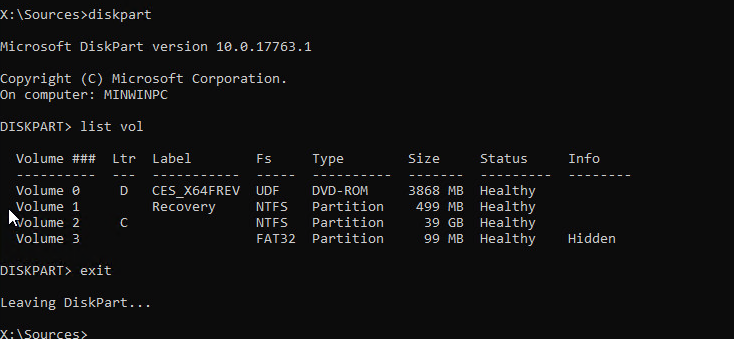
- Для этого загрузитесь с установочного (загрузочного диска) и на экране начала установки нажмите Shift + F10
- Чтобы разобраться с буквами дисков, назначенных в среде WinPE, выполните команду diskpart -> list vol (в моем примере диску, на котором установлена Windows присвоена буква C:\, эту букву я буду использовать в следующих командах);

- Проверим системные файлы и исправим поврежденные файлы командой: sfc /scannow /offbootdir=C:\ /offwindir=C:\Windows
- Для исправления хранилища компонентов используйте следующую команду (в качестве источника для восстановления компонентов мы используем WIM файл с установочным образом Windows 10, с которого мы загрузили компьютер):
Dism /image:C:\ /Cleanup-Image /RestoreHealth /Source:D:\sources\install.wim - Если на целевом диске недостаточно места, то для извлечения временных файлов нам понадобится отдельный диск достаточного размера, например F:\, на котором нужно создать пустой каталог: mkdir f:\scratch и запустить восстановление хранилища компонентов командой:
Dism /image:C:\ /Cleanup-Image /RestoreHealth /Source:D:\sources\install.wim /ScratchDir:F:\scratch