- How to: Repair Install Windows 10
- Repair install of Windows 10
- Create a Windows 10 Installation Media
- Option 1: Windows Repair Install Using the ISO file
- Option 2: Windows Repair using USB Installation Media
- Option 3: Windows 10 repair install using ‘Get Windows 10 (GWX)’ app
- Start Repair from the Installation Media
- Recovery options in Windows 10
How to: Repair Install Windows 10
If you run into issues on your Windows 10 whatever issues they are, regardless of the issue Windows 10 allows you to do a repair install without booting directly from the installation media. Repair install will repair system files, and install the latest windows updates. The process is quiet straight forward and easy. However, before you begin, you will need to ensure that the following requirements are met.
Ensure that you have at least 9 GB free space on your hard disk (Windows Drive).
Have the installation media ready. You may do this using the USB or ISO file. However these MUST be the same build and edition as the Windows 10 software that is currently installed. Otherwise the repair install will not be successful.
The installation media MUST also be in the same language as the Windows 10 already installed. This is important especially for keeping files after the repair.
Use 32 bit or 64 bit for corresponding Windows 10 installations.
Repair install of Windows 10
There are three methods that you can chose to begin the repair install.
Create a Windows 10 Installation Media
Option 1: Windows Repair Install Using the ISO file
NOTE: This method should ONLY be used if your Windows 10 was activated.
Download the Windows 10 ISO file from here.
Save it on your PC, preferably on your desktop at first.
Now mount the ISO file click (here) to view steps.
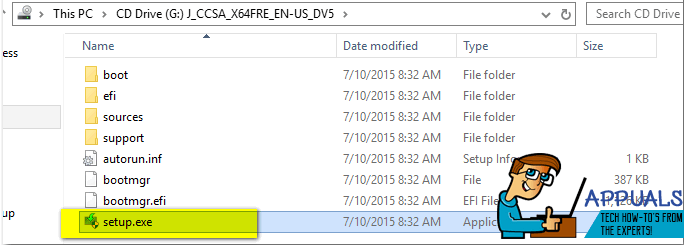
Now double click on the file setup.exe to kick start the repair – install from the mounted drive.
Option 2: Windows Repair using USB Installation Media
This option can be carried out by using the Windows Media Creation tool. Ensure you have suitable internet connectivity; and also prepare an empty USB flash disk with a minimum of 4 GB for a 32 bit installation or 8GB for 64 bit installation. If you use a flash drive with data inside you may lose it in the process. Now read system requirements, and keep the Windows 10 product key near you (if Windows 10 was already activated before you may not need it).
Go here to access the file for download. Download the Media Creation Tool from here. Save it on the desktop.
Once the download has completed, right click on it and select Run.
If prompted by UAC, click ‘yes’.
On the panel that appears, select the second option that reads “Create installation media for another PC” and then click NEXT.
The next panel is for language, architecture, and edition. Right under Architecture, uncheck the box for “use the recommended options for this PC”. This bit is important because it will allow you to specify the language, edition, and architecture as the current Windows installation.
In the boxes provided, choose the Language, edition and architecture. You can have both 32 bit and 64 bit Windows installations on the same USB, or simply opt for the one you need. Failure to provide a product key if prompted will allow you to only proceed with Home and Pro Keep in mind the version that was initially in your PC. Click Next.
The next panel offers two destination options for installing Windows 10; the USB or ISO file. Select the ‘USB flash drive’ option and proceed.
Plug the USB disk (either 4GB or 8GB depending on your preferred architecture) and then click on the instruction ‘Refresh drive list’. Your plugged USB will appear beneath. Select it and click NEXT.
Windows 10 now takes over and the download begins. When the download completes your USB is now fully set. Click FINISH.
Option 3: Windows 10 repair install using ‘Get Windows 10 (GWX)’ app
Ensure that you are connected to the internet for this option of repair install.
Connect to the internet and then go here
Scroll downwards and click on the link “Upgrade Now”.

A file with the prefix “GetWindows10… .exe” will be available for download. Save it on your computer. When completed, right click on it and then select run.
UAC may prompt you; just click on yes.
Windows 10 download begins. When complete, run it.
Start Repair from the Installation Media
All the above three options for repair install will lead to the same installation process. Windows 10 takes over the installation and prepares itself for the next step. After fetching the updates, the system will restart. This is the last stage of Windows 10 repair.
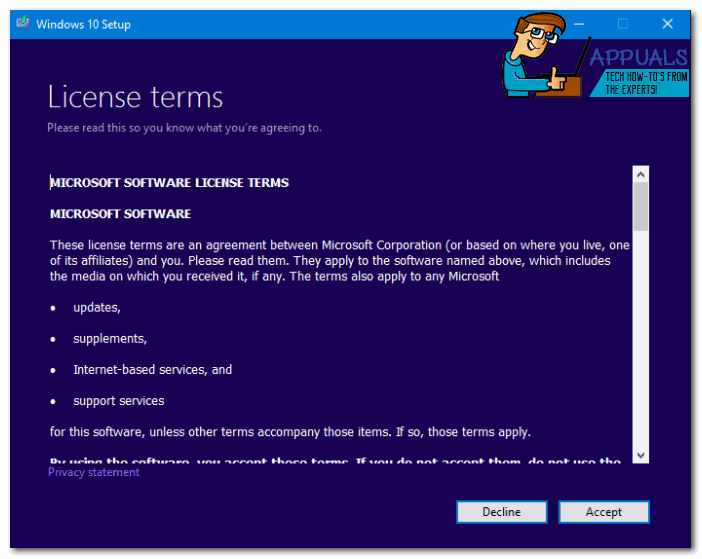
When the installation provides the License Terms, read them and ‘Accept’.
Windows 10 will now check for updates and installs the ones available. When all is set, click ‘Install’.
IMPORTANT NOTE: If you want to decide what remains in the system after the repair, click on “Change what to keep”. Select the option out of the three that suits you best and then click ‘Next’. You will lose all your data if “Keep personal files and apps” option is not selected.
Windows 10 installation proceeds. It takes a bit of time to complete.
When all is set, click on ‘Next’.
Depending on your preference, select “use express settings” or “Customize settings”. Under “customize settings”, you can enable or disable personalization and location settings. You may also enable or disable other aspects like error reporting or browser and protection.
Click NEXT.
Sign in to Windows 10.
Ensure that you have set the right time zone, time, and date.
You have now successfully repaired Windows 10.
Recovery options in Windows 10
If you’re having problems with your PC, the following table can help you decide which recovery option to use.
See this section
Your PC isn’t working well and you recently installed an update.
Your PC isn’t working well and it’s been a while since you installed an app, driver, or update.
Your PC won’t start, you haven’t created a recovery drive, and resetting your PC didn’t work.
Your PC won’t start and you haven’t created a recovery drive.
Your PC won’t start and you’ve created a recovery drive.
You want to reinstall your previous operating system.
Your PC isn’t working well and you recently installed an app.
Click one of the recovery options below and follow the steps to try to get things working again.
If you’ve recently installed a Windows update, uninstall the update to try to resolve the issue.
Select the Start button, then select Settings > Update & Security > Windows Update > View your update history > Uninstall updates.
View update history settings
Right-click the update you want to remove, and then select Uninstall.
Important: If you’ve encrypted your device, you’ll need your BitLocker key to reset your PC If you don’t know your BitLocker key, see Find my BitLocker recovery key.
Resetting reinstalls Windows 10, but lets you choose whether to keep your files or remove them, and then reinstalls Windows. You can reset your PC from Settings, the sign-in screen, or by using a recovery drive or installation media.
Reset your PC from Settings
Select the Start button, then select Settings > Update & Security > Recovery .
Open Recovery settings
Under Reset this PC, select Get started and then choose from the options and/or settings in the table below.
Keep my files > Change settings > Preinstalled apps On
Reinstalls Windows 10 and keeps your personal files.
Removes apps and drivers you installed.
Removes changes you made to settings.
Restores any apps your PC manufacturer installed if your PC came with Windows 10.
Keep my files > Change settings > Preinstalled apps Off
Reinstalls Windows 10 and keeps your personal files.
Removes apps and drivers you installed.
Removes changes you made to settings.
Removes any apps your PC manufacturer installed.
Reinstalls Windows 10 and removes your personal files.
Removes apps and drivers you installed.
Removes changes you made to settings.
Removes any apps your PC manufacturer installed. (If your PC came with Windows 10, apps from your PC manufacturer will be reinstalled.)
Note: Remove everything > Change settings gives you two options.
Data erasure On removes files and cleans the drive. If you’re planning to donate, recycle, or sell your PC, use this option. This might take an hour or two, but it makes it harder for other people to recover files you’ve removed.
Data erasure Off just removes files. It takes less time, but is less secure.
Reset your PC from the sign-in screen
If you can’t open Settings, you can reset your PC from the sign-in screen. Here’s how:
Press Windows logo key + L to get to the sign-in screen, and then restart your PC by pressing the Shift key while you select the Power button > Restart in the lower-right corner of the screen.
Your PC will restart in the Windows Recovery Environment (WinRE) environment.
On the Choose an option screen, select Troubleshoot > Reset this PC, and then choose one of the options in the previous table.

Connect the installation media you created to your PC and reinstall Windows 10.
Open File Explorer and select the drive with the installation media.
From the root directory of the drive, double-click setup.exe, and then select Yes when asked if you’d like to allow the app to make changes to your device.
Select Change what to keep.
Select one of the following options, and then select Next:
Keep personal files and apps – This will preserve your personal data, apps, and settings.
Keep personal files only – This will preserve your personal data and settings, but all your apps will be removed.
Keep nothing – This will remove all personal data, settings, and apps.
Warning: You cannot undo a reinstallation of Windows 10. Be sure to back up your files first if you choose the Keep nothing option.
To finish, select Install to start reinstalling Windows 10 on your PC.
Your PC will restart several times during the resinstallation.
Important: If you’ve encrypted your device, you’ll need your BitLocker key to use a recovery drive to restore or reset your PC If you don’t know your BitLocker key, see Find my BitLocker recovery key.
If your PC won’t start and you haven’t created a recovery drive, download installation media and use it to restore from a system restore point or reset your PC.
Download the Windows 10 media creation tool and then run it.
Select Create installation media for another PC.
Choose a language, edition, and architecture (64-bit or 32-bit).
Follow the steps to create installation media, and then select Finish.
Connect the installation media you created to your nonfunctional PC, and then turn it on.
On the initial setup screen, enter your language and other preferences, and then select Next. If you don’t see the setup screen, your PC might not be set up to boot from a drive. Check your PC manufacturer’s website for info on how to change your PC’s boot order, and then try again.
Select Repair your computer.
On the Choose an option screen, select Troubleshoot. From there, you can:
Restore from a system restore point by selecting Advanced options > System Restore. This will remove recently installed apps, drivers, and updates that might be causing your PC problems. Restoring from a restore point won’t affect your personal files.
Important: If you’ve encrypted your device, you’ll need your BitLocker key to use a recovery drive to restore or reset your PC If you don’t know your BitLocker key, see Find my BitLocker recovery key.
If your PC won’t start, you can use a recovery drive to restore from a system restore point or recover your PC. For info on how to create a recovery drive on a working PC, see Create a recovery drive.
Note: If you are using a Surface, see Creating and using a USB recovery drive for Surface to download and create a USB recovery image specifically for your Surface device.
To restore or recover using the recovery drive:
Connect the recovery drive and turn on your PC.
Press Windows logo key + L to get to the sign-in screen, and then restart your PC by pressing the Shift key while you select the Power button> Restart in the lower-right corner of the screen.
Your PC will restart in the Windows Recovery Environment (WinRE) environment.
On the Choose an option screen, select Troubleshoot, and then select one of the following two options. (If you don’t see the Choose your option screen, your PC might not be set up to boot from a drive. Check your PC manufacturer’s website for info on how to change your PC’s boot order.)
To restore from a system restore point, select Advanced Options > System Restore. This won’t affect your personal files, but it will remove recently installed apps, drivers, and updates that might be causing your PC problems.
To reinstall Windows 10, select Advanced Options > Recover from a drive. This will remove your personal files, apps and drivers you installed, and changes you made to settings.
For a limited time after upgrading to Windows 10, you’ll be able to go back to your previous version of Windows by selecting the Start button, then select Settings > Update & Security > Recovery and then selecting Get started under Go back to the previous version of Windows 10. This will keep your personal files, but it’ll remove apps and drivers installed after the upgrade, as well as any changes you made to settings. In most cases, you’ll have 10 days to go back.
Open Recovery settings
To go back, you’ll need to:
Keep everything in the windows.old and $windows.
bt folders after the upgrade.
Remove any user accounts you added after the upgrade.
Know the password you used to sign in to Windows 7 or Windows 8.1 (if you used one).
Have the USB drive you used to upgrade to Windows 10 (if you used one).
Note: If you go back to Windows 8.1, some apps that came with Windows, like Mail and People, might not work anymore. To fix the apps, reinstall them from the Microsoft Store.
Note: The option in Settings to go back to your previous version of Windows is only available for a limited time after upgrading.
Info for Windows Insiders
If you’re an Insider and the current preview build isn’t working for you, select the Start button, then select Settings > Update & Security > Recovery . Under Go back to the previous version of Windows 10, select Get Started. This won’t remove your personal files, but it’ll remove recently installed apps and drivers, and change settings back to their defaults.
Going back to an earlier build won’t remove you from the Insider Program. When the next preview build is ready, it’ll be installed on your PC.
This option takes your PC back to an earlier point in time, called a system restore point. Restore points are generated when you install a new app or driver, and when you create a restore point manually. Restoring won’t affect your personal files, but it will remove apps, drivers, and updates installed after the restore point was made.
In the search box on the taskbar, type control panel,andthen choose it from the list of results
In the Control Panel search box, type recovery.
Select Recovery > Open System Restore.
In the Restore system files and setting box, select Next.
Select the restore point that you want to use in the list of results, and then select Scan for affected programs.
If you don’t see the restore point that you want to use, select the Show more restore points check box to see more restore points.
If you’re not seeing any restore points, it might be because system protection isn’t turned on. Here’s how to check:
In the search box on the taskbar, type control panel,andthen choose it from the list of results.
In the Control Panel search box, type recovery.
Select Recovery > Configure System Restore > Configure and see if the Turn on system protection option is selected.
If the Turn on system protection option is not selected, system protection isn’t turned on and there aren’t any restore points. In this scenario, you won’t be able to recovery your PC using a system restore point and will need to use one of the other recovery options listed on this page.
If the Turn on system protection option is selected, continue with step 6.
You’ll see a list of items that will be deleted if you remove this restore point. If you’re OK with the deletions, select Close> Next > Finish.


