- Windows 10 Startup Repair Not Working: Solved
- Overview of Startup Repair not working in Windows 10
- How to fix Windows 10 Startup Repair not working efficiently?
- Case 1: Windows 10 Startup Repair loop
- Solution 1: Disable automatic restart
- Solution 2: Run chkdsk
- Solution 3: Rebuild bcd settings
- Case 2: Windows 10 Automatic Repair failed
- Solution 1. Run sfc /scannow command
- Solution 2. Disable early launch anti-malware protection
- Extra tip for fixing Windows 10 startup repair issue
- Summary
- Surface Pro
- Добавить комментарий Отменить ответ
- How to use Startup Repair to fix boot problems with Windows 10
- How to quickly repair startup problems on Windows 10
- Accessing Advanced startup when PC isn’t loading
- Accessing Advanced startup using bootable media
- Accessing Advanced startup when PC is loading
- Using Startup Repair to fix loading problems
- More Windows 10 resources
- Microsoft’s Surface Duo is not ‘failing up’
- Here’s what you can do if Windows 10 update KB5001330 is causing issues
- Review: NZXT made its first AMD motherboard and it’s brilliant
- These are the best PC sticks when you’re on the move
Windows 10 Startup Repair Not Working: Solved
When you encounter Windows 10 Startup Repair not working problems, you can refer to this article and find effective solutions here.

By AOMEI  / Last Updated February 21, 2021
Overview of Startup Repair not working in Windows 10
Windows 10 has its own repair tools, and Startup Repair is the frequently-used one. You can use Startup Repair to scan and repair some PC issues like damaged/corrupted system files or invalid boot files. If your Windows 10 won’t boot, you can use installation disc or system repair disc to boot into Advanced options, and then perform a Startup Repair.
However, some users find Windows 10 Startup Repair not working sometimes. Here are two most common cases:
Case 1: Windows 10 Startup Repair loop
Windows 10 Startup Repair loop also can be called Windows 10 Startup Repair stuck. When you encounter this error, Windows 10 will boot again and again into Startup Repair and present an endless loop of loading Startup Repair. You cannot access anything on your computer.
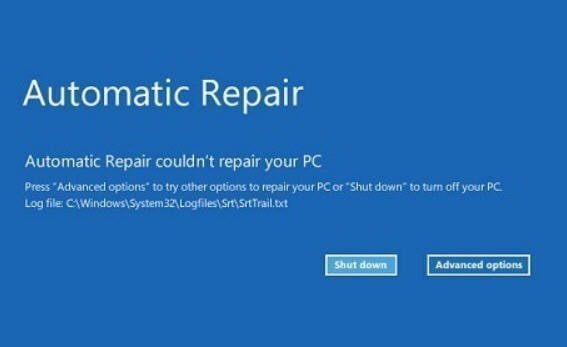
Case 2: Windows 10 Automatic Repair failed
Startup Repair is supposed to help you to fix some issues, but it will not always work. Sometimes, you may receive a message on the screen that says Windows 10 Automatic Repair couldn’t repair your PC.
How to fix Windows 10 Startup Repair not working efficiently?
Learn how to resolve Startup Repair not working in Windows 10 under two cases separately:
Case 1: Windows 10 Startup Repair loop
If you cannot use Startup Repair, then your option is to disable automatic restart, run chkdsk and rebuild bcd settings.
Solution 1: Disable automatic restart
To disable automatic restart, please follow the steps below:
1. Restart your computer and then on the screen titled «Choose an option», click Troubleshoot > Advanced options > Startup Settings > Restart subsequently.
2. On the Startup Settings screen, press 9 or F9 to choose Disable automatic restart after failure. After that, just wait for your PC to boot and see if Windows 10 Startup Repair loop is solved.

Solution 2: Run chkdsk
Corrupted boot partition may cause Windows 10 Startup Repair loop issue. You can try to check the boot volume using chkdsk:
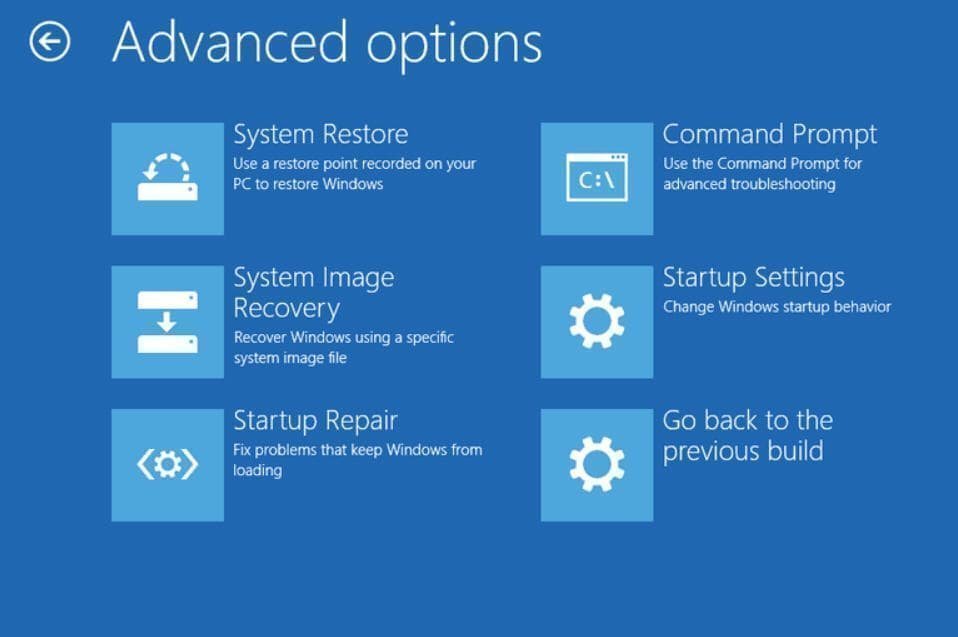
1. Restart your computer and then on the screen titled «Choose an option», click Troubleshoot > Advanced options > Command Prompt.
2. In the Command Prompt window, type chkdsk C: / f /r and press Enter to check your system partition for corrupted, invalid or deleted system files.
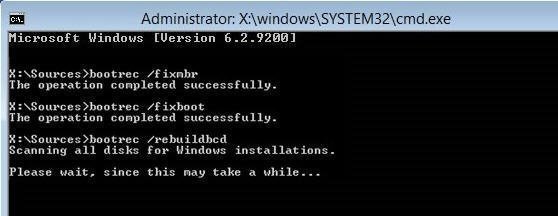
Solution 3: Rebuild bcd settings
To rebuild bcd settings, you may follow the instructions below:
1. Open Command Prompt as mentioned in Solution 2.
2. Type following command lines and press Enter after each to fix Startup Repair stuck issue:
bootrec /fixmbr
bootrec /fixboot
bootrec /rebuildbcd
Case 2: Windows 10 Automatic Repair failed
If you are told Windows 10 Automatic Repair couldn’t repair your PC, then try the following solutions:
Solution 1. Run sfc /scannow command
You can run the sfc /scannow command (System File Checker) to repair system files.
1. Restart your computer. Open Command Prompt in Advanced option as mentioned above.
2. When Command Prompt appears, type sfc /scannow /offbootdir=d:\ /offwindir=d:\windows and press Enter.
3. Restart your computer after the process is done.
Solution 2. Disable early launch anti-malware protection
If you have been facing the problem after installing an anti-malware program, you can disable anti-malware protection to fix Windows 10 Automatic Repair failed.
1. Restart your computer. On the screen titled «Choose an option», click Troubleshoot > Advanced options > Startup Settings.
2. Press 8 or F8 to select Disable early launch anti-malware protection at list and then press Enter.
Extra tip for fixing Windows 10 startup repair issue
As you see, the Windows 10 Startup Repair not working problem can be caused by corrupted, invalid or deleted system files. Therefore, it’s important for you to create a system image backup so that you can restore system to a normal state when problems occur.
Here I’d like to recommend the best free backup and restore software — AOMEI Backupper Standard. It can be used in Windows Visa/XP/7/8/8.1/10. It allows you to create not only system backup but also disk backup, partition backup and file backup. Click the button below to download this freeware:
With the intuitive interface, you can create a system image backup via AOMEI Backupper in only three steps: click Backup and System Backup > select a destination path to save the backup image > click Start Backup.

Notes:
If you want to continuously protect your computer, you can create a scheduled backup at daily, weekly, monthly, etc.
Incremental or differential backup is recommended, because it only backs up the changed data, thus saving much time and disk space.
To restore your computer when it fails to boot, you can create a bootable disk beforehand.
Summary
There are five solutions offered in this article to help you solve the Windows 10 Startup Repair not working problem. You can pick one solution according to your situation. To restore from possible system errors, you may backup your computer with AOMEI Backupper.
If you want to protect unlimited computers within your company, you can pick AOMEI Backupper Technician. With the inbuilt AOMEI Image Deploy tool, you are also allowed to deploy/restore system image file on server-side computer to multiple client-side computers over network.
Surface Pro
Однажды ваше устройство может начать загружаться очень медленно или перестанет загружаться вообще. Вместо того, чтобы тратить время на поиски причины, в Windows 10 включили инструмент Startup Repair, который позволит быстро решить большую часть возможных проблем с загрузкой.
В этой инструкции мы объясним вам, как воспользоваться данным инструментом.
Как быстро решить проблемы Windows 10 с загрузкой
Сначала вам нужно зайти в продвинутые настройки, сделать это можно как минимум тремя способами.
Зайти в настройки, если компьютер не загружается
Если ваше устройство зависло при загрузке, вы можете воспользоваться этим способом:
Включите компьютер
Как только на экране появится логотип Windows, нажмите на кнопку включения (это сразу же прервет процесс загрузки)
Повторите шаги 1 и 2 дважды
После третьего раза Windows 10 откроет раздел продвинутых настроек, где вы сможете восстановить загрузку Windows, воспользовавшись инструкцией в конце статьи.
Зайти в настройки, использовав устройство запуска
Если ваш компьютер вообще не запускается, вы можете также воспользоваться устройством запуска следующим образом:
Запустите компьютер с помощью устройства запуска Подсказка: если ваш компьютер не запускается с помощью флешки, вам нужно поменять настройки базовой системы входа-выхода и удостовериться в том, что запуск будет возможен через USB-устройство. Как правило, настроить BIOS можно запустив компьютер и зажав клавишу Delete или ESC, но лучше проверьте это заранее на сайте производителя.
Нажмите «Далее»
Нажмите «Восстановить компьютер» в правом нижнем углу экрана
Выполнив все эти шаги, воспользуйтесь инструкцией в конце статьи для инструмента восстановления.
Как зайти в настройки, пока компьютер загружается
Если у вас есть доступ к рабочему столу, вы можете воспользоваться этой инструкцией для доступа к Startup Repair
Откройте настройки
Нажмите «Обновления и безопасность»
Нажмите на «Восстановить»
В разделе «Продвинутые настройки» выберите «Перезапустить сейчас»
После выполнения этих шагов воспользуйтесь инструкцией ниже, чтобы решить проблемы с загрузкой вашего компьютера
Как воспользоваться инструментом Startup Repair
В разделе продвинутых настроек, выполните следующие шаги:
Выберете «Продвинутые настройки»

Выберите Startup Repair
Выберите свой аккаунт
Введите пароль
Нажмите «Далее»Подсказка: как только вы выполните все эти шаги, программа начнет сканировать ваш ПК на предмет неполадок.
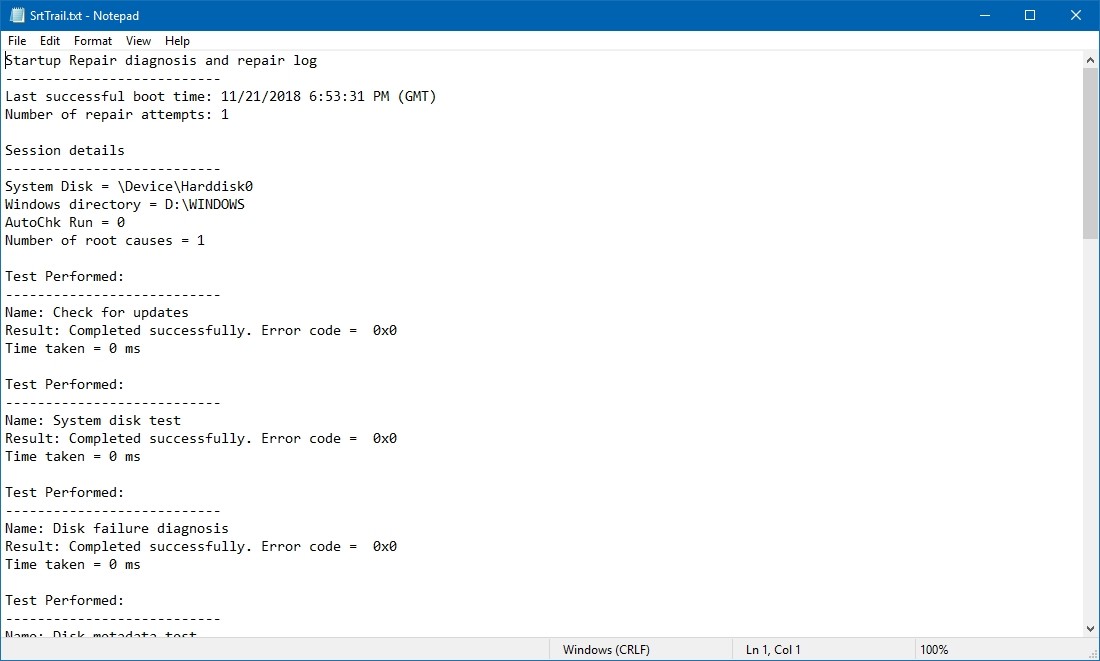
Во время этого процесса создается текстовый файл Srt.Trail.txt в папке C:\Windows\System32\Logfiles. В нем вы можете подробнее ознакомиться с результатами диагностики.
Если же вы уже давно пользуетесь одной и той же версией ПО, попробуйте переустановить Windows 10. Этот процесс займет больше времени и удалит все с вашего ПК, но он поможет решить все проблемы не только с загрузкой, но и с производительностью, жизнью батарейки и другим.
Добавить комментарий Отменить ответ
Для отправки комментария вам необходимо авторизоваться.
How to use Startup Repair to fix boot problems with Windows 10
It’s just a matter of time before your device gets stuck loading or won’t start at all. Instead of spending time trying to find out the problem, Windows 10 includes the Startup Repair feature designed to quickly fix most common issues that may be preventing your computer from loading correctly.
In this Windows 10 guide, we’ll walk you through the steps to use the Startup Repair tool to fix boot problems on your device.
How to quickly repair startup problems on Windows 10
To use the Startup Repair feature to fix boot issues with Windows 10, you’ll need to access the Advanced startup settings, which you can do in at least three different ways depending on your situation.
Accessing Advanced startup when PC isn’t loading
If your device isn’t loading or stuck during boot, you can use this method to access the recovery environment:
As soon as the Windows logo appears on your screen, press the power button. (This will immediately interrupt the boot sequence.)

After the third interruption, Windows 10 will open into the Advanced Startup environment, and then you can continue with the steps below to use the Startup Repair tool to fix booting issues with Windows 10.
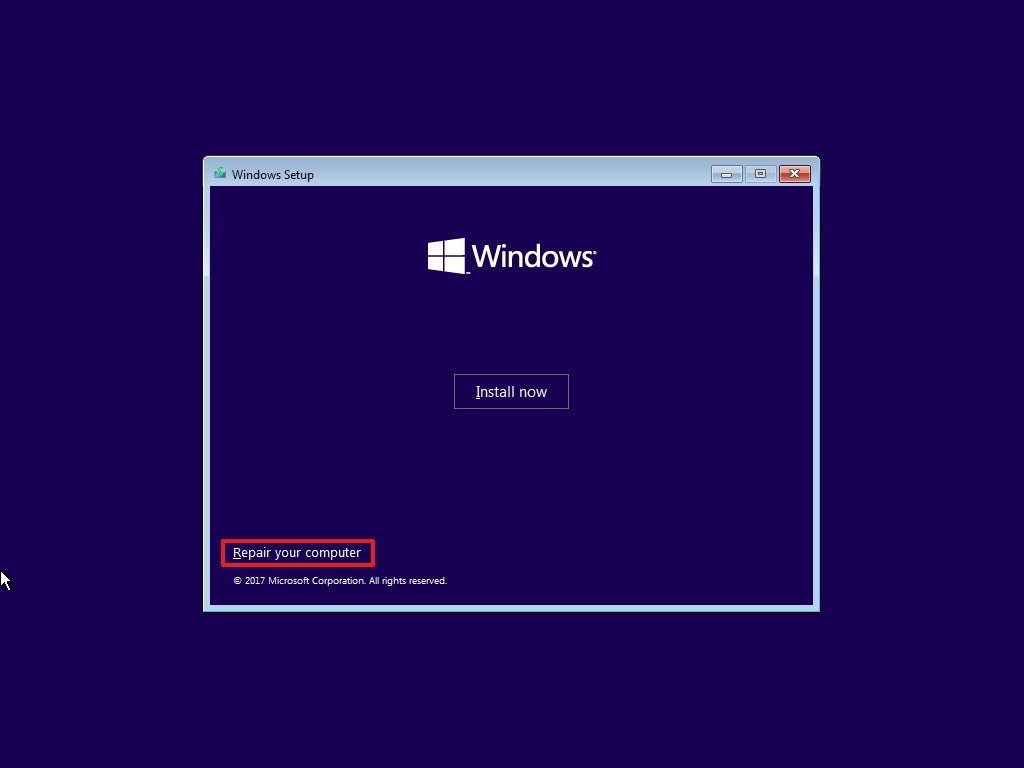
Accessing Advanced startup using bootable media
Alternatively, in the case your device isn’t starting at all, you can use a USB installation media to get to the Advanced settings environment. Here’s how:
Start your device using a USB bootable media.
- Quick Tip: If your computer isn’t starting from the USB flash drive, you’ll need to change your system’s BIOS settings to make sure it can boot from USB. Usually, you can access the BIOS by powering up your device and pressing one of the functions, Delete, or ESC keys, but make sure to check your manufacturer’s support website for more information.
Click the Repair your computer link in the bottom-right corner.
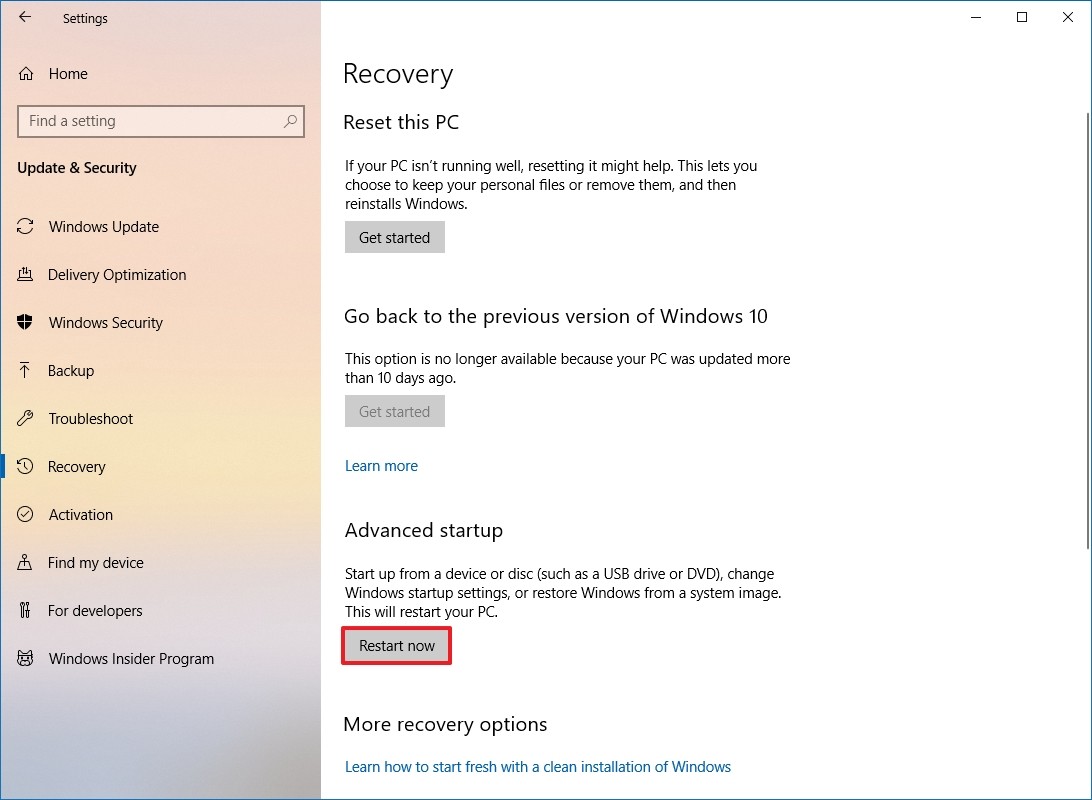
Accessing Advanced startup when PC is loading
If you have access to the desktop, you can use these steps to access the recovery environment to use the Startup Repair tool:
- Open Settings.
- Click on Update & Security.
- Click on Recovery.
Under the «Advanced startup» section, click the Restart now button.
After completing the steps, you can now continue with the steps below to fix loading problems with your device using the automatic repair feature.
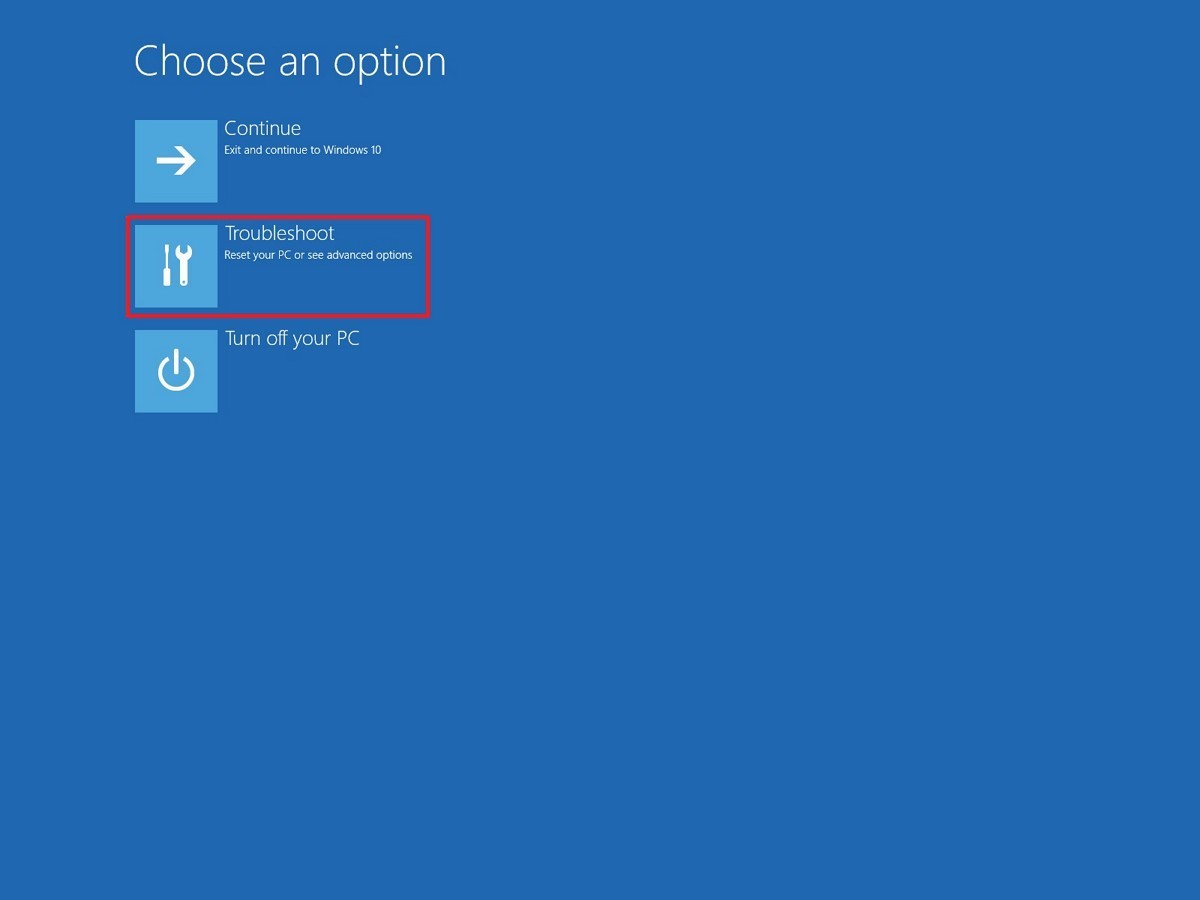
Using Startup Repair to fix loading problems
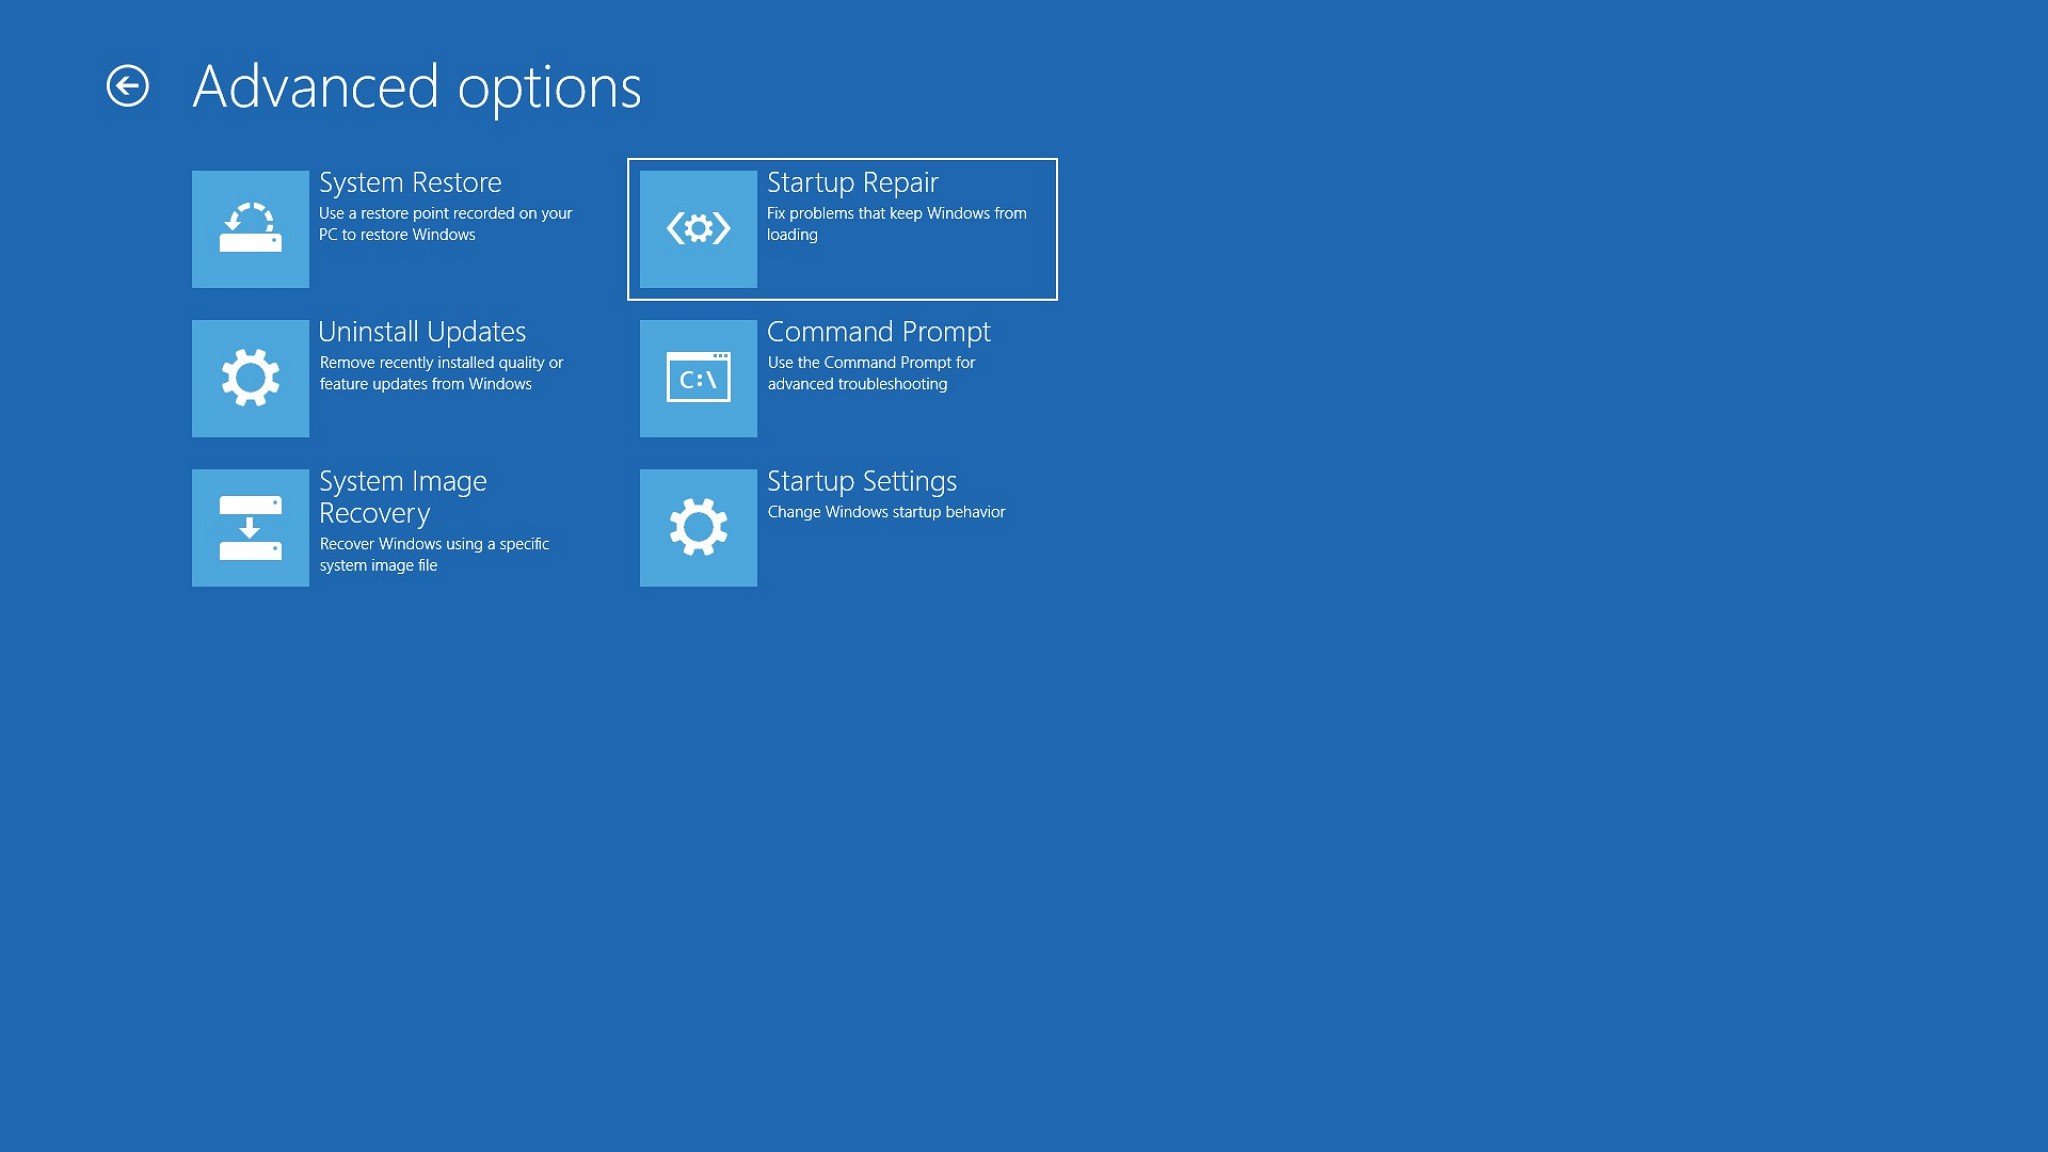
While in the Advanced startup environment, use the following steps to use Startup Repair:
Click the Troubleshoot button.
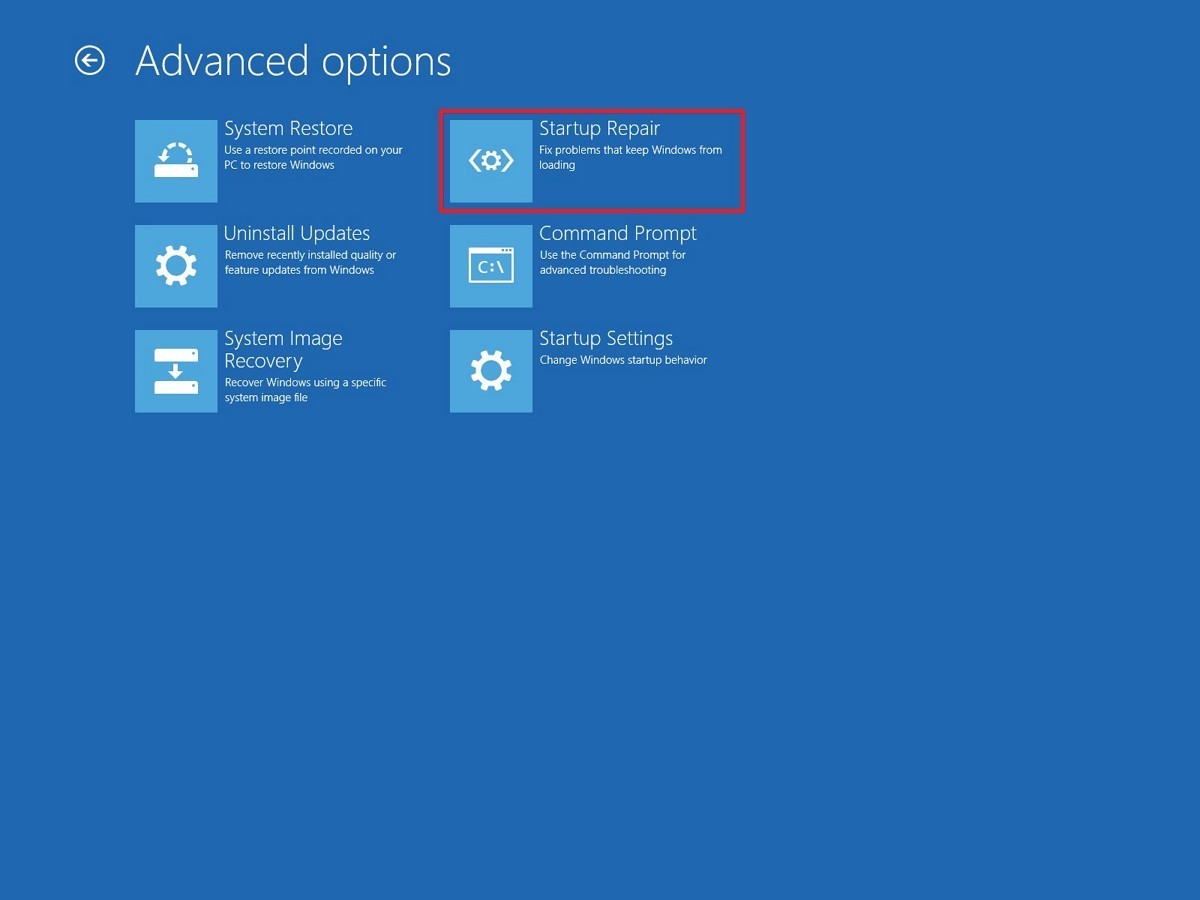
Click the Advanced options button.
Click the Startup Repair button.
Click the Continue button.
Quick Tip: If your computer is loading correctly, using this tool, you’ll get the «Start Repair couldn’t repair your PC» message because there’s nothing that needs fixing.
Once you’ve completed the steps, the Start Repair feature will proceed to scan, detect, and fix any problems that may prevent your device from loading correctly.
Also, the repair process creates a SrtTrail.txt file in the «C:\Windows\System32\Logfiles» folder with log information that you can view to have a better understanding of the diagnostics.

If you’re still having problems, you should use the Windows Central forums to find help.
Alternatively, if you’ve been running the same installation for a long time, you should consider nuking the old installation with a clean copy of Windows 10. This process will take longer, and it’ll erase everything on your computer, but it’ll help to fix the loading issues, as well as performance, battery life, and other problems.
More Windows 10 resources
For more helpful articles, coverage, and answers to common questions about Windows 10, visit the following resources:
![]()
Microsoft’s Surface Duo is not ‘failing up’
Microsoft announced this week that it was expanding Surface Duo availability to nine new commercial markets. While Surface Duo is undoubtedly a work in progress, this is not a sign of a disaster. It’s also doesn’t mean that Surface Duo is selling a ton either. Instead, the reason for the expansion is a lot more straightforward.
![]()
Here’s what you can do if Windows 10 update KB5001330 is causing issues
In this guide, we’ll show you the steps to get rid of the update KB5001330 to fix profile, gaming, and BSoD problems with the Windows 10 October 2020 Update and May 2020 Update.
![]()
Review: NZXT made its first AMD motherboard and it’s brilliant
NZXT made its first motherboard with an AMD chipset. The N7 B550 supports the latest AMD Ryzen processors and there’s plenty to love about this platform. To differentiate the N7 B550, NZXT made notable changes to the layout of the motherboard to make it easy to create a clean PC build.
![]()
These are the best PC sticks when you’re on the move
Instant computer — just add a screen. That’s the general idea behind the ultra-portable PC, but it can be hard to know which one you want. Relax, we have you covered!


