- How To Replace a Motherboard Without Reinstalling Windows 10
- Can You Replace a Motherboard On Windows 10?
- How to Check Your Windows 10 License Type
- How To Replace a Motherboard Without Reinstalling Windows 10
- Windows 10 License Troubleshooter
- Activate With Windows 7 or Windows 8.1 Product Key
- You Don’t Have to Reinstall Windows 10!
- How to Change, Reset and Replace File Associations in Windows 10
- How to Set and Change File Associations
- How to Reset or Delete a File Association in Command Prompt
- Conclusion
- How to Upgrade Motherboard and CPU without Reinstalling Windows [MiniTool Tips]
- Summary :
- Quick Navigation :
- Can You Upgrade Motherboard and CPU without Reinstalling Windows
- How to Upgrade Motherboard and CPU without Reinstalling Windows
- Method 1: Use MiniTool ShadowMaker for Universal Restore
- Operation 1: Back up the Windows OS before Upgrade
- Operation 2: Create a Bootable Disc or Drive for Universal Restore after Hardware Upgrade
- Operation 3: Upgrade Your Motherboard and CPU
- Operation 4: Important — Restore System to Dissimilar Motherboard
- Method 2: Change Registry
- Activate Your Windows 7 for Motherboard and CPU Update
- Bottom Line
- ABOUT THE AUTHOR
How To Replace a Motherboard Without Reinstalling Windows 10
The trick is getting them to play nicely afterwards
Every now and then, you’ll want to make upgrades to your system hardware. The most common part to upgrade is a hard drive to a solid-state drive, or a shiny new graphics processing unit (GPU). At times, however, you might want to replace your motherboard—the bit of the computer that helps all the other parts communicate.
Upgrading a motherboard isn’t too difficult. But activating Windows 10 and having it play nicely with your new motherboard is a different story. Here’s how you replace a motherboard without reinstalling Windows 10.

Can You Replace a Motherboard On Windows 10?
The problem with replacing a motherboard while using Windows 10 stems from Microsoft’s licensing. Or rather, misunderstanding how Windows 10 licenses work when you want to make a major upgrade.
There are three main Windows 10 license types:
- OEM: Original Equipment Manufacturer licenses come preinstalled on the hardware you purchase and are linked to the motherboard in the device
- Retail: You purchase a retail license online and can transfer the license between different computers
- Volume: Microsoft issues volume licenses in bulk to large organizations, such as businesses, universities, or governments, and allows a single license key to activate numerous installations

Each Windows license links to the hardware it’s first installed on, specifically, the motherboard. Only the retail license is transferable between motherboards. If you attempt to swap out the motherboard on a Windows 10 machine using an OEM or Volume license, there is a strong chance the new installation will not activate Windows 10.
There are several examples, however, of Windows 10 OEM and Volume licenses activating on new hardware, including a motherboard. For more information, check out how to transfer a Windows 10 license to a new computer.
How to Check Your Windows 10 License Type
Before attempting to replace your motherboard, check the type of Windows 10 license installed on your system.
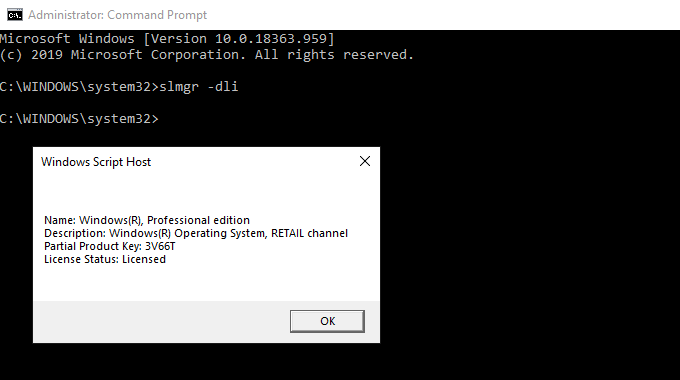
Type command prompt in your Start Menu search bar, and open the Best Match. Now, input the following command:
slmgr -dli
Wait a brief moment for the Windows Script Host window to appear. You’ll see the Windows 10 license type alongside the Description. It will clearly state which license type you have, be that retail, OEM, or volume.
If you have a retail license, you can transfer your Windows 10 installation to a new motherboard easily.
How To Replace a Motherboard Without Reinstalling Windows 10
When you switch out your motherboard, you can keep the hard drive or solid-state drive with your Windows 10 installation. After replacing the motherboard, you reconnect the Windows 10 drive. All being well, Windows 10 will reconfigure itself, and you can continue using the operating system.
As you might expect, it doesn’t always work out like that! For the most part, you’ll encounter issues relating to Windows 10 license activation. The best way to make sure your new motherboard doesn’t require a fresh installation is to link your Windows license and your Microsoft account before making the change.
Press Windows Key + I, then head to Updates & Security > Activation. Under Add a Microsoft account, select Add an account. After this, you’ll need to sign into your Microsoft account. Once you complete the sign-in process, Microsoft will link your Windows 10 license and your Microsoft account.
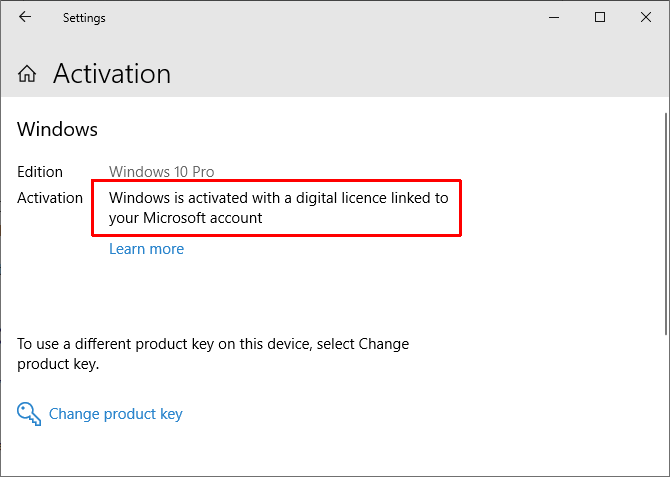
Linking your account allows you to sign back into Windows 10 after installing your new motherboard, without messing around with product codes or otherwise. However, you should note that only Retail licenses transfer in this manner. That said, there are numerous examples of OEM or Volume licenses also activating, so it’s worth a try.
Windows 10 License Troubleshooter
Windows 10 includes a license troubleshooter you can use to attempt to fix any post-motherboard issues. The troubleshooter should detect that you recently installed new hardware.
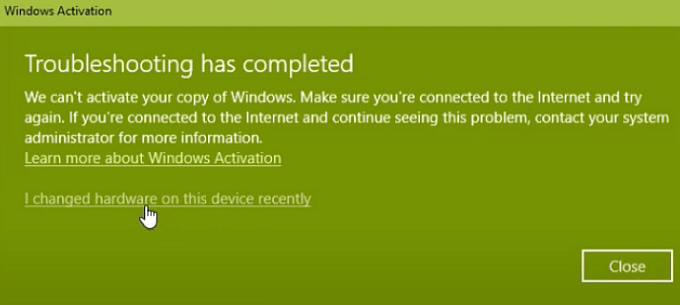
After installing your new motherboard, press Windows Key + I, then head to Updates & Security > Activation, where you may find the Windows is not activated message. If you do see the message, head to the bottom of the page, and select Troubleshoot.

Now, select I changed hardware on this device recently. Then, sign into your Microsoft account and identify the device you are using. The Microsoft activation process will whirr into life, and after a moment or two, it should activate Windows 10 with your new motherboard.
Activate With Windows 7 or Windows 8.1 Product Key
When Windows 10 was announced, Microsoft confirmed that existing Windows 7 and Windows 8/8.1 license holders would receive a free upgrade to Windows 10. The upgrade process converted licenses for the older Windows versions into digital licenses for the new operating system.
That digitization of licenses and product keys left many Windows users without a specific product key for their new operating system—only the information in the Settings panel that you have a digital license.
If Windows 10 will not activate after installing a new motherboard and you upgraded to Windows 10 via Windows 7 or 8/8.1, you can attempt to activate Windows 10 on the new hardware combination using your old product key.
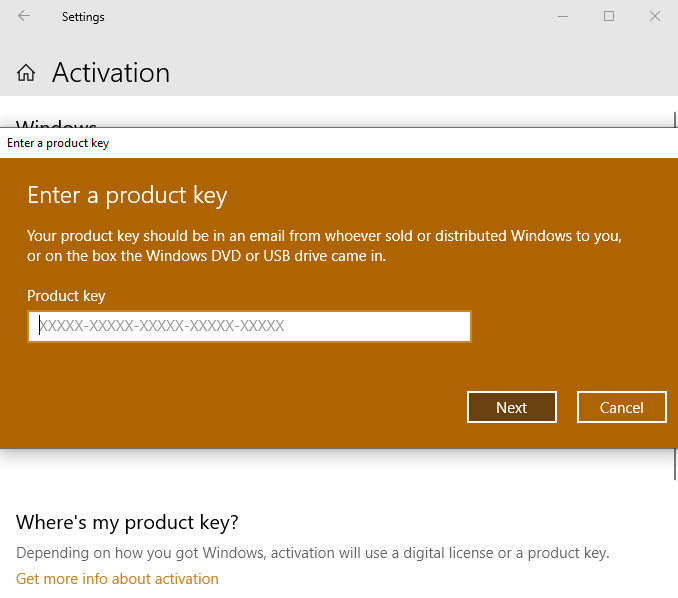
Press Windows Key + I, then head to Updates & Security > Activation. Under Update product key, select Change product key. Input the product key associated with your Windows 7 or Windows 8/8.1 license and select Next. Windows 10 should now activate.
Struggling to find your old product key? Here are a few places you can check to find it!
You Don’t Have to Reinstall Windows 10!
You don’t have to reinstall Windows 10 after upgrading your motherboard if you take a few steps before making the switch. The difficulty is getting Windows 10 and your new motherboard to play nicely after you complete the upgrade.
Windows 10 Retail license holders should have no trouble at all. The Retail license is a product designed for multiple installations, without issue.
Windows 10 OEM and Volume license holders can attempt to upgrade their motherboard without reinstalling Windows. It definitely works on occasion—but not all of the time. Try and remember back to the Windows 10 launch. Did you upgrade from Windows 7 or Windows 8/8.1 to Windows 10? If so, you need to try using your product key from the old operating system.
If you opt for a clean Windows 10 installation, make sure to check out how to create a Windows 10 installation USB stick.
Gavin is a professional technology writer with a decade of experience covering security, gaming, cryptocurrencies, Windows, and Linux, plus some diversions into copywriting for real estate, sports, and PC hardware businesses. He graduated in 2010 with a BA (Hons) Contemporary Writing with Digital Arts and has been putting those writing skills to work ever since. Gavin lives in the depths of Cornwall with his family and enjoys hiking, board games, sea swimming, football, and tea. Read Gavin’s Full Bio
How to Change, Reset and Replace File Associations in Windows 10

File associations are a vital part of a functioning Windows experience, so making sure that the right file types automatically open with the right software is a must. But what if you assign the wrong file association or just want to change it to a better program? Windows 10 has proven more restrictive than past versions in terms of file associations and can be particularly fiddly if you just want to remove an association altogether.
Luckily, we have the answers, showing you how to change, reset and replace file associations in Windows 10.
How to Set and Change File Associations
First up, the easy stuff. You’ve probably been asked a thousand times by Windows when opening a file whether you want to associate it with a certain program. Maybe you just pick one of the suggested programs, and that’s the end of that.
But Windows’ suggested programs aren’t always the right ones, so how do you pick exactly what you want?
There are two ways to do it:
First, you can right-click a file whose association you want to change, then select “Open With.” If the program you want to open it with isn’t there, click “Choose another app” at the bottom of the window.

In the new box you’ll see much the same list as before, but scroll down and click “More apps” for an extended list to appear. Select the app you want to associate the file with and tick “Always use this app to open .xxx files.”

If the app you want doesn’t appear in the list, don’t bother with the option “Look for another app on this PC.” That will only open the file with your chosen program on a one-off basis.
To properly manage your file associations, click the Start button, type “default app settings” and click on it in the search results. Here you’ll see an overview of the default file associations. Click any of programs in the list to see your other options for that function.

To see a more comprehensive list of file associations, scroll down and click “Choose default applications by file type.” This will show you a full list of all the file types available and the apps they’re associated with.
You can click any of these, but in many cases you’ll find that there are no options available. This happens with more obscure file types, such as various esoteric image formats that only open with image-editing software like Photoshop. If you have the right program, but it’s not appearing as an option in the associations list, you can force the association using the command prompt (see next heading).

If you want, from the main “Default apps” screen you can click “Reset” to reset the file associations to Microsoft’s recommended defaults. (Warning: Microsoft will of course point you back to using their own software.)
How to Reset or Delete a File Association in Command Prompt
Resetting a file association to nothing is a little more intricate, and you’ll need to do it through an elevated command prompt.
Click Start, type cmd , right-click Command Prompt, then “Run as administrator.”
into the command prompt (where “filename” is the name of the app you want to dissociate, and “ext” is the extension, such as .jpg, bin, .mp3 or whatever).
If you’re unsure of the filename, just enter “assoc” into the command prompt to see a list of all the file type associations. The bit you want to enter after “ftype” is the entire part after the = symbol.
For the sake of the example, we decided to dissociate the “wtv” extension from VLC, so the command we typed was

Once you’ve entered the command, the file type should be dissociated/empty, and you can set a new one when you try to open that file type next time.
Or, if you want to use the command prompt to associate or reassociate files with apps, just follow the below format, replacing the “wtv” and directory with the extension and directory of the program you want to associate it with:

Conclusion
That should tell you everything you need to know about file associations and give you control over which programs go with which extensions. While the command prompt method may be a bit more tricky, it’s less restricted than the “Default apps” window, so if the program you want doesn’t turn up there, you can force the association through the trusty command prompt.
Content Manager at Make Tech Easier. Enjoys Android, Windows, and tinkering with retro console emulation to breaking point.
How to Upgrade Motherboard and CPU without Reinstalling Windows [MiniTool Tips]
By Vera | Follow | Last Updated January 27, 2021
Summary :
This post is intended for every user who wants to upgrade motherboard and CPU without reinstalling Windows 10/8/7 from scratch. If you are one of them, follow the instructions so you can keep your current Windows installation, programs and settings after upgrading/replacing/changing the motherboard and CPU.
Quick Navigation :
Can You Upgrade Motherboard and CPU without Reinstalling Windows
Sometimes, your hardware such as a motherboard, CPU, etc. may become defective and cause start up issues in your Windows 10/8/7 OS. Or, you may be not be satisfied with your current motherboard and CPU and want to upgrade or replace them.
For most home & office users nowadays, completing a fresh install is not a problem after the motherboard and CPU update, but keeping this tedious job away is still necessary. Besides, you will have to reinstall all the previously installed applications, configure system settings, and transfer data since the clean install will remove them, not to mention some of the programs need re-activating.
Thus, like most other people, you probably also want to upgrade your hardware without reinstalling Windows.
Then, here comes a question: can I upgrade my motherboard and CPU without reinstalling Windows 10/8/7?
The answer is Yes!
This article is targeted to you — it introduces how to replace dead motherboard without reinstalling Windows in detail. Once the process is correctly completed, the Windows OS will be able to boot after the motherboard upgrade.
How to Upgrade Motherboard and CPU without Reinstalling Windows
To ensure the system can run properly after the hardware change, here are 3 available ways for you to easily replace a dead motherboard and CPU without reinstalling Windows.
Method 1: Use MiniTool ShadowMaker for Universal Restore
MiniTool ShadowMaker, one of the best Windows backup software, is designed to help Windows 10/8/7 users to back up files, the OS, partition and the entire disk for data protection. If anything in the computer goes wrong, you can perform a quick disaster recovery.
Additionally, its Universal Restore feature allows you to restore Windows OS to a computer with different hardware. Thus, it is exactly what you need if you try replacing the motherboard and changing CPU without reinstalling Windows 10/8/7. No changes will be made to the previous system settings that you are accustomed to.
Above all, it offers a Media Builder to create a bootable disc or USB drive to boot the PC when it is unbootable. With this tool, you can restore the system to the PC with different hardware.
Now, try out this tool by downloading its Trial Edition for free from the following button. Note that this edition only offers a 30-day free trial. If you like this software, upgrade to its Pro Edition.
After downloading, start the hardware upgrade. And here, we will take «replace motherboard without reinstalling Windows 7» as an example.
Operation 1: Back up the Windows OS before Upgrade
Before the upgrade, change, or replacement of the motherboard and CPU, we strongly suggest creating a system image backup to avoid any accidents. Of course, you can skip this process to the next one if you find it unnecessary.
Let’s see how to back up Windows 7 OS.
Step 1: Launch MiniTool ShadowMaker Trial Edition.
Step 2: You will be directed to the Home page to set up a backup if no previous backup was created. Just follow the tip to go to the Backup tab.
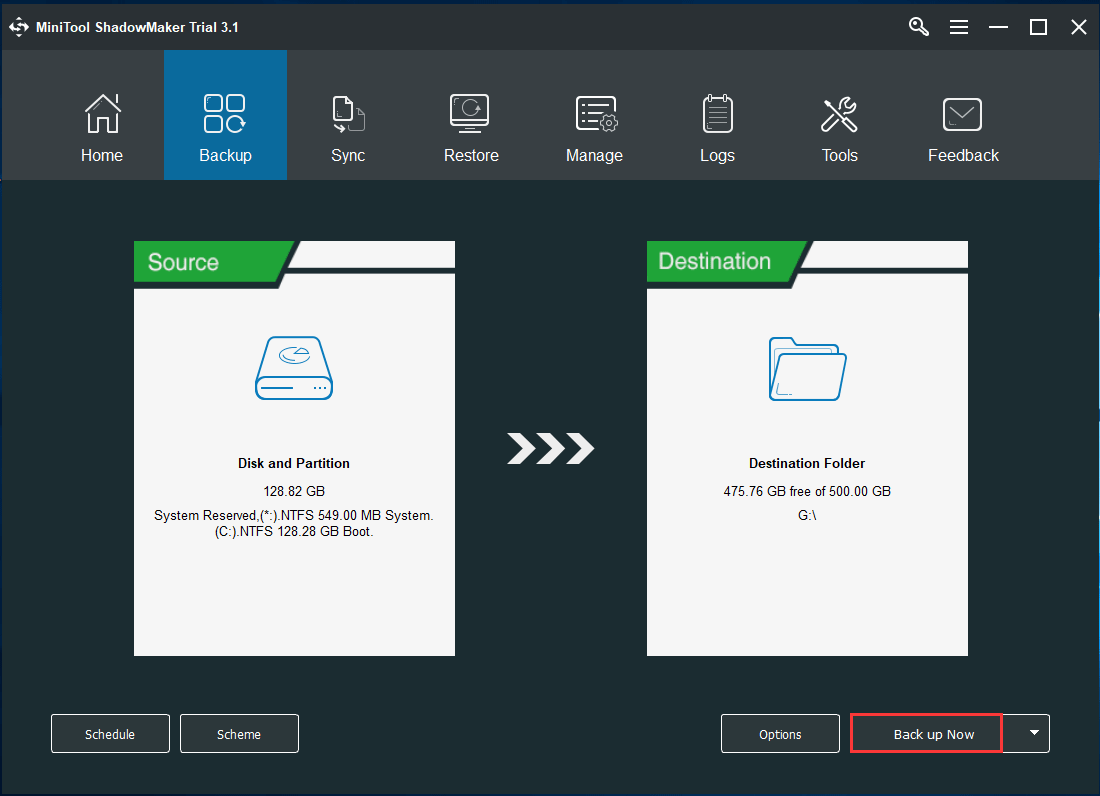
Step 3: Take a look at this following interface! You will find that all system-related partitions have been chosen as the backup source by default, as well as a destination folder. Just click Back up Now in the Manage tab to perform the task
Operation 2: Create a Bootable Disc or Drive for Universal Restore after Hardware Upgrade
After changing motherboard and CPU, your Windows 7 will very likely fail to run. Thus, to upgrade motherboard and CPU without reinstalling Windows, you need to create a bootable CD/DVD disc or USB flash drive with the Media Builder feature of MiniTool ShadowMaker for universal restore.
Step 1: Open MiniTool ShadowMaker Trial Edition, choose Keep Trial and local backup.
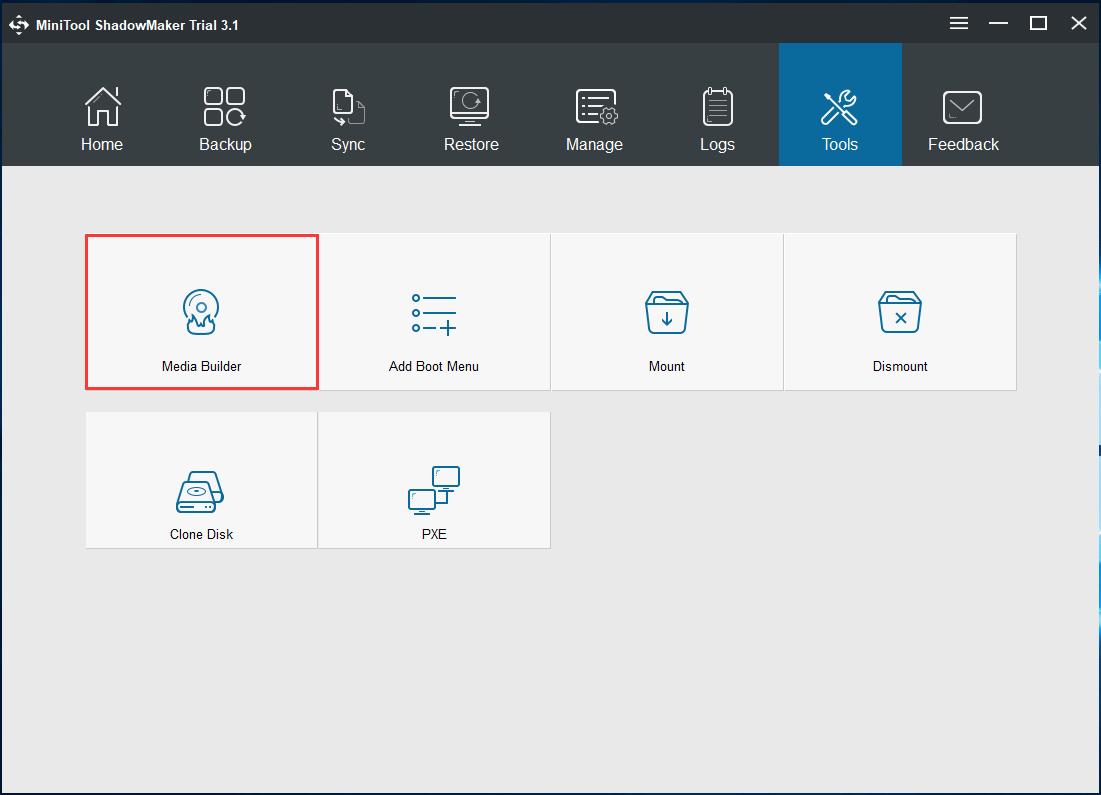
Step 2: Under the Tools tab, choose Media Builder feature.
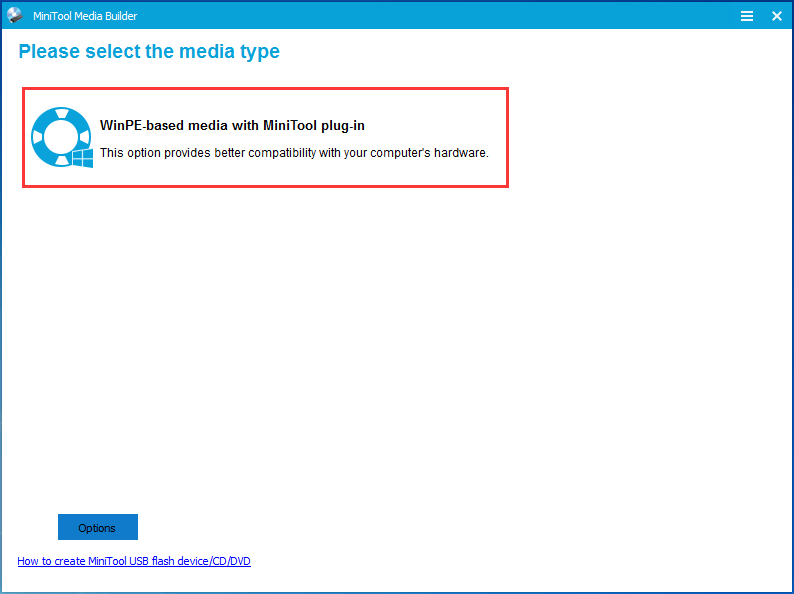
Step 3: Click the WinPE-based media with MiniTool plug-in section to continue.
Step 4: Choose media destination, which can be ISO file, USB hard drive, USB flash drive, and CD/DVD disc. Then, start the creation.
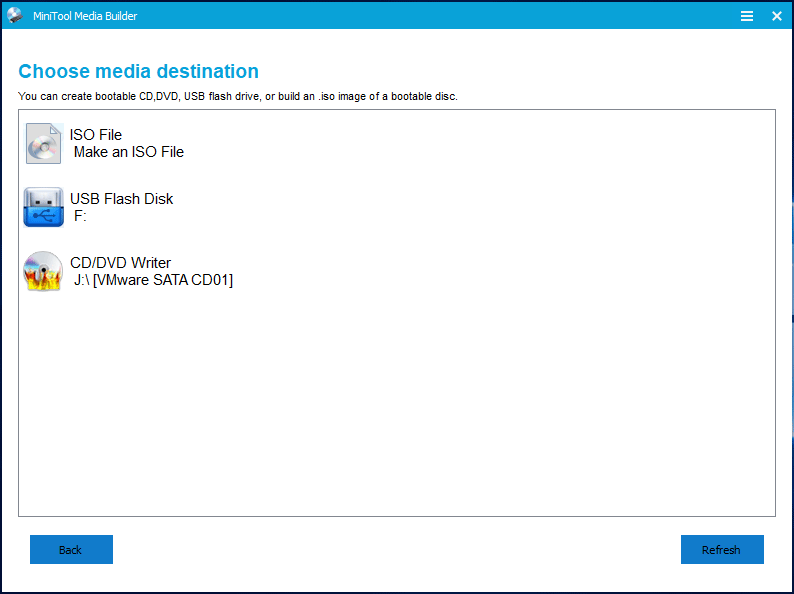
In the end, you will have a recovery drive with system backup.
Want to back up system files to the recovery drive to restore PC? Here are the detailed information and two effective alternatives ways.
With the created bootable media, you can boot your PC from the bootable disc or USB drive after installing a new motherboard in Windows 7.
Operation 3: Upgrade Your Motherboard and CPU
After creating a bootable USB drive or CD/DVD disc with a system backup, now you can start changing the motherboard and CPU.
To replace the dead motherboard and install a new motherboard in Windows 7, you should ensure the motherboard you choose can be installed in the computer case and pay attention to the motherboard’s port.
Additionally, the CPU should be selected according to the motherboard’s model and performance parameter. In short, choose proper motherboard and CPU.
After completing the selection, take measure to upgrade them. This post — How to Upgrade and Install a New CPU or Motherboard (or Both) is helpful for you to do this work.
Operation 4: Important — Restore System to Dissimilar Motherboard
If you have changed your motherboard and CPU, Windows 7 will be not working. It is likely that you need to do a clean install of Windows and restore OS since the installed Windows chipset drivers may be incompatible.
Don’t worry. MiniTool ShadowMaker has a feature called Universal Restore, enabling you to restore the system to the computer with dissimilar hardware. Here, you can use it to perform a restore after changing CPU and motherboard without reinstalling Windows 7/8/10.
Step 1: Change your boot order and boot your Windows using the bootable media you have created in Operation 2.
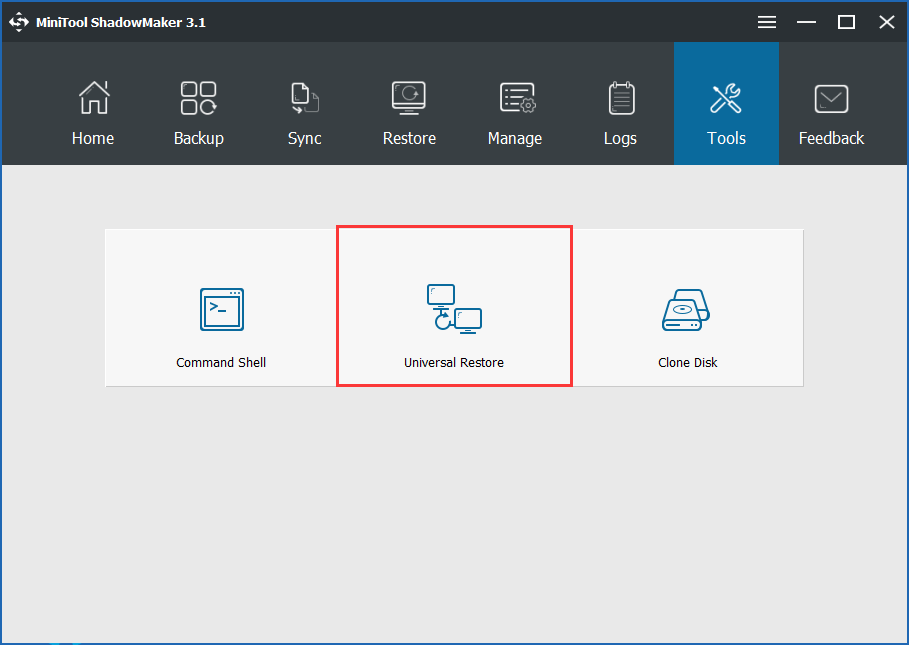
Step 2: A few seconds later, MiniTool ShadowMaker Bootable Edition will launch. Just go to the Tools tab to choose the Universal Restore feature.
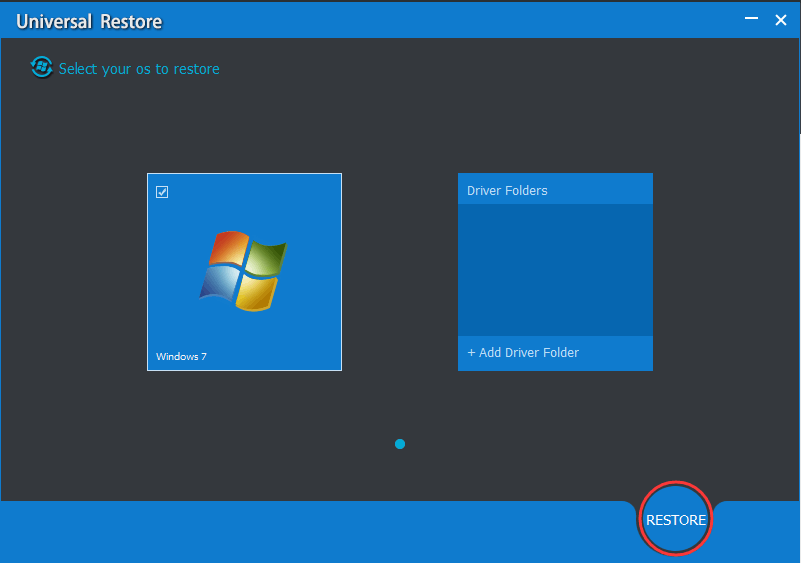
Step 3: Then, this software will automatically detect and list the operating system installed on the hard drive. Choose Windows 7 and click Restore to repair the unbootable OS after replacing or upgrading the motherboard and CPU.
With MiniTool ShadowMaker, you can easily upgrade motherboard and CPU without reinstalling Windows 10/8/7. Now, download and install it on your PC for this work. You can share this freeware with your friends that need it.
Method 2: Change Registry
This way is a bit complicated. Here, we will walk you through two cases about how to replace motherboard without reinstalling Windows 7 by changing the registry.
Case 1: Modify Registry before Replacing Motherboard and CPU
This method needs to be completed before you replace your motherboard and CPU. If you haven’t replaced your motherboard and CPU yet, Windows can start up normally. In this case, you have to change the registry in the current working Windows before proceeding motherboard and CPU upgrade.
Step 1: Press Win + R to bring up the Run dialog, input regedit in the textbox and click OK to open Registry Editor.
Step 2: In the following window, navigate to this path:
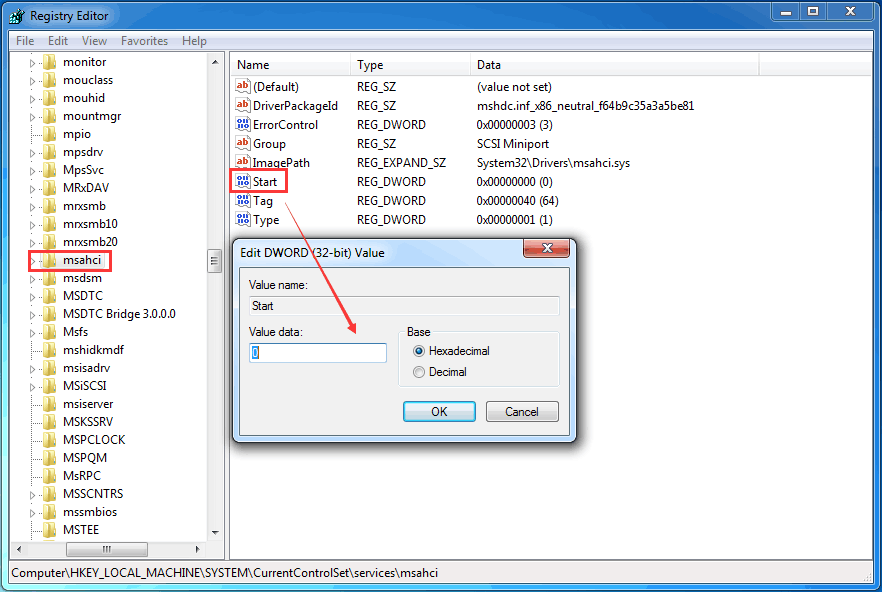
HKEY_LOCAL_MACHINE\SYSTEM\CurrentControlSet\services\msahci
Step 3: Double-click the Start DWORD and change its value data to 0. Click OK to go on.
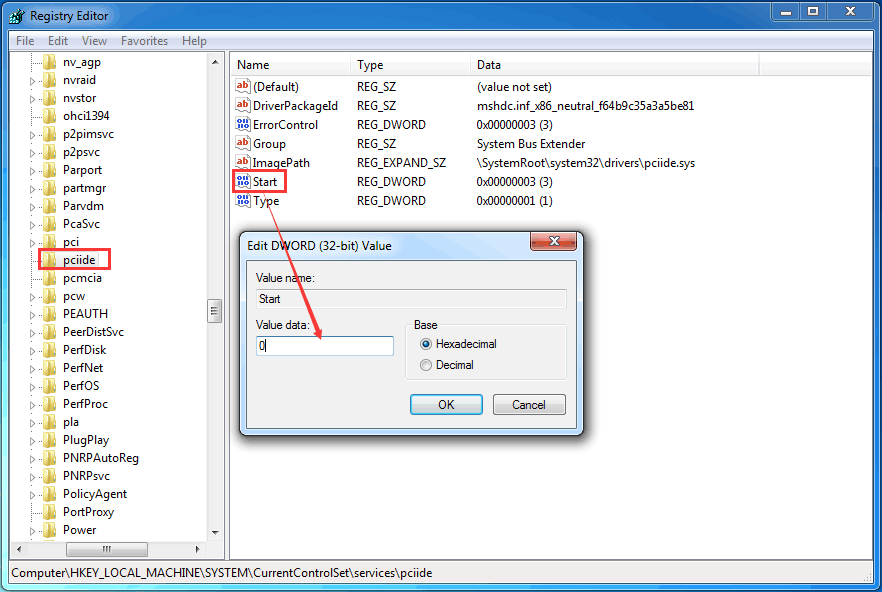
Step 4: Then, change the following key’s DWORD value data to 0:
HKEY_LOCAL_MACHINE\SYSTEM\CurrentControlSet\services\pciide
After modifying the registry, you can shut down your computer and then start installing a new motherboard and CPU. After that, your Windows OS should be able to boot normally.
This method is quite helpful for replacing the motherboard and changing the CPU without a fresh install. Please remember to complete this method before you upgrade the motherboard and CPU.
Case 2: Modify Registry Using an Offline Registry Editor after Motherboard Update
Perhaps you have replaced your motherboard and CPU but forgot to change the registry beforehand, then Windows OS failed to boot.
In this case, in addition to using MiniTool ShadowMaker to perform a universal restore (mentioned in Operation 4), you can choose to use an offline Registry Editor to modify the Windows Registry to upgrade motherboard and CPU without reinstalling Windows.
To do this, you are required to boot the non-working PC from a Windows 7 installation disc, and then start the following operations.
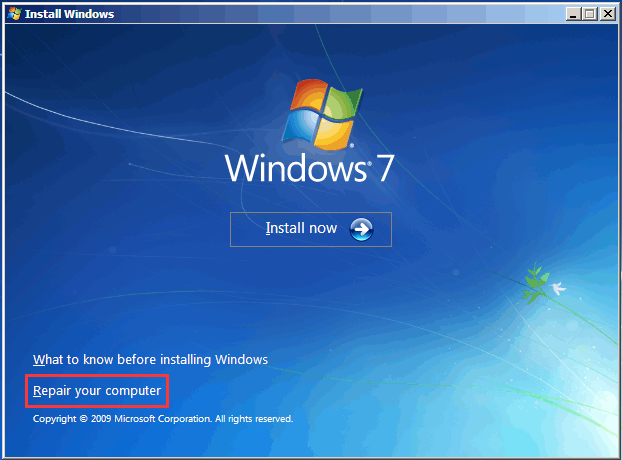
Step 1: After computer boot, configure the language, time and format, keyboard or input method.
Step 2: In the following screen, click Repair your computer.
Step 3: In the System Recovery Options screen, choose Command Prompt.
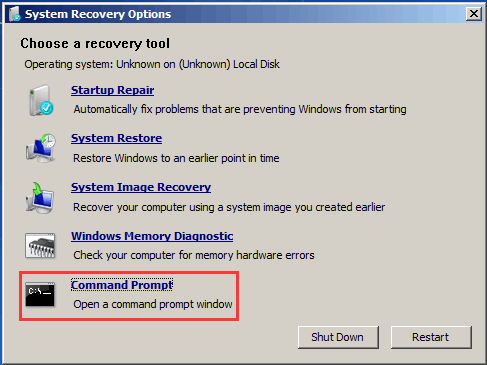
Step 4: In the CMD window, type regedit command and press Enter to open Registry Editor.

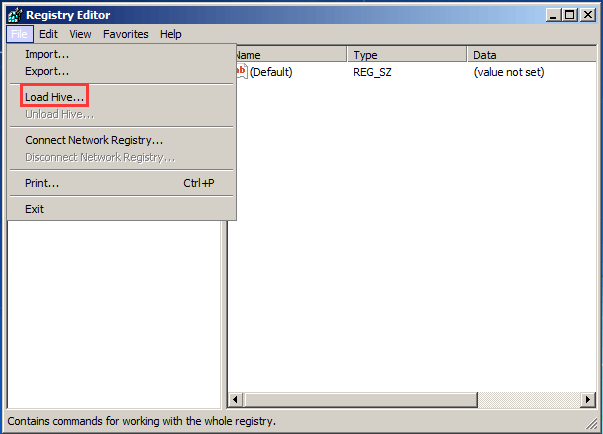
Step 5: Highlight the HKEY_LOCAL_MACHINE key.

Step 6: Choose Load Hive from the File menu to load the offline registry.
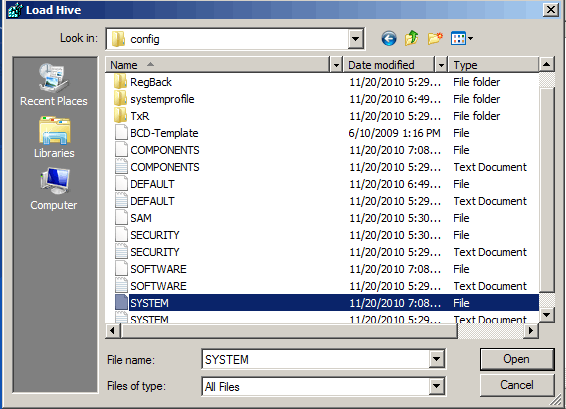
Step 7: Go to the drive where Windows is installed and choose system file. Usually it is the path: C:\Windows\system32\config\system. Then click the Open button.
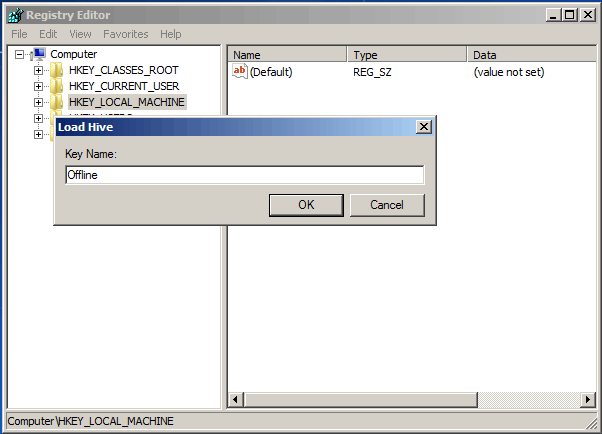
Step 8: Type a key name, for example, Offline.
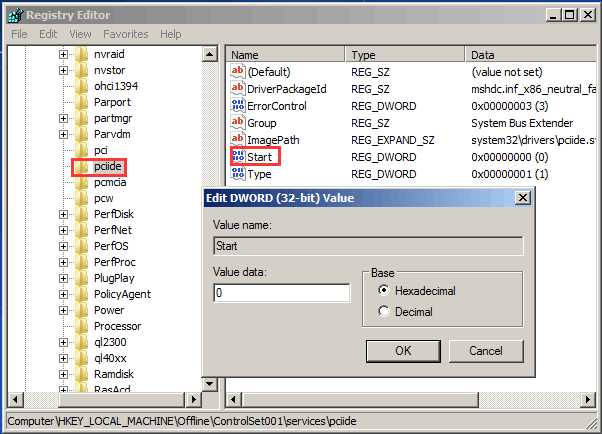
Step 9: Go to HKEY_LOCAL_MACHINE\Offline\ControlSet001\services\msahci and double-click Start to change the value data to 0.
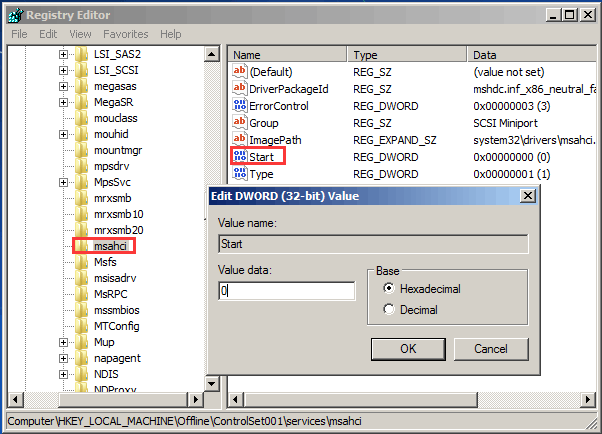
Step 10: Then, perform the same modification to this key:
HKEY_LOCAL_MACHINE\Offline\ControlSet001\services\pciide
Step 11: After finishing the modifications, highlight Offline and choose Unload Hive from the File menu to write back the changes you have made to the offline Registry.
Step 12: Restart your PC, specify the SATA mode (IDE-ATA, AHCI or RAID) according to your needs or leave the default settings in BIOS, exit BIOS, remove the Windows 7 installation disc, let the OS run properly and install required hard disk controller drivers.
By this way, you can upgrade motherboard and CPU without reinstalling Windows.
If you want to replace motherboard without reinstalling Windows 7 when it is dead, change the registry based on the actual situations.
Activate Your Windows 7 for Motherboard and CPU Update
After you finish upgrading your motherboard and CPU, you may be required to reactivate Windows. If your OS is Windows 7, there is nothing to worry about. Windows will most likely reactivate by itself. If it doesn’t, call Microsoft for help.
For Windows 10, Microsoft gives a help tutorial — Reactivating Windows 10 after a hardware change. Alternatively, you can reactivate it by following the tips.
Step 1: Before the upgrade, go to the Settings tab, and change the account to a Microsoft Account rather than Local Account.
Step 2: Upgrade the motherboard & CPU. After Windows 10 boots again, it will tell Windows 10 to reactivate:
Go to Settings > Update & security > Troubleshoot > I changed hardware on this device recently.
Next, sign in your Microsoft Account again and click the Activate button. Then, Windows 10 will grab the activation key from your online Microsoft account and re-link it to your computer with its freshly-upgraded hardware.
Step 3: If you prefer a local account instead of a Microsoft account, you can change the account back.
With these three steps, you now know how to upgrade motherboard and CPU without reinstalling Windows 10, and how to reactivate the OS as well.
Bottom Line
After finishing reading this post, you should know how to replace motherboard and CPU without reinstalling Windows 10/8/7. Follow the methods above if you need to upgrade motherboard and CPU without fresh install.
If you have any questions regarding MiniTool ShadowMaker or any suggestions of hardware update, please feel free to contact [email protected] or leave a message in the comment part below.
ABOUT THE AUTHOR

Position: Columnist
Vera is an editor of the MiniTool Team since 2016 who has more than 5 years’ writing experiences in the field of technical articles. Her articles mainly focus on disk & partition management, PC data recovery, video conversion, as well as PC backup & restore, helping users to solve some errors and issues when using their computers. In her spare times, she likes shopping, playing games and reading some articles.


