- Замечания
- Примеры
- Пример 1
- Example2
- Use the WinForms ReportViewer Control
- To add the ReportViewer Control to a Windows application
- Viewing Reports in Remote Processing Mode
- Viewing Reports in Local Processing Mode
- To add the Sales Order Detail report to a Windows application
- Использование элемента управления WinForms ReportViewer Use the WinForms ReportViewer Control
- Добавление элемента управления ReportViewer в приложение Windows To add the ReportViewer Control to a Windows application
- Просмотр отчетов в режиме удаленной обработки Viewing Reports in Remote Processing Mode
- Просмотр отчетов в режиме локальной обработки Viewing Reports in Local Processing Mode
- Добавление отчета «Сведения о заказе на продажу» в приложение Windows To add the Sales Order Detail report to a Windows application
Замечания
Когда Вы используете режим вывода Visual FoxPro object-assisted , все предложения команды REPORT FORM доступны вашему ReportListener в его члене-объекте CommandClauses, за исключением предложений отбора записей (scope, FOR , и WHILE ). Вы можете использовать атрибут CommandClauses.RecordTotal для информации о диапазоне выполнения отчета, или присваивать эти значения вашему объекту ReportListener перед выполнением вашего отчета. Тема Свойство CommandClauses Property даст Вам подробную информацию о том, как каждое предложение представлено в члене-объекте CommandClauses.
Примеры
Пример 1
Следующий пример показывает, как выполнить пакетное задание по выводу на печать отчетов, сотоящее из двух отчетов. Visual FoxPro выполняет двойной проход отчетов, чтобы получить полное число страниц, которое сохраняется в системной переменной _PAGETOTAL для того, чтобы позволить применить выражение «Page X of Y» в оформлении отчета.
| Обратите внимание: |
|---|
| Вы можете гарантировать, что проход отчета выполняется дважды включением _PAGETOTAL в выражениях вашего отчета. Если Вы не нуждаетесь в _PAGETOTAL, но хотели бы, чтобы для других вычислений осуществлялось два прохода, можете использовать режим вывода object-assisted и устанавливать свойство ReportListener TwoPassProcess в .T. . Для подробной информации, см. TwoPassProcess Свойство . |
NORESET определяет, что печать номеров страниц переносится на следующий отчет. NOPAGEEJECT определяет, что первая страница второго отчета продолжает печататься на обратной стороне последней страницы первого отчета.
Example2
Следующий пример показывает, как Вы можете осуществить предварительный просмотр перед направлением отчета на принтер.
Чтобы сделать окно предварительного просмотра немодальным, следующий код включает ключевое слово NOWAIT :
Чтобы предварительно просматривать результаты в указанном окне, следующий код включает предложение WINDOW , чтобы задать окно по имени MyWindow, которое Вы предварительно создали командой DEFINE WINDOW :
Use the WinForms ReportViewer Control
To view reports that have been deployed to a report server or reports that exist on the local file system, you can use the WinForms ReportViewer control to render them in a Windows application.
To add the ReportViewer Control to a Windows application
Create a new Windows application using either Microsoft Visual C# or Microsoft Visual Basic.
Open an exiting Windows application project and add a new form.
Locate the ReportViewer control in the Toolbox. If the Toolbox is not visible, you can access it from the View menu by selecting Toolbox.
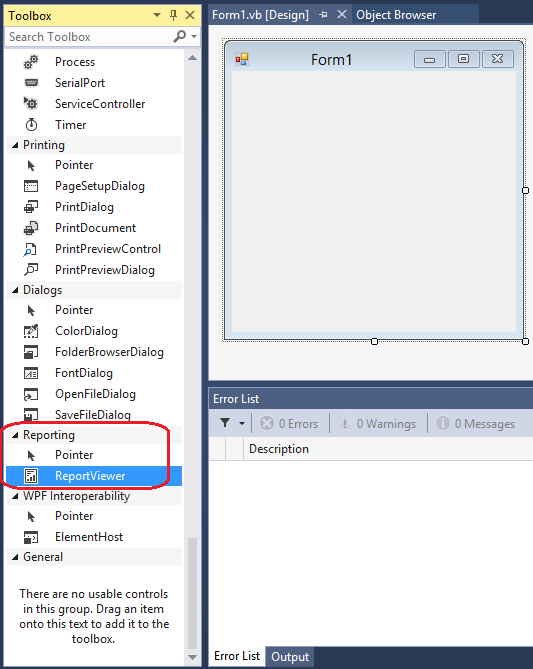
Drag the ReportViewer control onto the design surface of the Windows Form.
A ReportViewer control named reportViewer1 is added to the form.
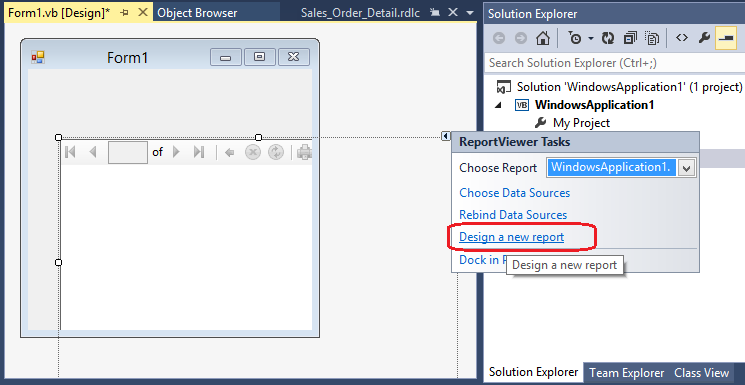
After the control is added to the form, the ReportViewer Tasks smart tag appears and prompts you to select a report.
If the report you wish to view has been deployed to a report server, select the option from the Choose Report drop-down list. After the option is selected, two additional properties appear: Report Server Url and Report Path. The Report Server Url is the address to the report server and the Report Path is the full path to the report to render.

If the report you wish to view a report in local mode, select either the Design a new report option to launch the report designer or select a report that is already part of the existing project.
Viewing Reports in Remote Processing Mode
The following example demonstrates how to render a report that has been deployed to a report server using the WinForms ReportViewer control. This example uses the Sales Order Detail report that is included with the AdventureWorks2012 sample reports project.
C#
VB.NET
Viewing Reports in Local Processing Mode
The following example demonstrates how to render a report that is part of the Windows application and has not been deployed to a report server.
To add the Sales Order Detail report to a Windows application
Open the Windows project to which the report will be added.
From the Project menu, select Add Existing Item.
Browse to the location where you installed the AdventureWorks2012 Report Samples project.
The download the report samples, go to AdventureWorks 2012 Report Samples
Select the Sales Order Detail.rdl file and click the Add button.
The Sales Order Detail.rdl file should now be part of the project.

Right-click the Sales Order Detail.rdl file in Solution Explorer and select Rename. Rename the report to Sales Order Detail.rdlc and press ENTER.
If Solution Explorer is not visible, you can open it from the View menu by selecting Solution Explorer.
Renaming the file extension from rdl to rdlc will allow you to edit the report using report designer for MicrosoftVisual Studio 2005.
After the report has been renamed, select the file and locate the Properties window. Change the Copy to Output Directory property to Copy if Newer.

If the Properties window is not visible, you can open it from the View menu by selecting Properties Window.
The following code example will create a dataset for the sales order data and then render the Sales Order Detail report in local mode.
Использование элемента управления WinForms ReportViewer Use the WinForms ReportViewer Control
Для просмотра отчетов, развернутых на сервере отчетов, и отчетов, существующих в локальной файловой системе, можно использовать элемент управления WinForms ReportViewer для подготовки отчетов к просмотру в приложении Windows. To view reports that have been deployed to a report server or reports that exist on the local file system, you can use the WinForms ReportViewer control to render them in a Windows application.
Добавление элемента управления ReportViewer в приложение Windows To add the ReportViewer Control to a Windows application
Создайте новое приложение Windows с помощью Microsoft Microsoft Visual C# Visual C# или Microsoft Microsoft Visual Basic Visual Basic . Create a new Windows application using either Microsoft Microsoft Visual C# Visual C# or Microsoft Microsoft Visual Basic Visual Basic .
Открыть существующий проект приложения Windows и добавить новую форму. Open an exiting Windows application project and add a new form.
Укажите элемент управления ReportViewer в окне Панель элементов. Locate the ReportViewer control in the Toolbox. Если окно Панель элементов не отображается, к нему можно получить доступ из меню Вид, выбрав пункт Панель элементов. If the Toolbox is not visible, you can access it from the View menu by selecting Toolbox.

Перетащите элемент управления ReportViewer в область конструктора Windows Form. Drag the ReportViewer control onto the design surface of the Windows Form.
В форму будет добавлен элемент управления ReportViewer с именем reportViewer1. A ReportViewer control named reportViewer1 is added to the form.
После добавления элемента управления в форму появляется смарт-тег Задачи ReportViewer и выводится приглашение выбрать отчет. After the control is added to the form, the ReportViewer Tasks smart tag appears and prompts you to select a report.
Если требуемый отчет развернут на сервере отчетов, выберите параметр из раскрывающегося списка Выбор отчета. If the report you wish to view has been deployed to a report server, select the option from the Choose Report drop-down list. После выбора параметра на экране появляются два свойства : URL-адрес сервера отчетов и Путь к отчету. After the option is selected, two additional properties appear: Report Server Url and Report Path. Свойство URL-адрес сервера отчетов задает адрес сервера отчетов, а свойство Путь к отчету задает полный путь к подготавливаемому к просмотру отчету. The Report Server Url is the address to the report server and the Report Path is the full path to the report to render.

Если просматриваемый отчет является отчетом в локальном режиме, выберите параметр Создать новый отчет для запуска конструктора отчетов или отчет, который уже является частью существующего проекта. If the report you wish to view a report in local mode, select either the Design a new report option to launch the report designer or select a report that is already part of the existing project.

Просмотр отчетов в режиме удаленной обработки Viewing Reports in Remote Processing Mode
В следующем примере показана подготовка к просмотру отчета, развернутого на сервере отчетов при помощи элемента управления WinForms ReportViewer. The following example demonstrates how to render a report that has been deployed to a report server using the WinForms ReportViewer control. В этом примере используется отчет Sales Order Detail, который включен в проект с образцами отчетов AdventureWorks2012 AdventureWorks2012 . This example uses the Sales Order Detail report that is included with the AdventureWorks2012 AdventureWorks2012 sample reports project.
C# C#
VB.NET VB.NET
Просмотр отчетов в режиме локальной обработки Viewing Reports in Local Processing Mode
В следующем примере показана подготовка к просмотру отчета, который является частью приложения Windows и не был помещен на сервер отчетов. The following example demonstrates how to render a report that is part of the Windows application and has not been deployed to a report server.
Добавление отчета «Сведения о заказе на продажу» в приложение Windows To add the Sales Order Detail report to a Windows application
Открыть проект Windows, в который будет добавлен отчет. Open the Windows project to which the report will be added.
В меню Проект выберите пункт Добавить существующий элемент. From the Project menu, select Add Existing Item.
Перейти в папку, в которой были установлены проекты образцов отчетов AdventureWorks2012 AdventureWorks2012 . Browse to the location where you installed the AdventureWorks2012 AdventureWorks2012 Report Samples project.
Чтобы скачать примеры отчетов, перейдите в раздел Примеры отчетов AdventureWorks 2012. The download the report samples, go to AdventureWorks 2012 Report Samples
Выберите файл Sales Order Detail.rdl и нажмите кнопку Добавить. Select the Sales Order Detail.rdl file and click the Add button.
Файл «Сведения о заказе на продажу.rdl» теперь станет частью проекта. The Sales Order Detail.rdl file should now be part of the project.

Щелкните правой кнопкой мыши файл Sales Order Detail.rdl в обозревателе решений и выберите команду Переименовать. Right-click the Sales Order Detail.rdl file in Solution Explorer and select Rename. Переименуйте отчет в Сведения о заказах на продажу.rdlc и нажмите клавишу ВВОД. Rename the report to Sales Order Detail.rdlc and press ENTER.
Если обозреватель решений не отображается, его можно открыть из меню Вид, выбрав пункт Обозреватель решений. If Solution Explorer is not visible, you can open it from the View menu by selecting Solution Explorer.
Переименование расширения из rdl в rdlc позволит редактировать отчет при помощи конструктора отчетов для Microsoft Microsoft Visual Studio 2005 Visual Studio 2005 . Renaming the file extension from rdl to rdlc will allow you to edit the report using report designer for Microsoft Microsoft Visual Studio 2005 Visual Studio 2005 .
После переименования отчета выберите файл и перейдите в окно «Свойства». After the report has been renamed, select the file and locate the Properties window. Для свойства Копировать в выходной каталог задайте значение Копировать более новые. Change the Copy to Output Directory property to Copy if Newer.

Если окно Свойства не отображается, можно открыть его из меню Вид, выбрав Окно «Свойства» . If the Properties window is not visible, you can open it from the View menu by selecting Properties Window.
В следующем примере кода создается набор данных для данных о заказе на продажу, а затем подготавливается к просмотру отчет «Сведения о заказе на продажу» в локальном режиме. The following code example will create a dataset for the sales order data and then render the Sales Order Detail report in local mode.


