- Добавление и управление репозиторями в CentOS/RHEL
- Подключение репозиториев EPEL и Remi в CentOS
- Конфигурационные файлы репозиториев (*.repo)
- Как отключить репозиторий в CentOS?
- Проверка обновлений в нужном репозитории
- Другие популярные репозитории пакетов для CentOS
- Create an Apache-based YUM/DNF repository on Red Hat Enterprise Linux 8
- More Linux resources
- Prerequisites
- Create your repository
- Step 1: Mount the Red Hat Enterprise Linux 8 media
- Step 2: Create a local YUM repository from the mounted media
- Step 3: Copy media content to the local directory
- Step 4: Configure the local YUM/DNF repository
- Step 5: Test and verify your local repository
- Set up your Apache web server
- Install Apache
- Configure Apache to auto-start at boot
- Configure the firewall
- Verify that Apache is up and running
- Configure Apache
- Test and clean up
- Change permissions and set SELinux
- Set up the client
- Add the repo
- Test the repo
- Red Hat Customer Portal
- Log in to Your Red Hat Account
- Red Hat Account
- Customer Portal
- Select Your Language
- Red Hat Training
- Chapter 3. Repositories
Добавление и управление репозиторями в CentOS/RHEL
В стандартных (официальных) репозиториях RHEL/CentOS доступно лишь небольшое количество базовых пакетов, причем в них иногда предлагаются не самые новые версии программ. Однако вы можете использовать сторонние публичные или частные репозитории для установки новых версий программ в Red Hat Enterprise Linux, CentOS, Oracle Linux и Scientific Linux. Из наиболее распространённых сторонних репозиториев можно выделить Remi и EPEL. В этой статье мы рассмотрим особенности подключения, управления и использования дополнительных репозиториев с помощью пакетного менеджера YUM в CentOS 7.
Подключение репозиториев EPEL и Remi в CentOS
При установке операционной системы (в нашем примере это CentOS 7), по умолчанию устанавливаются базовые репозитории. Посмотреть их список можно следующей командой:
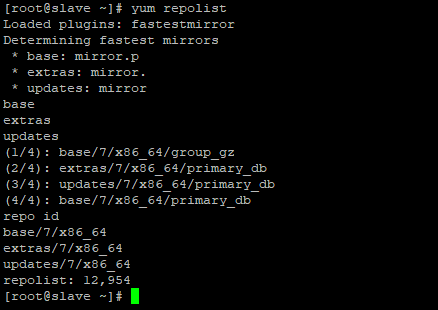
Как можно увидеть на скриншоте в системе установлено 3 репозитория — base, extras, updates.
Этих основных репозиториев хватит, чтобы начать вашу работу по установке базового ПО и установке дополнительных репозиториев.
Рассмотрим, как добавить дополнительные репозитории в CentOS.
Пожалуй, самый популярный на данный момент репозиторий — это EPEL.
Репозиторий EPEL в CentOS 7 устанавливается очень просто (в отличии от CentOS 6) через RPM пакет (это самый простой способ добавления репозитория):
yum install epel-release
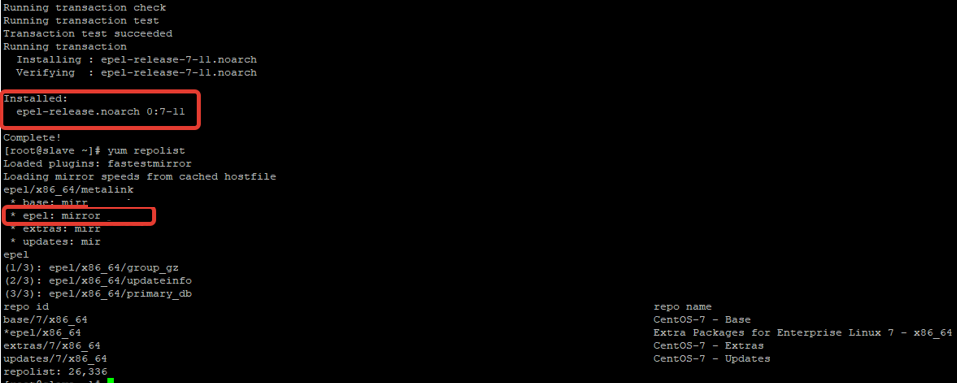
После установки данный репозиторий отображается в списке, даже без дополнительных манипуляций (очистка кэша yum не требуется).
Чтобы подключить репозиторий Remi, выполните команду:
rpm -ivh http://rpms.famillecollet.com/enterprise/remi-release-7.rpm
Если RPM пакета для нужного репозитория нет, вы можете добавить его, вручную создав конфигурационный .repo файл в каталоге /etc/yum.repos.d (см. следующий раздел).
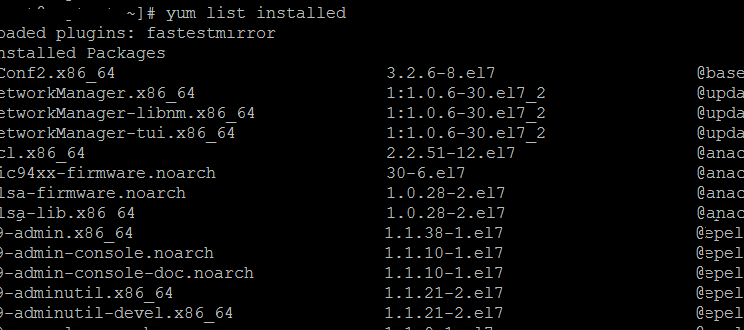
Чтобы понять из каких репозиториев установлены конкретные пакеты в вашей систему, вы можете вывести полный список пакетов:
yum list installed
Как вы видите, для каждого пакета указано из какого репозитория он установлен (на скрипншоте есть репозитории base, update, epel и anaconda).
Вы можете вывести список пакетов, доступных для установки в конкретном репозитории:
yum repo-pkgs epel list
Конфигурационные файлы репозиториев (*.repo)
Все конфигурационные файлы репозиториев расположены в директории /etc/yum.repos.d/. В конфигурационных файл *.repo. Типовой конфигурационный файл репозитория содержит следующие параметры:
- name — имя репозитория;
- baseurl — ссылка на репозиторий (может быть ftp://address, http://address, https://address или file://address для локального репозитория);
- enabled – нужно ли использовать данный репозиторий: 1 – репозиторий подключен, 0 – отключен;
- async – использовать ли параллельную загрузку пакетов (auto/on/off);
- gpgcheck – нужно ли выполнять проверку GPG (1 – проверять);
- gpgkey — ссылка на GPG ключ;
- exclude — список исключенных пакетов;
- includepkgs — список включенных пакетов;
- mirrorlist – список зеркал репозитория.
В минимальном случае repo файл может выглядеть так:
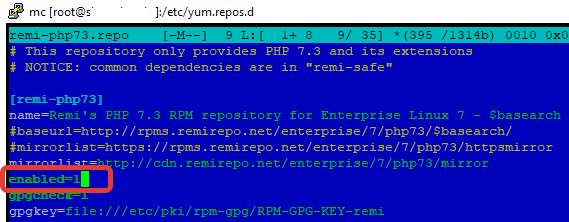
Например, после подключения репозитория REMII, в директории репозиториев появится несколько конфигурационных файлов Remi (remi-*.repo).
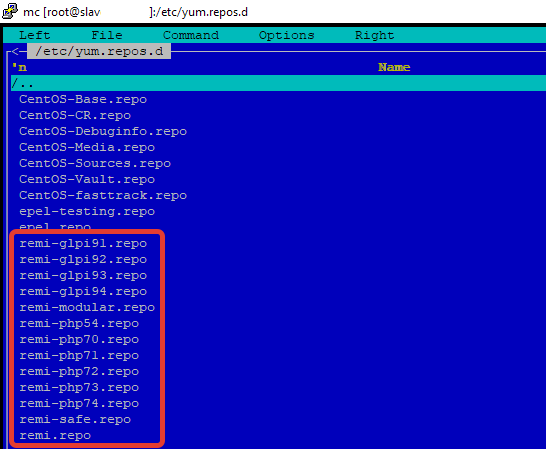
Как вы видите, Remi имеет отдельный конфигурационный файл для каждой версии php. Вам нужно включить нужную вам версию в конфигурационном файле, например у меня на сервере будет стоять версия php 7.3, для этого я включил именно этот репозиторий (в файле remi-php73.repo указал enabled=1):
Вы можете подключит репозиторий вручную, для этого нужно создать конфигурационный файл репозитория в директории /etc/yum.repos.d/. Подключим репозиторий MaruaDB.
Добавим в него данные, которое нам предоставляет разработчик пакета MariaDB:
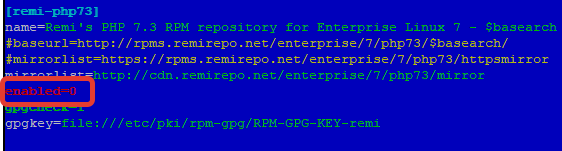
Как отключить репозиторий в CentOS?
Чтобы отключить один из подключенных репозиториев, достаточно в его конфигурационном файле указать enabled=0 .
После этого, нужно сбросить кэш в yum:
И пересоздать его заново:
Теперь при установке или обновлении пакетов, репозиторий remi-php73 использоваться не будет.
Если вы хотите, чтобы определенный репозиторий не использовался только при выполнении текущей команды обновления/установки пакета, можно отключить репозиторий в рамках выполнения запроса yum, например:
yum update —disablerepo=epel
В этом примере мы отключили репозиторий EPEL и выполнили обновление пакетов в системе.
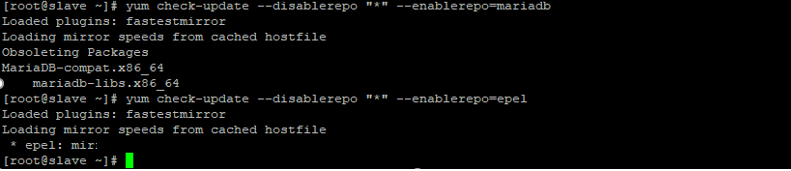
Вы можете временно отключить всех репозитории, кроме определенных. Например, чтобы установить обновления только для пакетов из репозитория MariaDB:
yum update —disablerepo «*» —enablerepo=mariadb
Для удаления репозиториев используется утилита yum-config-manager, которая входит в набор yum-utils.
yum -y install yum-utils
Удалите репозиторий, например remi:
yum-config-manager —disable remi
Для полного удаления репозиторий нужно удалить его конфигурационные файлы и обновить кэш yum.
Проверка обновлений в нужном репозитории
Мы можем проверить, есть ли обновления пакетов в нужном репозитории, немного измегим команду из прошлого пункта:
yum check-update —disablerepo «*» —enablerepo=mariadb
Таким образом вы можете управлять подключенным репозиториями на сервере. Отметим, что разные репозитории могут содержать одинаковые пакеты и при обновлении у вас может возникать конфликт версий. Поэтому всегда оставляйте включенными только те репозитории, с которыми вы работаете.
Другие популярные репозитории пакетов для CentOS
MariaDB – как можно догадаться из названия, это репозиторий в котором содержатся пакеты MariaDB. Репозиторий cоздан разработчиками MariaDB, поддерживается и обновляется постоянно.
Чтобы установить данный репозиторий в систему, нужно создать для него repo файл с содержимым:
Nginx – аналогично предыдущему репозиторию, несет в себе пакеты связанные с httpd-сервером nginx.
И подключение данного репозитория, похоже на подключение репозитория MariaDB. Создаем создаем .repo файл и помещаем туда данную информацию:
Данного списка репозиториев хватит для настройки так называемого LAMP, с установленным в качестве front-end сервера nginx-ом.
Пожалуй, этого списка репозиториев хватит практически каждому пользователю, я приведу еще пару примеров более-менее популярных.
Webtatic – данный репозиторий поддерживается ограниченным количеством специалистов, в основном это Andy Thompson, в нем содержаться пакеты относящиеся к php, но менее популярный, чем Remi, и я догадываюсь почему. На момент написания статьи, последняя версия php в этом репозитории была 7.2.
yum repo-pkgs webtatic list | grep php7
Чтобы подключить данный репозиторий, нужно установить rpm пакет:
rpm -Uvh https://mirror.webtatic.com/yum/el7/webtatic-release.rpm
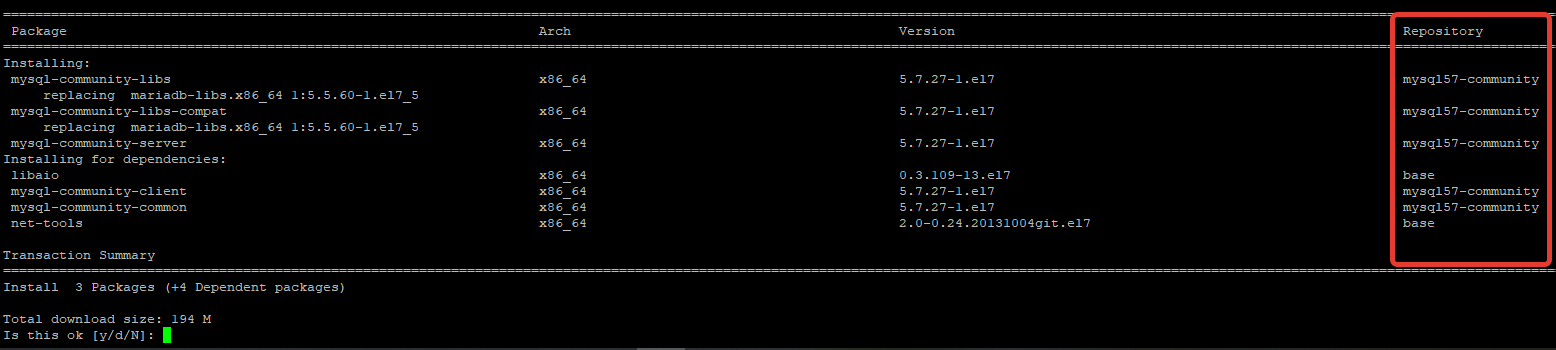
MySQL – ну и пожалуй я напомню о mysql. Данный репозиторий не поставил вместе с популярными, так как на мой взгляд mysql как сервер БД отошел на второй план и в основном на сервера устанавливается MariaDB. НО если кто-то желает установить именно mysql (например, для Bitrix нужен именно mysql), вы можеже подключить этот репозиторий себе. Например если хотите подключить mysql 5.7:
И устанавливаем его:
rpm -Uvh mysql57-community-release-el7-9.noarch.rpm
После установки, у меня появилась возможность установить mysql:
В этой статье мы показали особенности управления репозиториями в CentOS и рассмотрели полезные репозитории.
Источник
Create an Apache-based YUM/DNF repository on Red Hat Enterprise Linux 8

Software repositories are usually used over the internet and can be accessed by multiple users worldwide. However, you can create your own local repository on your local server and use it as a single user, or allow access to other machines on your LAN using a web server or FTP.
More Linux resources
The advantage of creating a local repository is that you don’t require an internet connection to install software packages or updates. Another benefit is, of course, the download speed. Since the packages are downloaded via a local network, the updates perform quickly.
Yellowdog Updater, Modified (YUM) or Dandified YUM (DNF) are software package managers that manage RPM-based Linux distributions. With YUM or DNF, you can install and update groups of computers without having to manually update each RPM.
In this article, I will explain how to set up a local Apache-based YUM/DNF repository on Red Hat Enterprise Linux (RHEL) 8, using the installation DVD or ISO file. I will also show you how to find and install software packages on client RHEL 8 machines using the Apache webserver. We’ll cover the same process for NGINX and FTP in future articles.
[Want to try out Red Hat Enterprise Linux? Download it now for free.]
Prerequisites
You will need to set up two Red Hat Enterprise Linux 8 systems: one local repo server and one client machine that will use the local repository from the local server. The result will look something like this:
Local Repository Server: RHEL 8 [10.0.0.10]
Local Client Machine: RHEL 8 [10.0.0.11]
RHEL 8 installation DVD
Create your repository
Creating your repository involves a number of steps. Let’s walk through them.
Step 1: Mount the Red Hat Enterprise Linux 8 media
First, mount the local media (the DVD, USB stick, etc.) that contains Red Hat Enterprise Linux 8. Use the installation DVD:
Or mount the ISO image:
Step 2: Create a local YUM repository from the mounted media
Move the existing repo files located in /etc/yum.repos.d :
From this point, it is better if we continue as the root user. Switch to superuser with su command.
Next, create a directory for the repo:
Use this directory with Nginx or Apache for serving files over the LAN.
Create the new local repository’s configuration file, local-dvdrom.repo , under the /etc/yum.repos.d directory:
Step 3: Copy media content to the local directory
Copy the ISO files locally under the /local_repo directory:
Wait until the files are copied, then verify that the files were copied using:
Step 4: Configure the local YUM/DNF repository
Edit the repo configuration file we created earlier:
Paste this configuration into it:
Install the required packages for creating, configuring and managing the local repository:
Finally, run the createrepo command:
Step 5: Test and verify your local repository
In this step, you clean up the temporary repository files and verify that the local repository is enabled:
Verify that the local repository was created:
You can see that the local repository generated files, so everything is ok at this point.
If you read the above command output carefully, you’ll see the warning message, This system is not registered to Red Hat Subscription Management. You can use subscription-manager to register . If you want to suppress or prevent this message while running the dnf or yum command then edit the file /etc/yum/pluginconf.d/subscription-manager.conf :
and change the parameter enabled=1 to enabled=0 :
Set up your Apache web server
As I mentioned before, this article covers setting up your own repository using the Apache web server. Let’s walk through installing and configuring Apache to serve your repo.
Install Apache
To install the httpd (Apache) package using YUM:
Configure Apache to auto-start at boot
Once Apache is installed, start and enable the httpd service to auto-start at boot and verify its status using the following commands:
Configure the firewall
Next, configure the firewall so that Apache can be reached:
Verify that Apache is up and running
You can now verify that your Apache server is up and running by going to the localhost URL on your web browser. The default Apache web page http://localhost/ should be displayed.
Configure Apache
To configure Apache, open the configuration file:
When opened, find the DocumentRoot line and change it to:
Then change the /var/www/http directory section:
Test and clean up
Now, start the Apache service again and test its status:
Everything is good. Remove the welcome page so you can serve the repo files:
Now, test httpd and restart Apache:
Change permissions and set SELinux
Continue the security configuration by changing the permissions on the local_repo directory and configuring SELinux. To change the permissions:
Then, check if SELinux is enforcing:
If it is Enforcing , type:
If SELinux is not set to Enforcing, then the files will not serve from the repo.
And make the change permanent by editing the /etc/sysconfig/selinux file and set the following value:
Set up the client
Now, to configure the Red Hat Enterprise Linux 8 client machine’s repository.
Add the repo
On the client machine, add the local repos from the server to the client’s YUM configuration:
Then paste the following configuration (be sure to change the server IP address according to your setup):
Test the repo
Test the LocalServerRepo by installing a package. For example:
That is great! Everything works as expected. You now have an Apache-based local YUM/DNF repository in Red Hat Enterprise Linux 8, using the installation DVD or ISO file.
Источник
Red Hat Customer Portal
Log in to Your Red Hat Account
Your Red Hat account gives you access to your profile, preferences, and services, depending on your status.
If you are a new customer, register now for access to product evaluations and purchasing capabilities.
Need access to an account?
If your company has an existing Red Hat account, your organization administrator can grant you access.
Red Hat Account
Customer Portal
For your security, if you’re on a public computer and have finished using your Red Hat services, please be sure to log out.
Select Your Language
Red Hat Training
A Red Hat training course is available for RHEL 8
Chapter 3. Repositories
Red Hat Enterprise Linux 8 is distributed through two main repositories:
Both repositories are required for a basic RHEL installation, and are available with all RHEL subscriptions.
Content in the BaseOS repository is intended to provide the core set of the underlying OS functionality that provides the foundation for all installations. This content is available in the RPM format and is subject to support terms similar to those in previous releases of RHEL. For a list of packages distributed through BaseOS, see the Package manifest.
Content in the Application Stream repository includes additional user space applications, runtime languages, and databases in support of the varied workloads and use cases. Application Streams are available in the familiar RPM format, as an extension to the RPM format called modules , or as Software Collections. For a list of packages available in AppStream, see the Package manifest.
In addition, the CodeReady Linux Builder repository is available with all RHEL subscriptions. It provides additional packages for use by developers. Packages included in the CodeReady Linux Builder repository are unsupported.
For more information about RHEL 8 repositories, see the Package manifest.
Источник


