- WIN10 does not utilize full 16GB of RAM, 8GB hardware reserved
- Replies (16)
- Windows 10 Reserved but no update notification?
- Replies (6)
- Как отключить и включить зарезервированное хранилище в Windows 10
- Отключить или Включить зарезервированное хранилище при помощи DISM
- Отключить или Включить зарезервированное хранилище через реестр
- Don’t Want Microsoft to Reserve 7GB for Windows Updates? Here’s How to Disable It
- Steps to disable Windows 10 reserved storage
- Reserved Storage in Windows 10 explained
- Reserved Storage in Windows 10
- View Reserved Storage size
WIN10 does not utilize full 16GB of RAM, 8GB hardware reserved
I have been reading previous posts on this subject but have yet to find a resolution to this issue. So far I have: Verified all 16GB are recognized in BIOS, BIOS is up to date. This is a new build. System specs shows 16GB physical RAM installed, but only 7.95 are «useable.» I ran the memory diagnostic tool (mdsched) and no errors were reported. I verified via msconfig that the «max memory» box was NOT checked. Memory is installed in slots 1 and 3.
Hardware/Software:
MSI 990FXA MB
AMD FX-8370 8 core
Kingston Hyperx 8GBx2 DDR3 1600 mhz
WIN 10 64-bit Home
MSI suggested changing/increasing the virtual memory and this had no effect. I understand there are memory limitations with 32-bit OS but I have 64-bit WIN10 so this is quite puzzling. No one I have contacted seems to have a solution or specific explanation. MSI concluded that it is a Windows related issue. I would appreciate an explanation of the issue, maybe it is normal?
Replies (16)
* Please try a lower page number.
* Please enter only numbers.
* Please try a lower page number.
* Please enter only numbers.
This is what we may find interesting ( I had it in before one of many edits to my first post — Edit crazy here)
( Where it shows memory usage 7.9GB on your previous image, it should read 15.9 +/- ).
— Do try one stick at a time in both slots 1&3. Just so we can truly know, and move on.
Because Windows recognises all 16GB they should be good though.
The BIOS update is not really all that old, and fits within the Win10 era.
No Win10 ‘chipset’/ INF — ME drivers ?
— Or. Maybe it’s to do with Rapid Start ( or AMD equivalent to this Intel nomenclature) ?
This setting would be found in BIOS. I don’t have this enabled as I’m using an SSD, but I suppose
it could «reserve» half your RAM ?
When this option is enabled, if the system needs more RAM, it will be able to access more from this feature.
Superfetch could theoretically use a fair bit of RAM as well, but I do have this enabled and still have
all my RAM available.
3 people found this reply helpful
Was this reply helpful?
Sorry this didn’t help.
Great! Thanks for your feedback.
How satisfied are you with this reply?
Thanks for your feedback, it helps us improve the site.
How satisfied are you with this reply?
Thanks for your feedback.
2 people found this reply helpful
Was this reply helpful?
Sorry this didn’t help.
Great! Thanks for your feedback.
How satisfied are you with this reply?
Thanks for your feedback, it helps us improve the site.
How satisfied are you with this reply?
Thanks for your feedback.
I think this should answer all questions, as I have and still do have the problem but now it does worry me. open your task manager, go into performance, at the bottom click open resource monitor, and select the tab MEmory, you will see, that your OS has it reserved, but you may think why, well since your system sees that it has 16 GB of RAM, your system alone will not use 16 GB ever, on its own or idle, of course, you’ll get up there if your gaming and running server at the same time etc, or running video programming stuff. But in short, Windows reserves this to be used only when necessary, meaning as long as you don’t need it, well. you don’t need it, but Windows will give you the extra 8 GB or whatever is a reserve for when you computers need and demands it. GAMING ETC. hope this helps.
P.S. I know you know its reserved but for those who don’t that’s why I explained how to get there. But its reserved until you need it. so if your PC for Whatever reasons need the extra 8GB it will use it and access the reserved RAM. so no need to worry you are all good.
11 people found this reply helpful
Was this reply helpful?
Sorry this didn’t help.
Great! Thanks for your feedback.
How satisfied are you with this reply?
Thanks for your feedback, it helps us improve the site.
Windows 10 Reserved but no update notification?
I used this guide here to get the windows 10 icon and reserve my upgrade as I have Windows Embedded 8.1 Industry Pro:
I used that method about 2 months ago at least and have recieved no update notification, why is this?
Also, Can I use the media creation tool or the Windows 10 Upgrade Assistant still or do those programs not work not that windows 10 is not free, even if I have reserved my upgrade through the icon.
Replies (6)
Was this reply helpful?
Sorry this didn’t help.
Great! Thanks for your feedback.
How satisfied are you with this reply?
Thanks for your feedback, it helps us improve the site.
How satisfied are you with this reply?
Thanks for your feedback.
That seems kinda sloppy of microsoft. I forgot to mention that I reserved my windows 10 update via the w10 icon before July 29th, so that should help right? I would think it should because it shouldnt be my fault that microsoft never gave me my windows 10 download. Unfortunately I don’t think it even matters because even if they update should come eventually I don’t think it will considering I reserved windows 10 at least 2 months ago.
Also here is an image of the windows 10 updater/reserver, and it says and has said since I first reserved windows 10 two months ago, that I will get a notification for install AFTER july 29th, which is why I wasn’t bothered about the fact that the windows 10 would stop being free after july 29th.
Was this reply helpful?
Sorry this didn’t help.
Great! Thanks for your feedback.
How satisfied are you with this reply?
Thanks for your feedback, it helps us improve the site.
Как отключить и включить зарезервированное хранилище в Windows 10
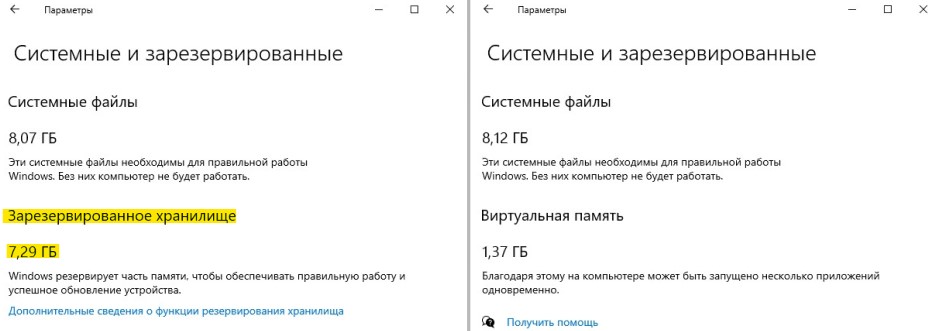
Зарезервированное хранилище в Windows 10 — функция, предназначенная для выделения части доступного пространства на диске для обновлений и во избежание проблем из-за нехватки места. Эта функция стала доступна с версии 1903 и включается по умолчанию после чистой установки. Пользователи просто лишаются 8 гигабайт дополнительного места на своем компьютере или ноутбуке. Особенно эту функцию не любят те пользователи, которые используют малообъемные SSD диски.
Начиная с версии 2004 в Windows 10 вводятся новые команды DISM, которые позволяют определить состояние, отключить или включить функцию зарезервированного хранилища в Windows 10. До версии 2004 можно было отключить резервное хранилище в системе, но это делалась через реестр, что является не безопасным, особенно для новичков. Согласитесь, ввести всего-лишь одну команду в cmd, куда проще и удобнее, чтобы отключить Reserved Storage, чем ковырять реестр. Разберем, как отключить или включить функцию зарезервированного хранилища в Windows 10 при помощи команд DISM, и при помощи редактора реестра.
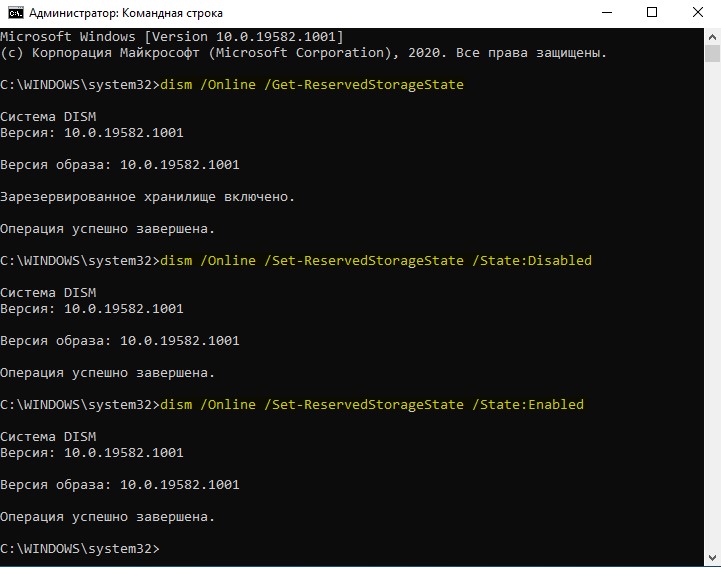
Отключить или Включить зарезервированное хранилище при помощи DISM
Обратите внимание, что команды DISM будут работать начиная с версии 2004. Запустите командную строку от имени администратора и введите следующие команды:
- dism /Online /Get-ReservedStorageState — проверяет состояние.
- dism /Online /Set-ReservedStorageState /State:Disabled — отключить.
- dism /Online /Set-ReservedStorageState /State:Enabled — включить.
Отключить или Включить зарезервированное хранилище через реестр
Так как выше команды будут доступны в Windows 10 с версии 2004, то зарезервированное хранилище можно отключить или включить при помощи редактора реестра. Нажмите Win+R и введите regedit, чтобы быстро открыть редактор реестра. В реестре перейдите по пути:
- HKEY_LOCAL_MACHINE\SOFTWARE\Microsoft\Windows\CurrentVersion\ReserveManager
- Справа найдите значение ShippedWithReserves, нажмите по нему два раза и задайте значение 0.
- Перезагрузите ПК и зарезервированное хранилище будет отключено в Windows 10.
- Если захотите включить обратно зарезервированное хранилище, то просто замените значение с 0 на 1.
Don’t Want Microsoft to Reserve 7GB for Windows Updates? Here’s How to Disable It

This week started with Microsoft announcing that the new versions of Windows 10 will reserve around 7GB of disk space exclusively for Windows updates, system cache, etc. Since then the company has dropped a Preview Build to Insiders to begin testing this particular «feature» that could help Windows users get rid of all the update-related data loss issues.
However, there are also concerns for devices that may not have enough storage. While the Windows world doesn’t typically suffer from storage deficiency like the MacBooks, there are still a number of low-end devices or older machines that could do without Microsoft hogging so much of space for downloading and installing updates.
The company clarified that this is being done to «improve day-to-day function of your PC by ensuring critical OS functions always have access to disk space.» But, there are many Windows enthusiasts who don’t like Microsoft making these decisions for them. If you aren’t a fan of this «reserved storage» idea, it seems you can disable Windows 10 reserved storage, after all.
Steps to disable Windows 10 reserved storage
Microsoft hasn’t officially shared this guide of disabling the reserved storage. The company had said that users will be able to reduce the reserved storage by disabling some of the built-in OS features that aren’t needed, including any additional languages (steps to reduce storage here).

But, it appears you can completely disable Windows 10 reserved storage. Remember, reserved storage is only available to Windows Insiders in the Fast ring right now and will be rolled out to the public after the official release of Windows 10 version 1903 in April. If you are a Fast Ring Insider, you can test these steps to see if this works for you.
Here is the simple way to disable Windows 10 reserved storage on 19H1 (version 1903):
- Click Windows key + R, type regedit and hit enter (or, type regedit.exe in the Start menu).
- In the Editor, navigate to:
- HKEY_LOCAL_MACHINE\SOFTWARE\Microsoft\Windows\CurrentVersion\ReserveManager.
- Look for ShippedWithReserves on the right-side panel.

- Double click it and set its value to 0 and exit the Registry Editor.
- Restart your machine.

If you want to test the Reserved Storage in the future, you can follow the same steps and set the value back to 1. To test how much space has been reserved, click Start > search for “Storage settings” > click “Show more categories” > “System & reserved” > “Reserved storage” size.
Note: reserved storage is currently in early testing process and the above guide may not always work. It is also possible that Microsoft decides to not roll this feature out to the wider public based on Insider feedback that it receives in the coming weeks.
Reserved Storage in Windows 10 explained
‘Failed Updates’ comes across as one of the major issues plaguing Windows 10 users during its upgrade. It occurs when not enough free storage is available for the task to be completed. This is set to change as Microsoft has come up with a practical alternative – Reserved Storage. The software-giant will automatically reserve enough space to ensure the process completes without any hassles. It will reserve 7GB of disk space to prevent big Updates from failing. This post explains how the new Storage Reserve will work in Windows 10.
Reserved Storage in Windows 10
Reserved Storage will be enabled automatically on new PCs with Windows 10, v1903 pre-installed, and for clean installs. It will not be enabled when updating from a previous version of Windows 10.
Through activation of the Reserved Storage feature, less space will be consumed by updates, apps, temporary files, and system caches. Moreover, the feature will not only reserve storage but also be utilized for the day to day smooth running of your PC.
Reserved Storage will start at about 7GB. Once activated, it cannot be removed from the OS. However, if required, you can influence the amount of space reserved.
Optional features
Whenever an optional feature is installed, Windows will invariably increase the amount of reserved storage. This practice ensures there’s enough space available to maintain this feature on your device when updates are installed. That said, you can downsize the space quota by uninstalling optional features, not in use.
Installed Languages
Although most customers stick to a single language, some users prefer to switch between two languages at least. As such, when an additional language is installed, Windows naturally increases the reserved storage quota. This makes sure there is enough space to maintain installed languages. Similar to optional features, you can choose to configure the space amount required for reserved storage by removing languages you aren’t using.
View Reserved Storage size
If you would like to view the Reserved storage size, open Settings > ‘Storage settings’.
Select ‘Show more categories’ > ‘System & reserved’.
Finally, look at the ‘Reserved storage’ size and you will see the disk space allocated there.
In a nutshell, Storage Reserve is a new feature that Microsoft intends to test for improving Windows 10 experience. It will simplify the upgrading process by removing all the temporary unrequired OS files and allow the update to take over the full reserve area. In the case of misfortune, Windows will assume responsibility and guide you fully through steps to reduce the clutter or free up disk space.


