- Как очистить кэш DNS на mac OS?
- Руководство по очистке кэша DNS на mac OS
- Как сбросить кэш DNS в macOS High Sierra
- Как сбросить кэш DNS в MacOS High Sierra
- Reset Mac DNS Cache in MacOS Monterey, Big Sur On MacOS (Flush DNS Cache)
- How to Flush or Reset DNS Cache in MacOS Monterey On Mac
- How to clear DNS Cache in MacOS Monterey on Mac
- How to Reset And Flush DNS Cache in macOS Monterey
- Using Dig to Check Query Times
- jaysukh patel
- How to Reset DNS Cache in macOS High Sierra
- How to Reset DNS Cache in MacOS High Sierra
- How to Flush your DNS Cache on Mac
- What is DNS cache?
- Why you should clear DNS cache
- How to flush DNS cache on Mac
- To flush your DNS cache on macOS Big Sur:
- How to сlear the DNS in older macOS versions
- Clearing browser caches with MacKeeper
- The bottom line
- How often should I flush the DNS cache on Mac?
- How do I check my DNS cache on a Mac?
- Is it safe to flush DNS cache?
- How do I clear DNS cache in Safari?
Как очистить кэш DNS на mac OS?
Пользователям операционной системы mac OS, ровно как и пользователям компьютеров под управлением Windows, время от времени может понадобиться сменить адреса для DNS-серверов. Процедура крайне простая, о чем вы, вероятно, осведомлены, но, иногда, после смены настроек DNS сетевого подключения, нужно выполнить очистку кэша DNS, так как из-за него могут возникать различные проблемы и неудобные ситуации. Помимо прочего, кэш DNS нужно в некоторых случаях сбрасывать, чтобы применить изменения в параметрах сетевого подключения.
Если вы зашли на страничку с данным материалом, то вы столкнулись с нуждой в очистке – или, как его порой называют, сбросе – кэша DNS на своем Макбуке. Так как же все таки выполнить эту процедуру? Ну, практически точно также, как на любом другом компьютере на Windows – через одну удобную команду. Давайте же посмотрим, что это за команда и чем ее выполнить.
Руководство по очистке кэша DNS на mac OS

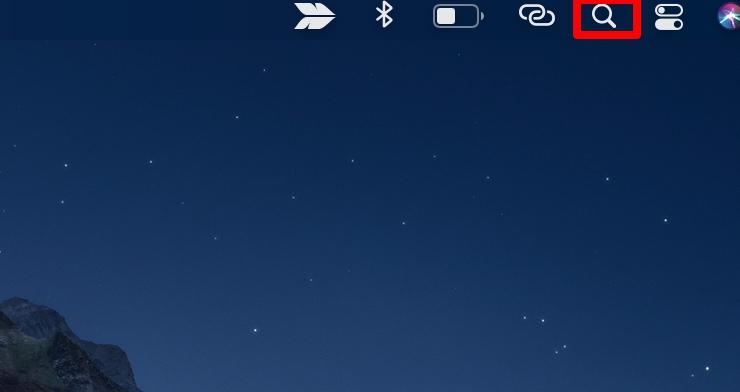
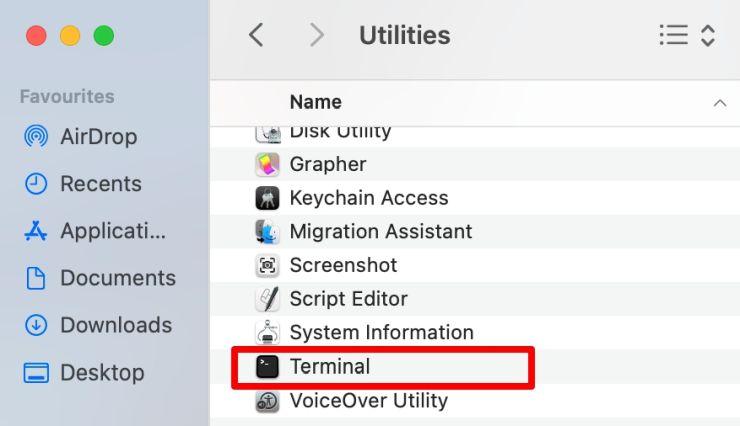
Очистка кэша, как и многие другие операции на mac OS, производится посредством Терминала операционной системы. Для начала вам нужно открыть приложение Терминала, что можно выполнить как минимум тремя способами:
- Finder→Программы→Утилиты→Терминал.app;
- Ctrl+Пробел→Терминал→Выбрать найденный в поисковике системы результат;
- Dock→Программы→Утилиты→Терминал.app.
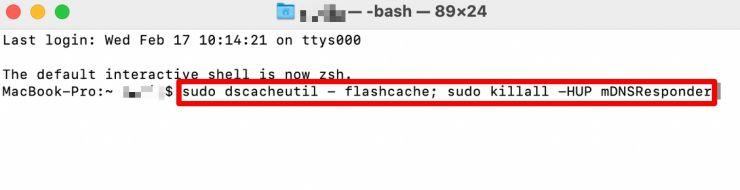
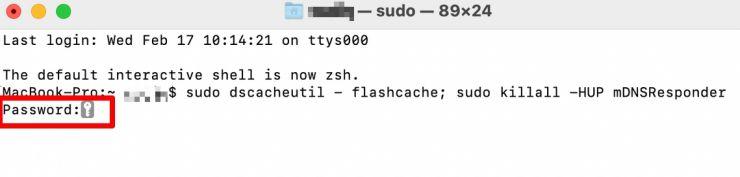
Выберите любой из этих способов, чтобы открыть перед собой приложение Терминал. Отлично, Терминал был открыть – и теперь ввести в него команду, которая очистит кэш DNS. Введите в него следующую команду:
Как только введете команду, нажмите Enter, после чего введите вам потребуется ввести пароль Администратора системы(с этим проблем, вероятно, не будет). Далее вам нужно подождать несколько секунд – кэш DNS был успешно очищен. Однако, как убедиться, что кэш действительно был очищен?
Что же, существует крайне удобный способ проверки посредством Консоли операционной системы macOS. Чтобы выполнить проверку, вам нужно следовать следующим шагам:
- пройдите в папку с утилитами любым из представленных выше способов;
- найдите и откройте программу Консоль.app;
- нажмите на поисковую строку программы и впишите в нее mDNSResponder;
- нажмите Enter;
- затем впишите рядом с предыдущим запросом в поисковой строке Cache size;
- нажмите Enter;
- со все еще открытой Консолью, снова откройте Терминал;
- впишите в него команду sudo killall -INFO mDNSResponder и нажмите Enter;
- после выполнения команды вы должны будете увидеть размер кэша DNS в Консоли – запомните его;
- теперь введите в Терминал команду sudo killall -HUP mDNSResponder.
- затем введите снова команду sudo killall -INFO mDNSResponder.
После ввода последней команды вы должны будете увидеть изменение размера кэша DNS, а это означает, что ваши попытки по его очистке были завершены успешно.
Источник
Как сбросить кэш DNS в macOS High Sierra
Хотите сбросить и очистить кэш DNS в macOS High Sierra? Периодически это нужно делать, особенно когда настройки DNS поменялись или когда из кэша нужно удалить конкретный сервер или домен.
Чаще всего этим занимаются веб-разработчики и системные администраторы, но иногда кэш DNS приходится очищать и обычным пользователям.
В macOS High Sierra это можно сделать с помощью команды «mDNSResponder» в окне Terminal. Так же кэш DNS сбрасывается и в macOS Sierra с El Capitan, хотя этот процесс менялся много раз за историю операционных систем Mac OS и Mac OS X.
Как сбросить кэш DNS в MacOS High Sierra
Учтите, что сброс кэша DNS нарушит любую активность в интернете.
1. Откройте программу Terminal в папке /Программы/Утилиты.
2. В окне введите следующую команду:
sudo killall -HUP mDNSResponder; sleep 2; echo macOS DNS Cache Reset | say
3. Нажмите клавишу Return (Enter) и введите пароль администратора. Затем нажмите эту же клавишу ещё раз.

4. Подождите, пока не появится сообщение «кэш DNS очищен». Это значит, что всё получилось.
5. Закройте Terminal.
Вам может понадобиться перезапустить некоторые программы с подключением к интернету, чтобы применить изменения, но большинство браузеров достаточно просто обновить.
Если этот способ не сработает, можно попробовать следующую команду:
sudo killall -HUP mDNSResponder && echo macOS DNS Cache Reset
Этот метод работает в macOS High Sierra, которая является версией Mac OS 10.13.x.
Источник
Reset Mac DNS Cache in MacOS Monterey, Big Sur On MacOS (Flush DNS Cache)
Last Updated on Jun 26, 2021
flushdns mac with MacOS Monterey is easy with MacOS Monterey on All Macs (iMac, MacBook, MacBook Pro, MacBook Air, Mac Mini). Are you looking to clear and reset the DNS cache in macOS Monterey? Then we have listed some best methods to do so. Periodically users need to reset the DNS cache because sometimes a specific domain or name server is cached or Mac DNS settings have been changed. At that time you need to remove the existing DNS cache. So moving further we will see how to reset the DNS cache in macOS Monterey.
we are happy to help you, submit this Form, if your solution is not covered in this article.
Execute Command in Terminal: Below commands are case sensitive and use space where it needs
How to Flush or Reset DNS Cache in MacOS Monterey On Mac
Step 1: Launch “Terminal” directly from the Home screen using Spotlight. Or “Applications” > “Utilities” > “Terminal.app” or Type “Terminal” in Spotlight search.
Step 2: Now, enter the command below, To execute use your Mac’s system administrator password [Not an Apple ID].
sudo killall -HUP mDNSResponder; sleep 2; echo macOS DNS Cache Reset | say

Step 3: Hit “return key” and then enter the Admin password and again enter.
Step 4: Wait until “DNS cache has been cleared” appears on the terminal screen.
Step 5: Quit “Terminal”.
You must close all the applications running connected to the internet and wait for the changes to take place. Sometimes the changes take place through a simple refresh in the apps.
If in case the above terminal code doesn’t workout for you then you should break that command and write like this,
sudo killall -HUP mDNSResponder && echo macOS DNS Cache Reset
How to clear DNS Cache in MacOS Monterey on Mac
If you have made DNS servers and still you didn’t encounter any changes, then you should clear the DNS cache and again check it this workout for you. It is not necessary to close all the applications which use DNS like Firefox, Safari and other web browsers.
Step 1: Launch “Terminal” from the “Utilities” which you will find in “Applications”.
Step 2: Enter the command with accuracy,
Sudo killall –HUP mDNSResponder;say DNS cache has been flushed

Step 3: Hit return key and enter Admin password.
Step 4: It will take some time to “clear DNS cache”.
Also, you will get a kind of voice message from the system that DNS cache has been flushed.
Alternatively, we have one more command to clear DNS cache if the above one doesn’t work for you,
sudo killall -HUP mDNSResponder;sudo killall mDNSResponderHelper;sudo dscacheutil -flushcache;say MacOS DNS cache has been cleared
![]()
How to Reset And Flush DNS Cache in macOS Monterey
Follow the steps to Reset and flush the DNS Cache,
Step 1: Launch “Terminal”.
Step 2: Enter the following command,
sudo killall -HUP mDNSResponder && echo macOS DNS Cache Reset
Step 3: Once you enter the command tap return key and enter the Admin password.
Step 4: It will take few moments to clear cache.
Using Dig to Check Query Times
This method is used to check whether the DNS is perfectly working or not.
Step 1: Open “Terminal”.
Step 2: Type “dig howtoisolve.com”. In place of our website, you can enter any website to check query time.

Step 3: You can check result in “Query Time”.If query time is more then change macOS DNS settings to Google DNS.
After changing the DNS server to Google DNS, you can verify the query time again by the same dig command.
Hope you get pro tips, why you shouldn’t share this helpful guide with others. Share this page on your profile and recommend to your friends for more tips and guide on MacOS Monterey issues and problems.
jaysukh patel
Jaysukh Patel is the founder of howtoisolve. Also self Professional Developer, Techno lover mainly for iPhone, iPad, iPod Touch and iOS, Jaysukh is one of responsible person in his family. Contact On: [email protected] [OR] [email protected]
Источник
How to Reset DNS Cache in macOS High Sierra

Need to reset and clear DNS cache in macOS High Sierra? Some Mac users may need to occasionally reset their local DNS cache, typically because the Mac DNS settings have changed, or a particular name server or domain is cached and they need to flush existing DNS cache.
While it’s most often web developers, systems administrators, and network admins that fiddle with DNS and have to reset and clear their DNS caches, sometimes other Mac users need to clear the DNS caches as well.
In macOS High Sierra, you can reset DNS cache by targeting the mDNSResponder process via the command line available in Terminal app. This is similar to clearing DNS cache in macOS Sierra and El Capitan, though the process to reset DNS cache has changed many times throughout the history of the Mac OS and Mac OS X operating system.
How to Reset DNS Cache in MacOS High Sierra
Note that resetting and flushing DNS cache will likely interrupt any active internet activity or usage.
- Launch the Terminal application, it is found within the /Applications/Utilities/ folder on a Mac
At the command line, enter the following syntax:
sudo killall -HUP mDNSResponder; sleep 2; echo macOS DNS Cache Reset | say
Hit the Return key and then enter the administrator password, then hit return again
You may need to quit and relaunch certain internet connected applications for the changes to take effect, though most web browsers can suffice with a simple refresh.
If the above approach doesn’t work for whatever reason, you can break the command syntax down into smaller components:
sudo killall -HUP mDNSResponder && echo macOS DNS Cache Reset
This applies for macOS High Sierra, which is versioned as Mac OS 10.13.x. Users interested in learning how to reset DNS cache in prior versions of MacOS can learn how to do so for Sierra, El Capitan, Yosemite, and earlier versions of Mac OS X if desired.
Источник
How to Flush your DNS Cache on Mac
Most of the time, your Mac’s DNS cache isn’t something you need to worry about. It works quietly in the background, sending you to the right websites when you ask for them. But if it gets corrupted, then you can run into problems loading sites, with 404 errors being common. One solution is to clear your Mac’s DNS cache.
If you’re flashing your DNS cache because you’re experiencing problems, you might have malware on your Mac. It’s worth running a scan with MacKeeper just to be sure.
- Open MacKeeper, and select Antivirus from the menu
- Click Start scan
- Wait for the scan to finish
- If MacKeeper finds any suspicious files, take the recommended actions
Hopefully, your Mac is free of malware, but you should always make sure it’s protected. You can try out MacKeeper for free, and you get one free fix to see what it can do.
Thankfully, you can flush DNS cache on Macs in just a few short steps. In this guide we’ll show you how to flush the DNS cache on your Mac and cover the following key areas:
What is DNS cache?
To understand what a DNS cache is, you first need to know what DNS is. When you load a website, you connect to a DNS (Domain Name System) server online. This looks at the web address in your browser, and it then checks that against a database of IP addresses. These IP addresses tell your web browser where to find the server that contains that website. This process is called a DNS lookup.
The DNS cache is a temporary database on your computer of all the recent DNS lookups it’s carried out. This enables your browser to resolve these lookups faster, thereby cutting down web page loading times.
Why you should clear DNS cache
Over time, the DNS cache can become outdated or corrupted, leading to connectivity problems. It can also be affected by malware, causing your browser to take you to malicious sites or phishing schemes.
Flushing your Mac’s DNS cache can eliminate these problems. However, if you do find your browser redirecting to malicious sites, you should also run a malware scan on your Mac.
How to flush DNS cache on Mac
To flush your DNS cache on macOS Big Sur:
1. Click the Spotlight search button or use Command+Space to do a search
2. Type in Terminal, and double-click the Terminal application under Top Hit to open it

Note: If you’re unable to open Terminal through Spotlight, navigate to Go > Utilities > Terminal or click Applications, open the Utilities folder and then double-click Terminal.
3. Once Terminal is open, enter this command: sudo dscacheutil -flushcache; sudo killall -HUP mDNSResponder
4. Enter your Mac’s password and then press Enter to clear the DNS cache
How to сlear the DNS in older macOS versions
Older macOS versions use different commands. To flush the DNS cache in these older versions, enter these in Terminal:
- In macOS El Capitan or newer, run sudo killall -HUP mDNSResponder
- For macOS Yosemite, enter sudo discoveryutil udnsflushcaches
- In Mac OS Lion, Mountain Lion and Mavericks, the command is sudo killall -HUP mDNSResponder
- In Mac OS Snow Leopard, enter sudo dscacheutil –flushcache
- For MacOS Leopard, run sudo lookupd –flushcache
- And in Mac OS Tiger, use lookupd –flushcache
Once you’ve flushed the DNS cache on your Mac, check the problematic website to see if the problem is fixed and you’re able to visit the site normally again.
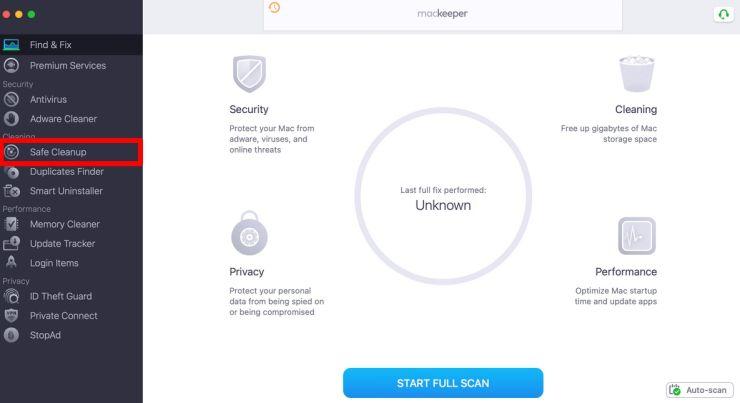
Clearing browser caches with MacKeeper
Clearing browser caches regularly for all your browsers can be time consuming. With a cache clearing tool like MacKeeper, you can clean all caches automatically and get the job done in a snap.
MacKeeper can analyze any files that hog space on your Mac, while protecting you from accidentally deleting important system files.
To get clear your browser caches with MacKeeper:
1. Download and install MacKeeper on your Mac
2. Launch the tool and then go to the Cleaning section in the right pane
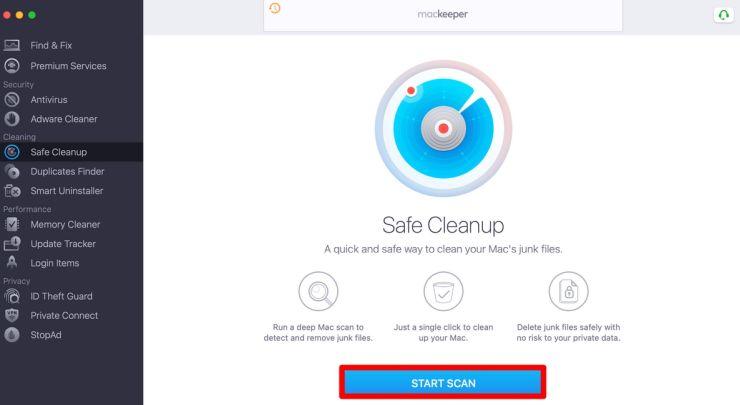
3. Click Safe Cleanup
4. Click the blue Start Scan button
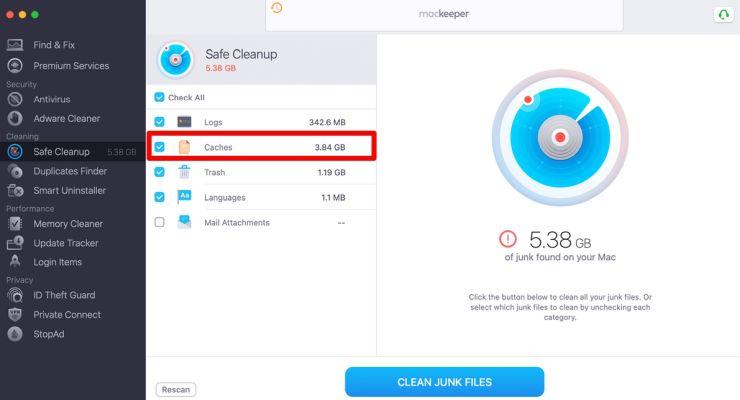
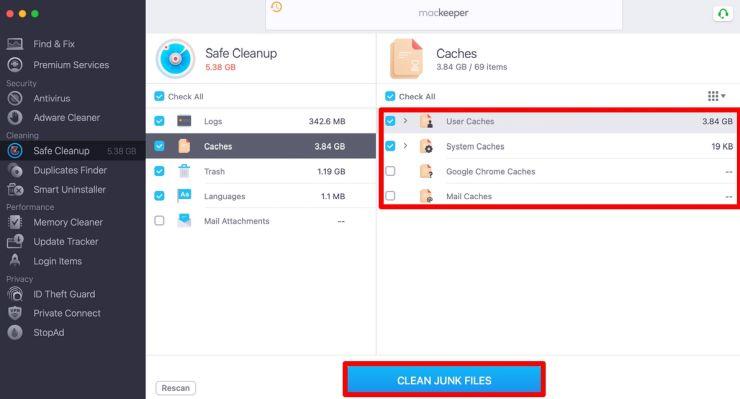
5. Next, check the Caches box, and click to select all the caches you want to clear. These include user caches, system caches, mail caches and browser caches
6. Click the blue Clean Junk Files button to confirm your action. MacKeeper will clear all the browser caches and clean any junk files that prevent your Mac from working properly
The bottom line
Clearing your Mac’s DNS cache can help when you’re unable to access a website and you’re not sure what’s causing the problem. With the detailed steps in this guide and cleaning/maintenance tools like MacKeeper, you can resolve the problem, get back to browsing the web and help your Mac run more smoothly.
How often should I flush the DNS cache on Mac?
There’s no recommended time span, but you can do it as often as needed without causing any harm to your Mac.
How do I check my DNS cache on a Mac?
To check DNS cache on your Mac:
- Open the Console app, select your Mac and then enter any:mdnsresponder in the search bar
- Open a Terminal window, and enter sudo killall –INFO mDNSResponder
- Go back to the Console app and view the list of cached DNS records
- You can also check DNS cache entries in your web browser. For example, if you’re using Chrome, enter chrome://net-internals/#dns in the address bar to view the current list of cached DNS records
Is it safe to flush DNS cache?
Yes, it’s safe to flush DNS cache on your Mac. Cached data is simply temporary storage, but flushing DNS cache too often prevents it doing its job of speeding up page loading.
Clearing your Mac’s DNS cache can help you hide your search behavior, protect against manipulation by cybercriminals and solve technical problems when accessing web apps. But there’s no point in doing it if you don’t need to.
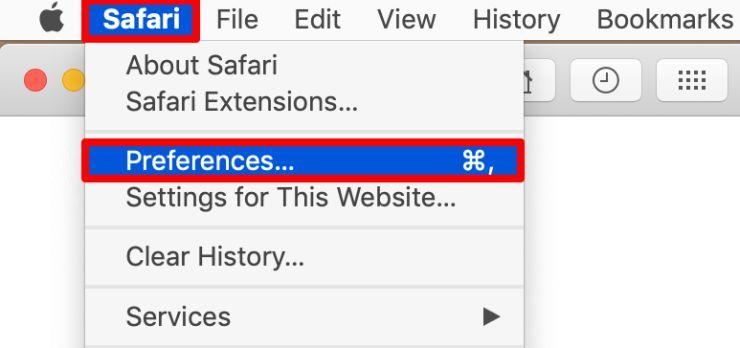
How do I clear DNS cache in Safari?
Safari browser also keeps a DNS cache. When you restart the browser, it clears the cache automatically, but you can do the same manually without relaunching the app.
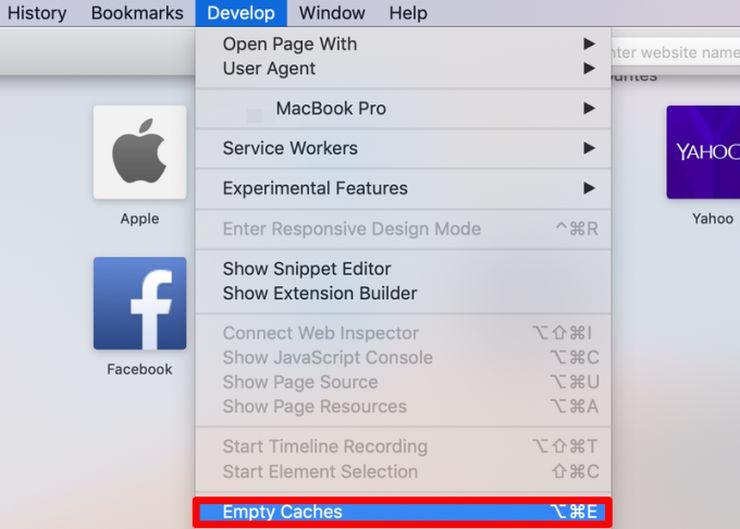
1. In Safari, go to Safari > Preferences in the menu bar
2. Click Advanced and then tick the Show Develop menu in menu bar box to enable the Develop menu
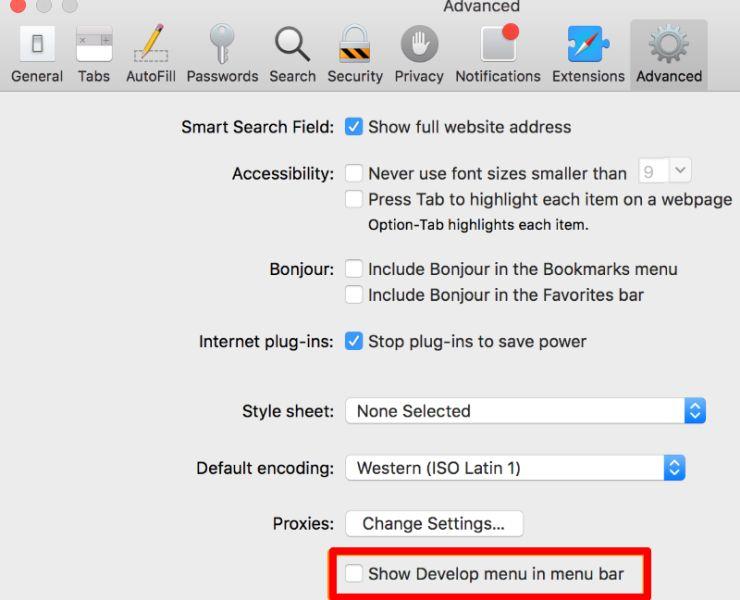
3. From the menu bar, select Develop > Empty Caches. Once your browser cache is cleared, quit and relaunch the browser
Read more guides:
With over 5 years of supporting Mac users, Ruslana lives and breathes everything Mac. Tech expert, Apple lover, and well, a cutie. Say hi on LinkedIn!
With over 5 years of supporting Mac users, Ruslana lives and breathes everything Mac. Tech expert, Apple lover, and well, a cutie. Say hi on LinkedIn!
Mac working slowly? Feel the benefit of removing digital junk.
Источник


