- Resilio Sync
- Contents
- Security
- Synchronization
- Installation
- Usage
- Configuration
- Automatic config file creation
- Troubleshooting
- Missing storage path
- Ignore some files/folders synchronization
- Инструкции
- Командная строка Linux: краткий курс для начинающих
- Перенаправление ввода/вывода в Linux
- Работа с файлами и каталогами в Linux
- Как сгенерировать SSH-ключ для доступа на сервер
- Как установить и настроить веб-сервер Apache
- Руководство по написанию скриптов в Linux Bash
- Введение в Git: настройка и основные команды
- Как установить MySQL на Windows
- Как установить и использовать MySQL Workbench
- Создание нового пользователя и настройка прав в MySQL
- Install Resilio Sync (BTSync) on Ubuntu 20.04, 18.04 Desktop/Server
- Installing Resilio Sync on Ubuntu 20.04 and Ubuntu 18.04 From Official Repository
- Setting Up the Resilio Sync Web UI
- Sharing Folders with Other Devices
- Receiving Folders From Other Devices
- Using Resilio Sync on Ubuntu 20.04, 18.04 Server
- Setting Up Resilio Sync Reverse Proxy with Nginx
- Setting Up Resilio Sync Reverse Proxy with Apache
- Secure the Resilio Sync Web GUI with HTTPS
- Open Resilio Sync Port in Firewall
- Resilio Sync iOS App
- How to Configure Selective Sync
- Conclusion
Resilio Sync
Resilio Sync (formerly: BitTorrent Sync or BTSync) is a proprietary file sharing system that relies on the BitTorrent protocol.
Peer-to-peer (P2P) sync, instead of having a central server which archives every file, uses peer-to-peer connections between the devices themselves therefore there is no limit on data storage and/or transfer speed. The user’s data is exclusively stored on the devices with which the user chose to be in sync with, hence it is required to have at least two user devices, or «nodes» to be online. If many devices are connected simultaneously, files are shared between them in a mesh networking topology.
Contents
Security
All traffic between devices is encrypted with AES-128 in counter mode, using a unique session key. This key is derived from a ‘secret’ which itself is a random 21 Byte key Base32-encoded. By handing over the ‘secret’, files and folders can be shared with other users.
Synchronization
When a device adds a folder for synchronization, a secret is generated. From now on, every device that wants to synchronize that folder must know the secret key.
The synchronization has no speed or size limits, as long as both devices have enough disk space.
Installation
rslsync AUR can be installed from the AUR. The package includes systemd service definitions for managing the rslsync daemon. This package creates a default /etc/rslsync.conf for system/root operation. Make the desired changes (e.g. login id and password) to those files prior to enabling the service-file with systemctl.
Alternatively, the bare ‘tar.gz’ packaged executable can be downloaded from the official website. The rest of this guide assumes that you are using the rslsync AUR package.
Usage
The Linux client of Resilio Sync does not use a typical GUI, instead it sets up a WebUI server accessible at localhost:8888 . Shared folders can also be configured statically in a configuration file, but doing so disables the WebGUI.
Once installed, you will first need to create a configuration file at
/.config/rslsync/rslsync.conf , see #Configuration. You will also need to create the storage_path directory. When that is done, start and (if you want it to start on boot) start/enable the user service rslsync (i.e., with the —user flag).
The service will run as the user invoking the command. Note that the above command is not run as root: doing so may lead to a cryptic error stating that D-Bus has refused the connection.
You can also run it as the rslsync.service system user (without the —user flag).
Configuration for this user is located at /etc/rslsync.conf , and metadata is saved in /var/lib/rslsync/ by default. You should review the configuration settings especially user and password, see below.
Configuration
A sample configuration file can be created using:
You will probably want to change some of the settings, including:
- device_name
- storage_path
- webui/login
- webui/password
Automatic config file creation
 This article or section is out of date.
The btsync-autoconfig AUR package provides a systemd user service ( btsync-autoconfig.service ) which, if enabled, triggers when a user’s btsync.service starts and creates a config file with default values if it does not already exist.
The install script enables the service for all users by default. Although disabling it defeats most of its purpose, it can be disabled using
Individual users can then enable it if they like:
/.config/btsync/btsync.conf if it does not exist, and guesses some default values of the settings:
- device_name: $USER@$HOSTNAME
- storage_path:
/.btsync
The script also creates the storage_path directory set in the config file if it does not exist. This is done intependently from the creation of the config file.
Troubleshooting
Missing storage path
If you start the service but cannot reach the WebUI, check the status of the rslsync by entering systemctl —user status rslsync (or systemctl status rslsync for the system-wide instance).
A common error is Storage path specified in config file does not exist. . This is easily fixed by mkdir
/.rslsync , or whatever your storage_path is set to.
Ignore some files/folders synchronization
If you don’t want Resilio Sync to track some files in your sync folder, please use IgnoreList . IgnoreList is located in hidden .sync folder.
IgnoreList is a UTF-8 encoded .txt file that allows you to specify single files, paths or rules for ignoring during the synchronization job. Each line of the IgnoreList file represents a separate rule. All the files that fall under the ignore filter are not indexed and not counted in the «Size» column in Sync main view.
It supports ‘?’ and ‘*’ wildcard symbols.
Note that IgnoreList is applied only to the folder where it is contained and will not work with the files that have already been synced. If you add indexed files to IgnoreList , they will be deleted on other syncing devices. In order to avoid this:
- Remove the folder from sync on all the devices.
- Modify IgnoreList file on all of them so that it contains same info.
- Re-add the modified folders.
For further details, please refer to Ignoring files in Sync (IgnoreList)
Источник
Инструкции
27 сентября 2021
Командная строка Linux: краткий курс для начинающих
27 сентября 2021
Перенаправление ввода/вывода в Linux
27 сентября 2021
Работа с файлами и каталогами в Linux
26 сентября 2021
Как сгенерировать SSH-ключ для доступа на сервер
23 сентября 2021
Как установить и настроить веб-сервер Apache
23 сентября 2021
Руководство по написанию скриптов в Linux Bash
21 сентября 2021
Введение в Git: настройка и основные команды
21 сентября 2021
Как установить MySQL на Windows
21 сентября 2021
Как установить и использовать MySQL Workbench
20 сентября 2021
Создание нового пользователя и настройка прав в MySQL
© ООО «Селектел», 2008—2021
Полностью изолированные физические серверы любой конфигурации с облачной готовностью
Виртуальные машины с моментальным масштабированием и поддержкой Infrastructure-as-code
В дата-центрах TIER III Москвы, Санкт‑Петербурга и ЛО
Инфраструктура на базе VMware для бизнес-критичных задач любой сложности
Готовые к работе управляемые базы данных PostgreSQL и MySQL™
Полностью готовый к работе кластер Kubernetes для управления контейнерами
Масштабируемое хранилище данных с гибким ценообразованием, поддержкой FTP и S3 API
Запуск кода по запросу или событию без создания и обслуживания сервера
Источник
Install Resilio Sync (BTSync) on Ubuntu 20.04, 18.04 Desktop/Server
This tutorial will be showing you how to install Resilio Sync (formerly BitTorrent Sync) on Ubuntu 20.04 and 18.04. Resilio Sync is a free, fast, peer-to-peer file sharing and syncing tool released by Resilio, Inc, available for Linux, FreeBSD, Mac, Windows, Android, iOS, Amazon Kindle Fire and NAS devices.
Unlike Dropbox or NextCloud, Resilio Sync does not require a central server to store files. Instead, you just need to install Resilio Sync on end devices to sync files via the BitTorrent protocol, so you will not be bound by the storage limit of a server.
Installing Resilio Sync on Ubuntu 20.04 and Ubuntu 18.04 From Official Repository
Resilio Sync has a repository for Ubuntu. First, we need to import Resilio Sync’s public key so that the package manager can verify the Resilio Sync package. Open up a terminal window and run the following command to download the public key.
Then import the public key with apt-key .
Next, run the following commands to add the Resilio Sync repository. (The add-apt-repository command is provided by the software-properties-common package.)

Ubuntu 20.04 and 18.04 will automatically update package index, so you don’t have to manually run sudo apt update. Now install the Resilio Sync package with the following command.
Once installed, Resilio Sync will be automatically started. You can check its status with:
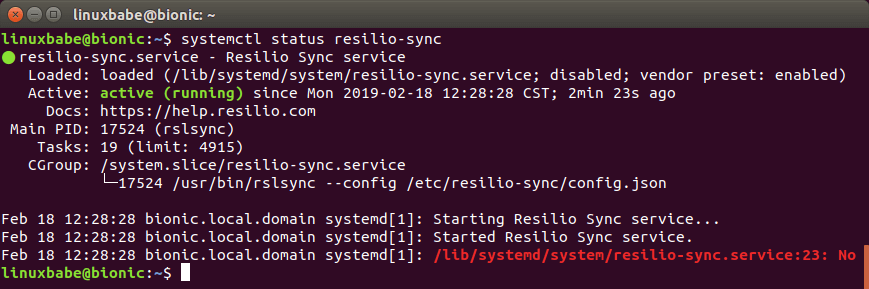
Hint: Press Q to gain back control of the terminal after running the above command.
If it’s not running, you can start it with:
By default, Resilio Sync won’t start at boot time. You can enable auto start with:
Resilio Sync runs as the rslsync user and the Web UI listens on 127.0.0.1:8888 as specified in /etc/resilio-sync/config.json configuration file.
Setting Up the Resilio Sync Web UI
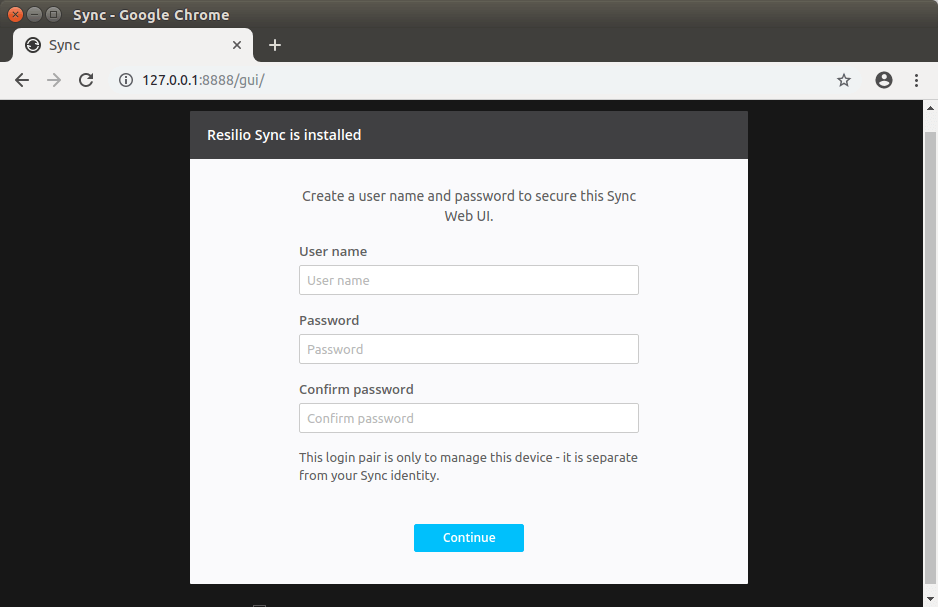
The Linux version of Resilio Sync doesn’t provide with a desktop client. Instead, you need to configure things via a web interface. Type in the following in your web browser address bar to access the Resilio Sync Web UI.
If you install Resilio Sync on a remote Linux server, you need to set up a reverse proxy with Nginx or Apache in order to access the web UI. See the later part of this article.
You will be asked to set a username and password to secure the Web UI.
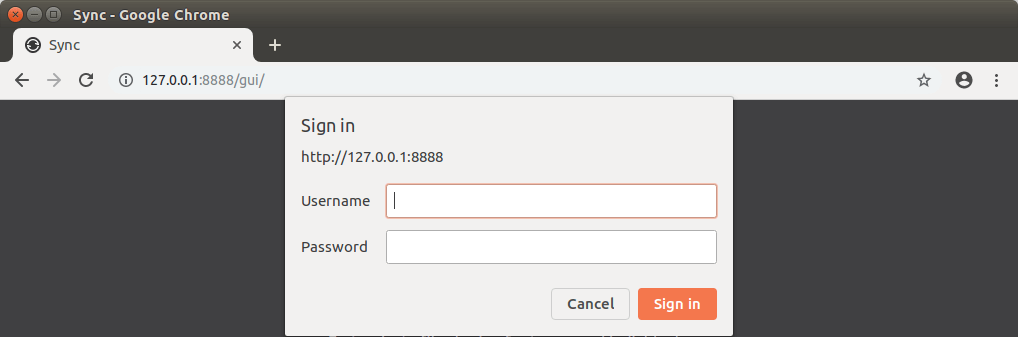
Then choose a name for your device and click Get started .

And enter the username and password you just created.
Once logged in, you can share a folder on your computer to other devices or receive a folder from another device.
Sharing Folders with Other Devices
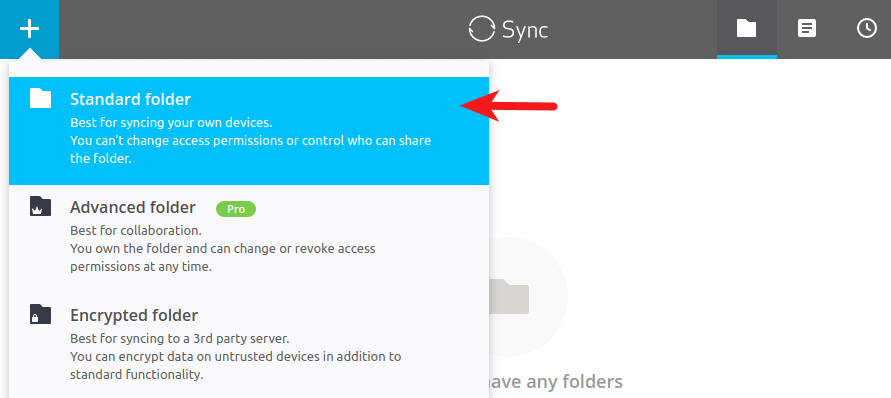
To share a folder on your computer, click the + button at the upper left corner and select standard folder.
Then select a folder on your computer.
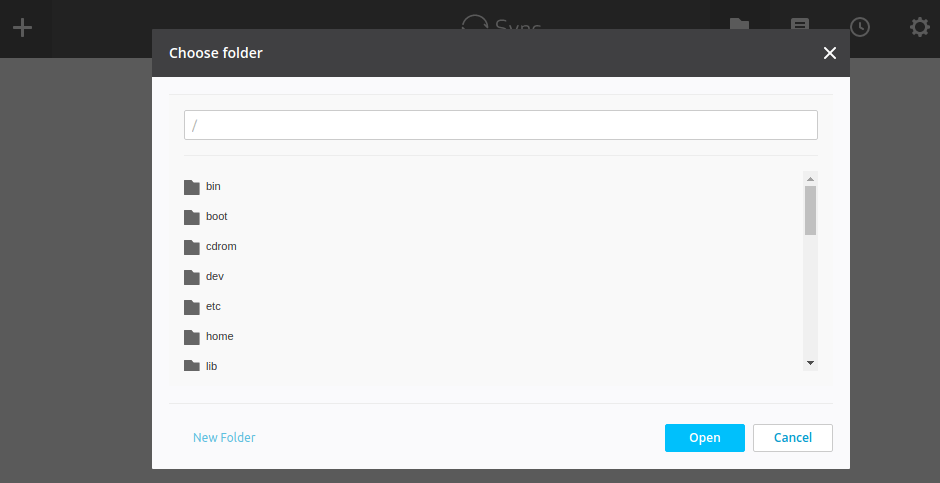
You might encounter the following error message.
That’s because Resilio Sync is running as rslsync user, who doesn’t have permission to access that folder.
Let’s say you selected your home folder /home/your-username/ as the shared folder. To fix the above error, all you need to do is to grant permissions on your home folder to the rslsync user with the following command.
The above command won’t change the owner of the shared folder. The owner has the same permissions as usual. What it does is to grant read, write and execute permissions to one more user, namely rslsync . Note that -R (recursive) flag must come before -m (modify) flag, which is immediately followed by the access control list entry ( u:rslsync:rwx ).
If you see this error:
Then install the acl package and re-run the above setfacl command.
Now you should be able to add your home folder as the shared folder.
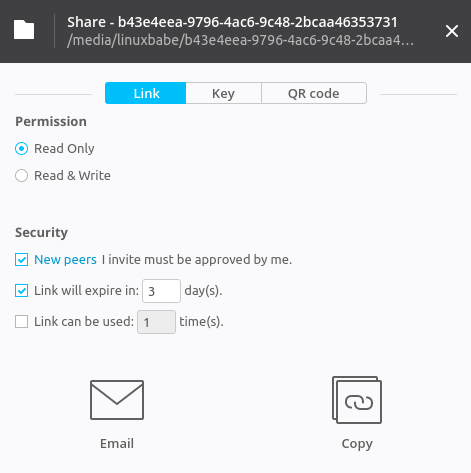
After the folder is added, you can share this folder via a link, secret key or QR code.
If the share folder is huge, it will take some time for Resilio Sync to index the content.
Receiving Folders From Other Devices
To receive a folder from another device, click the + button at the upper left corner and select “Enter a key or link”.

Then enter the key or link.

Using Resilio Sync on Ubuntu 20.04, 18.04 Server
You can install Resilio Sync on Ubuntu 20.04 and 18.04 server from repository mentioned above. If your server is sitting in the cloud, then you need to set up reverse proxy in order to access the Web UI because the Web UI listens on local host only. Once the reverse proxy is configured, you can access the Web UI via a domain name.
Setting Up Resilio Sync Reverse Proxy with Nginx
Nginx becomes more and more popular these days as a web server and reverse proxy. Install Nginx on Ubuntu 20.04, 18.04 server with the following command.
Start Nginx and enable auto start.
Now create a virtual host file for Resilio Sync.
Copy and paste the following lines in to the file. Replace resilio.example.com with your real domain name. You should also add a DNS A record for this sub-domain.
Save and close this file. Then test Nginx configuations.
If the test is successful, reload Nginx.
Now in your browser’s address bar type in resilio.example.com and you should be able to access the Web GUI.
Setting Up Resilio Sync Reverse Proxy with Apache
Apache is well-known web server that can also be used as a reverse proxy. If you prefer Apache to Nginx, install it on Ubuntu 20.04, 18.04 server with:
Start Apache and enable auto start.
To use Apache as a reverse proxy, we need to enable the proxy modules and the header module.
Now create a virtual host file for Resilio Sync.
Copy and paste the following lines in to the file. Replace resilio.example.com with your real domain name. You should also add a DNS A record for this sub-domain.
Save and close the file. Then enable this virtual host.
Now you can access the Web UI via resilio.example.com .
Secure the Resilio Sync Web GUI with HTTPS
To encrypt the HTTP traffic when you visit Resilio Sync web UI via a domain name, we can enable HTTPS by installing a free TLS certificate issued from Let’s Encrypt. Run the following command to install Let’s Encrypt client (certbot) on Ubuntu 20.04, 18.04 server.
If you use Nginx, then you also need to install the Certbot Nginx plugin.
Next, run the following command to obtain and install TLS certificate.
If you use Apache, install the Certbot Apache plugin.
And run this command to obtain and install TLS certificate.
- —nginx : Use the nginx plugin.
- —apache : Use the Apache plugin.
- —agree-tos : Agree to terms of service.
- —redirect : Force HTTPS by 301 redirect.
- —hsts : Add the Strict-Transport-Security header to every HTTP response. Forcing browser to always use TLS for the domain. Defends against SSL/TLS Stripping.
- —staple-ocsp : Enables OCSP Stapling. A valid OCSP response is stapled to the certificate that the server offers during TLS.
The certificate should now be obtained and automatically installed.
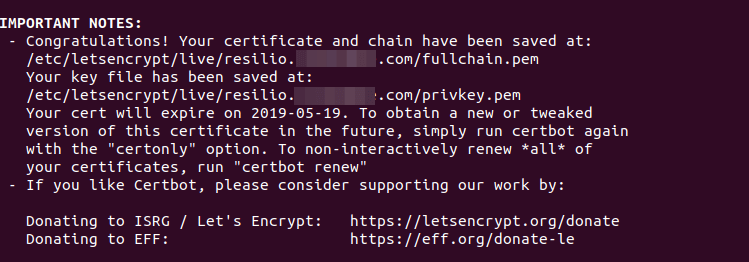
And you can access Resilio Sync Web UI via HTTPS ( https://resilio.example.com ).
Open Resilio Sync Port in Firewall
In addition to the Web UI port, Resilio Sync also needs to listen on the public interface to connect to peers. The listening port is different for each device. You can find it in Resilio Sync Web UI by going to Preference -> Advanced.
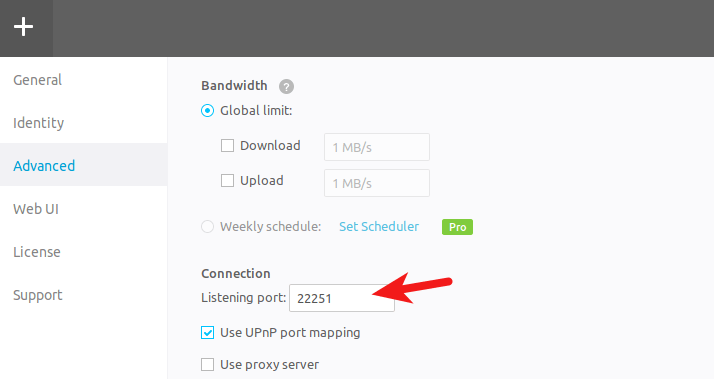
If you enabled UFW firewall on your Ubuntu server, then you need to open this port. For example, my port is 22251, so I run the following command to open it.
Resilio Sync iOS App
I use Resilio Sync to sync files between my Ubuntu desktop, Ubuntu server and iPhone. Some say that the iOS app is a complete disaster, but I found it working very well. By default, Selective Sync is enabled in the iOS app. That means individual files will be synced only when you choose to. If you disable Selective Sync, all files will be synced immediately.
How to Configure Selective Sync
In the Web UI, Resilio Sync tells you that selective sync is a pro feature for Linux users, but actually we can configure selective sync from the command line. Every sync folder has a hidden .sync folder created by Resilio Sync. In this hidden folder, there’s a file named IgnoreList , which is a UTF-8 encoded .txt file that helps you specify single files, paths and rules for ignoring during the synchronization job. It supports “?” and “*” wildcard symbols.
For example, I need to sync a folder between computer A and B in read and write mode. Computer B contains a file that I don’t want to be synced to computer A. Here’s the steps that I did to ignore that file.
- I add the folder in computer A’s Resilio Sync web UI.
- Now computer A has a .sync hidden folder.
- I add the name of that file in IgnoreList on computer A, so it will refuse to receive that file from Computer B.
- Share the folder with computer B in read and write mode.
- Once the synchronization is finished, I can add the name of that file in Computer B’s IgnoreList , so computer B won’t share that file with other computers if a new computer joins the synchronization.
Conclusion
I hope this tutorial helped you install Resilio Sync on Ubuntu 20.04 and Ubuntu 18.04. As always, if you found this post useful, then subscribe to our free newsletter to get more tips and tricks. Take care 🙂
Источник


