- How to resize Windows 10 partition without losing data
- Why disk partition can be re-sized?
- Windows 10 partition resizing tools
- How to resize partition in Windows 10 using Disk Management:
- To shrink a volume:
- To extend a volume:
- Resize Window 10 volume with free partition software
- How to Free Resize Partition for Windows 7, 8 or 10?
- How to free resize partition in Windows 7
- Extend Partition
- Shrink partition
- Resize Windows 10 System Partition
- Replies (6)
How to resize Windows 10 partition without losing data
by John, Updated on: March 1, 2021
This article introduces how to resize partition in Windows 10 (32 & 64 bit) without losing data or reinstalling OS/programs. Resize volume with Windows 10 Disk Management and free partition editor.
C drive out of space is common issue in Windows 10 computers, no matter you use desktop or laptop, SSD, mechanical disk or even RAID arrays. The fast way to solve this problem is resizing partitions to increase C drive free space, but to many computer users, it is not an easy task to resize Windows 10 partitions. In technical forums, many people ask similar questions such as: «is it possible to re-size disk partition without reinstalling OS, my c drive is full but there is plenty in D«, «Is it safe to resize my Windows 10 drives, will it cause data damage?«
In this article I’ll explain why disk partitions can be resized, and how to resize partition in Windows 10 with built-in Disk Management tool and free partition editor software.
Why disk partition can be re-sized?
A partition (also called as drive or volume) is just part of entire hard disk and there could be many partitions in a disk. Many people use partition C for Operating System, create separate partitions for programs and personal files. Before saving files to a partition, it must be formatted with a file system. The common file system in Windows computer is FAT32 and NTFS. Take MBR style disk as example:
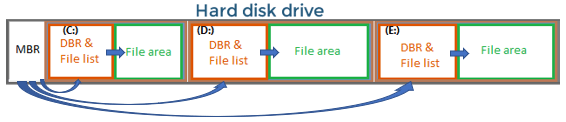
- Operating System read the parameters in MBR (master boot record) and then it knows how many partitions in this disk, and the start/end position of each partition.
- From DBR of each partition, Operating System gets the list of all files in this partition including name, create date, type and many other parameters of each file.
- From the parameters, Operating System can locate the data area.
To change a file, Operating System simply modify the data area and then update the associated parameters in DBR.
To resize partition in Windows 10 computer, it is much easier if it doesn’t require moving files of this partition. In this case, the partition tool just modify the parameters of start and end position of this volume. But if file moving is required, it is much more complicated, besides updating partition position, the partition tool also move location and update parameters of all file in this volume, so it cost much longer time if there are large amount of files.
Windows 10 partition resizing tools
There are two kinds of tools to resize volume in Windows 10: built-in Diskpart command or GUI Disk Management and 3rd-party partition manager software.
Some people like to use Windows native tools thinking they have best compatibility, but it’s not true. I’ve encountered the issue at least 3 times that Disk Management destroyed my drives when shrinking partition. Be careful when there are many partitions including Logical drive on a disk.
Third party software is much more powerful and it’s much easier to resize partition for Windows 10/8/7 computers. However, few partitioning software are safe enough. Therefore, before resizing partition, you’d better make a backup and run the safest program. Otherwise, your system and partitions may be damaged.
Better than other tools, NIUBI Partition Editor has unique 1 Second Rollback, Virtual Mode and Cancel-at-well technologies to protect system and data. In addition, it has Hot-Resize technology to help resize disk partition without rebooting and advanced file-moving algorithm to help resize partition 30% to 300% faster.
How to resize partition in Windows 10 using Disk Management:
Windows 10 Disk Management has no «resize volume» function, partition resizing is realized by Shrink Volume and Extend Volume. Note: only NTFS partition is supported. FAT32 and EFI partition can’t be resized by this native tool.
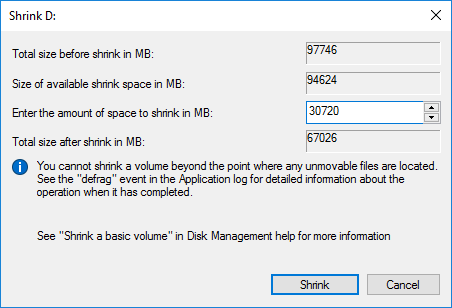
To shrink a volume:
- Press Windows and X on keyboard and select Disk Management from the list.
- Right click the partition and select Shrink Volume.
- In the pop-up window, enter the amount of space and then click Shrink to execute.
To extend a volume:
- Right click this drive in Disk Management and select Extend Volume.
- Simply click Next in the pop-up Extend Volume Wizard window.
- Confirm the operation and click Finish to proceed.
To extend partition in Windows 10 Disk Management, your disk partition layout must meet the requirements:
- There must be adjacent Unallocated space on the right of this drive.
- If there’s no such space, you must delete the right partition to get contiguous Unallocated space.
- On MBR style disk, Free space deleted from Logical drive cannot be added to any Primary partition, even if it is right adjacent.
Windows 10 has another native tool — Diskpart to help change partition size. Diskpart is a command line tool, although it works in different way, it has same limitations with Disk Management. Learn how to extend partition with diskpart.
If you want to extend C drive by shrinking D or any other partition, it is impossible with Disk Management or diskpart command. Because, Shrink Volume can only shrink a partition (such as D:) towards left and make Unallocated space on the right side, but to extend C drive with either native tool, Unallocated space must be on the left side of D. This is the reason why Extend Volume is disabled for C drive after shrinking D.
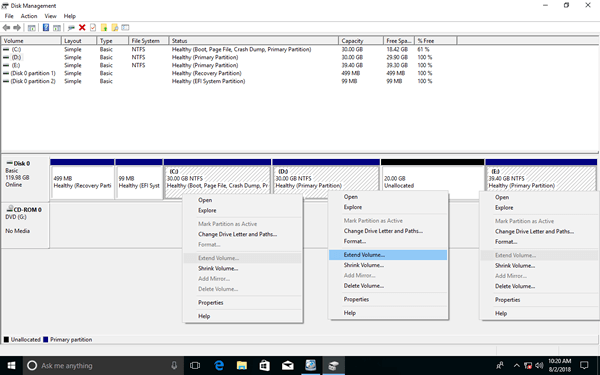
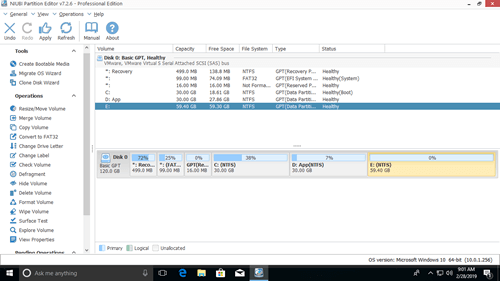
As you see in the screenshot, Extend Volume is also disabled for E drive, because Unallocated space is on its left side.
Resize Window 10 volume with free partition software
To resize partition in Windows 10 without losing data, NIUBI Partition Editor is better choice. Both NTFS and FAT32 partition can be resized. Unallocated space can be generated on either left or right when shrinking partition. This space can be combined to any contiguous and non adjacent partitions on the same disk.
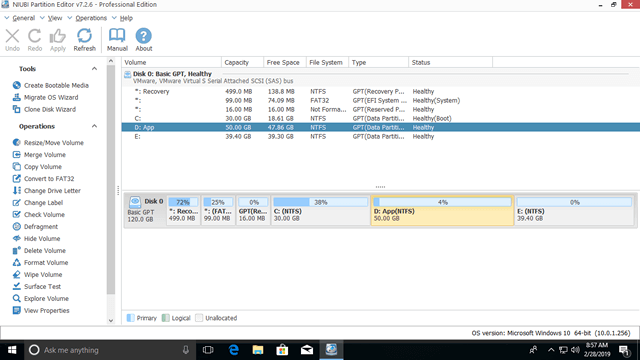
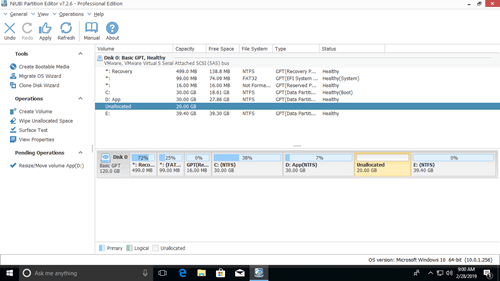
Download this program, you’ll see all storage devices with partitions structure and other information on the right, available operations to the selected disk or partition are listed on the left and by right clicking.
How to resize partition in Windows 10/8/7 laptop/desktop with NIUBI:
Right click a partition (here is D:) and select «Resize/Move Volume«, you have two options in the pop-up window.
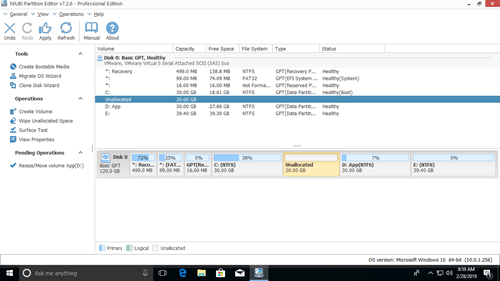
Option 1: If you drag left border towards right in the pop-up window,
Then partition D is resized and 20GB Unallocated space is made on the left.
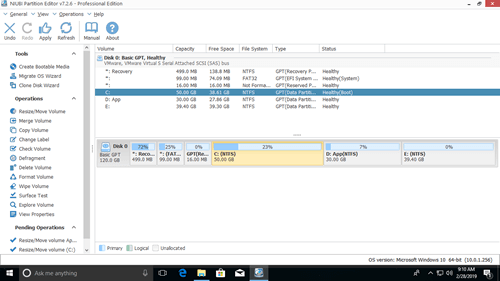
Option 2: If you drag right border towards left in the pop-up window,
Then Unallocated space will be made on the right side of D drive.
If you want to extend C drive partition, follow Option 1 above to make Unallocated space on the left side of D. Then right click C: drive and select «Resize/Move Volume» again, drag right border rightwards to combine this Unallocated space.
Then two pending operations are created on bottom left, you need to click Apply on top left to take effect.
If you want to extend partition E, follow Option 2 above to make Unallocated space on the right of D drive. Then right click E: and select «Resize/Move Volume» again, drag left border leftwards to combine the Unallocated space.
If you want to shrink E to extend non adjacent partition C, follow the steps below:
- Shrink drive E: and make Unallocated space on the left side.
- Move Unallocated space from right side of drive D: to the left.
- Add Unallocated space to C drive.
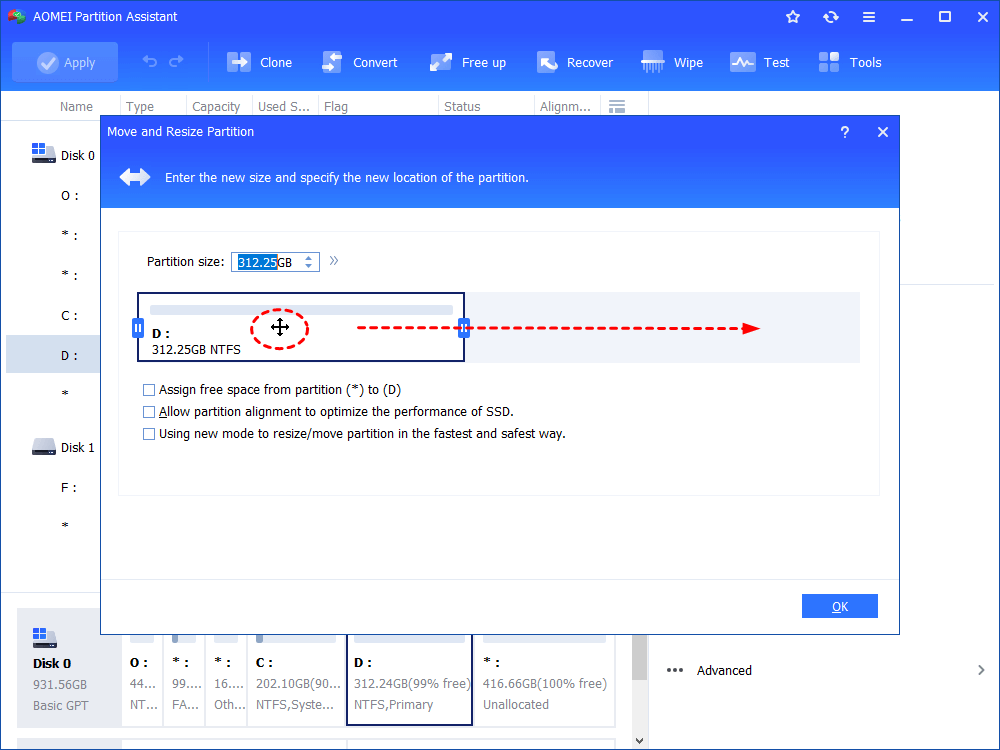
To move Unallocated space from right to the left, right click drive D: and select «Resize/Move Volume», drag the middle towards right in the pop-up window:
Watch the video guide how to resize volume in Windows 10 (32/64 bit):
Besides resizing partition for Windows 10 laptop and desktop, it helps you move, merge, copy, convert, defrag, wipe, hide partition, scan bad sectors and much more. There’s free edition for Windows 10/8/7/Vista/XP home computer users. Except 1-Second Rollback technology and bootable media builder, it is the same with paid Professional edition.
How to Free Resize Partition for Windows 7, 8 or 10?
You can free resize partition in Windows 7 without losing data via AOMEI Partition Assistant Standard.

By AOMEI  / Last Updated June 12, 2020
Part of Windows 7 users found that sometimes, Windows Disk Management cannot extend volume or shrink volume, and they need to figure out a way to free resize partition in Windows.
Well, the AOMEI Partition Assistant Standard Edition is a totally free disk partition software for managing and optimizing hard drive for your PC and laptop. It allows you to resize partition in Windows 7 free. Besides, it has many other free features such as create, delete, format partition, etc. AOMEI Partition Assistant Standard supports all Windows PC operating systems including Windows 10, Windows 8/8.1, Windows 7, Windows Vista, Windows XP, both 32bit and 64bit. Here are the detailed steps for how to free resize partition in Windows 7 by using AOMEI Partition Assistant Standard.
How to free resize partition in Windows 7
AOMEI Partition Assistant allows you to extend partition or shrink partition more flexibly. Just free download this software, install and launch it. Then, follow the next content to extend or shrink volume.
Extend Partition
It can extend partition effortlessly. If the unallocated space is not adjacently behind the partition that you want to extend, it enables you to change position.
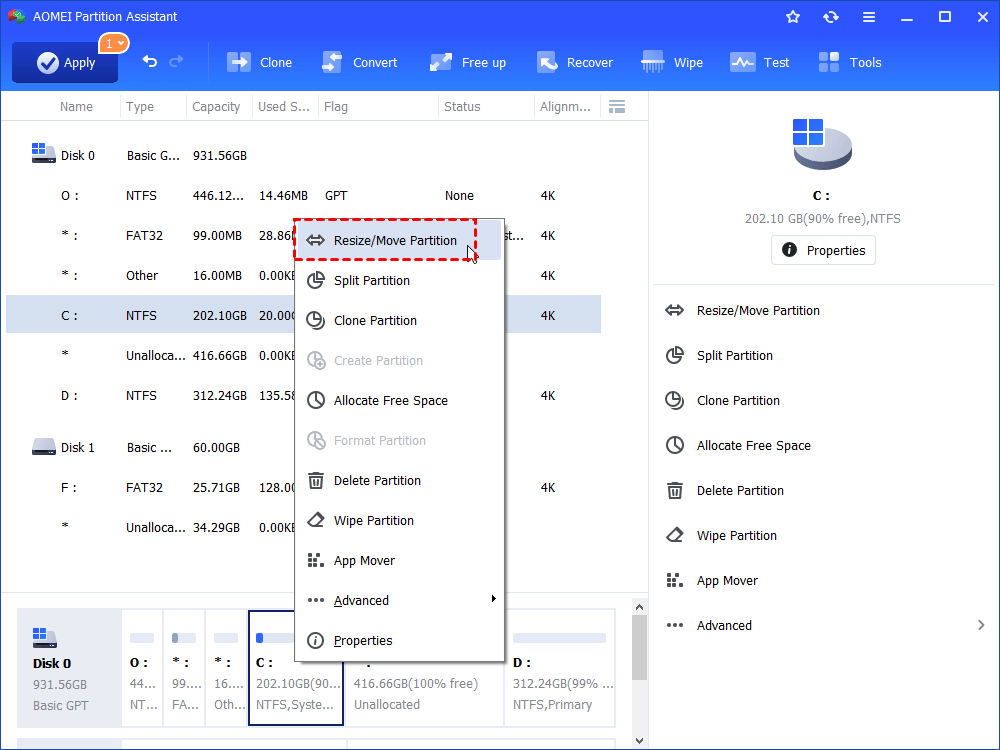
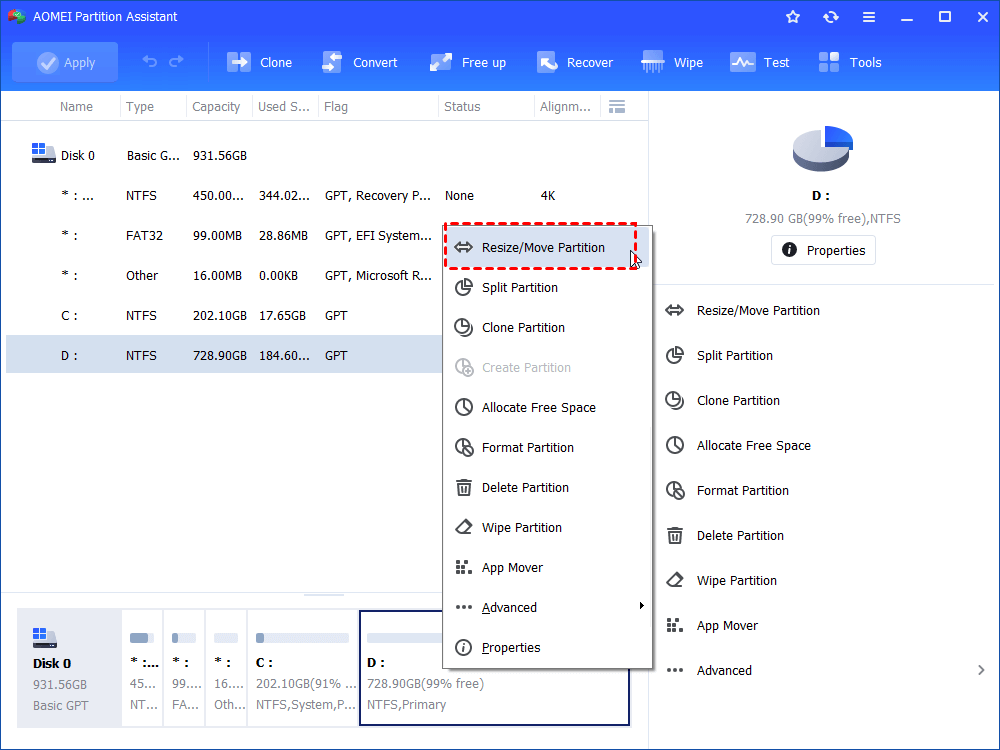
Step 1. Right-click the partition between the partition that you want to extend and the unallocated space and choose «Resize/Move Partition».
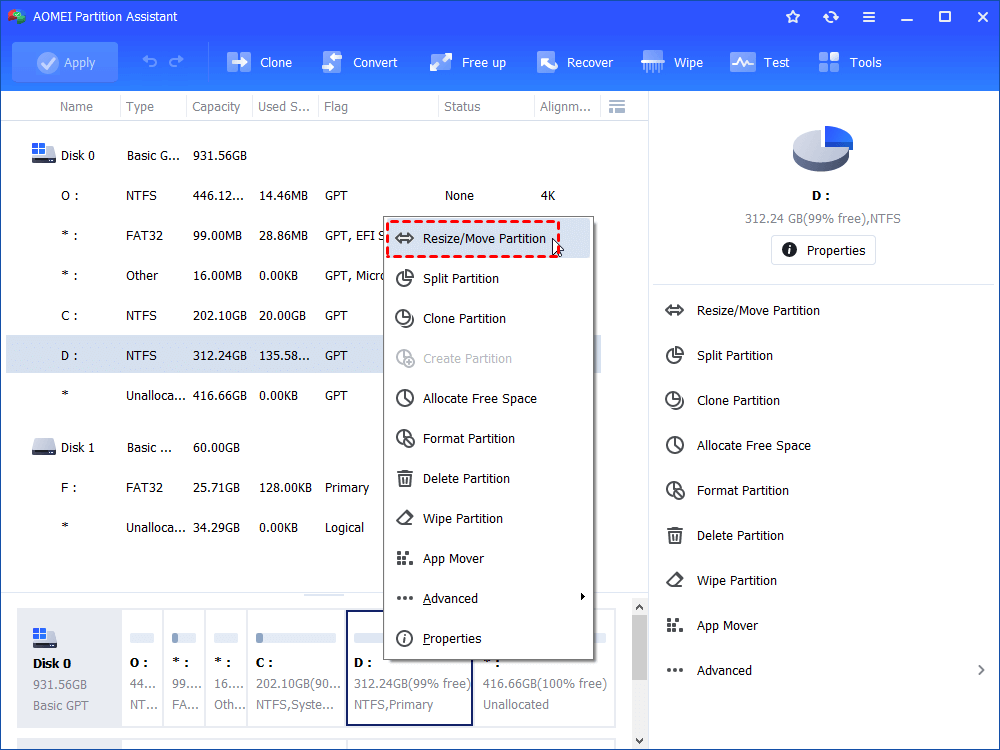
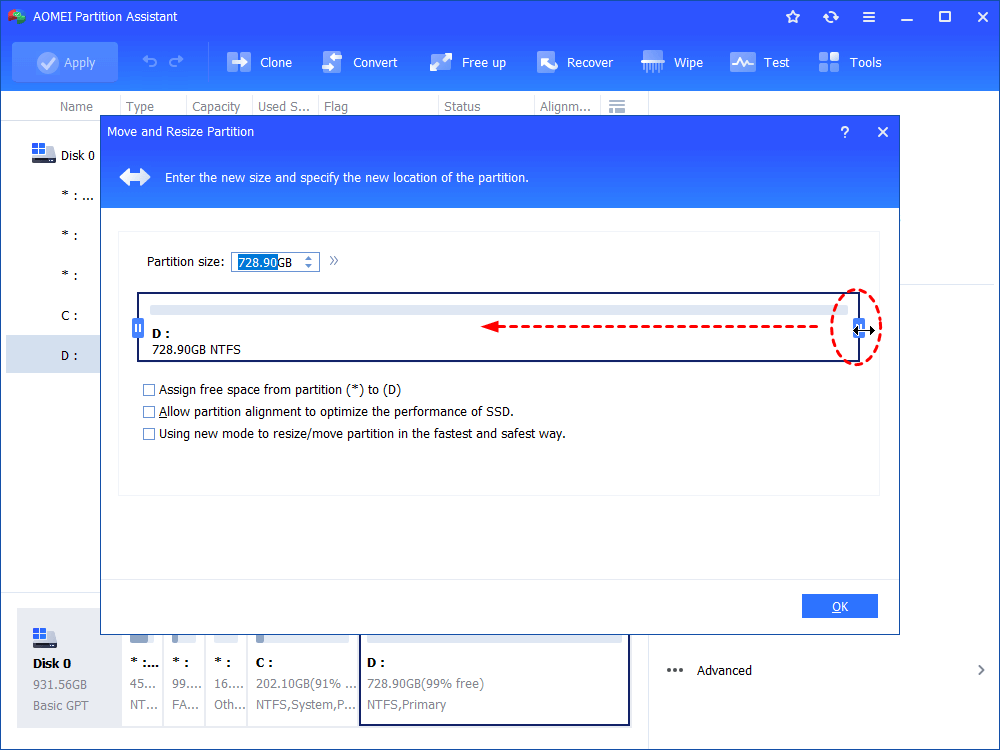
Step 2. Drag partition D rightward and click OK.
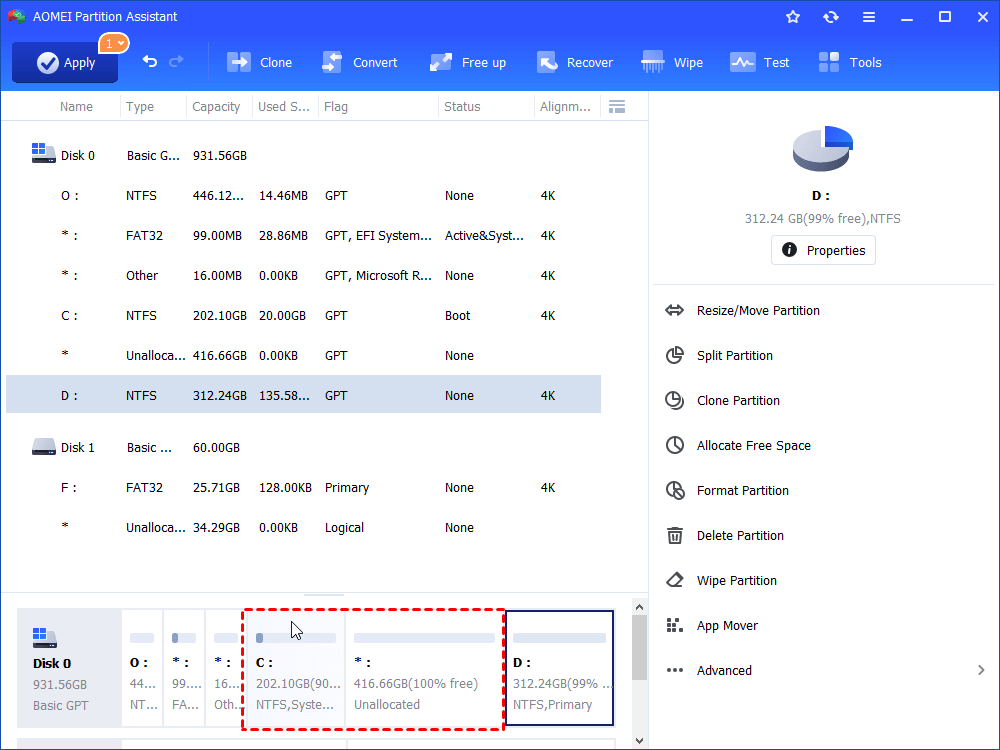
Step 3. Here you’ll find that the unallocated space is behind C drive.
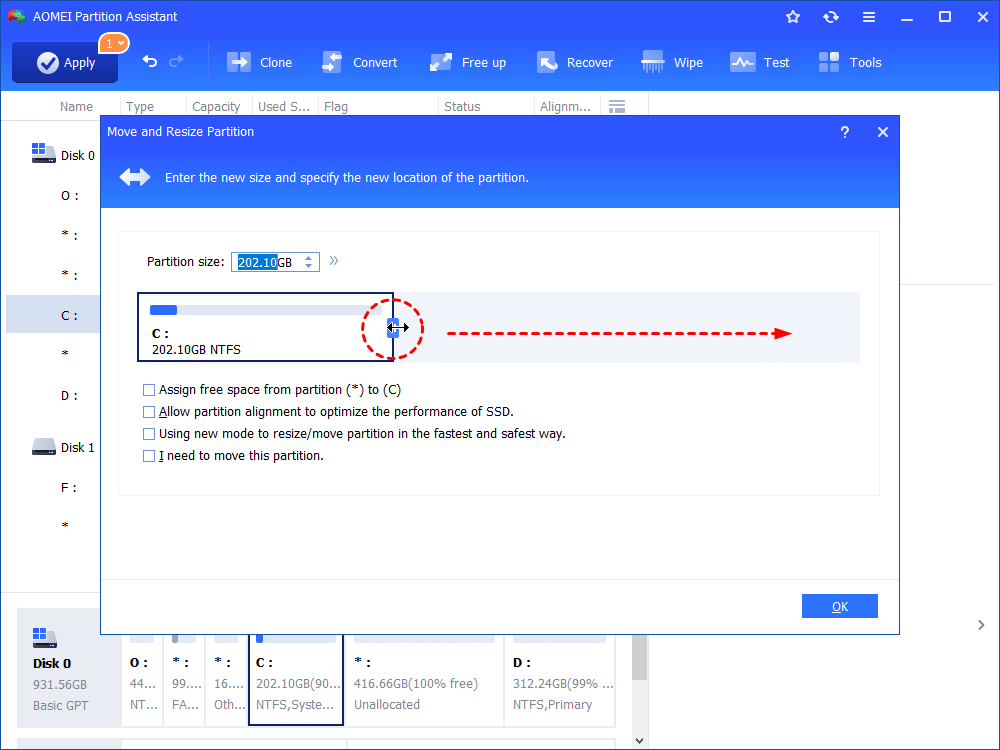
Step 4. Right-click C drive and choose «Resize/Move Partition» .
Step 5. Slide the double-sided arrow to the right. Then, click «OK».
Shrink partition
If you want to shrink partition on the disk, the AOMEI Partition Assistant can provides you a simpler and safer way to shrink volume.
Step 1. Right-click the partition you want to shrink, select «Resize/Move Partition».
Step 2. Then, you drag the double-headed arrow toward inside flexible, or type the amount you want to shrink in the blank space. Click OK.
Step 3. Back to the main interface, you can see that the partition has been shrunk and there is unallocated space behind the partition. Click Apply to execute the task.
Notes:
Shrink system partition may execute under PreOS Mode.
If there are some page file or AOMEI Partition Assistant installation file running, it will be executed under PreOS Mode.
If there are still some programs running on the partition, AOMEI Partition Assistant will suggest you close the running program, or the process will be executed under PreOS Mode.
AOMEI Partition Assistant is such an outstanding software that you can use to free resize partition in Windows 7/8/10. It is a great tool that can free manage partition for Windows 7, Windows 8, and Windows 10. Besides changing partition size, you can also use it to create partition from unallocated space.
Resize Windows 10 System Partition
How can I Extend my Windows 10 system partition (C:60GB to 150GB)?
I have 1HDD 1TB with 2 partitions C: and D:
Replies (6)
![]()
Thank you for posting your query in Microsoft Community.
I understand your concern, and we in Community will try to help you in the best possible way we can.
I suggest you to follow the steps below and check if that helps.
- Run Disk Management. Open Run Command (Windows button +R) a dialog box will open and type «diskmgmt.msc«.
- In the Disk Management screen, just right-click on the partition that you want to shrink, and select “Extend Volume” from the menu
- Locate your system partition — that’s probably the C: partition. Right-click on it and select “Shrink Volume.” If you have multiple partitions on your hard drive, you could also choose to resize a different partition to free up space.
Hope the information helps. Please let us know if the issue persist and we will be happy to assist you further.
102 people found this reply helpful
Was this reply helpful?
Sorry this didn’t help.
Great! Thanks for your feedback.
How satisfied are you with this reply?
Thanks for your feedback, it helps us improve the site.
How satisfied are you with this reply?
Thanks for your feedback.
I have a new computer with a 512GB SSD drive that shipped with the following 7 partitions:
The first and last partition show as unallocated and do not even show up under the Windows Disk Management utility. See below for my Disk Management information: It only shows 4 partitions, not 7, for some reason unknown. This is confusing to me.
My goal is to merge partitions so I only have one primary C: volume that is accessed by default. Is it possible to merge all of the unallocated volumes as well as the Data D: drive into the OS (C:) volume?
And what is the 499 MB Recovery partition used for? It shows it as being empty. I can not extend the C: volume using Disk Management because I tested and I shrunk Volume D: it ends up creating unallocated volumes that cant be extended on to the C: volume.
I am afraid to use the third party Easus Partition master as it seems like it may create even more unallocated and unuseable volumes.
PLEASE HELP if ANYBODY HAS ANY INFORMATION!
12 people found this reply helpful
Was this reply helpful?
Sorry this didn’t help.
Great! Thanks for your feedback.
How satisfied are you with this reply?
Thanks for your feedback, it helps us improve the site.
How satisfied are you with this reply?
Thanks for your feedback.
This is no different than going through Administrative Tools. On my new Surface Book with 1TB SSD, the built-in ‘Shrink Volume’ option provides me with only 4322 MB of recoverable space. ****, this is my second MS computer (Surface Pro 3 was first) and that feature didn’t work either! Can’t Microsoft get something simple like this right?
What do I do now, just use a single partition? I normally like to keep my data separate from the system disk but you’re making it frustratingly impossible!
11 people found this reply helpful
Was this reply helpful?
Sorry this didn’t help.
Great! Thanks for your feedback.
How satisfied are you with this reply?
Thanks for your feedback, it helps us improve the site.
How satisfied are you with this reply?
Thanks for your feedback.
7 people found this reply helpful
Was this reply helpful?
Sorry this didn’t help.
Great! Thanks for your feedback.
How satisfied are you with this reply?
Thanks for your feedback, it helps us improve the site.
How satisfied are you with this reply?
Thanks for your feedback.
22 people found this reply helpful
Was this reply helpful?
Sorry this didn’t help.
Great! Thanks for your feedback.
How satisfied are you with this reply?
Thanks for your feedback, it helps us improve the site.
How satisfied are you with this reply?
Thanks for your feedback.
You can use the Disk Management tool to resize the partition on your C drive. To do this, follow these steps:
- Open Disk Management.
- On the lower part of the Disk Management window, right-click on Data (D:) and select Shrink Volume. from the options.
- In the field provided in the Shrink dialog box, enter the amount of space by which to shrink the disk and click Shrink.
Note: If you want to allocate 100 GB to drive C:, you need to put 100000 on the field provided.
This will create an Unallocated space as shown on the image below.
Click Finish.
Keep us updated with the results of the solution above.


