- How to change partition size in Windows 10
- Change partition size with Windows 10 Disk Management
- How to decrease partition size in Windows 10:
- How to increase partition size in Windows 10:
- Adjust partition size with partition editor
- Take care of data while resizing disk partition
- How to resize partition in Windows 10 (32/64 bit)
- Resize partition with Windows 10 Disk Management
- How to resize system partition C in Windows 10
- How to resize data volume (D) in Windows 10
- In Summary
- 3 Ways to Resize Partition Windows 10 without Losing Data
- Why should we resize partition Windows 10?
- 3 ways to resize partition on Windows 10 PC without data loss
- Way 1. Use third-party freeware
- Way 2. Resize Partition Windows 10 Command Line
- Way 3.В Try Disk Management
- Conclusion
How to change partition size in Windows 10
by Andy, Updated on: March 1, 2021
This article introduces how to change partition size for Windows 10 computer without losing data. Resize disk partition with native Disk Management and partition editor software.
When system C drive is running out of space, nobody wants to start from scratch, so many people search by Google to find a better way. In technical forums, many people have similar questions such as:
- Is it possible to change partition size in Windows 10 without reinstalling OS.
- Is it safe to re-size partition and which tool is better to change allocated partition size.
The answer is definitely yes. To change volume size in Windows 10 laptop and desktop, there are 2 options: Windows built-in Disk Management and third party partition editor software. Because of many shortages, Disk Management is not the best tool to change partition size.
Change partition size with Windows 10 Disk Management
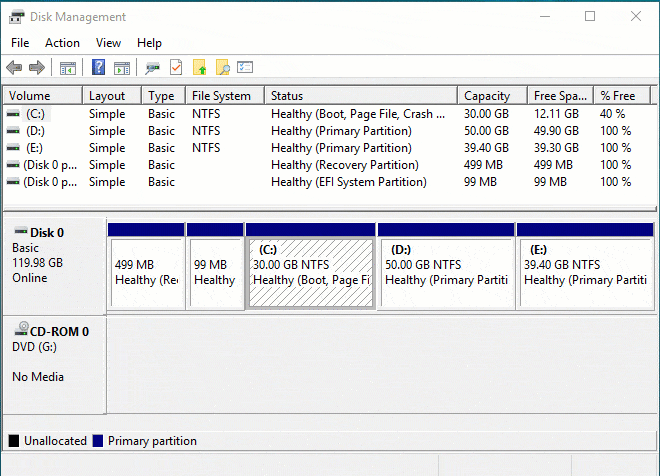
Windows 10 Disk Management inherited Shrink Volume and Extend Volume functions from previous version. Shrink Volume can decrease the size of both system C drive and data volumes. Extend Volume can increase size of a drive when there is adjacent Unallocated space. Both functions are safe to change partition size in Windows 10 (32 & 64 bit).
However, if you want to extend a volume by shrinking another one, Disk Management cannot help you, learn why.
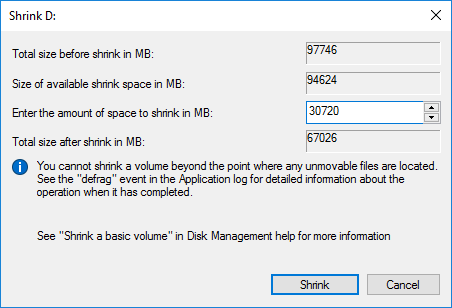
How to decrease partition size in Windows 10:
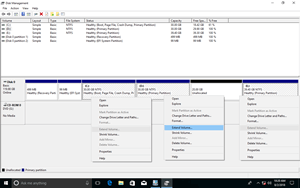
- Press Windows and X on the keyboard and select Disk Management from the list.
- Right click the drive you want to decrease and select Shrink Volume.
- Enter the amount of space (1024MB=1GB) and click Shrink to execute.
This drive will be shrunk within a short time in most cases.
Restrictions of Shrink Volume function:
- Only NTFS partition can be shrank, FAT32 and other types of volumes are not supported.
- Unallocated space can only be generated on the right side.
- Sometimes you can only shrink little space because of some unmovable files are located, even though there is large amount of free space in this drive.
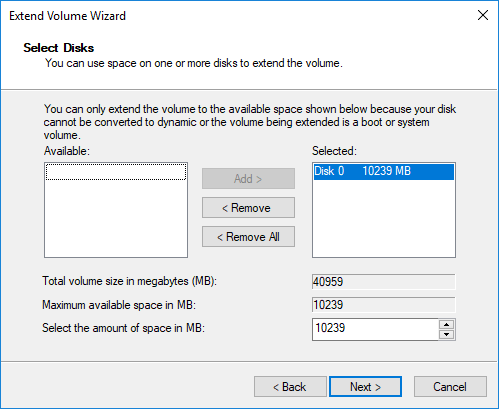
How to increase partition size in Windows 10:
Only when your disk drive configuration meet the requirements below, Extend Volume is workable to increase partition size.
- There must be adjacent Unallocated space on the right side of the drive that you want to extend. If there’s no such Unallocated space, you must delete the right contiguous partition.
- The drive that you want to extend must be formatted with NTFS, FAT32 and other types of partitions are not supported.
- On MBR disk, the partitions to be deleted and extended must be the same Primary or Logical drive. Otherwise, you still cannot extend partition after deleting the right contiguous one.
To increase volume size with Disk Management:
- Right click the NTFS partition that has right adjacent Unallocated space and select Extend Volume.
- Simply click Next in the pop-up Extend Volume Wizard window.
- Click Next to use default selected disk and space, or change manually.
- Click Finish to execute.
Adjust partition size with partition editor
Comparing with Windows 10 Disk Management, NIUBI Partition Editor has advantages while resizing partition, for example:
- Both NTFS and FAT32 partitions are supported to shrink and extend.
- Unallocated space can be made on either left or right when shrinking a drive.
- Partitions can be extended via 1 step with adjacent Unallocated space on either side.
- Unallocated space can be moved and combined to any nonadjacent partition on the same disk.
- If there is not plenty of space in the same disk, NIUBI can copy to a larger one and extend partition with extra space.
How to change partition size in Windows 10 with NIUBI Partition Editor:
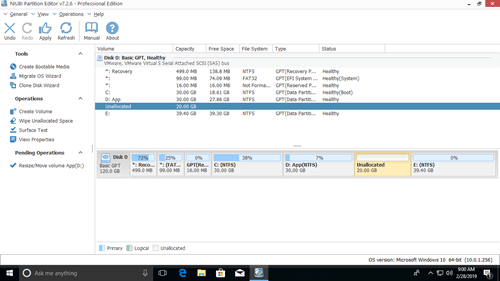
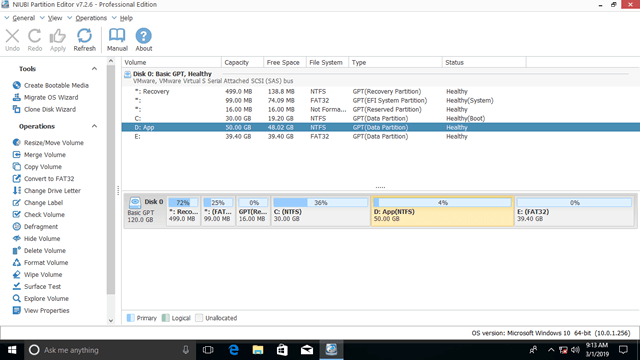
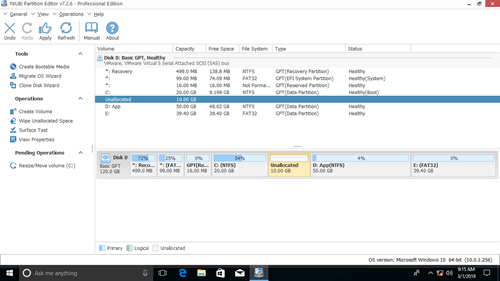
Download this program and you’ll see all disk partitions with structure and other information. In my test computer, there are drive C, D, E and system reserved partitions.
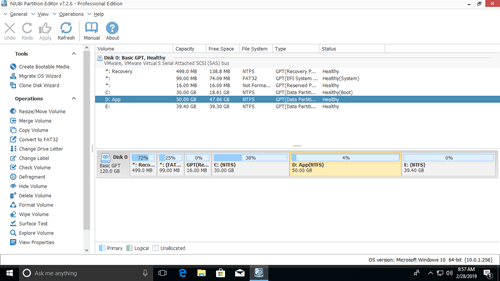
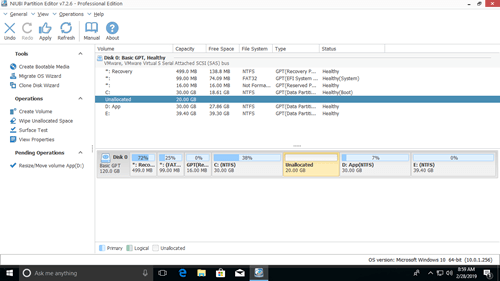
There are two options when decrease partition size, right click this partition (here is D:) and select «Resize/Move Volume».
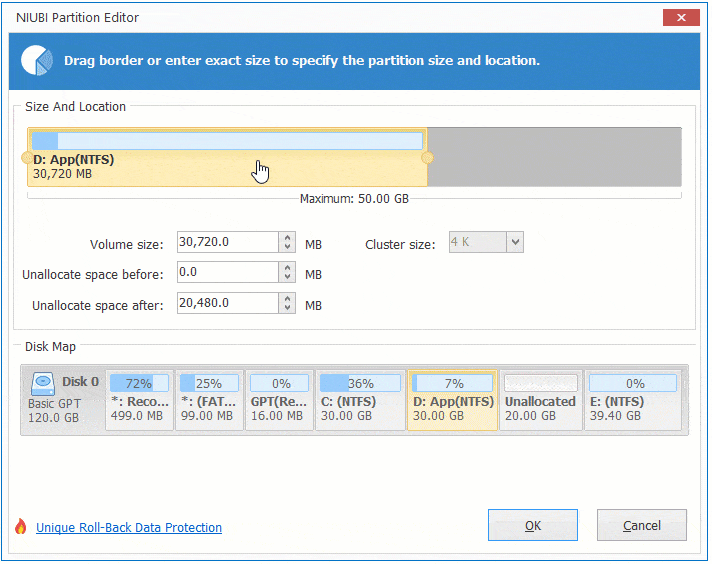
Option 1: If you drag left border towards right in the pop-up window,
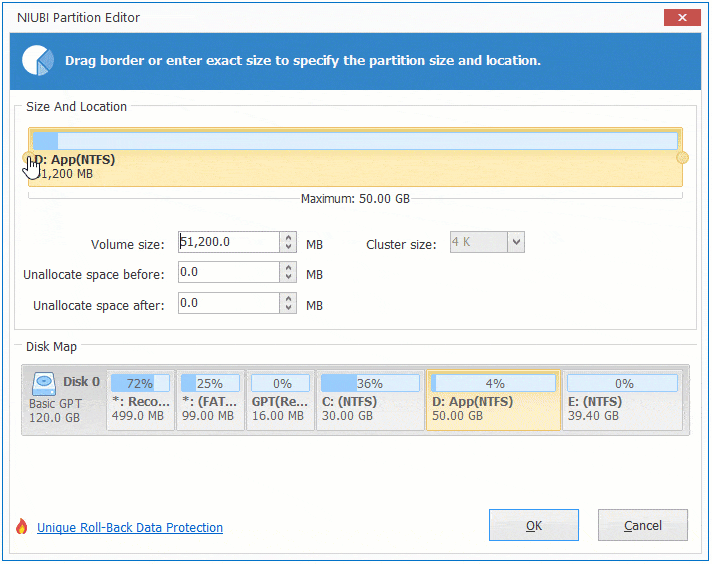
Then Unallocated space will be produced on the left side.
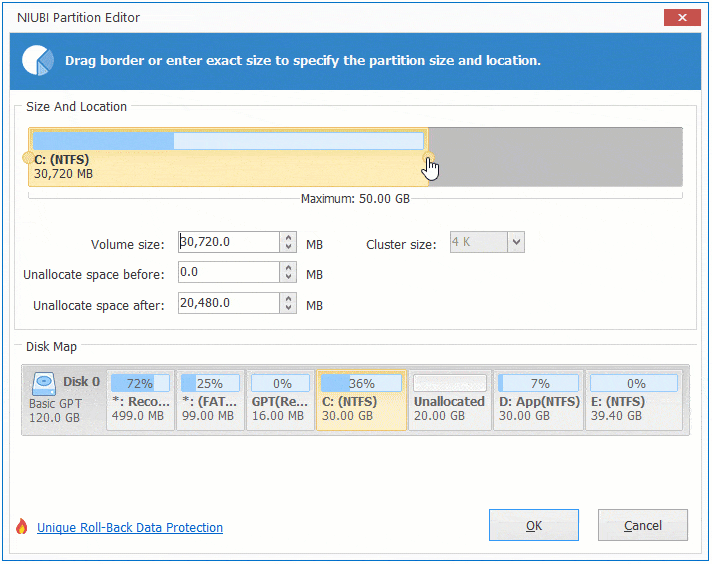
Option 2: If you drag right border towards left in the pop-up window,
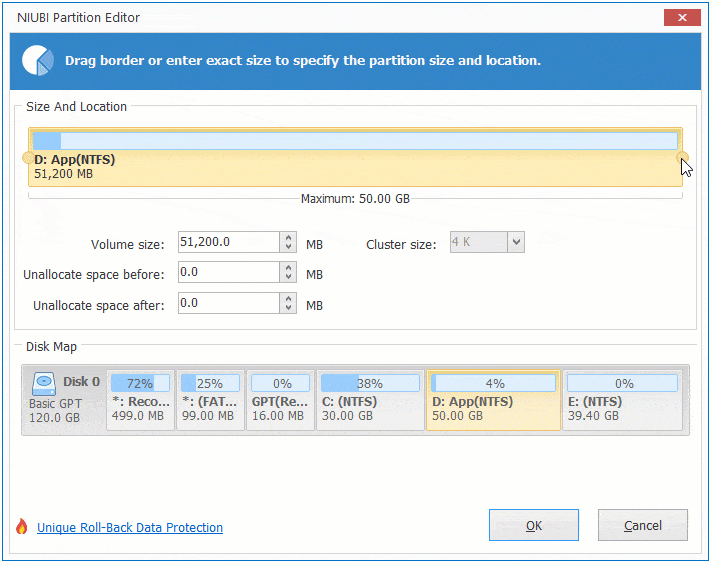
Then Unallocated space will be produced on the right side.
These Unallocated space can be used to create new volume or combine to other partition.
To increase size of partition C:
Right click C and select «Resize/Move Volume» again, drag right border rightwards to combine Unallocated space.
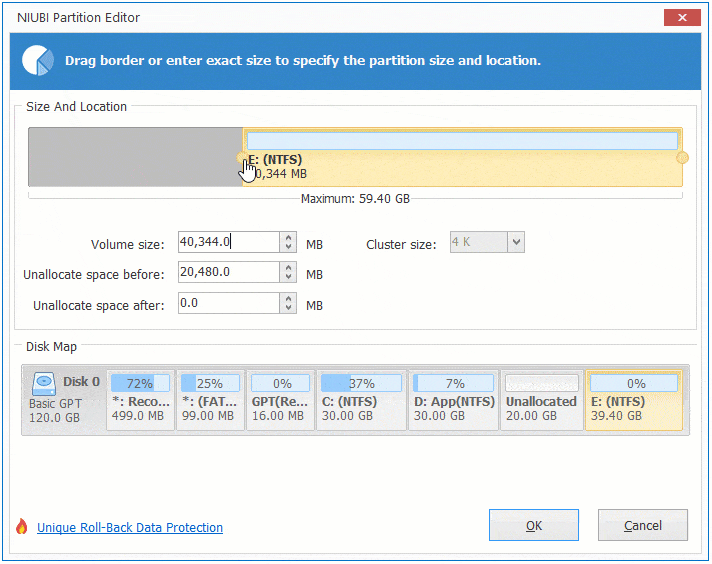
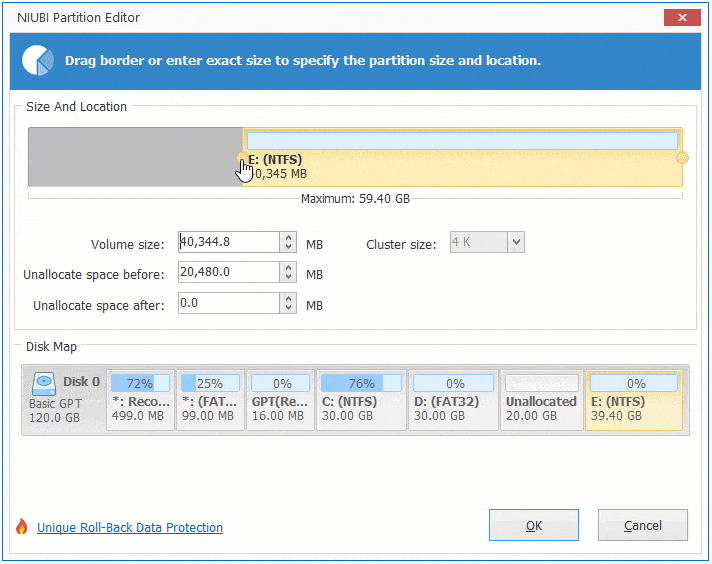
To increase size of partition E:
Right click E and select «Resize/Move Volume» again, drag left border leftwards to combine Unallocated space.
If you want to decrease E to increase C, follow Option 1 to make Unallocated space on the left side of E. Before adding Unallocated space to C drive, there is an additional step to move Unallocated space to left side of D. To do this, right click drive D and select «Resize/Move Volume», drag middle position towards right in the pop-up window.
Take care of data while resizing disk partition
There is potential system and data damage risk while change partition size for Windows 10 computer. So you’d better back up first and use safe partitioning software. Better than other software, NIUBI Partition Editor provides powerful 1 Second Rollback, Virtual Mode and Cancel-at-well technologies to protect system and data.
Besides changing partition size, it helps you do many other operations such as: merge, convert, defrag, copy, hide, wipe and scan partition. Initialize, convert, set read-only attribute to disk, etc.
How to resize partition in Windows 10 (32/64 bit)
Updated on: November 16, 2019
This article introduces how to resize partition on Windows 10 without reinstalling Operating System, resize disk partition for Win10 without losing data.

Resize partition with Windows 10 Disk Management
It is common operation to change partition size after running the desktop or laptop for a period of time. There are many reasons that leads to resize disk partition in Windows 10, such as: C or D drive is created too large, so you need to resize it to create more partitions. System partition C is running out of space, so you need to resize with a data volume.
Microsoft provides a native Disk Management tool to help resize partition on Windows 10 (32 and 64 bit). Shrink Volume can reduce a partition and generated Unallocated space on the right side. Extend Volume can expand a partition with contiguous Unallocated space.
It is very easy and fast to resize volume with this tool, press Windows and X on your keyboard and then you’ll see Disk Management.
To shrink a partition:
- Right click it and select Shrink Volume.
- Enter an amount in MB (1024MB=1GB).
- Click Shrink to proceed.
To extend a partition:
- Right click it and select Extend Volume.
- Click Next in the pop-up window.
- Click Next to use default setting or enter an amount manually.
- Click Finish to proceed.
However, as the screenshot above shows you can’t extend C drive or E after shrinking D. Because this Unallocated space is non adjacent to C and on the left side of E, so Extend Volume greyed out for these two volumes.
Windows 10 Disk Management cannot shrink or extend FAT32 partition. In fact, only NTFS and RAW partitions are supported. Check all reasons why can’t extend volume via Disk Management.
How to resize system partition C in Windows 10
If you just want to shrink C drive to create new volume, it is much easier and you won’t encounter any issue in most cases, but there are still several points you should know:
- You can only shrink little space if there are unmovable files are located.
- If the free space changed before you clicking Shrink, you may receive the error of «not enough space available».
- You can’t shrink C to expand D or other volumes.
You’d better run professional partition tool to resize partition on Windows 10.
Here I’ll show you how to resize disk partition with NIUBI Partition Editor, which is the safest and fastest tool. Download it, you’ll see all disk partition info on the right and available operations on the left.
Right click C drive and select «Resize/Move Volume«, if you drag left border towards right in the pop-up window:
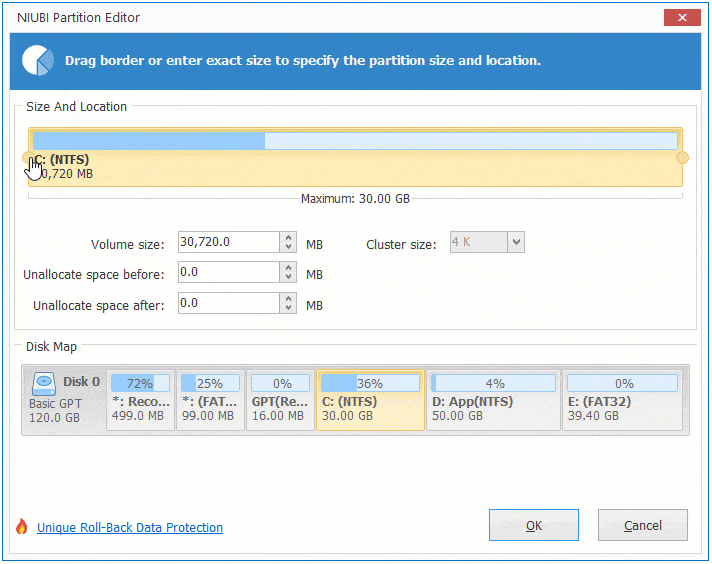
Unallocated space is generated on the left side of C drive.
If you drag right border towards left in the pop-up window:
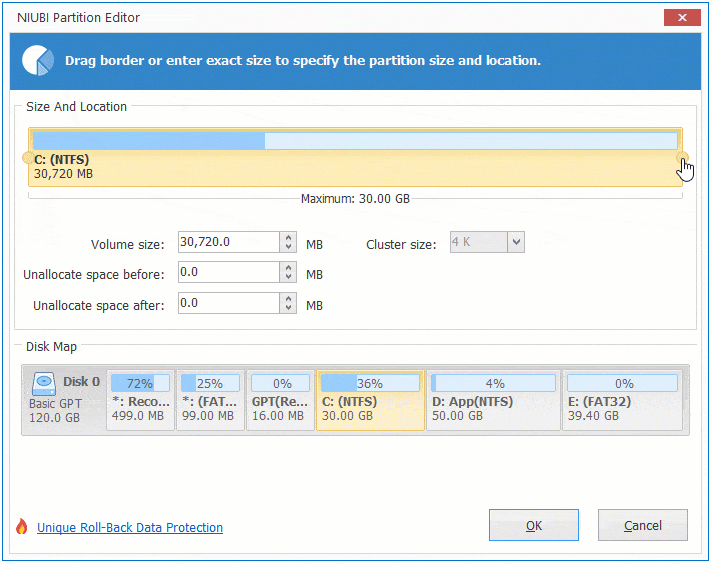
Unallocated space is generated on the right side of C drive.
How to resize data volume (D) in Windows 10
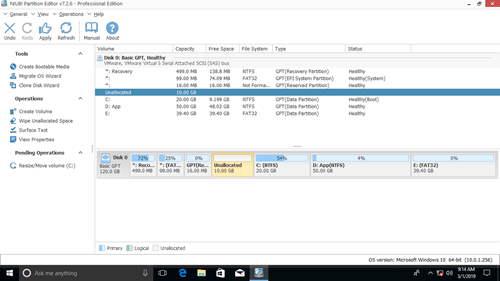
Similarly, you can resize partition D to smaller size. If you want to create new partitions, right click the Unallocated space and select «Create Volume«.
If you want to extend C drive, generate Unallocated on the left side of D when resizing.
And then right click C and select «Resize/Move Volume» again, drag the right border rightwards to combine the Unallocated space.
If you want to extend E drive, generate Unallocated on the right side of D when resizing.
And then right click E, select «Resize/Move Volume» again, drag the left border leftwards to combine the Unallocated space.
If you want to shrink E to expand C volume, you need an additional step to move Unallocated space from right side of D to the left.
To do this, right click D and select «Resize/Move Volume«, drag the middle position towards right in the pop-up window.
In Summary
To resize disk partition on Windows 10, the native Disk Management is useless in most situations. To accomplish this task, NIUBI Partition Editor is much faster and easier. You just need to drag and drop on the disk map to shrink and extend partition.
Besides moving and resizing volume partition, it helps you do many disk and partition management operations.
3 Ways to Resize Partition Windows 10 without Losing Data
Why should we resize partition Windows 10 and how to do that? Luckily, in the following tutorial, you will not only understand the reason, but also, you’ll learn the 3 best ways to resize any partition without losing data on your Windows 10 computer.

By Michael  / Last Updated March 17, 2021
Question
Recently, I bought a new Dell PC and after starting it, I found there was only one partition C. I just want to know how I can resize this partition Windows 10 to create other partitions so that I can manage various files with ease. Can anybody help?
— Question from microsoft.com
Why should we resize partition Windows 10?
For Windows 10 computer owners like us, sometimes, we need to change the size of certain partitions for different purposes. For example, when we bought a new PC, there is usually only one partition on the disk and in this case, we have to manually shrink it to create unallocated space and use the unallocated space to create another partition. Or over time, the storage space on the system C drive may no longer be enough and it worsens the performance of our PC. So, we have to extend the C drive to make our PC run better.
Of course, there’re still many other reasons why we should resize partition Windows 10, but this is not what we should be concerned about in this post. What we need to know is how to resize partitions safely? If you still have no idea how to get it done, then, don’t worry, just keep reading and you’ll find the answers soon.
3 ways to resize partition on Windows 10 PC without data loss
To resize partition Windows 10 without data loss, here, I listedВ the 3 safest ways. Choose the method you prefer in terms of your own needs.
Way 1. Use third-party freeware
When it comes to disk partition management, there is quite a lot of software on market claiming to help resize disk partition on Windows 10 but none of them is as pragmatic as AOMEI Partition Assistant Standard. Why am I so fond of this software? First, it can not only help me resize partition by shrinking and extending without data loss, but also, it provides many other useful features like partition clone, partition wipe, and partition format. Then, this software is totally free and it contains no bundleware that is adverse to your PC.
Free download the most powerful disk manager software to resize partition Windows 10 free.
в–є Shrink a partition
Sometimes, you may need to shrink a partition to create unallocated space for other partitions. Follow the steps below to learn how to do that.
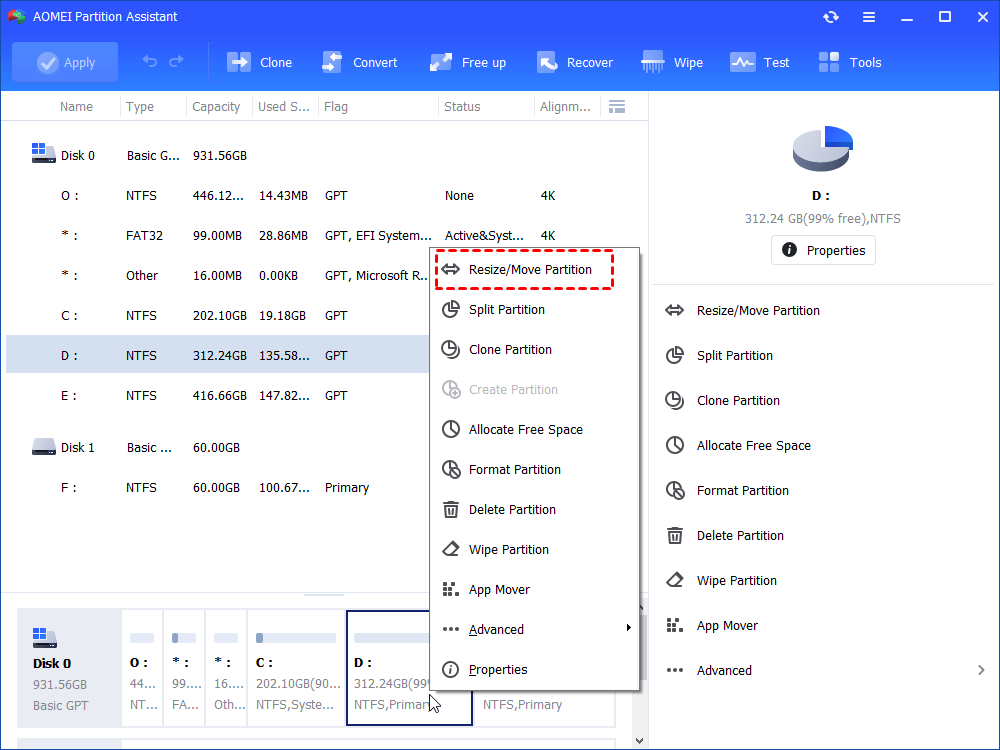
Step 1. Launch and install AOMEI Pa rtition Assistant Standard. Then, all disks and partitions will be listed on the interface.
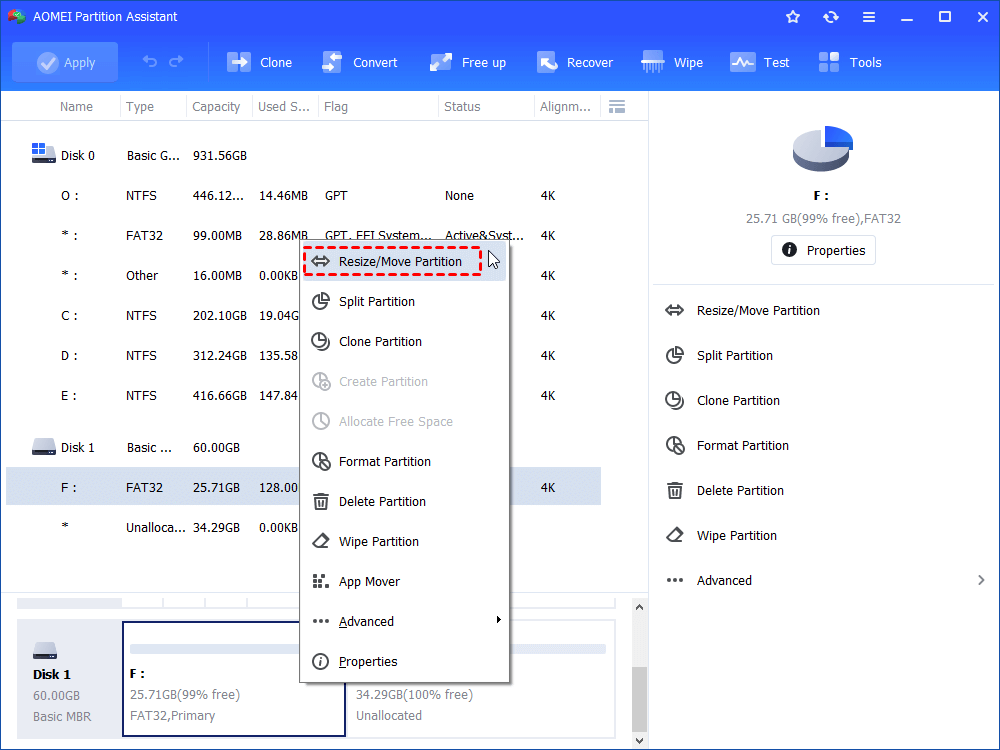
Step 2. Right-click on the partition you wish to shrink and select “Resize/Move Partition”.
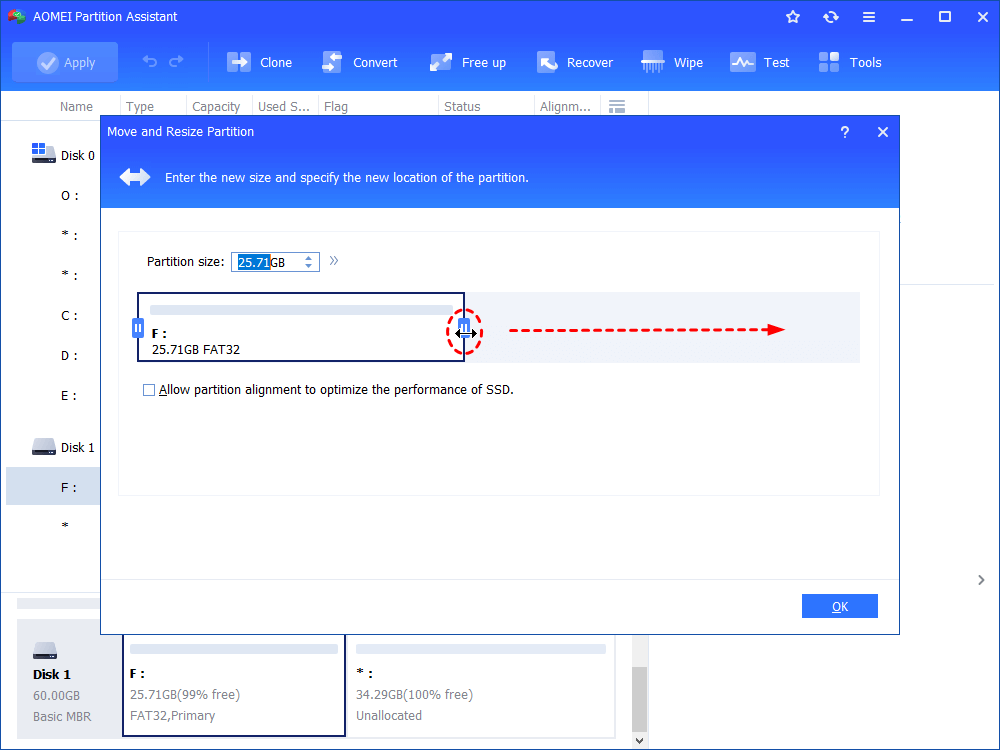
Step 3. In the popup window, adjust the length of the green bar by dragging the circle on both sides to determine the size of the space to shrink. When it’s done, click on “OK”

Step 4. After returning to the main interface, click on “Apply” on the upper left side and then, hit “Proceed” to start the shrinking operation.

в–є Extend a partition with 2 methods
Generally, with AOMEI Partition Assistant Standard, there’re 2 major methods to extend a partition. Let’s start with the first method.
Part 1. Extend by resizing
Note: To apply this method, there must be a piece of unallocated space on either side of the partition you wish to extend.
Step 1. Locate the partition you want to extend, right-click on it, and select “Resize/Move Partition”.
Step 2. Now, you can find there is a segment of white bar that is contiguous to the green bar. The white bar is the unallocated space mentioned above. Drag the circle to eliminate the while bar to extend the partition. When it’s done, still, click on “OK” to return to the main interface.
Step 3. Click on “Apply” to start the extension.
Part 2. Extend by merging
When there is a piece of unallocated space on your disk but it’s not contiguous to the target partition, you can extend the partition by merging the unallocated space into it with this freeware.
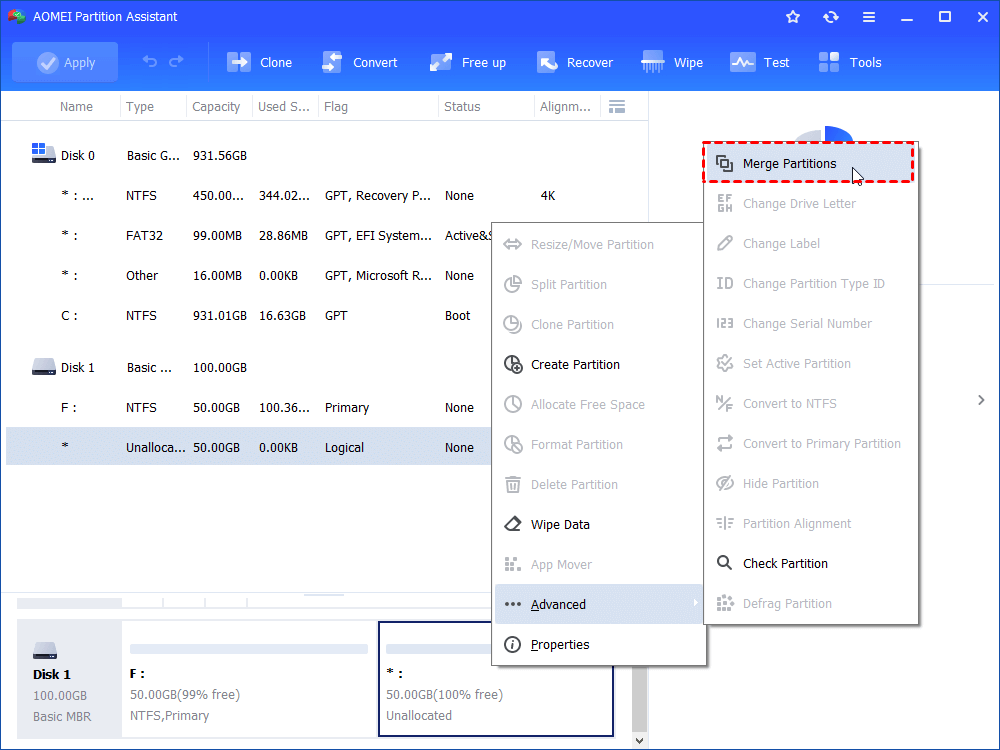
Step 1. Right-click on the unallocated space, right-click on it, and select “Merge Partitions”.
Step 2. In the popup window, all partitions on your disk will be shown. Tick off the partition you want to merge the unallocated space into and click on “OK”.

Step 3. Hit “Apply” and then “Proceed” to start the merging process.
Way 2. Resize Partition Windows 10 Command Line
In computing, DiskPart is a utility provided by Microsoft after Windows 2000 that enables you to manage your drives by giving different commands. So, of course, with this utility, you can resize partitions on your Windows 10 computer.
в–є Shrink a partition
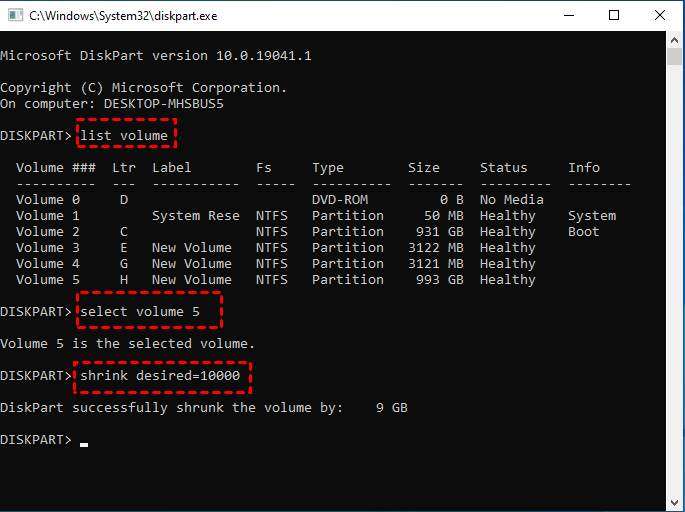
1. Type “diskpart” in the search box on the taskbar and hit “ENTER”.
2. Type “list volume” and hit “ENTER” to list all partitions on your PC.
3. Type “select volume x” and hit “ENTER”. “x” represents the target partition.
4. Type “shrink desired=”xxxxx” and hit “ENTER”. “xxxx” represents the size to be shrinked.
в–є Extend a partition
Limit: To extend a partition with DiskPart, there must be enough unallocated space on the right side and contiguous to the target partition. Also, the partition to be resized is supposed to be RAW or NTFS.
1. Type “diskpart” in the search box on the taskbar and hit “ENTER”.
2. Type “list volume” to bring all partitions on your PC.
3. Type “select volume x” and hit “ENTER”. “x” refer to the target volume number.
4. Type “extend size=”xxxxx” and hit “ENTER”. “X” refers to the size of space.
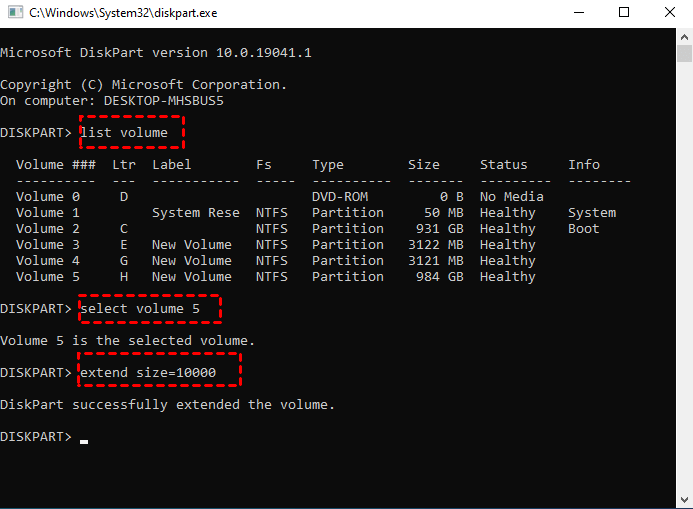
If there is no unallocated space on the right side and contiguous to the partition you’re going to extend, the warning “There is not usable space for this operation” will pop up. In this case, you must delete the partition which is next to the target partition.
Way 3.В Try Disk Management
Another Windows 10 inbuilt program that helps resize partitions is called Disk Management. With this utility, professional users are able to perform many operations including partition shrink, partition extend, partition format, and partition delete.
в–є Shrink a partition
1. Right-click on “This PC” on your desktop, select «Manage», and click on «Disk Management».
2. On the right part of the window, you can find all your disks and partitions. Select the partition you wish to shrink, right-click on it and select “Shrink Volume”.
3. In the popup window, input the amount of space to shrink in MB and hit “Shrink”.
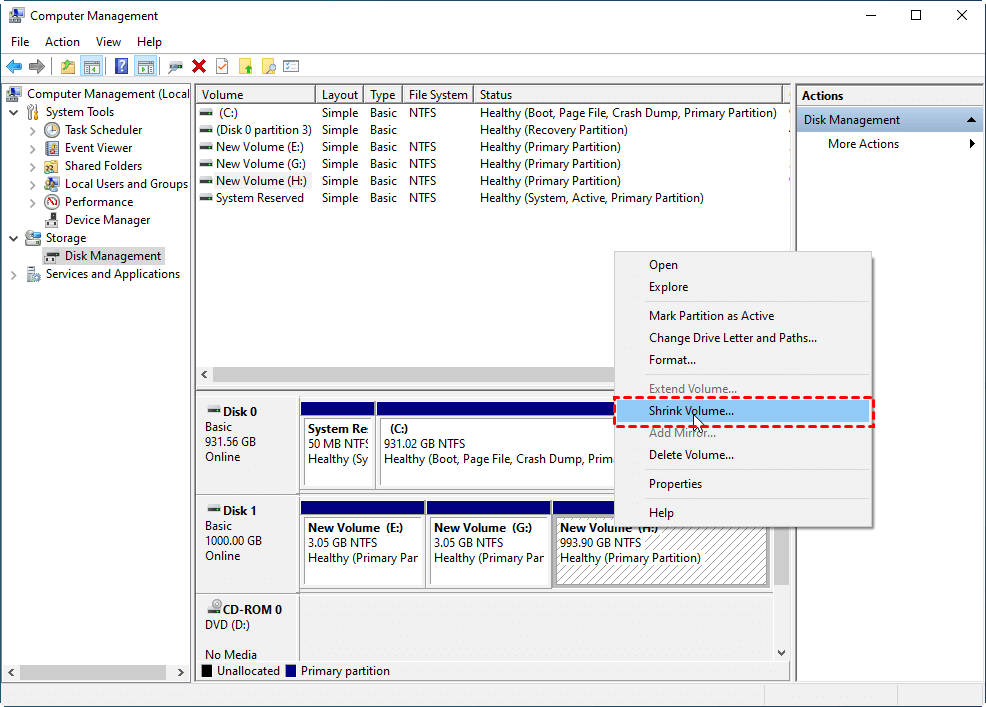
в–є Extend a partition
Limit: There must be enough unallocated space on the right side of the target partition to extend and also, they should be contiguous to each other. Moreover, the volume to be extended must be in RAW or NTFS.
1. Open Disk Management as mentioned above.
2. Right-click on the partition you want to extend.
3. Select “Extend Volume”.
4. Follow the wizard until you click on “Finish”.
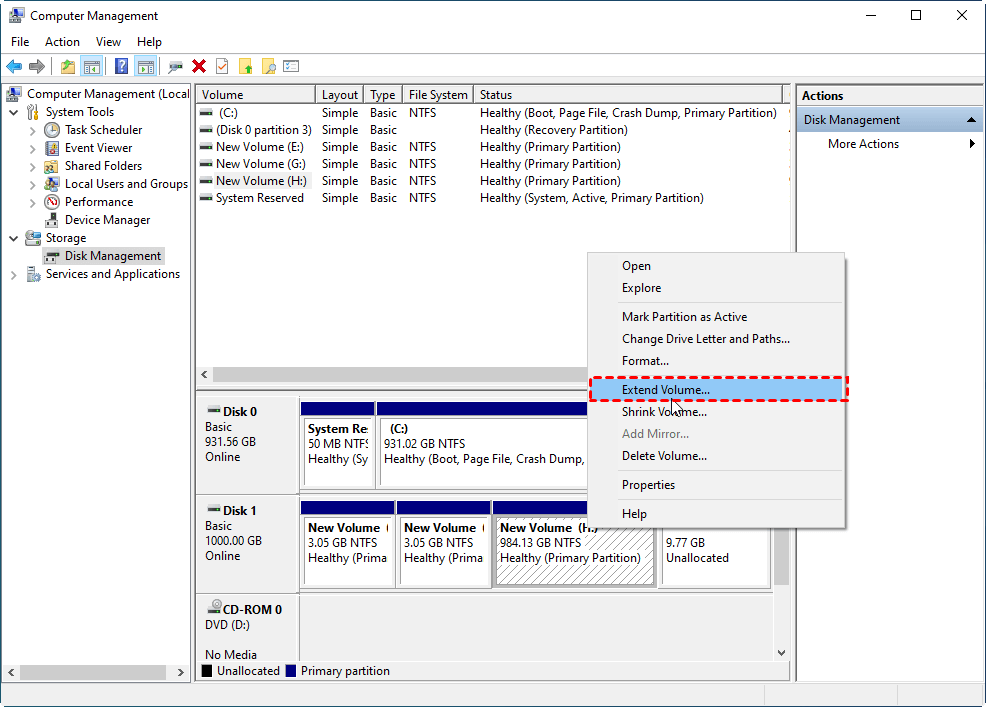
If there is not unallocated space next to the target partition you’re going to extend, “Extend Volume” will be greyed out. In this case, it’s necessary to delete the partition that is next to the target one.
Conclusion
Why should we and how to resize partition Windows 10? In the article above, you’ve learned the reason and the most pragmatic ways to perform it. However, in DiskPart and Disk Management, there are limits that affect your user experience. As a better alternative, AOMEI Partition Assistant Standard helps resize Windows 10 partition without the limits of the location of the unallocated space and the type of the file system. As for this powerful software, if you want to try more features like splitting partition and allocating free space from one drive to another, please upgrade it to Pro version.


