- [2021 Update]How to Resize EXT4 Partition in Windows 10
- Content
- About Resizing EXT4 Partition in Windows 10
- Can Windows 10 resize ext4 partition
- Resize EXT4 partition under Windows without losing data
- How to Resize EXT4 Partition in Windows 10 with EaseUS Partition Master
- Furthermore — EXT4 Partition Reader under Windows 10
- FAQ about resizing EXT4 partition in Windows
- Как изменить размер раздела Linux
- Работа с разделами в GParted
- Меняем размер разделов диска с помощью fdisk
- Earl C. Ruby III
- Getting rid of self-resizing windows in Ubuntu Linux 12.04
- 24 thoughts on “ Getting rid of self-resizing windows in Ubuntu Linux 12.04 ”
[2021 Update]How to Resize EXT4 Partition in Windows 10
«Does anyone know how to resize ext4 partition under Windows? I find the most common answer is to download Ubuntu operating system, but stitching two OS is not my ideal choice. Can you recommend some solutions to help me resize Linux partition without data loss?»
It is well known that we can use GParted to resize EXT4 partition under Linux operating system. What is the method under the Windows environment? EaseUS Partition Master is a powerful partition manager, which supports several file systems, including NTFS, EXT4, EXT3, EXT2, FAT32, FAT16, FAT12, ReFS. You can resize EXT4 partition in Windows 10 easily.
Content
About Resizing EXT4 Partition in Windows 10
Ext4 is a journaling file system for the Linux system, developed as the successor to EXT3.В
Resizing disk partition is useful for improving hard disk performance. Partitioning is convenient for managing disk space and defragmenting disks. Improve the efficiency of the use of disk space without wasting storage space.
Can Windows 10 resize ext4 partition
If you visit the technical blog to ask how to resize Linux partition in Windows, many people will suggest to install dual system for your computer. Because Windows does not support ext4 partition under Linux, not to mention resizing EXT4 partition.В
Windows still provide two disk partition methods to resize partition — Disk Management and Diskpart cmd. But none of them can create EXT4 partition, even resize EXT4 partition under Windows. You can’t view EXT4 on windows like you see NTFS system on Linux.
Resize EXT4 partition under Windows without losing data
The non-destructive EXT4 partition of the hard disk refers to the adjustment of the partition without destroying the original data in the hard drive (for example, resizing, dividing one area into two areas, adding new partitions, etc.).В
Most of the time, there is no risk to partition hard drive. Although, it is still necessary to back up essential data in case of any unexpected disasters. It is recommended to back up the data before proceeding.
We recommend that you choose your EXT4 partitioning software carefully because some partitioning software is not 100% secure. EaseUS Partition Master is aВ good partition software. It is easy to operate and master.
How to Resize EXT4 Partition in Windows 10 with EaseUS Partition Master
In this guide, we provide EaseUS Partition Master to resize the EXT4 partition. You can trust this all-in-one partition tools for data security.
EaseUS Partition Master contains many features such as create, merge, create, format, delete partitions. Besides, it can migrate OS, and clone a hard drive.
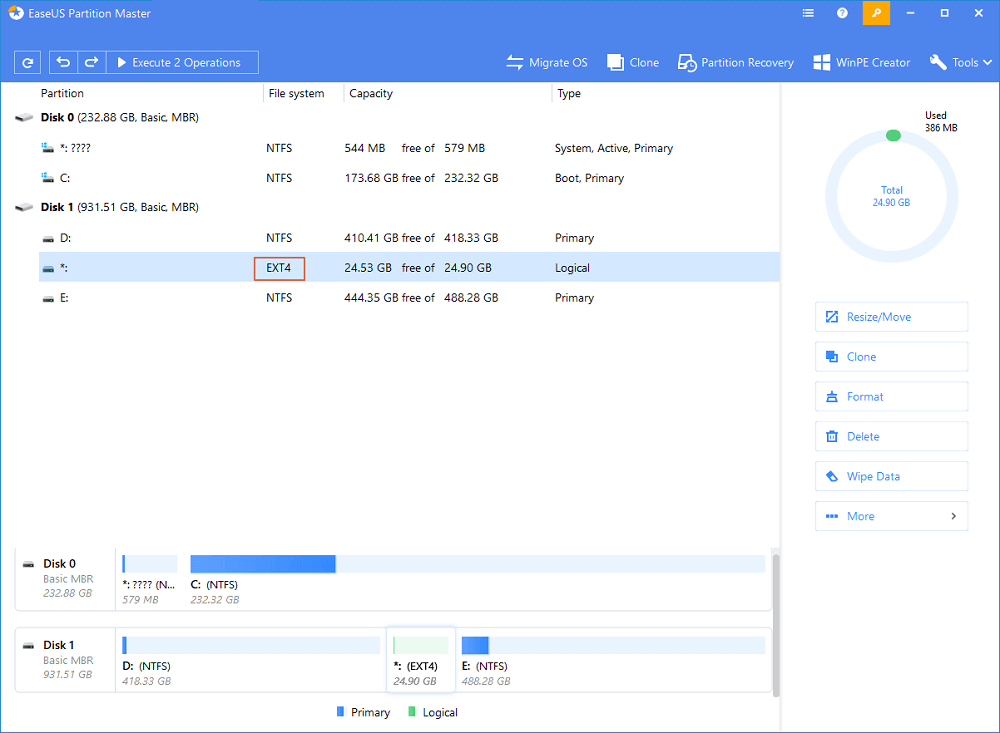
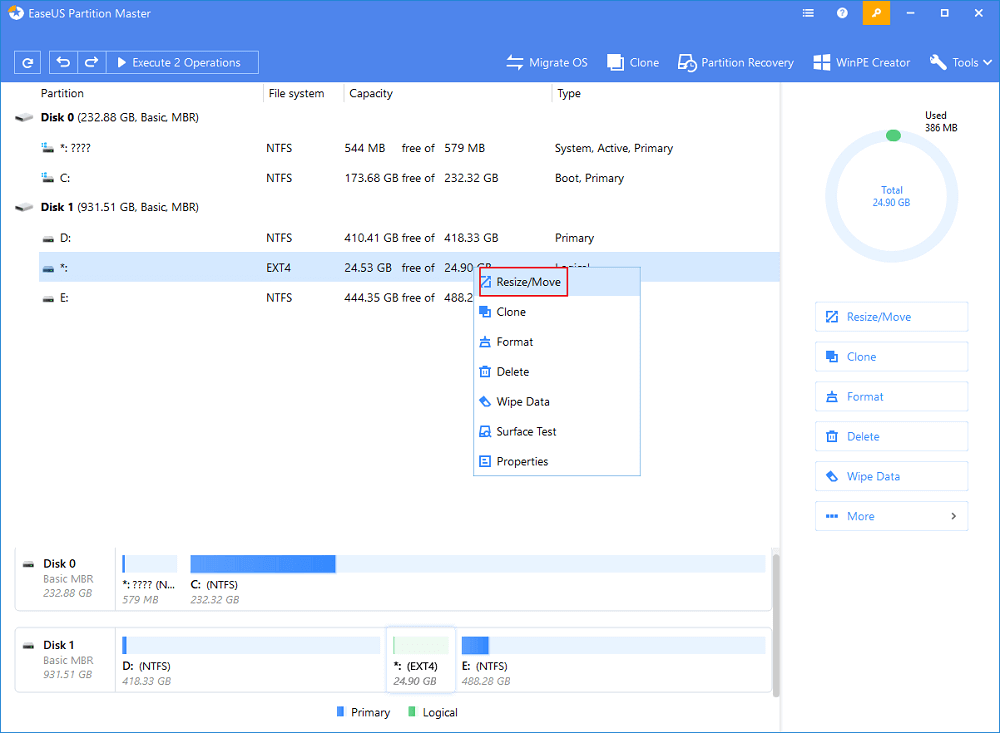
Step 1: Locate and right-click the EXT4 partition, select «Resize/Move».
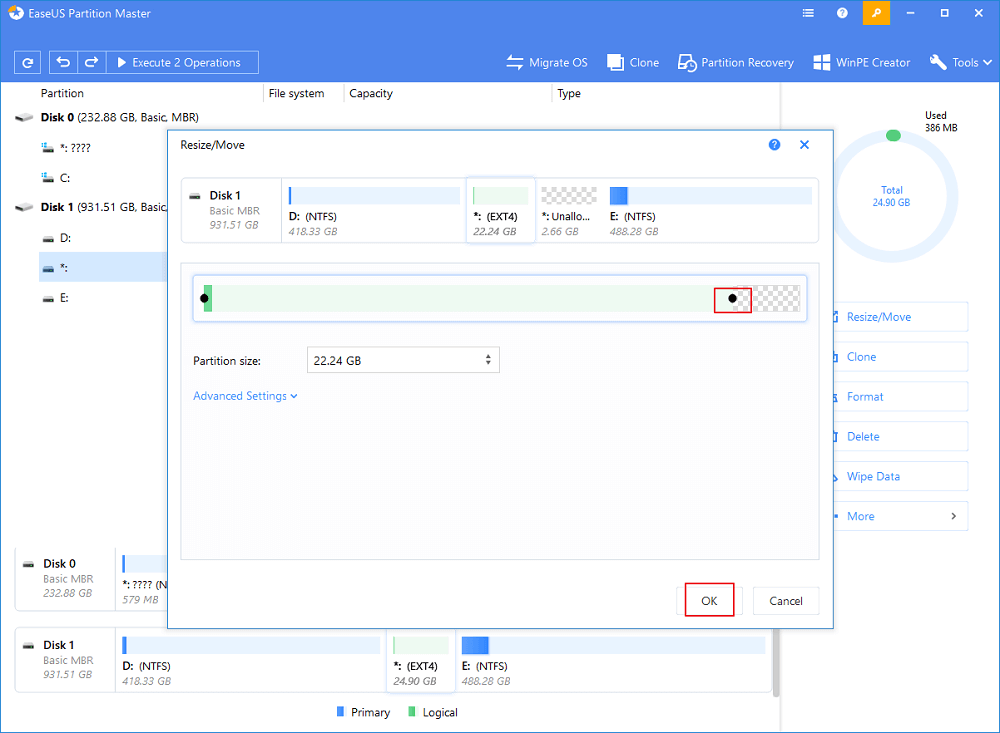
Step 2: Drag the dotВ leftward or rightward to resize theВ partition space.
Or you can drag the whole partition to switch its position with the neighbor unallocated space.В And click «OK» to confirm.
Step 3пјљClick «Execute Operation» and click «Apply» to save all the changes.
Furthermore — EXT4 Partition Reader under Windows 10
Ext2Fsd supports EXT2/3/4, but only for read Linux partition.В
Features:
- View and copy EXT2/3/4 files and folders.
- LVM2 Support.
- LRU based block cache for faster concurrent access.
- EXT4 Extents support.
- Recursively copy whole directories.
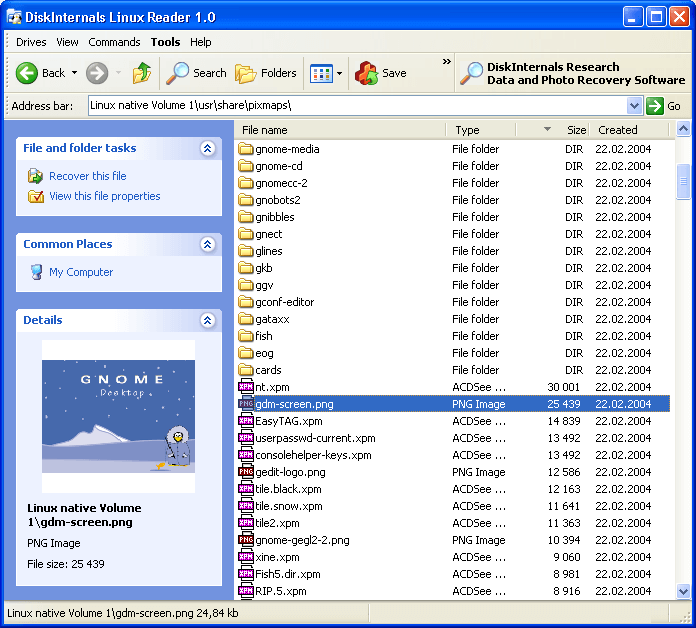
Linux Reader supports EXT2/3/4, HFS, and ReiserFS, only for read.
It is a popular and free software product. You can read more file systems including Ext2/3/4, ReiserFS, Reiser4, HFS, HFS+, FAT, exFAT, NTFS, ReFS, UFS2, RomFS(reader), ZFS (preview only*), XFS (preview only*) and Hikvision NAS and DVR (preview only*).
Ext2Fsd is an open-source Linux EXT2/3/4 file system. It supports reading and writing.

Features:
FAQ about resizing EXT4 partition in Windows
1. Can I resize EXT4 Linux partition under Windows?
Windows doesn’t support EXT4 file system and you can’t read and write data into it. And it is also impossible to resize EXT4 partition under Windows without utilizing a third-party partition tool.
2. Is there any risk of resizing EXT4 partition under Windows?
If your disk has the necessary files, you have better backup your documents. And you can install a third-party partition manager — EaseUS Partition Master. It is designed for Windows to resize EXT4 partition to avoid partition risk.
3. How do I resize EXT4 partition in Windows 10?
- Install and run EaseUS Partition Master.
- Select the EXT4 partition you want to resize.
- Drag the storage bar to set partition size and click OK.
4. Can Windows 10 read and write EXT4 partition?
- Read-only: Ext2Read and DiskInternals Linux Reader.
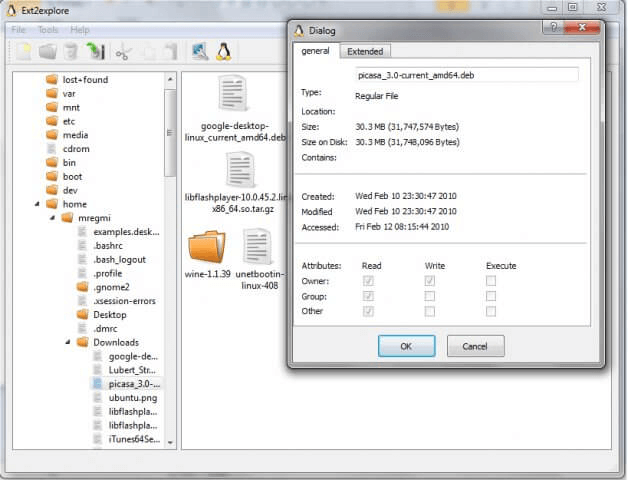
Ext2Read is an explorer-like utility to explore EXT2/3/4 files. It can also be used to view and copy disk and data.
Linux Reader will act as a bridge between your Windows and Linux Ext2/3/4 file system. This easy-to-use tool runs under Windows and allows you to browse the Linux Ext2/3/4 file system. It also extract files from there, providing an access mode for the resource manager.В
- Read and Write: Ext2Fsd
It directly supports reading and writing of ext2/ 3/4 partitions. But support for ext4 is limited.
Как изменить размер раздела Linux
Изменение размеров логических томов в Linux осуществляется сложнее, нежели в Windows, что связано с особенностями использования консольных команд и доступных графических приложений. Однако эта задача под силу любому пользователю, и приведенные далее инструкции помогут разобраться с тем, как выполнить ее быстро.
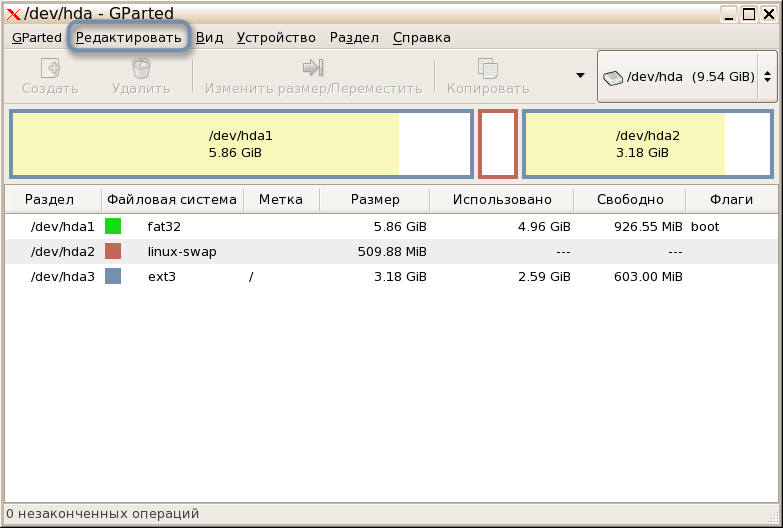
Работа с разделами в GParted
Не все юзеры Linux предпочитают использовать терминал, когда можно обойтись без него. К тому же новички в этой операционной системе не особо желают разбираться с активацией сложных команд. Поэтому в качестве первого варианта предлагаю ознакомиться с использованием программы GParted, которая представляет собой полноценную систему управления дисками.
GParted по умолчанию установлена в большинстве популярных дистрибутивов и их оболочках. Однако если при запуске окажется, что она отсутствует, используйте менеджер приложений или пользовательские репозитории для стандартной процедуры инсталляции. После этого приступайте к выполнению следующей инструкции.
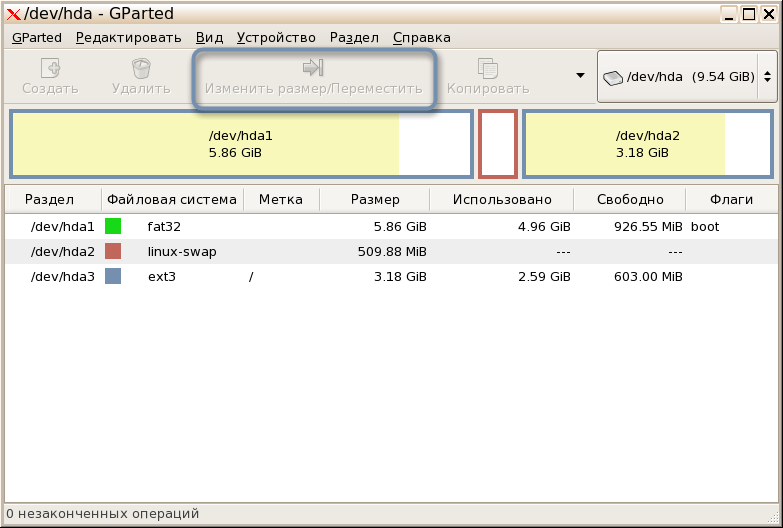
- Запустите приложение через терминал, введя там gparted, или нажмите по созданному значку. В главном окне сразу можно выбрать диск, размер которого необходимо изменить, и нажать по кнопке «Изменить размер/Переместить» .

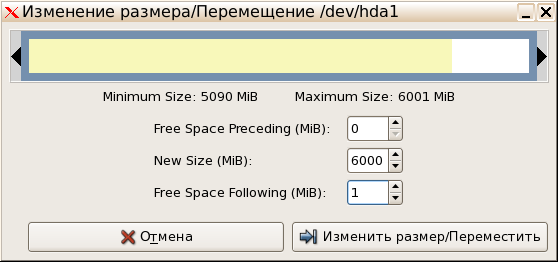
- Отобразится новое окно, где вы можете добавить свободное пространство к диску или же сжать том, освободив тем самым определенное количество мегабайт. Как только выставите новые настройки, подтвердите действие, чтобы закрыть это окно.
- В главном меню разверните всплывающее меню «Редактировать» и нажмите «Применить все операции» .
- В новом окне следите за прогрессом операции, а по ее завершении можете убедиться в том, что размер был успешно изменен.

Если все пространство уже распределено по разделам, учитывайте, что сначала его придется вернуть к нераспределенному, сжав один или несколько логических томов. Затем свободные мегабайты уже можно будет отнести к новому тому, расширив его.
Меняем размер разделов диска с помощью fdisk
Более гибкий, но сложный вариант изменения размера диска в Linux подразумевает использование консольной утилиты fdisk. Для выполнения расширения тома на все свободное пространство понадобится выполнить более десятка разных действий, но на все про все уйдет не больше 10 минут.
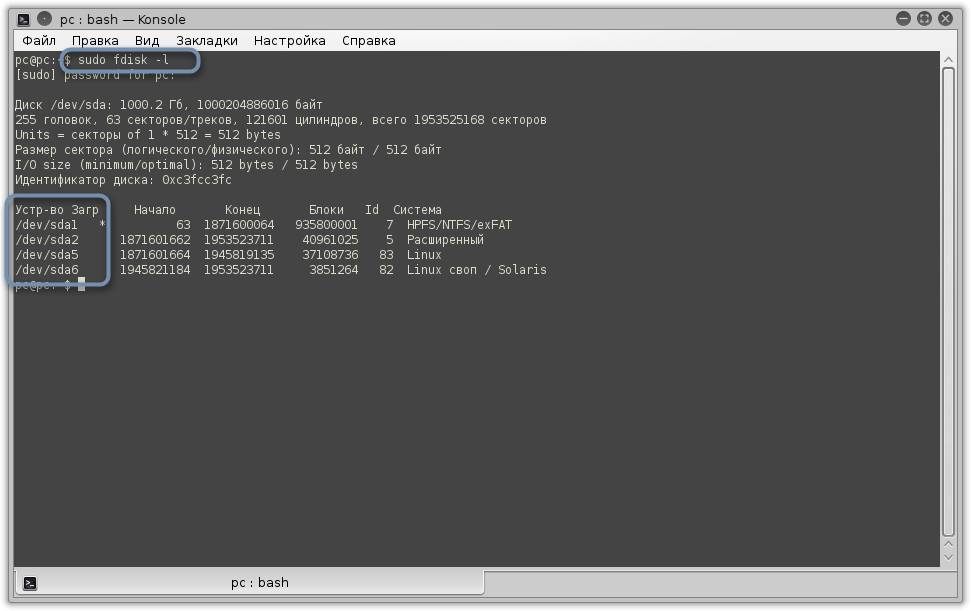
- Если вы пока не знаете, под какими метками располагается сам диск и его логические тома, используйте команду sudo fdisk -l, отобразив список со всеми секторами.
- Используйте команду umount /dev/sdb2 для размонтирования раздела. Замените его название на необходимое и учитывайте, что корневой том размонтировать так просто нельзя, понадобится загрузка с LiveCD.
- Далее укажите fdisk /dev/sdb , подключившись тем самым к указанному диску.
- Посмотрите все разделы, введя p и нажав на Enter .
- За удаление отвечает d; после активации этого атрибута понадобится ввести цифру раздела, который вы хотите удалить (при этом форматирования не происходит, все данные сохраняются).
- Последовательно активируйте n (новый раздел), p (основной) и 2 (замените на номер тома). При появлении уведомления о создании первого и последнего сектора подтверждайте операцию нажатием на Enter .
- Проверьте список томов еще раз через p , а затем нажмите w для сохранения изменений.
Осталось только указать файловой системе, что размер тома был расширен до максимального, поскольку пока отображается старое значение. Для этого сначала определите используемую файловую систему через df -T . Введите одну из трех следующих команд, отталкиваясь от полученной информации:
Для ext2/ext3/ext4 :
XFS :
Reiserfs :
В командах номера разделов указаны в качестве примеров, вы же заменяете их на свои. Еще оставлю пример команды для монтирования диска, если ранее он был отключен:
Сделать это нужно уже после внесения всех изменений.
Для уменьшения размера раздела используйте последовательность команд:
После ввода последней снова используйте последовательную активацию букв так, как это было показано в предыдущей инструкции, чтобы создать новый раздел. Кроме того, не забудьте смонтировать его обратно!
Earl C. Ruby III
this must be the place

Getting rid of self-resizing windows in Ubuntu Linux 12.04
I’ve been using a pre-release “daily build” installation of Ubuntu 12.04 “Precise Pangolin” and noticed that current default for Gnome is for windows to resize themselves when you get close to the edge of the screen. I have two 22″ widescreen monitors and if I moved a window near the top edge it would maximize and fill the screen. If I moved a window to any edge Gnome would decide for me that what I “really” wanted was to enlarge the window to fill half the screen or do something else equally annoying. This might work well on a 10″ netbook screen, but on dual 22″ monitors it’s annoying as hell.
I tracked the problem down to a setting in Compiz, the screen compositing tool used by many Linux desktop environments, so if you’re using KDE or Unity with Compiz and you’re finding self-resizing windows irritating this fix should work for you as well.
To fix the problem you need to install the CompizConfig Settings Manager, so fire up Synaptic Package Manager and search for “compizconfig-settings-manager” and install it.
Once installed, if you’re using Gnome go to Applications > System Tools > Preferences and click “CompizConfig Settings Manager” to start the tool.
Scroll down to “Window Management.”
Uncheck “Place Windows”.
Leave “Grid” checked, but click the word “Grid” to get the Grid settings, then go to the Edges tab and change all Resize Actions to “None”.
Now your desktop will do what you tell it to do, rather than second-guessing you and doing something that you do not want.
One thing that you can now do (that you probably really don’t want) is to have the title bar (and it’s controls) move off-screen, which means you can’t move or resize the window unless you Alt-right-click on it. To fix that issue:
Check the “Put” plugin.
Click the word “Put” to bring up more options, go to the “Misc Options” tab, check “Avoid Offscreen”, click Back, then Close Window.
Hope you find this useful.
24 thoughts on “ Getting rid of self-resizing windows in Ubuntu Linux 12.04 ”
I actually like that behavior, though I’m still using Ubuntu 10.04, so I just set up my windows like that using a keyboard shortcut. IMO the mouse snap is a useful thing once you get used to it, but then again I liked the idea before it became a common thing.
Something that I feel is useful: assuming you’re clicking on the title bar and dragging to move windows, I’d recommend holding alt and left clicking anywhere in the window to move them instead. Gives you a larger target and generally you avoid the snap unless you really want it.
Thank you. I’ve newly installed Ubuntu 12.04 and had to reinstall from scratch once the autoupdate-install botched things. Getting everything back to a useful state, this has been an issue in graphics programs (Gmp windows were snapping and causing unintentional lines when the canvas moved under the brush because a window was jumping to the screen borders at odd times) which I’m hoping is now fixed.


