- How to Remotely Shutdown or Restart a Windows Computer
- Remote Shutdown Overview
- Remote Shutdown via Command Prompt
- Remote Shutdown via Shutdown Dialog
- Remote Shutdown via Batch File
- How to Restart or Shutdown a Remote Computer
- Windows Shutdown Command
- Restart or Shutdown Examples with Command Line
- Example 1: Restart Remote Computer
- Example 2: Restart With a Custom Message
- Example 3: Immediate Restart no Countdown
- Example 4: Log user off remote computer
- Restart or Shutdown with Powershell
- Example 1: Use Powershell to restart a computer
- Example 2: Use PowerShell to shutdown a computer
- Example 3: Use PowerShell to restart a list of computers
- Example 4: Use PowerShell to shutdown down two computers
- How to Restart Remote Computer on Windows Systems
- How to Enable Remote Reboot
- How to Allow Remote Reboot in Firewall
- How to Find the Computer Name
- How to Restart a Computer Using the Command Line
- Use Powershell to Restart a Computer
- Use Powershell to Restart a List of Computers in Your Company Network
- How to Restart Remote Computers Using Action1 Solution for Businesses
- Get Started with Action1 Cloud Solution.
- Start free now, scale up later. Use free forever to manage up to 50 endpoints.
How to Remotely Shutdown or Restart a Windows Computer
3 different ways to flip the switch
This article will show you how to use the remote shutdown command tool in Windows to remotely shutdown or restart a local or networked computer. This can be very useful sometimes if you have multiple computers at home or on your network that you want to quickly shutdown or restart.
You can even remotely shutdown a computer over the Internet, but you would first have to either VPN into the network or into the target computer you want to shut down. I’m not going to cover VPNs in this article, but if that’s something you want to do, feel free to Google it.
You can perform a remote shutdown from the command prompt using the shutdown command and its associated switches, from the remote shutdown dialog box, or from a batch file. I’ll go through all three methods in this article.
Remote Shutdown Overview
In order to get this to work, there are a couple of steps you have to complete first otherwise you’ll constantly get an Access is Denied (5) error message and it will drive you mad.
Step 1: Firstly, in order to remotely shutdown a computer on your network, you’ll need to make sure you have Administrative access to the target computer. If you’re on a home network, the best way to do this is to make sure all computers are in the same workgroup and that they all have at least one Administrator account with the same username and password.
You don’t have to use the built-in administrator account on either computer for this to work, but the user account you do use on both computers has to be part of the Administrators group on the local computer. If you go to Control Panel and click on User Accounts and it says Administrator or Local Administrator, then you’re fine. Again, the names of the user accounts and the password have to be the same.

If you’re in a corporate environment with a domain, you will probably want to login using the domain administrator account. Using those credentials, you should be able to shutdown any other computer on the network, even if they are logged in using different credentials.
Step 2: The second step is to turn on File and Printer Sharing and to allow it through the Windows firewall. To do this, go to Control Panel and click on Network and Sharing Center first. Click on the Change advanced sharing settings link in the left menu and select the radio button for Turn on network discovery and Turn on file and printer sharing.

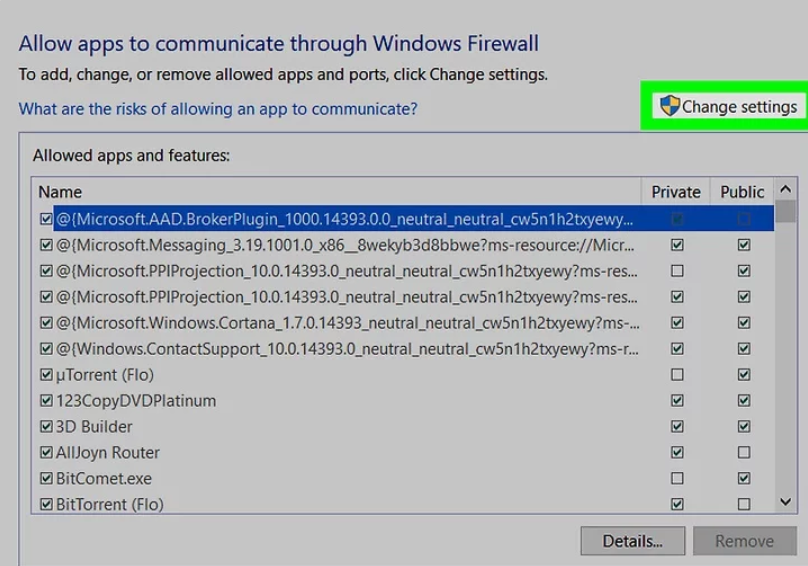
Go back to the main Control Panel window and click on Windows Firewall. Click on the Allow a program or feature through Windows Firewall in the left menu.

Make sure you only check the Home/Work (Private) box and not Public. You do not need to allow anything else through the firewall. You might read on other sites to allow WMI, Remote Shutdown, Network Discovery, etc, but I’ve tested it without any of those and it works just fine.
Step 3: Lastly, if you are trying to target a Windows Vista, Windows 7 or Windows 8 computer remotely, you will need to modify the registry. Unless you do this, it simply won’t work. You will only get the Access is Denied message no matter what.
Open the registry editor by going to Start and typing in regedit. Now navigate to the following key:
HKEY_LOCAL_MACHINE – SOFTWARE – Microsoft – Windows – CurrentVersion – Policies – System
Right-click on System on the left hand side and choose New – DWORD (32-bit) Value.

A new value will pop up at the bottom in the right window and the text will be highlighted. Change the name to LocalAccountTokenFilterPolicy and press Enter. Now double-click on it and change the value from 0 to 1.

Click OK and close out of the registry. You don’t need to restart the computer as the changes should take effect immediately. This registry key is needed because in Windows Vista and higher, an administrator account is stripped of its credentials when connecting remotely. This will allow the account to remain with administrative privileges.
You’ll also read on other sites to start the Remote Registry service if that’s not running and to edit the local security policy by adding the Everyone group to Force shutdown from a remote system policy setting. In my testing on Windows 7 and 8, there was no need to complete these tasks and you really shouldn’t because it opens up your system to potential hackers.
Obviously, you’ll also need to know all the names of the other computers on the network. You can do that by going to Control Panel and then clicking on System.

Remote Shutdown via Command Prompt
The shutdown command is most flexible when using it from the command prompt because you can add a bunch of switches to it, which allow you to customize the behavior. Go to Start, then Run, and type in CMD. You can see the list of switches by typing shutdown /? in the command window.

You have to use at least one switch in order for the command to do anything. Basically you would type in shutdown /x /y /z where x, y, z are letters in the list above.
Here are a couple of the most common command switches and the actions they perform:
/s: Shuts down the computer
/r: Restarts the computer
/m \\computername: The target remote computer to shut down
/f: Forces programs to close immediately
/t: Will wait a certain amount of time in seconds before shutting down or restarting
/a: Aborts a shutdown if you used a previous shutdown command with /t.
So for remotely shutting down another machine on your network, you would type into the command prompt the following commands:
This command will restart the computer named computername and force all programs that are still running to close.
shutdown –m \\computername –s –f –c “The computer will restart, please save all work.” –t 60
This command will shutdown the computer named computername, force all programs that are running to close, show a message to the user and countdown 60 seconds before it shuts down.

Remote Shutdown via Shutdown Dialog
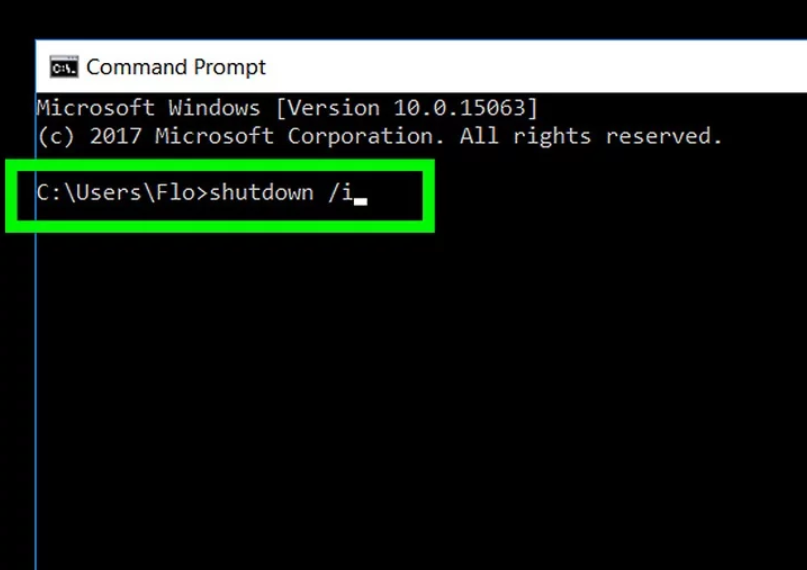
If you don’t like all those switches or using the command prompt in general, then you can bring up the shutdown dialog box. You can do that easily by just using the /i command switch for the shutdown command.

The remote shutdown dialog will now appear as shown below.

Click the Add or Browse button to add computers to the list. You can then run the commands on the entire batch of computers. If you click Add, you’ll need to enter in the network name of the computer in the format \\computername or just computername, either works.

Of course, you need to know the actual computer name, which I mentioned how you can determine above. So add as many computers to the list as you like and then set your options. You can shutdown, restart or annotate unexpected shutdown.
You can also display a warning, if you like, for however many seconds you choose and you can type in a comment at the bottom which will be displayed to users. That’s about it!
Remote Shutdown via Batch File
Finally, you can create a batch file so that can do all of this by just running the file. Alternatively, you can schedule the batch file to be run at specific intervals or during specific events using Task Scheduler.
Just go to Notepad and type in the commands you would have typed into the command prompt:
Then simply save the file with a .BAT file extension by choosing All Files for Save as type and add .bat to the end of the file name.

This will restart three computers on my home network. You can put as many commands into the batch file as you like, so feel free to experiment!
I’ve written an extensive post on how to use batch files in Windows, so read that if you are not familiar with batch files or task scheduler. Enjoy!
Founder of Online Tech Tips and managing editor. He began blogging in 2007 and quit his job in 2010 to blog full-time. He has over 15 years of industry experience in IT and holds several technical certifications. Read Aseem’s Full Bio
How to Restart or Shutdown a Remote Computer
There will be times as a Windows Administrator that you will need to reboot or shutdown a remote computer or server.
In this tutorial, I’ll show you two easy methods for rebooting and shutting down remote computers.
The first method uses a built in Windows command and the second method uses PowerShell.
Windows Shutdown Command
Windows systems has a built in shutdown command that can be used to restart or shutdown local and remote computers.
The command is shutdown.
To use this command just open the windows command prompt and type shutdown.
To view the full list of command options type shutdown /? in the CMD window.
There are several command line switches, below I list the most useful options.
/s – Shutdown the computer
/r – restart computer
/m \\computer – Specify the remote computer
/t xxx – Set the time out period before shutdown to xxx seconds
/c “comment” – Message to display on the screen before restart or shutdown
Now lets move onto some examples
Restart or Shutdown Examples with Command Line
In these examples, I’ll be on PC1 and will initiate a remote restart or shutdown on PC2.
I’ll be using the /r switch in these examples, you can change them to /s to shutdown instead of restart.
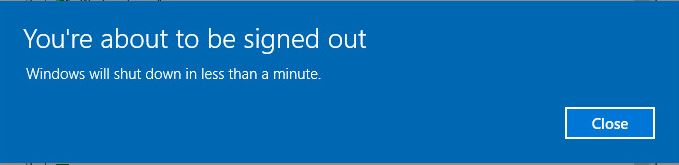
Example 1: Restart Remote Computer
By default, this will prompt the remote computer and give it about a minute before it restarts.
The pop up below is what a Windows 10 system will display.
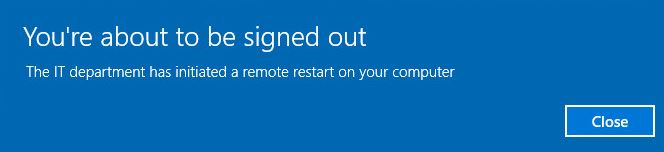
Example 2: Restart With a Custom Message
You may want to display a custom message to the logged on users, to do that just use the /c command.
Below is the pop up on the remote computer with the custom message.
Example 3: Immediate Restart no Countdown
If you want to immediately restart with no countdown or message use this command.
If you want a longer countdown just specify the seconds /t 60
Example 4: Log user off remote computer
If you just want to log a user off the remote computer use this command.
Restart or Shutdown with Powershell
Here are a few examples of how you can restart or shutdown computers with PowerShell.
The downside to PowerShell is it doesn’t have as many options as the shutdown command. There is no option to prompt users with a custom message or provide a countdown.
Example 1: Use Powershell to restart a computer
This command will immediately restart a remote computer. The -Force option will force a restart even if a user is logged on.
Example 2: Use PowerShell to shutdown a computer
This command will shutdown a remote computer. Use the -Force to force a shutdown even if a user is logged on.
Example 3: Use PowerShell to restart a list of computers
This is handy if you have several computers to restart. Just list all the computers you want in a text file and add that to the PowerShell command.
Example 4: Use PowerShell to shutdown down two computers
Recommended Tool: SolarWinds Server & Application Monitor
![]()
This utility was designed to Monitor Active Directory and other critical services like DNS & DHCP. It will quickly spot domain controller issues, prevent replication failures, track failed logon attempts and much more.
What I like best about SAM is it’s easy to use dashboard and alerting features. It also has the ability to monitor virtual machines and storage.
How to Restart Remote Computer on Windows Systems
Author: Peter Barnett Date: Feb 15, 2019
There will be times as a Windows Administrator that you will need to restart remote computer or server. In this tutorial, I’ll show you two easy methods for rebooting remote computers.
A remote computer cannot be restarted using the command line if it is not configured properly and if it is not connected to the same network as another computer.
Fully functional for 50 endpoints, never expires. More details >
How to Enable Remote Reboot
To configure the computer you wish to reboot (hereinafter referred to as the remote computer), first open the Start menu by clicking on the Windows logo in the lower left corner of the screen.
In the Start menu search bar, type ‘services’ to find the Services utility.
When the search results appear, click on the Services utility icon. (It looks like a gear and appears at the top of the Start menu.) A Services menu will open.
If you don’t see the Services icon, type ‘services.msc’ into the search bar and the Services menu will appear.
In the R section of the Services menu, scroll down and right click on Remote Registry.
Select the Properties icon. (It looks like a gray square and folder, and it is located under the View tab at the top of the window.) The Options window will open.
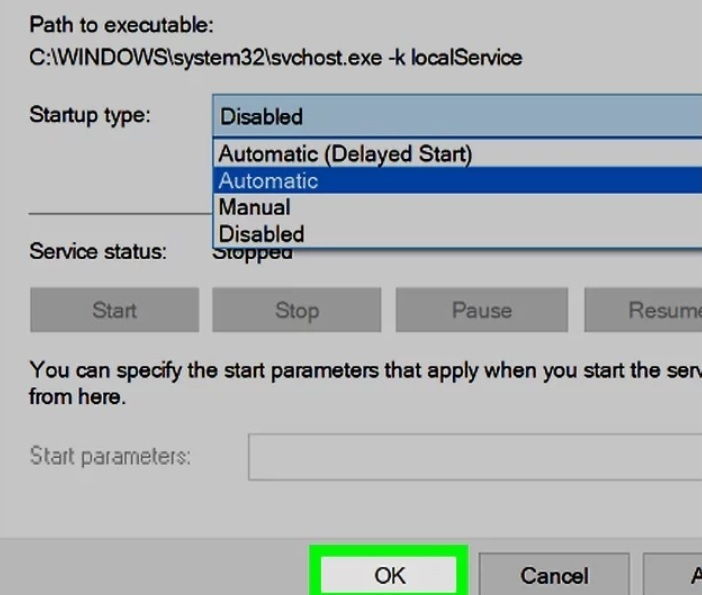
Open the start-up drop-down menu located in the middle of the window.
Select Automatic from the drop-down menu.
Click OK (bottom of the window). The remote reboot function is now enabled on the computer.
How to Allow Remote Reboot in Firewall
Open the Start menu on a remote computer (not the computer from which the reboot command will be sent).
In the search bar of the Start menu, type ‘Firewall’ to find the Windows Firewall program.
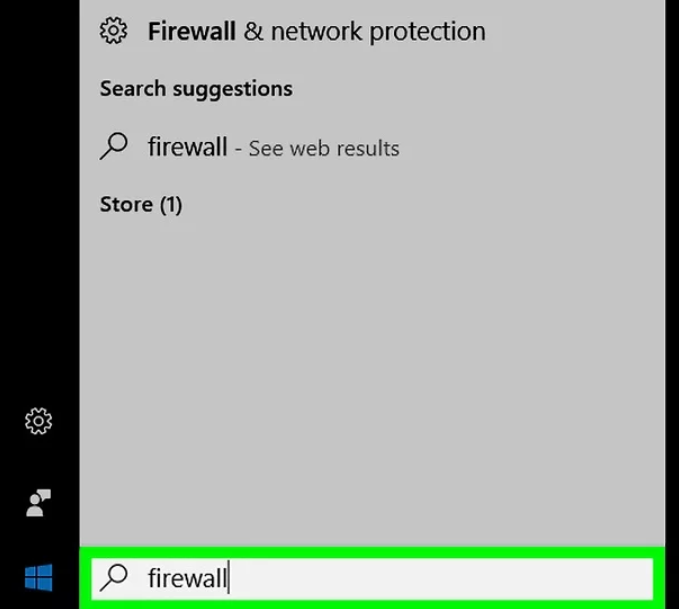
Click the Windows Firewall icon located at the top of the Start menu. (It looks like a brick wall with a globe.)
Click Allow an app or feature through Windows Firewall. You’ll find it in the upper left corner of the window.
A list of all programs and services will open.
Scroll down and find the «Windows Management Instrumentation (WMI)». You will find this option at the bottom of the program list.
In the upper right corner above the list of programs, click Change Settings. A list of programs will open.
Scroll down to the bottom of the program list and tick the box on the left of Windows Management Instrumentation (WMI).
On the right-hand side of Windows Management Instrumentation (WMI), you’ll see the option to tick either Private or Public. If your computers are connected to a public network, check the box in the Public column.
Click OK at the bottom of the window. Now the firewall will not block remote access to the computer.
How to Find the Computer Name
Open the Start menu on a remote computer (not on the computer from which the reboot command will be sent).
Open Windows Explorer by clicking on the folder icon in the Start menu.
Click This Computer. (This icon looks like a computer and sits on the left of the Windows Explorer window.)

Click the Computer tab in the upper left of the window. The toolbar will open.
Click Properties. (This is a red checkmark icon on a white background, located on the left side of the toolbar.) The computer settings will open.

In the middle of the page, you’ll find the name of the computer in the ‘computer name’ line of the Computer name, domain and workgroup section. Write down the name of the computer exactly as it appears here.
How to Restart a Computer Using the Command Line
Sit at another computer. It must be connected to the same network as the remote computer. Log in as an administrator.
Open the Start menu by clicking on the Windows logo in the lower left corner of the screen.
In the Start menu search bar, type ‘Command’ so that the Command Prompt utility appears in the search results.
Click the Command Prompt icon located at the top of the Start menu to open the Command window.
Type ‘shutdown / i’ in the Command Prompt window and then press ↵ Enter. A window will open with the option to restart the remote computer.
On the right side of the window, click Add. A new window will open.
Enter the name of the remote computer in the corresponding text box. If you have not yet found the name of the remote computer, do it now (see the previous section above). Click OK.
In the Select the desired action for computers section, open the drop-down menu and make sure the Restart option is selected. If necessary, check the box beside Warn users of the action, too, and input the time during which the warning will be displayed on the screen. Then click OK.
Use Powershell to Restart a Computer
The command below will immediately restart a remote computer. The -Force option will also force a restart even if a user is logged on:
Restart-Computer -ComputerName REMOTE_COMPUTER_NAME -Force
Use Powershell to Restart a List of Computers in Your Company Network
This command is handy if you have several computers to restart. Just list all the computers you want in a text file and add that to the PowerShell command below:
restart-computer (get-content c:\work\computers.txt)
How to Restart Remote Computers Using Action1 Solution for Businesses
Action1 helps you to restart endpoints remotely. This is useful in a variety of workflows, including installing updates or rolling out new group policies. In addition, you have the option of forcing reboot immediately or specifying a schedule that will work both for you as an administrator and for remote employees. Create an account at Action1 to get started right away.
To restart a remote endpoint:
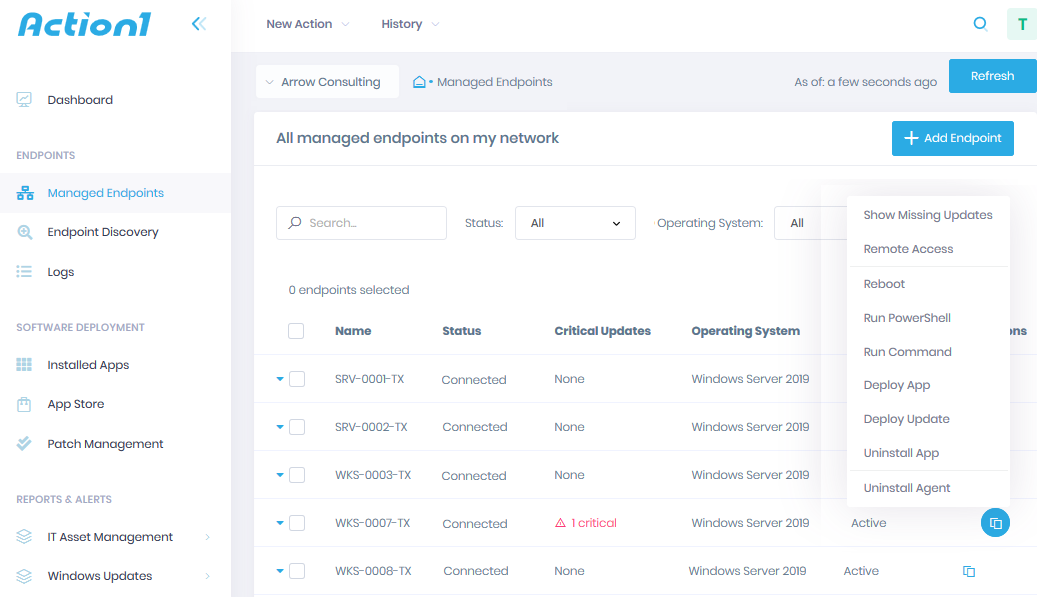
- 1. Navigate to the Managed Endpoints page.
- 2. Locate the endpoint(s) you want to restart and select Reboot.
Note: Alternatively, click the locations in the Actions column and select Reboot. Or click New Action on top of the page and select Reboot from the drop-down list.
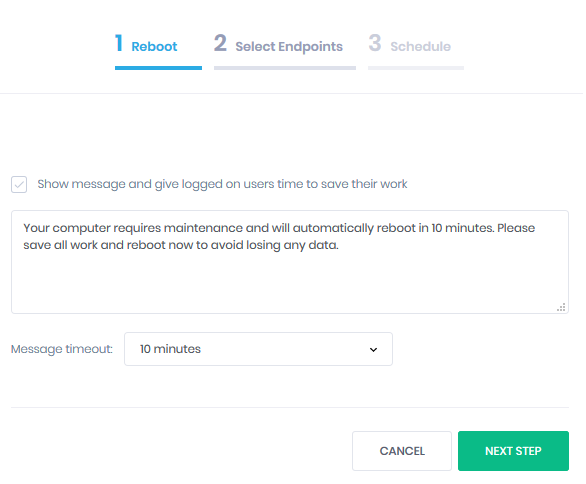
Complete the wizard:
- 1. On the Reboot step, choose if you want to warn users that a reboot is coming. The notice will appear on their screens before the endpoints restart. You can choose to show a default text or enter any other text. Then, specify the message timeout. Make sure you provide enough time to allow users to save their work and prepare for restart.
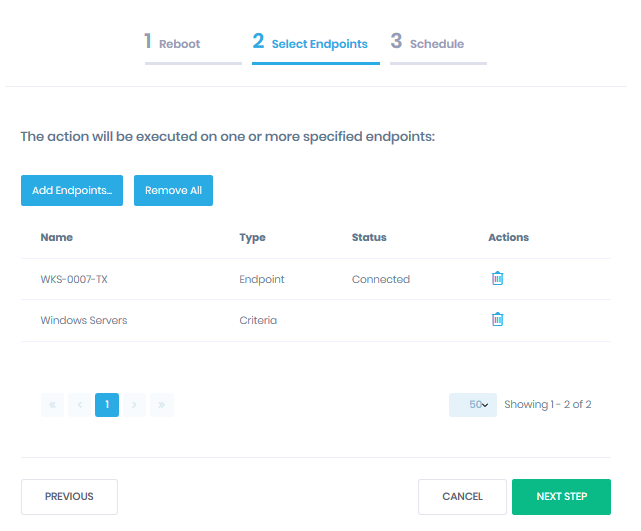
2. On the Select Endpoints step, check the endpoints you plan to reboot. You can include more endpoints by clicking Add Endpoints. Action1 enables you to add endpoints individually, or you can specify a criteria such as Windows Server 2019 or Windows Desktop OS.
3. On the Schedule step, review your action and pick the right time to execute it. For example, you can force reboot immediately or schedule obligatory restarts once a week to deliver updates. Once ready, click Finish.

4. After clicking Finish, you’ll find yourself on the Actions/History page. Here, you’ll see the execution details. If you opted not to execute your action yet, you’ll find it waiting for you on the Actions/Scheduled page.

Get Started with Action1 Cloud Solution.
Action1 allows IT professionals to efficiently manage configurations for computers within and outside of the local network. In addition, the platform offers total control of patch management, OS and application upgrade distribution, software deployment, remote access, as well as many other features to run your IT security and administration as seamlessly as possible.
Start free now, scale up later. Use free forever to manage up to 50 endpoints.
Start your free trial or use free forever to manage up to 50 endpoints. More details >
Relevant How To Articles and Action1 Features:


