- Как отключить (включить) индексирование поиска (службу Windows Search) в Windows
- Как отключить индексирование
- Включение индексирования поиска
- Управление через командную строку
- Fix problems in Windows Search
- Check for updates
- Run the Search and Indexing troubleshooter
- Restart Windows Search or your device
- Reset Windows Search
- Windows 10, version 1809 and earlier
- Windows 10, version 1903 and later
- Help us improve Search in Windows 10
- Windows search service won’t start, cannot stop, cannot refresh
- Replies (5)
- Windows 10 Search Not Working [Solved]
- 1: Restart your computer
- 2: Restart Cortana / Search process
- 3: Modify Windows Search service
- 4: Restore indexing services
- 5: Run the built-in troubleshooter
- Last but not the least
Как отключить (включить) индексирование поиска (службу Windows Search) в Windows

В данной статье показаны действия, с помощью которых можно отключить или включить индексирование поиска (службу поиска Windows Search) в операционной системе Windows.
По умолчанию Windows использует индекс при поиске, чтобы ускорить результаты поиска. Индекс поиска выполняет индексирование контента, кэширование свойств и результатов поиска для файлов, электронной почты и другого контента.
Индекс использует службу поиска Windows Search и выполняется в фоновом режиме как процесс SearchIndexer.exe. Индекс автоматически перестраивается и обновляется при изменении, внесенных с момента последнего перестроения индекса, чтобы повысить точность результатов поиска.
Если вы предпочитаете выполнять поиск без использования индекса, можно полностью отключить индексирование поиска (службу поиска Windows Search). Если отключить индексацию поиска, то поиск займет немного больше времени, но результаты поиска всегда будут актуальными и точными.
- Чтобы отключить или включить индексирование поиска (службу поиска Windows Search), необходимо войти в систему с правами администратора
- Если отключить индексирование поиска, пользователи больше не смогут выполнять поиск в библиотеках.
- Функция Временная шкала (Timeline) требует, чтобы служба поиска Windows была включена, запущена и настроена на автоматический (отложенный запуск).
Как отключить индексирование
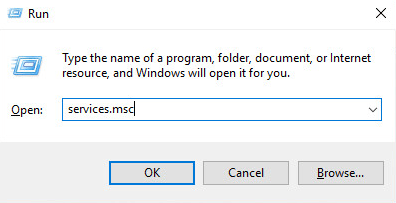
Чтобы отключить индексирование поиска (службу поиска Windows Search), откройте консоль «Службы», для этого нажмите сочетание клавиш  + R, в открывшемся окне Выполнить введите services.msc и нажмите клавишу Enter↵.

В окне Службы дважды щёлкните левой кнопкой мыши службу Windows Search .

В открывшемся окне Свойства: Windows Search (локальный компьютер) остановите службу нажав кнопку Остановить.

Затем в выпадающем списке Тип запуска: выберите пункт Отключена и нажмите кнопку OK.

Включение индексирования поиска
Чтобы включить индексирование поиска (службу поиска Windows Search), откройте консоль «Службы», для этого нажмите сочетание клавиш + R, в открывшемся окне Выполнить введите services.msc и нажмите клавишу Enter↵.

В окне Службы дважды щёлкните левой кнопкой мыши службу Windows Search .

В открывшемся окне Свойства: Windows Search (локальный компьютер) в выпадающем списке Тип запуска: выберите пункт Автоматически (отложенный запуск) и нажмите кнопку Применить.

Затем запустите службу нажав кнопку Запустить.

Управление через командную строку
Также отключить или включить индексирование поиска (службу поиска Windows Search) можно используя командную строку.
Чтобы отключить индексирование поиска (службу поиска Windows Search), запустите командную строку от имени администратора и выполните следующую команду:
sc stop «wsearch» && sc config «wsearch» start=disabled

Чтобы включить индексирование поиска (службу поиска Windows Search), запустите командную строку от имени администратора и выполните следующую команду:
sc config «wsearch» start=delayed-auto && sc start «wsearch»
Fix problems in Windows Search
If Windows Search is unresponsive or the search results don’t appear as expected, try any of the following solutions in this article.
If you’re running Windows 10 May 2019 Update (version 1903) or later versions and Windows can detect a problem, we’ll run the Search troubleshooter automatically. This troubleshooter will reset Windows Search back to the default experience. View your troubleshooter history under Settings > Update & Security > Troubleshoot > View History. Follow the steps below if your issue is still not resolved.
Original product version: В Windows 10 — all editions
Original KB number: В 4520146
Check for updates
Windows 10 lets you choose when and how to get the latest updates to keep your device running smoothly and securely. To manage your options and see any available updates, select the Start button, and then go to Settings > Update & Security > Windows Update > Check for updates. Install any available updates, and then restart your computer if the updates require it.
For more information, see Update Windows 10.
Run the Search and Indexing troubleshooter
Your PC automatically indexes content to deliver faster search results. Learn more about Search indexing in Windows 10.
Use the Windows Search and Indexing troubleshooter to try to fix any problems that may arise. To use the troubleshooter, follow these steps:
- Select Start, then select Settings.
- In Windows Settings, select Update & Security >Troubleshoot. Under Find and fix other problems, select Search and Indexing.
- Run the troubleshooter, and select any problems that apply. Windows will try to detect and solve them.
You can also use a command prompt to open the troubleshooter. Press Windows logo key+R, enter cmd in the Open box, and then select OK. At the command prompt, run the following command:
Restart Windows Search or your device
End the SearchUI process to restart Windows Search by following these steps:
- Press Ctrl+Alt+Delete, and select Task Manager.
- In the Task Manager window, select the Details tab.
- In the Name column, right-click SearchUI.exe, and then select End task.
- When you’re prompted to end SearchUI.exe, select End process.
The Windows Search process will automatically restart the next time that you search.
If this solution doesn’t fix your problem, try restarting your device. Restarting will also install any pending updates.
You may want to bookmark this page before you restart.
Reset Windows Search
Try resetting Windows Search by using the method that’s appropriate for your version of Windows.
To determine which version of Windows your device is running, follow these steps:
Select Start > Settings > System > About.
Under Windows specifications, check which version of Windows your device is running.
Resetting Windows Search does not affect your files. However, it may temporarily affect the relevance of search results.
Windows 10, version 1809 and earlier
If the Windows 10 October 2018 Update or an earlier update is installed, reset Cortana to reset Windows Search by following these steps:
- Select Start, right-click Cortana, select More, and then select App settings.
- In the Cortana settings, select Reset.
Windows 10, version 1903 and later
If the Windows 10 May 2019 Update or a later update is installed, use Windows PowerShell to reset Windows Search by following these steps:
You must have administrator permissions to run this script.
Download the ResetWindowsSearchBox.ps1 script from the Reset Windows Search PowerShell script, and save the file to a local folder.
Right-click the file that you saved, and select Run with PowerShell.
If you’re asked the following question, select Yes.
Do you want to allow this app to make changes to your device?
The PowerShell script resets the Windows Search feature. When the word Done appears, close the PowerShell window.
If you receive the following error message:
Cannot be loaded because running scripts is disabled on this system
enter the following command on the command line of the PowerShell window, and then press Enter:
The current policy appears in the window. For example, you might see Restricted. We recommend that you note this value because you’ll have to use it later.
Enter the following command on the command line of the PowerShell window, and then press Enter:
You’ll receive a warning message that explains the security risks of an execution policy change. Press Y, and then press Enter to accept the change.
To learn more about PowerShell execution policies, see About Execution Policies.
After the policy change is completed, close the window, and then repeat steps 2-4. However, when the Done message appears this time, DON’T close the PowerShell window. Instead, press any key to continue.
Revert to your previous PowerShell execution policy setting. Enter the following command on the command line of the PowerShell window, press the Spacebar, enter the policy value that you noted in step 5, and then press Enter:
For example, if the policy that you noted in step 5 was Restricted, the command would resemble the following one:
You’ll receive a warning message that explains the security risks of an execution policy change. Press Y, and then press Enter to accept the change and revert to your previous policy setting.
Close the PowerShell window.
If your organization has disabled the ability to run scripts, contact your administrator for help.
Help us improve Search in Windows 10
If the previous suggestions don’t fix the problem, let us know by sending feedback in the Feedback Hub. Provide details, such as a description of the problem, screenshots, log files, and any other information that might be helpful. In the Feedback Hub, select the appropriate category and subcategory. In this case, submit your feedback in the Cortana and Search category.
Windows search service won’t start, cannot stop, cannot refresh
Replies (5)
This issue normally occurs when there is any wrong value set in the registry. This could be modified by any third party program or virus infections. Let’s perform the steps provided and see if it helps.
Method 1:
I would suggest you to perform the steps provided and see if it helps.
a. Press Windows key + R.
b. Type ‘regedit.exe’ and hit ENTER.
c. In regedit, go to: HKEY_LOCAL_MACHINE\SOFTWARE\Microsoft\Windows Search
d. In the right pane, right click on SetupCompletedSuccessfully and click on Modify.
NOTE: If SetupCompletedSuccessfully is not there, then in the right pane, right click on empty area and click on New and DWORD (32 bit) Value. Type SetupCompletedSuccessfully and press Enter.
e. Type 0 and click on OK.
NOTE: This is the number zero.
f. Close Regedit
g. Check with the issue now.
a. Press Windows key + W to search Settings.
b. Type “Users” without quotes and press enter.
c. To create new user account click on the plus sign (+) ‘Adda User’.
d. Select ‘Don’t want this user to sign in with Microsoft account?’
e. Click on Local account button
f. Enter the User name and click on next button and click on ‘Finish’.
g. Restart the computer and check if you get the logon screen.
Hope this information helps. Reply with the status so that we could help you further.
Windows 10 Search Not Working [Solved]
Last Updated: 2 years ago
If you’re having problems using Cortana or Search on Windows 10, we have here some effective methods that are going to help you fix this problem.
Note that not all Windows 10 users have this problem and the exact cause remains unclear, there is not a general fix for it. But the following methods are re
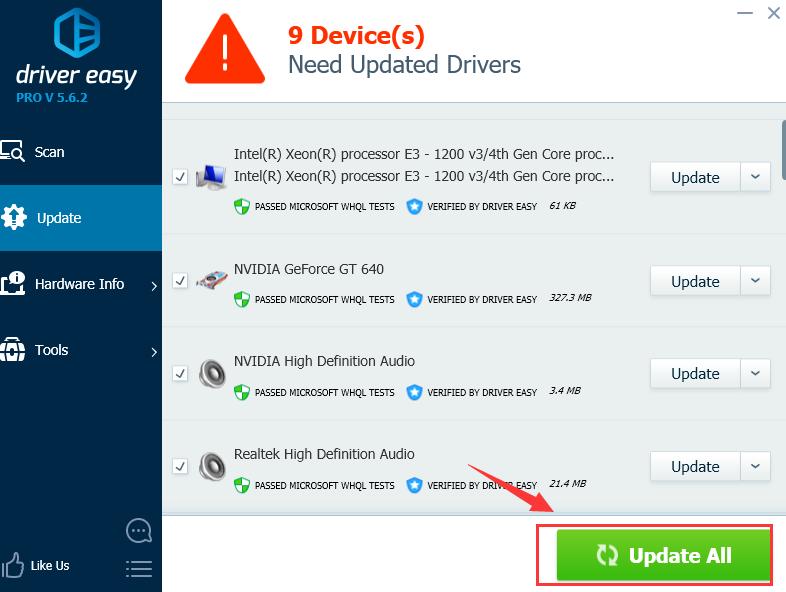
If you haven’t updated the device drivers on your PC to the latest, it’s time to update them with Driver Easy automatically.
You can try its Free version, and update your drivers one by one. Or you can update all your missing and outdated drivers automatically with just one-click with Driver Easy Pro version. No worry to try it as it comes with a no-questions-asked 30-day money-back guarantee and professional tech support 24/7.
1: Restart your computer
If you haven’t restarted your computer to see if the problem is gone, do it now before you proceed with the following steps, especially for those who are used to let the computer hibernate instead of shutting it off when not using.
2: Restart Cortana / Search process
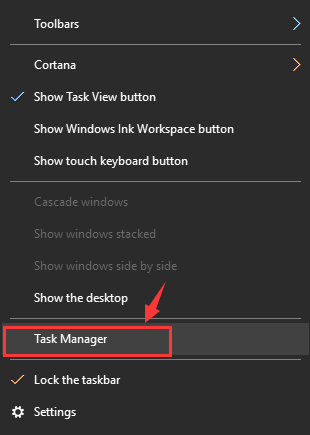
1) Right-click the task bar at the bottom of your computer desktop and choose Task Manager .
2) Press the C key on your keyboard and better locate the process Cortana , then right click it and click End task .
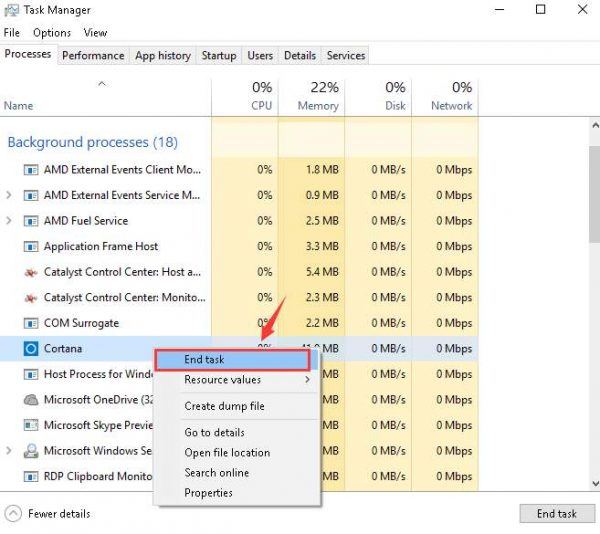
If you can find Search process (press S key to better help you locate it), also right-click it and choose End task.
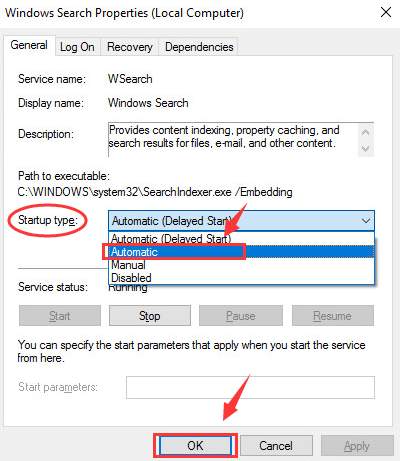
3: Modify Windows Search service
1) On your keyboard, press the Windows logo key and R at the same time, then type services.msc in the search box and press Enter .
2) Press W key to faster locate Windows Search option, and then right-click it and choose Properties.
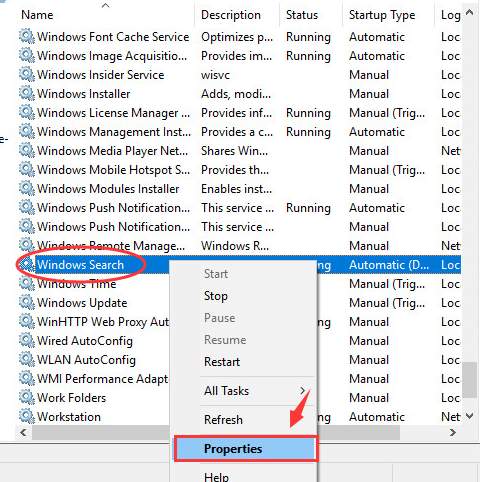
3) Change the Startup type to Automatic, and then click OK to save the change and exit.
4) Restart your computer after this.
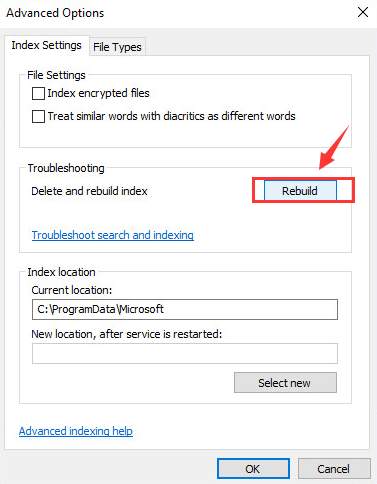
4: Restore indexing services
1) Follow the path: Start button > Control Panel (View by Small icons ) > Indexing Options .
2) Click the Advanced button.
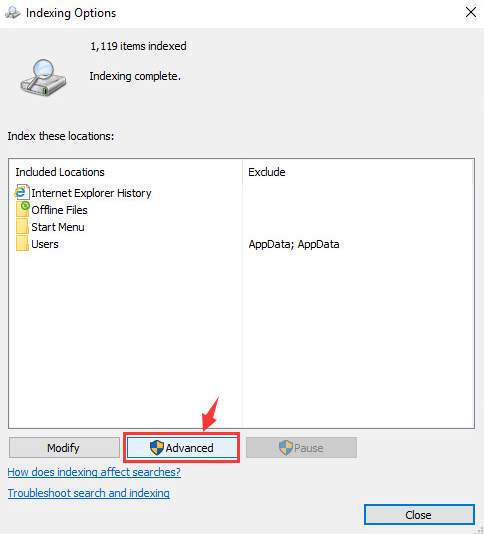
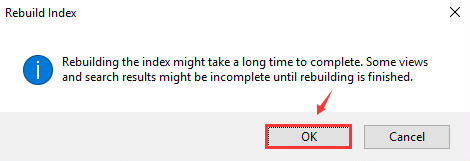
3) In the newly open window, click Rebuild button under Troubleshooting category.
You will be seeing this notification window, just click OK to continue.
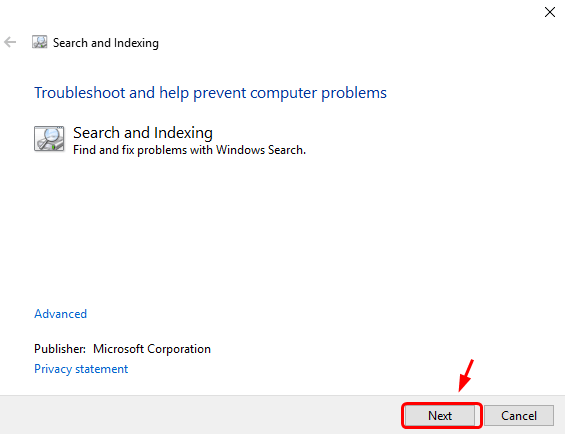
5: Run the built-in troubleshooter
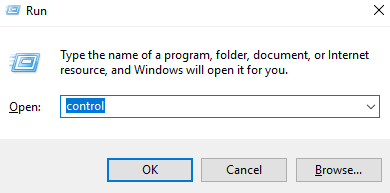
1) On your keyboard, press the Windows logo key and R at the same time, type in control and press Enter.
2) View by Small icons, then click Troubleshooting.
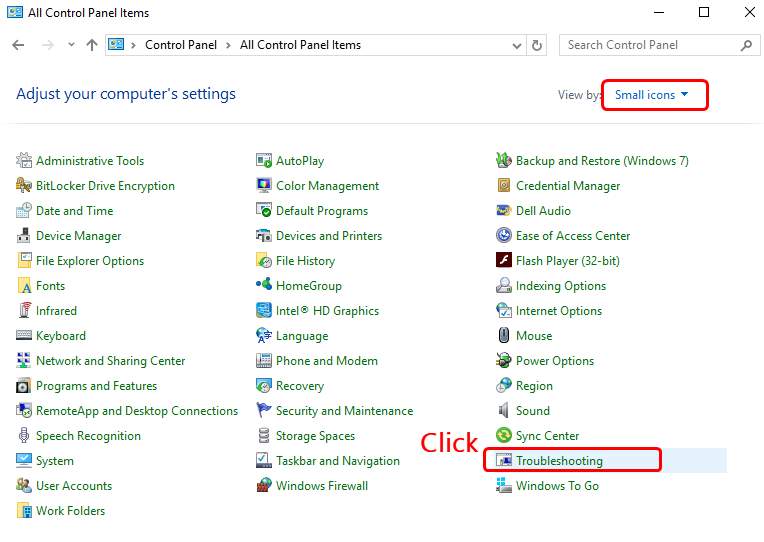
3) Click View all.

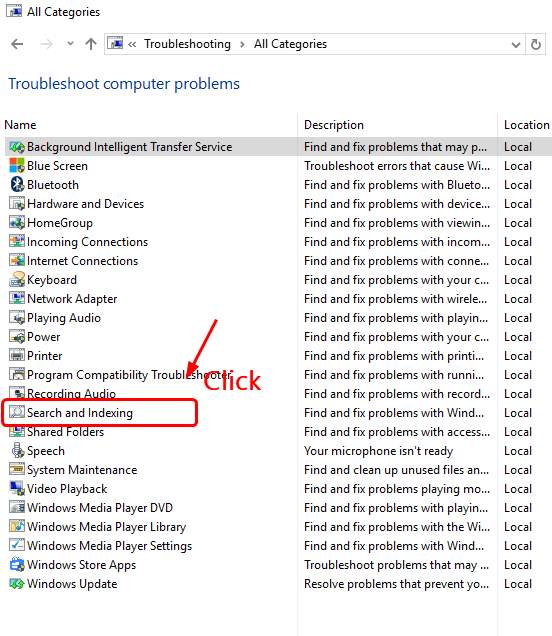
4) Click Search and Indexing.
5) Click Next.
6) Tick the box or boxes for the appropriate troubleshooting process you see. Then click Next to continue.
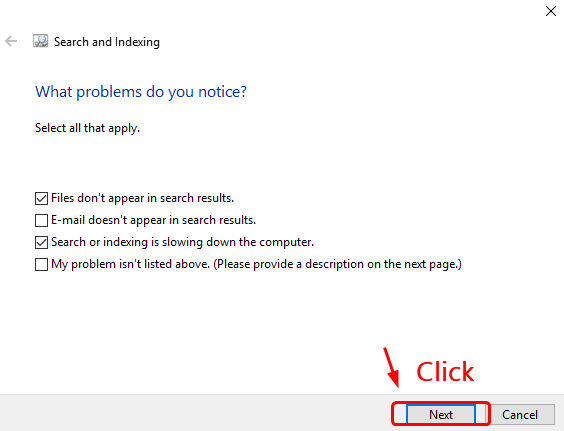
7) When the troubleshooting process finishes, Windows 10 should be able to tell you what went wrong and what you can do to fix it.
Last but not the least
If the above options still cannot help you fix the Cortana or Search issue in Windows 10, you might need to perform a Reset or Refresh of your Windows.


