- Recover lost or deleted files
- 2 Quick Ways to Restore Folders in Windows 10
- The need to restore folder in Windows 10
- How to restore folder in Windows 10?
- Method 1. Restore deleted folder in Windows 10 without software
- Method 2. Restore deleted folder in Windows 10 via data recovery software
- Get an easy way to backup your files in Windows 10
- Conclusion
- Recover lost files on Windows 10
- Windows File Recovery — Winter 2020 release
- Windows File Recovery — Summer 2020 release
Recover lost or deleted files
Note: If you’ve recently updated Windows 10 and are having problems finding files, see Find lost files after the upgrade to Windows 10.
If you can’t find a file on your computer or you accidently modified or deleted a file, you can restore it from a backup (if you’re using Windows backup) or you can try to restore it from a previous version. Previous versions are copies of files and folders that Windows automatically saves as part of a restore point. Previous versions are sometimes referred to as shadow copies.
To restore a file from a backup, make sure the media or drive that your backup is saved on is available, and then follow these steps:
To restore files from a backup
Open Backup and Restore by selecting the Start button  , selecting Control Panel, selecting System and Maintenance, and then selecting Backup and Restore.
Select Restore my files, and then follow the steps in the wizard.
Restore deleted files and folders or restore a file or folder to a previous state.
To restore a deleted file or folder
Open Computer by selecting the Start button , and then selecting Computer.
Navigate to the folder that used to contain the file or folder, right-click it, and then select Restore previous versions. If the folder was at the top level of a drive, for example C:\, right-click the drive, and then select Restore previous versions.
You’ll see a list of available previous versions of the file or folder. The list will include files saved on a backup (if you are using Windows Backup to back up your files) as well as restore points, if both types are available.
Note: To restore a previous version of a file or folder that’s included in a library, right-click the file or folder in the location where it’s saved, rather than in the library. For example, to restore a previous version of a picture that’s included in the Pictures library but is stored in the My Pictures folder, right-click the My Pictures folder, and then select Restore previous versions.
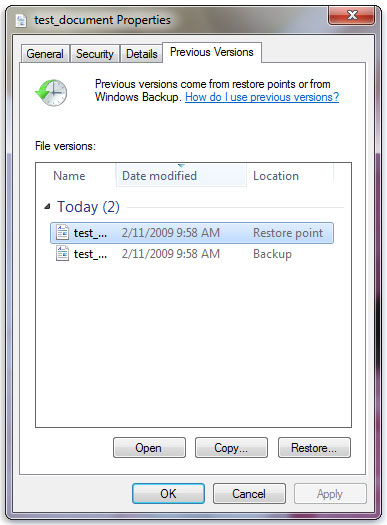
Some previous versions of files
Double-click a previous version of the folder that contains the file or folder you want to restore. (For example, if a file was deleted today, choose a version of the folder from yesterday, which should contain the file.)
Drag the file or folder that you want to restore to another location, such as your desktop or another folder.
The version of the file or folder is saved to the location that you selected.
Tip: If you don’t remember the exact file or folder name or its location, you can search for it by typing part of the name in the search box in the Documents library.
To restore a file or folder to a previous state
Right-click the file or folder, and then select Restore previous versions.
You’ll see a list of available previous versions of the file or folder. The list will include files saved on a backup (if you’re using Windows Backup to back up your files) as well as restore points, if both types are available.
The Previous Versions tab, showing some previous versions of files
Before restoring a previous version of a file or folder, select the previous version, and then click Open to view it to make sure it’s the version you want.
Note: You can’t open or copy previous versions of files that were created by Windows Backup, but you can restore them.
To restore a previous version, select the previous version, and then select Restore.
Warning: The file or folder replaces the current version on your computer, and the replacement can’t be undone.
Note: If the Restore button is unavailable, you can’t restore a previous version of the file or folder to its original location. You might be able to open it or save it to a different location.
2 Quick Ways to Restore Folders in Windows 10
How to restore folders in Windows 10? Read this guide to get two practical methods to find your lost folder.

By Lena  / Last Updated November 16, 2020
The need to restore folder in Windows 10
To free up the storage space of computer, people like to delete unnecessary files or folders from time to time. You may like to use the “Shift + Delete” to directly remove the folder. Or you may keep to the habit of regular emptying recycle bin. However, now you just find that you have deleted one folder that contains some important documents accidentally.
Then is it possible to retrieve deleted folder on your Windows 10 computer? Well, the answer is Yes. Actually, the deleted files are not really gone from your computer. They are just marked as available space and wait to be overwritten by new data. So you’d better stop using your computer at once. The folders are most often recoverable as long as they have not been overwritten. Keep reading to learn the methods to restore deleted folder in Windows 10.
How to restore folder in Windows 10?
Method 1. Restore deleted folder in Windows 10 without software
First, you can try to restore folders with the built-in utility — Previous Versions. It’s one very useful feature that is available in Windows 10/8/7. It can help you restore files to a previous version. Deleted files can also be restored.
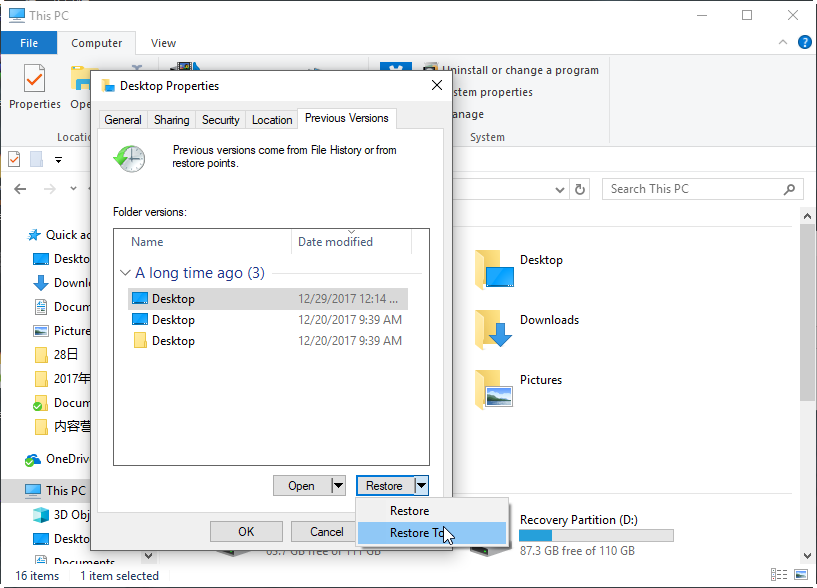
Step 1. Navigate to the location (folder or drive) where the folder was stored before being deleted.
Step 2. Right-click the drive or the folder, and then select Properties.
Step 3. Click the Previous Versions tab and then you will see all the available versions.
Step 4. Check and select the right version you want to restore. Click Restore to get the folder back.
Note: You may not see the Previous Versions option if you have not turned it on. You can first setup Previous Versions in Windows 10 and then have a try. Or if you have no luck of Previous Versions, you can try data recovery tool to help you. Just keep reading to learn more.
Method 2. Restore deleted folder in Windows 10 via data recovery software
If the Previous Versions utility can’t help you or you have no correct backup, then data recovery software is the way to go. Recoverit Pro, a professional PC data recovery tool can help you retrieve all kinds of deleted files without effort, including documents, pictures, audio files, etc. The following are the steps to restore deleted folder in Windows 10 with this tool.
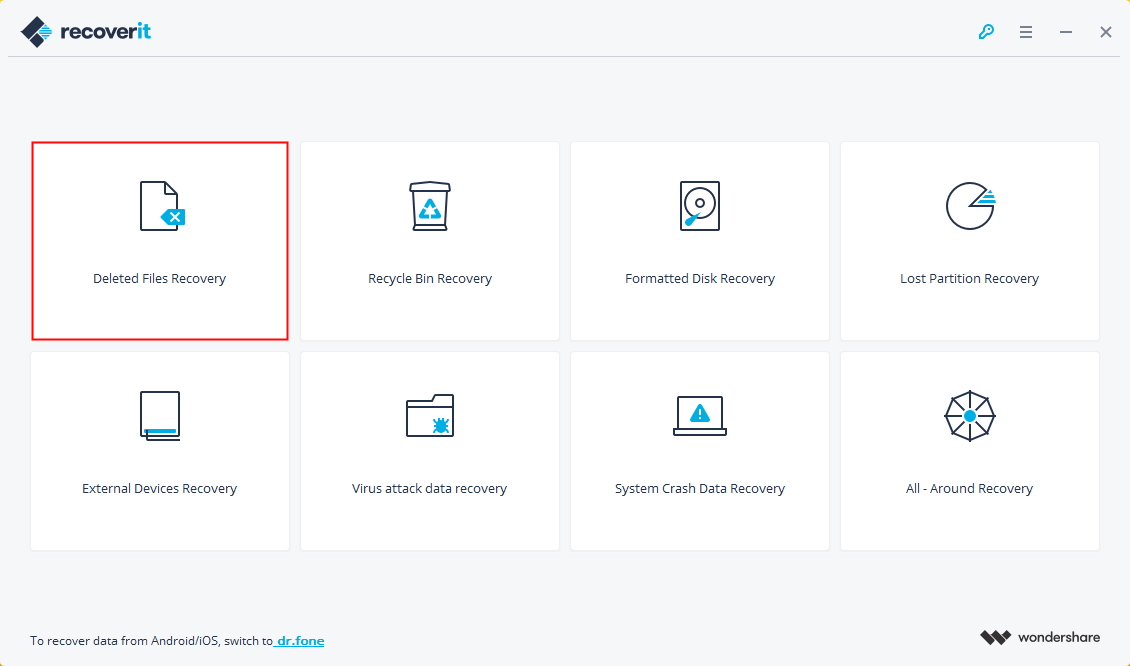
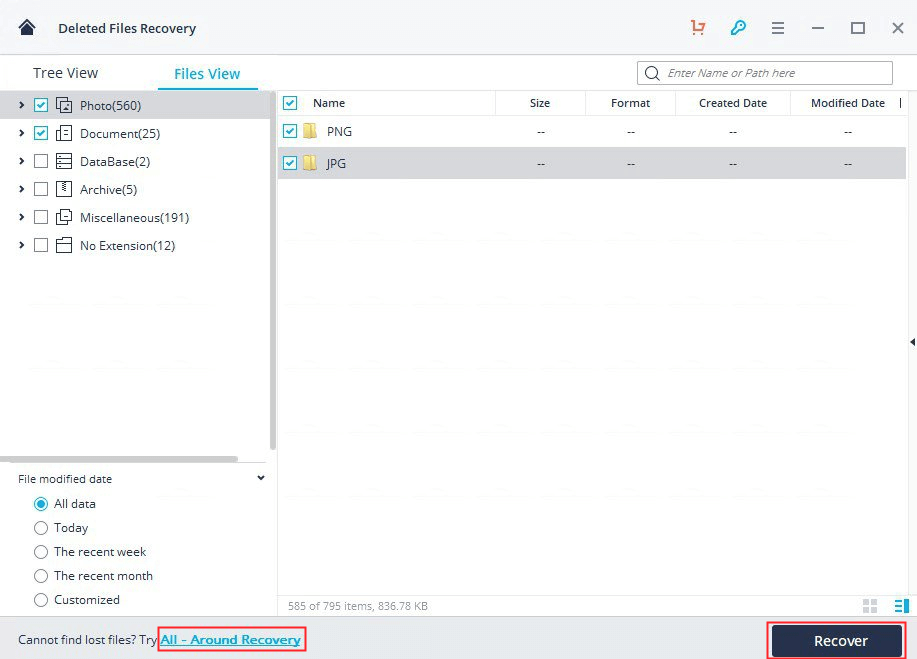
Step 1. Download, install and launch Recoverit > Select Deleted Files Recovery mode.
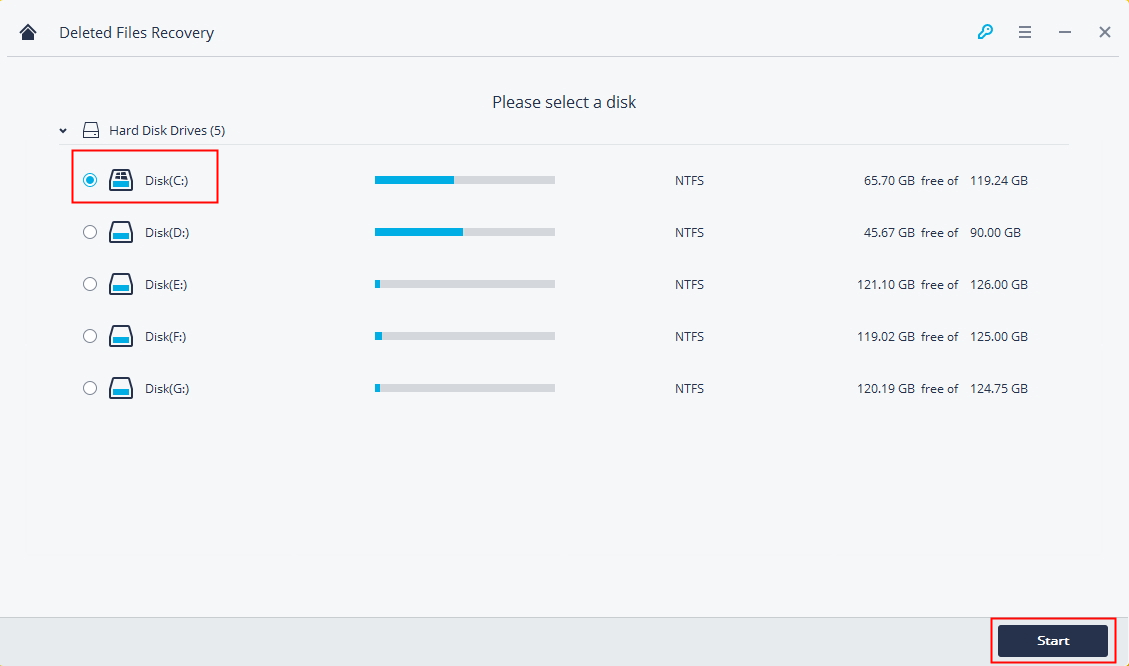
Step 2. Select the location where you lost the files and click Start.
Step 3. When the scanning process is done, you will see a list of your deleted files. Choose the files you want to get back and click Recover. (Try All-Around Recovery mode if you cannot find your lost data.)
Get an easy way to backup your files in Windows 10
Although it’s possible to restore deleted folders without backup, the whole process is time-consuming. In addition, besides accidental file deletion, there are many other factors that can lead to data loss such as system crash, hard drive failure, virus affection, etc. We may never know when the disaster will happen, but a backup can help you get out of the trouble as soon as possible.
If you prefer an easy and flexible way to backup your computer, then AOMEI Backupper Standard — one free computer backup tool is your best choice.
It enables you to do system/disk/partition/files backup & recovery.
It allows you to set custom schedule backup, and then it will automatically perform the backup daily/weekly/monthly.
How about give it a try? Just download AOMEI Backupper Standard on your Windows 10 PC and follow the steps below to make a backup in minutes. Here we take File Backup as an example.
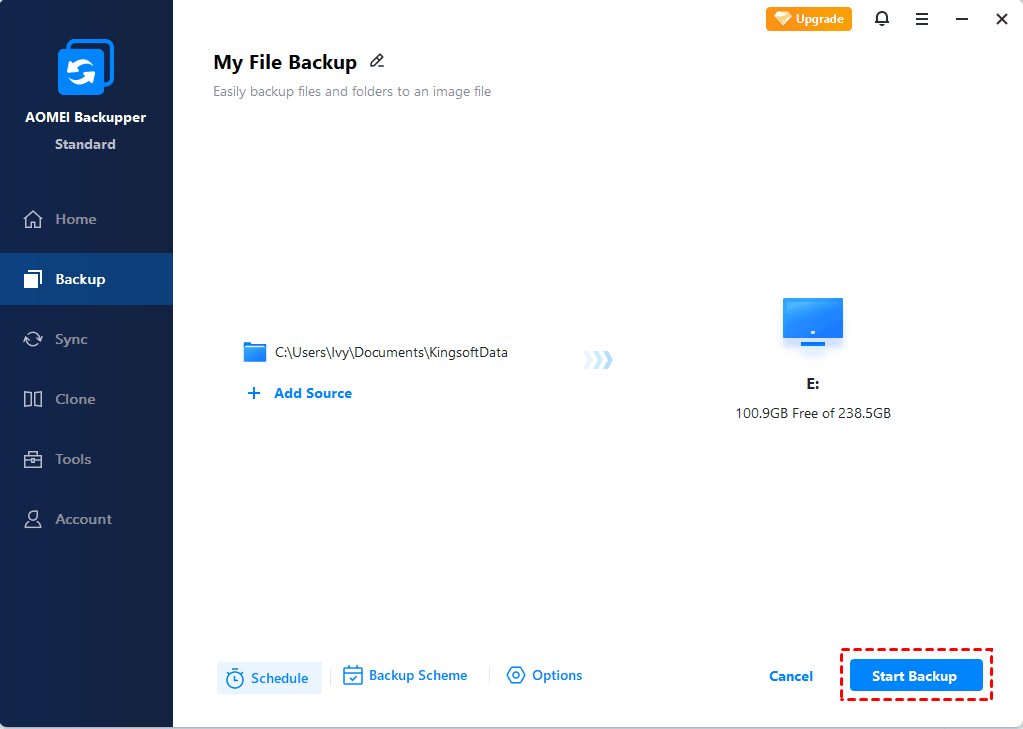
Step 1. Open AOMEI Backupper > Click Backup and then choose File Backup.

Step 2. Name the task > Click Add File or Add Folder > Click Browse to choose the files/folders you want to backup > Click OK to continue.

Step 3. Choose the location to save the backup image > Click Schedule to set the schedule task > Finally, click Start Backup to confirm.
Notes:
1. You can click Backup Options to set the compression level of the backup.
2. In AOMEI Backupper Professional, you can enable Scheme feature. It can help you remove old backup images automatically which can help you free up your storage. You can get the free trial version to explore it by yourself.
Conclusion
That’s all for how to restore deleted folder in Windows 10. According to your situation, the Windows Previous Versions or data recovery tool can help you make it. And obviously, it’s much easier to restore deleted files from the backup image than recover files with data recovery tool. Don’t forget to make a regular backup with AOMEI Backupper to keep your data safe.
Recover lost files on Windows 10
If you can’t locate a lost file from your backup, then you can use Windows File Recovery, which is a command line app available from the Microsoft Store. Use this app to try to recover lost files that have been deleted from your local storage device (including internal drives, external drives, and USB devices) and can’t be restored from the Recycle Bin. Recovery on cloud storage and network file shares is not supported.
Note This app requires Windows 10 build 19041 or later (See which version of Windows 10 you have).
Important: If you want to increase your chances of recovering a file, minimize or avoid using your computer. In the Windows file system, the space used by a deleted file is marked as free space, which means the file data can still exist and be recovered. But any use of your computer can create files, which may over-write this free space at any time.
Windows File Recovery — Winter 2020 release
If necessary, download and launch the app from Microsoft Store.
Press the Windows key, enter Windows File Recovery in the search box, and then select Windows File Recovery.
When you are prompted to allow the app to make changes to your device, select Yes.
In the Command Prompt window, enter the command in the following format:
winfr source-drive: destination-drive: [/mode] [/switches]
There are 2 basic modes you can use to recover files: Regular and Extensive.
Regular mode examples
Recover your Documents folder from your C: drive to the recovery folder on an E: drive. Don’t forget the backslash (\) at the end of the folder.
Winfr C: E: /regular /n \Users\ \Documents\
Recover PDF and Word files from your C: drive to the recovery folder on an E: drive.
Winfr C: E: /regular /n *.pdf /n *.docx
Extensive mode examples
Recover any file with the string «invoice» in the filename by using wildcard characters.
Winfr E: C: /extensive /n *invoice*
Recover jpeg and png photos from your Pictures folder to the recovery folder on an E: drive.
Winfr C: E: /extensive /n \Users\ \Pictures\*.JPEG /n\Users\ \Pictures\*.PNG
The source and destination drives must be different. When recovering from the operating system drive (often C: ), use the /n switches to specify the user files or folder.
Microsoft automatically creates a recovery folder for you called, Recovery_ on the destination drive.
When you are prompted for confirmation to continue, enter Y to start the recovery operation. Depending on the size of your source drive, this may take a while. To stop the recovery process, press Ctrl + C.
The following information can help you decide which file system you have and which mode to use.
SD cards, flash or USB drives ( 4GB)
There are several file systems supported by Windows that vary depending on the storage device or operating system. Recovering files from non-NTFS file systems is only supported by extensive mode. To see which file system you have, right click a drive in File Explorer and select Properties.
Deciding which mode to use
Use the following table to help you decide which mode to use. If you are not sure, start with Regular mode.
Deleted a while ago
After formatting a disk
A corrupted disk
The following table summarizes what each advanced switch is used for.
Specifies the storage device where the files were lost. Must be different from the destination-drive.
Specifies the storage device and folder on which to put the recovered files. Must be different from the source-drive.
Regular mode, the standard recovery option for non-corrupted NTFS drives
Extensive mode, a thorough recovery option suitable for all file systems
Scans for a specific file by using a file name, file path, file type, or wildcards. For example:
File name: /n myfile.docx
File path: /n /users/ /Documents/
Wildcard: /n myfile.*
Summary of syntax and switches for general users.
Summary of syntax and switches for advanced users.
The following table summarizes what each advanced switch is used for.
NTFS mode, a fast recovery option for healthy NTFS drives using the master file table
Segment mode, recovery option for NTFS drives using file record segments
Signature mode, recovery option for all file system types using file headers
Recover specific extension groups, comma separated
Signature mode extension groups and supported file types.
Saves a log file of the recovery operation in a different location than the default location on the recovery drive (for example, D:\logfile).
Overrides user prompts, which is useful in a script file.
Recovers undeleted files, for example, from the Recycle Bin.
Recovers system files.
Specifies whether to always (a), never (n), orkeep both always(b) when choosing whether to overwrite a file. The default action is to prompt to overwrite.
Recovers files without primary data streams.
To keep your results manageable and focus on user files, some file types are filtered by default, but this switch removes that filter. For a complete list of these file types, see the information after this table.
Specifies which file types are filtered. For a complete list of these file types, see the information after this table.
Specifies the number of sectors on the source device. To find sector information, use fsutil.
Specifies the cluster size (allocation unit) on the source device.
File extension filter list
The following file types are filtered from results by default. Use the /e switch to disable this filter or the /e: filter to specify file types not to filter.
_, adm, admx, appx, appx, ascx, asm, aspx, aux, ax, bin, browser, c, cab, cat cdf-ms, catalogItem, cdxm, cmake, cmd, coffee, config, cp, cpp, cs, cshtm, css, cur, dat, dll, et, evtx, exe, fon, gpd, h, hbakedcurve, htm, htm, ico, id, ildl, ilpdb, iltoc, iltocpdb, in, inf, inf_loc, ini, js, json, lib, lnk, log, man, manifest, map, metadata, mf, mof, msc, msi, mui, mui, mum, mun, nls, npmignore, nupkg, nuspec, obj, p7s, p7x, pak, pckdep, pdb, pf, pkgdef, plist, pnf, pp, pri, props, ps1, ps1xm, psd1, psm1, py, resjson, resw, resx, rl, rs, sha512, snippet, sq, sys, t4, targets, th, tlb, tmSnippet, toc, ts, tt, ttf, vb, vbhtm, vbs, vsdir, vsix, vsixlangpack, vsixmanifest, vstdir, vstemplate, vstman, winmd, xam, xbf, xm, xrm-ms, xs, xsd, ym
Can you give some tips to help me use the correct syntax?
Always use drive letters in the source and destination path, don’t forget the colon (:) after the drive letter, and make sure there is a space between the source and destination.
When you specify just a folder name, such as /n \Myfolder\, add a backslash (\) at the end of it.
If a file or folder name has spaces, surround it with quotes. For example:
winfr C: E: /regular /n «\Users\ \Documents\Quarterly Statement.docx»
What does mean in the command examples?
In the File Explorer address bar, enter C:\users to see a list of potential users on your computer. There may be several users on your computer, including you, the administrator, and the default account. When you see in a file path, it is a placeholder for the current username on your computer.
Why am I getting this message: «Source and Destination cannot refer to the same physical partition?»
The source and destination drive or partition path should not be the same. If you only have one drive, use a USB or external hard drive as your destination path. Don’t create a partition after losing data, because this reduces the chance of a successful recovery.
Why does the recovery operation take so long?
Depending on the size of the disk, it may take some time to recover the file, especially if you are using Extensive mode.
Why are additional files recovered from my operating system drive?
Behind the scenes, Windows is constantly creating and deleting files. By default, Windows File Recovery filters out these files, but some slip through. To prevent this, use the /n as per examples in this article.
What is the $Recycle.Bin folder?
For NTFS and segment modes, you may also see lost files recovered from the Recycle Bin (files either in the recycle bin or that were permanently deleted) with the name $files.xxx and stored in a folder called $RECYCLE.BIN.
What happens if the destination drive is full?
If you see the following message: «Destination disk is full, please free up space before resuming: (R)esume, (S)kip file, or (A)bort,» free up drive space on the destination drive, and then choose one of the options.
I was not able to recover the file, now what?
If you used Regular mode, try again in extensive mode if the file type is supported. It’s possible that the free space was overwritten, especially on a solid-state drive (SSD). If you need help, contact your administrator.
Windows File Recovery — Summer 2020 release
If necessary, download and launch the app from Microsoft Store.
Press the Windows key, enter Windows File Recovery in the search box, and then select Windows File Recovery.
When you are prompted to allow the app to make changes to your device, select Yes.
In the Command Prompt window, enter the command in the following format:
| winfr source-drive: destination-drive: [/switches] |
The source and destination drives must be different. When recovering from the operating system drive (often C: ), use the /n and /y: switches to specify the user files or folder.
Microsoft automatically creates a recovery folder for you called Recovery_ on the destination drive.
There are three modes you can use to recover files: Default, Segment, and Signature.
Default mode examples
Recover a specific file from your C: drive to the recovery folder on an E: drive.
| winfr C: E: /n \Users\ \Documents\QuarterlyStatement.docx |
Recover jpeg and png photos from your Pictures folder to the recovery folder on an E: drive.
| winfr C: E: /n \Users\ \Pictures\*.JPEG /n \Users\ \Pictures\*.PNG |
Recover your Documents folder from your C: drive to the recovery folder on an E: drive.
| winfr C: E: /n \Users\ \Documents\ |
Don’t forget the backslash (\) at the end of the folder.
Segment mode examples (/r)
Recover PDF and Word files from your C: drive to the recovery folder on an E: drive.
| winfr C: E: /r /n *.pdf /n *.docx |
Recover any file with the string «invoice» in the filename by using wildcard characters.
| winfr C: E: /r /n *invoice* |
Signature mode examples (/x)
When using signature mode, it’s helpful to first see the supported extension groups and corresponding file types.
Recover JPEG (jpg, jpeg, jpe, jif, jfif, jfi) and PNG photos from your C: drive to the recovery folder on an E: drive.
| winfr C: E: /x /y:JPEG,PNG |
Recover ZIP files (zip, docx, xlsx, ptpx, and so on) from your C: drive to the recovery folder on an E: drive.
| winfr C: E:\RecoveryTest /x /y:ZIP |
When you are prompted for confirmation to continue, enter Y to start the recovery operation.
Depending on the size of your source drive, this may take a while.
To stop the recovery process, press Ctrl+C.
The following information can help you decide which file system you have and which mode to use.
There are several file systems supported by Windows that vary depending on the storage device or operating system. Recovering files from non-NTFS file systems is only supported in signature mode. To see which file system you have, right click a drive in File Explorer and select Properties.
SD cards, flash or USB drives ( 4GB)
Deciding which mode to use
Use the following table to help you decide which mode to use. If you’re not sure, start with the default mode.
Deleted a while ago
Segment, followed by Signature
After formatting a disk
Segment, followed by Signature
A corrupted disk
Segment, followed by Signature
Recovery file type is supported (see following table)
Signature mode extension groups and file types
The following table summarizes the extension groups and the supported file types for each group when you use the /y: switch
jpg, jpeg, jpe, jif, jfif, jfi
mpeg, mp4, mpg, m4a, m4v, m4b, m4r, mov, 3gp, qt
zip, docx, xlsx, pptx, odt, ods, odp, odg, odi, odf, odc, odm, ott, otg, otp, ots, otc, oti, otf, oth
The following table summarizes what each basic command line parameter and switch is used for.
Parameter or switch
Specifies the storage device where the files were lost. Must be different from the destination-drive.
Specifies the storage device and folder on which to put the recovered files. Must be different from the source-drive.
Uses segment mode, which examines File Record Segments (FRS).
Scans for a specific file by using a file name, file path, or wildcards. For example:
File name: /n myfile.docx
File path: /n /users/ /Documents/
Wildcard: /n myfile.*
/n *.docx
/n * *
Uses signature mode, which examines file types and works on all file systems.
Scans for files with specific file types. Separate multiple entries by using commas. For a list of extension groups and corresponding file types, see the table, «Signature mode extension groups and file types» in the section, «About modes and file systems».
Shows signature mode extension groups and corresponding file types in each group.
Shows a quick summary of syntax and switches for general users.
Shows a quick summary of syntax and switches for advanced users.
The following table summarizes what each advanced switch is used for.
Saves a log file of the recovery operation in a different location than the default location on the recovery drive (for example, D:\logfile).
Overrides user prompts, which is useful in a script file.
Recovers undeleted files, for example, from the Recycle Bin.
Recovers system files.
Specifies whether to always (a), never (n), orkeep both always(b) when choosing whether to overwrite a file. The default action is to prompt to overwrite.
Recovers files without primary data streams.
To keep your results manageable and focus on user files, some file types are filtered by default, but this switch removes that filter. For a complete list of these file types, see the information after this table.
Specifies which file types are filtered. For a complete list of these file types, see the information after this table.
Specifies the number of sectors on the source device. To find sector information, use fsutil.
Specifies the cluster size (allocation unit) on the source device.
First sector to scan on the source device.
Can you give some tips to help me use correct syntax?
Here are some suggestions:
Always use drive letters in the source and destination path, don’t forget the colon (:) after the drive letter, and make sure there is a space between the source and destination.
If a switch has a colon, such as /y:, don’t add a space between the colon and the rest of the value.
When you specify just a folder name, such as /n \Myfolder\, add a backslash (\) at the end of it.
If a file or folder name has spaces, surround it with quotes. For example:
winfr C: E: /n «\Users\ \Documents\Quarterly Statement.docx»
To stop the recovery process, press Ctrl+C.
What does mean in the command examples?
In the File Explorer address bar, enter C:\users to see a list of potential users on your computer. There may be several users on your computer, including you, the administrator, and the default account. When you see in a file path, it is a placeholder for the current username on your computer.
Why am I getting this message: «Source and Destination cannot refer to the same physical partition?»
The source and destination drive or partition path should not be the same. If you only have one drive, use a USB or external hard drive as your destination path. Don’t create a partition after losing data, because this reduces the chance of a successful recovery.
Why does the recovery operation take so long?
Depending on the size of the disk, it may take some time to recover the file, especially if you are using signature mode.
Why are additional files recovered from my operating system drive?
Behind the scenes, Windows is constantly creating and deleting files. By default, Windows File Recovery filters out these files, but some slip through. To prevent this, use the /n switch in default and segment modes and the /y: switch in signature mode.
What is the $Recycle.Bin folder?
For default and segment modes, you may also see lost files recovered from the Recycle Bin (files either in the recycle bin or that were permanently deleted) with the name $files.xxx and stored in a folder called $RECYCLE.BIN.
What happens if the destination drive is full?
If you see the following message: «Destination disk is full, please free up space before resuming: (R)esume, (S)kip file, or (A)bort», Free up drive space on the destination drive, and then choose one of the options.
I was not able to recover the file, now what?
If you used default or segment mode, try again in signature mode if the file type is supported. It’s possible that the free space was over-written, especially on a solid state drive (SSD). If you need help, contact your administrator.


