- How to Restore Missing Power Plan Options on Windows 10
- What Causes Power Options to go Missing?
- Solution 1: Restore Them Manually
- Command Prompt:
- Download the Files Yourself:
- Solution 2: Use the Following Registry Hack
- Solution 3: A Useful Workaround
- Solution 4: Check for the New Battery Slider
- How to refresh, reset, or restore your PC
- Before you start to refresh or reset your PC
- Refresh, reset, or restore
- To refresh your PC
- To reset your PC
- To restore your PC to an earlier point in time
- Why and How to Enable System Restore in Windows 10
- Getting to KnowВ System Restore
- System Restore in Windows 10
- Why System Restore is Important in Windows 10
How to Restore Missing Power Plan Options on Windows 10
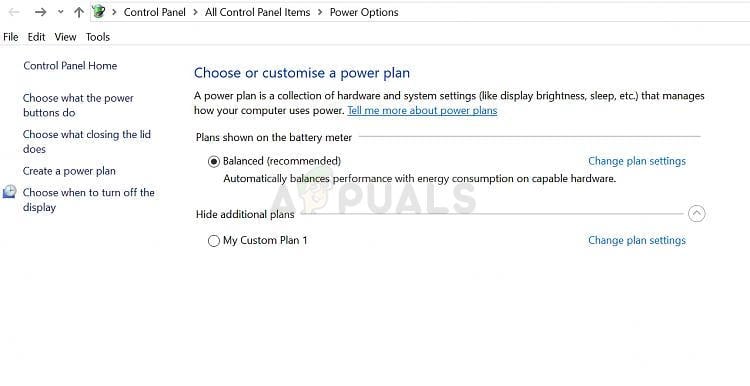
On Windows 10, Power Options allows you to customize your Power Usage – as per requirements. Technically, a power plan is a set of hardware and system settings that defines how power is used and preserved by your computer. There are three built-in power plans: Balanced, Power Saver and High Performance. They can be customised for your system, or you can create new plans based on them.
What Causes Power Options to go Missing?
Many users have reported variations of missing power plans, such as only balance power plan is available and the high performance power plan is missing. This could be due to a system corruption or a Windows Update recently installed which may have modified the registry or tweaked the power options.
We have gathered some working solutions so make sure you try them out. Good luck!
Solution 1: Restore Them Manually
If a Windows Update or something else you did has removed the power plans from your computer, you can get to them by running commands which will recreate them and have them available on your computer the same way as they were before. There are two ways you can do this and it depends on what you prefer.
Command Prompt:
You can restore the missing power plan settings simply by running several commands in Command Prompt.
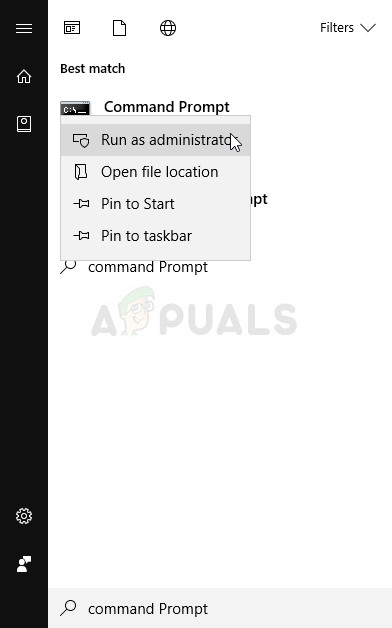
- Search for “Command Prompt” either right in the Start menu or by tapping the search button right next to it. Right-click on the first result which will appear at the top and select the “Run as administrator” option.
- Type in the following set of commands one after another and make sure you click Enter after typing each one and wait for the process to finish and display a “process successful” message:
Note: The last command can only work on Windows 10 versions after the 17101 build as it’s related to restoring the Ultimate Performance Power Plan available for the newest Windows 10 builds for workstations.
- Restart your computer and check to see if the power plans are back where they belong.
Download the Files Yourself:
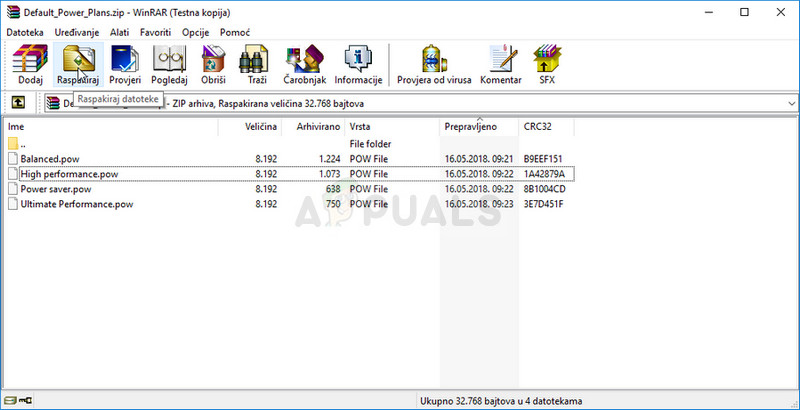
You can download the required files easily from a guide made by TenForums and it contains the “.pow” files which are used to represent a power plan.
- Click on this link in order to download the “.zip” file containing the power plans. Locate the file in your Downloads folder, right-click on it, and choose the Extract to option. Extract the files to any location but it’s best to keep it simple because of the following steps.
- Search for “Command Prompt” either right in the Start menu or by tapping the search button right next to it. Right-click on the first result which will appear at the top and select the “Run as administrator” option.
- Use the following command in order to install the required power plan:
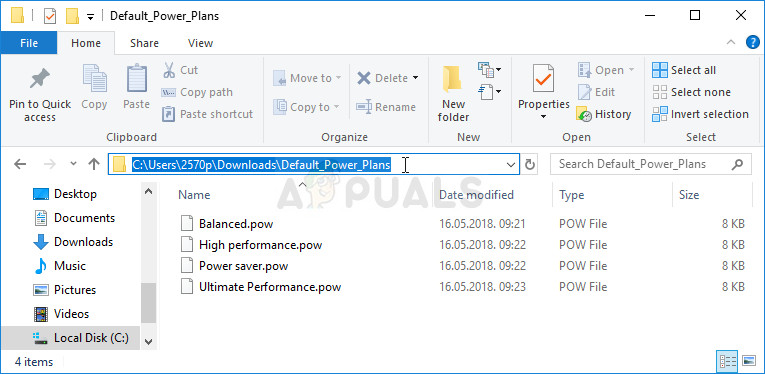
- In this scenario, instead of “Full path of .pow file”, you will have to paste the correct path to the file, in the folder you have extracted the files to. Let’s say you want to install the “Power saver” plan which is also named that way in the folder.
- Navigate to the folder where the files are located, click the address navigation bar at the top and copy the address after it has been selected. Head back to Command Prompt and paste the address. If the files were, let’s say, in the Downloads folder within their own folder called Default_Power_Plans, the command should look like:
- Make sure you repeat the same process for all power plans you want to install and check to see if they have returned in Control Panel.
Solution 2: Use the Following Registry Hack
If a Windows Update has indeed hidden these options, it’s possible that Windows it trying to replace this feature or push it into the history by replacing it with other features. If you still wich to use this exact option, you can turn it on using the following registry hack.
Since you will have to edit a registry key, we recommend you check out this article we have made for you to safely backup your registry to prevent unwanted side effects which shouldn’t occur if you just follow the steps carefully.
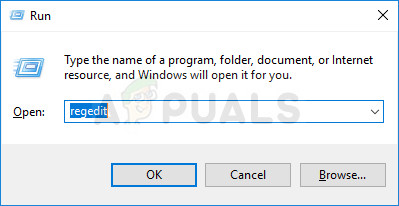
- Open the Registry Editor window by typing “regedit” in either the search bar, the Start menu, or the Run dialog box which can be accessed with the Windows Key + R key combination. Navigate to the following key in your registry by navigating at the left pane:
- Click on this key and try to locate an entry called CsEnabled at the right side of the window. If such option exists, right-click on it, and choose the Modify option from the context menu.
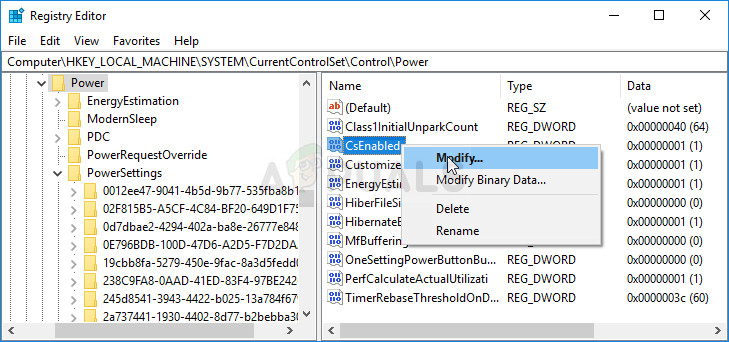
- In the Edit window, under the Value data section change the value from 1 to 0, and apply the changes you have made. Confirm any security dialogs which may appear during this process.
- You can now manually restart your computer by clicking Start menu >> Power button >> Restart and check to see if the problem is gone.
Note: If this didn’t work out for you, you can try adding an option to show these power plans individually for every power plan your computer knows about.
- Navigate to the following key in your registry by navigating at the left pane:
- You will be able to see plenty of weirdly named keys inside the PowerSettings key. Navigate to each one of these keys, right-click the right blank side of the, screen, and choose New >> DWORD (32bit) Value.
- Name each one of these values “Attributes” by right-clicking and choosing the Rename option. After that, right-click the newly created attributed value and choose the Modify option.

- Set the value to 2 under value data, keep the base in hexadecimal and click OK. Repeat the same process for each key in PowerSettings.
- Check to see if the problem is gone now.
Solution 3: A Useful Workaround
This workaround can be used quite easily if you want to add the power option which is missing quite easily. Since a new build of Windows usually only leaves the Balanced power plan intact, you can add it (or any other default plan) easily by creating a new plan which is exactly the same as this one.
- Right-click on the battery icon located in the system tray or the lower right part of your screen, next to time and date, and click on Power Options.
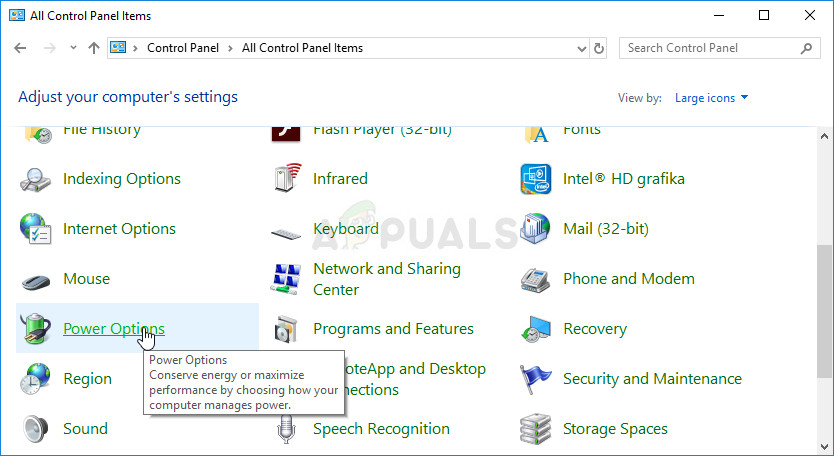
- If you have removed this from the system tray, click on the Start menu and search for Control Panel. Change the View by option to Large icons and click on the Power Options button.
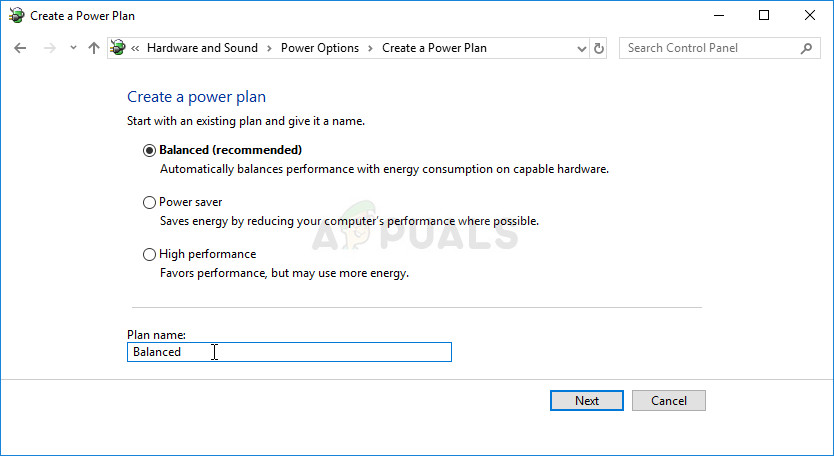
- At the left side of the window you should see several options displayed one under the other so click the Create a power plan option. You should see the Create a power plan window and a list of choices. Set the radio button to the power plan you wish to bring back.
- Under the Plan name, you can even name it the same way as it was originally named before clicking the Next button at the lower right part of the window.
- You will some additional settings, such as Turn off the display, Put the computer to sleep and Adjust plan brightness. You can set them up now or later, before clicking Create.
- You will now have access to this power plan so make sure you select it when necessary.
Solution 4: Check for the New Battery Slider
From the latest build of Windows, it appears that the power options have now started to change for users who didn’t perform the steps above and everyone will get to see the new slider you can use to either set everything to high performance or to save battery life.
Also, these settings will now be managed through the Settings tool and not via Control Panel.
How to refresh, reset, or restore your PC
Note: For information about this topic in Windows 10, see Recovery options in Windows 10.
If you’re having problems with your PC, you can:
Refresh your PC to reinstall Windows and keep your personal files and settings. Refresh also keeps the apps that came with your PC and the apps you installed from the Microsoft Store.
Reset your PC to reinstall Windows but delete your files, settings, and apps—except for the apps that came with your PC.
Restore your PC to undo recent system changes you’ve made.
If you’re having trouble starting (booting) your PC, see Windows Startup Settings (including safe mode), and go to the “Get to Windows Startup Settings in the Windows Recovery Environment” section. You can refresh, reset, or restore your PC from the Windows Recovery Environment.
If you want to back up and restore your personal files using File History, see Set up a drive for File History.
Before you start to refresh or reset your PC
In most cases, once you start to refresh or reset your PC, it’ll finish on its own. However, if Windows needs missing files, you’ll be asked to insert recovery media, which is typically on a DVD disc or thumb drive. If that happens, what you’ll need depends on your PC.
If your PC came with Windows 8.1 or Windows RT 8.1, you’ll need the discs or thumb drive that came with your PC. Check the info that came with your PC to see if your PC manufacturer provided these discs or media. In some cases, you might have created them when you first set up your PC.
If you don’t have either of those, you can make them if you have a USB thumb drive of 16 GB or larger. Having a recovery drive can help you troubleshoot and fix problems with your PC, even if it won’t start. For more info, see Create a USB recovery drive.
If you upgraded your PC to Windows 8.1 or Windows RT 8.1 with a DVD, use that disc. If you don’t have Windows 8.1 or Windows RT 8.1 media, contact Microsoft Support.
Refresh, reset, or restore
Select any of the following for more detailed info.
If your PC isn’t performing as well as it once did, and you don’t know why, you can refresh your PC without deleting any of your personal files or changing your settings.
Note: If you upgraded your PC from Windows 8 to Windows 8.1 and your PC has a Windows 8 recovery partition, refreshing your PC will restore Windows 8. You’ll need to upgrade to Windows 8.1 after the refresh has finished.
Warning: Apps you installed from websites and DVDs will be removed. Apps that came with your PC and apps you installed from Microsoft Store will be reinstalled. Windows puts a list of removed apps on your desktop after refreshing your PC.
To refresh your PC
Swipe in from the right edge of the screen, tap Settings, and then tap Change PC settings.
(If you’re using a mouse, point to the upper-right corner of the screen, move the mouse pointer down, click Settings, and then click Change PC settings.)
Tap or click Update and recovery, and then tap or click Recovery.
Under Refresh your PC without affecting your files, tap or click Get started.
Follow the instructions on the screen.
If you want to recycle your PC, give it away, or start over with it, you can reset it completely. This removes everything and reinstalls Windows.
Note: If you upgraded your PC from Windows 8 to Windows 8.1 and your PC has a Windows 8 recovery partition, resetting your PC will restore Windows 8. You’ll need to upgrade to Windows 8.1 after the reset has finished.
Warning: All of your personal files will be deleted and your settings will be reset. All apps that you installed will be removed. Only apps that came with your PC will be reinstalled.
To reset your PC
Swipe in from the right edge of the screen, tap Settings, and then tap Change PC settings.
(If you’re using a mouse, point to the upper-right corner of the screen, move the mouse pointer down, click Settings, and then click Change PC settings.)
Tap or click Update and recovery, and then tap or click Recovery.
Under Remove everything and reinstall Windows, tap or click Get started.
Follow the instructions on the screen.
Note: You’ll be asked to choose whether you want to erase data quickly or thoroughly. If you choose to erase data quickly, some data might be recoverable using special software. If you choose to erase data thoroughly, this will take longer but it makes recovering data less likely.
If you think an app or driver that you recently installed caused problems with your PC, you can restore Windows back to an earlier point in time, called a restore point. System Restore doesn’t change your personal files, but it might remove recently installed apps and drivers.
System Restore isn’t available for Windows RT 8.1.
Windows automatically creates a restore point when you install desktop apps and new Windows updates, if the last restore point is older than 7 days. You can also create a restore point manually at any time.
To restore your PC to an earlier point in time
Swipe in from the right edge of the screen, and then tap Search.
(If you’re using a mouse, point to the upper-right corner of the screen, move the mouse pointer down, and then click Search.)
Enter Control Panel in the search box, and tap or click Control Panel.
Enter Recovery in the Control Panel search box, and then tap or click Recovery.
Tap or click Open System Restore, and then follow the instructions.
If you need additional help refreshing, resetting, or restoring your PC, check out the Repair and Recovery community pages in the Windows forum for solutions that other people have found for problems they’ve experienced.
Why and How to Enable System Restore in Windows 10
Although considered an improvement in most respects over Windows 8, Microsoft’s upcoming Windows 10 — set to launchВ Wednesday, July 29thВ — curiously changes course on a relatively useful and important feature:В System Restore. Read on to find out why System Restore may be one of the first things you’ll want to enable after upgrading to Windows 10.

Getting to KnowВ System Restore
First introduced more than 15 years ago as part of Windows ME, System Restore tracks software installations, driver changes, and software updates, and allows a user to revert their PC to a prior state if one of the aforementioned events causes a problem. For example, System Restore canВ make a backup of a PC’s graphics card driver just before a new driver is installed. If that new driver causes an issue — e.g., distorted colors, reduced resolution, or a blank screen — the user can initiate a System Restore procedure that will revert Windows back to the original working graphics driver.

An early version of System Restore in Windows ME.
By default, Windows will create a record of the changes introduced by a system or software event — something called aВ restore point — automatically as changes occur on a user’s PC.В Users also have the option of manually creating restore points at any time, and are advised to do so before performing major upgrades or changes to the system.
Although sometimes likened to features like Time Machine in OS X, it’s important to note that System Restore isn’t a “backup” utility, at least not in the usual sense. It’s true that System Restore backs up important files related to Windows, such as registry files, drive and boot configurations, and hardware drivers, but the featureВ won’t back up your user data such as documents, music, or movies. Think of System Restore as backup for yourВ computer — the files that keep the system functioning, regardless of user data — rather than backup forВ you.
The feature wasn’t perfect, of course,В didn’t always work as intended, andВ required users to reserve a portion of each drive on which System Restore was enabled, but it was a handy and relatively easy to use safety measure that saved countless Windows users from bad drivers and botched upgrades.
But the true beauty of System Restore, as many computer repair technicians will attest, was that it was enabled by default on all recent versions of Windows. This often made software repairs for novice users much easier, as these users didn’t even know that System Restore was enabled on their PC, silently protecting them when they made the mistake of thinking that deleting their chipset drivers was a good idea.
As we’ve recently learned, however, that changes in Windows 10.
System Restore in Windows 10
The good news first: System Restore is available and fully functional in Windows 10. As we mentioned above, however, the bad news is that this feature is turned off by default. Even worse, the interfaceВ to enable and manage System Restore is relatively hidden in the legacy Control Panel, and isn’t something that a typical user will stumble upon while browsing the new Windows 10 Settings app.В That leaves users on their own to eventually discover the feature, hear about it from colleagues, or find an article like this one on the Web.
While there are new update and restore features built in to Windows 10, including the option to roll the system back entirely to the previous version of Windows, System Restore may still be a good choice for many users. Here’s how you can enable System Restore in Windows 10.
The easiest way to find the System Restore configuration window in Windows 10 is to simply search forВ it via the Start Menu. Just click on the Search or Cortana icon in your desktop taskbar, or tap the Windows Key on your keyboard, and typeВ System Restore.
You’ll see a search result appear labeled Create a restore point. Click itВ and you’ll be taken directly to the System Protection tab of the System Properties window, which is where System Restore options are located.В Alternatively, you can navigate to this same location viaВ Control Panel > System > System Protection.
If you’ve used System Restore in a previous version of Windows, you’ll recognize the interface. All eligible drives will be listed in the “Protection Settings” portion of the window, and you’ll need to manually enable System Restore on each drive you want protected. Due to the nature of System Restore, however, most users will only need to enable it on their primary C drive to gain adequate protection.
To enable System Restore in Windows 10, select your desired drive from the list and clickВ Configure. In the new window that appears, click the optionВ labeledВ Turn on system protection.
System Restore is useless without drive space in which to store its restore points, of course, so you’ll also need to reserve a portion of your drive for this purpose in the Disk Space Usage section of the window. As you drag the slider to the right, you’ll see the designated usage space represented both in actual size as well as a percentage of your drive. The more space you assign to System Restore, the more restore points you’ll have at your disposal in the event of a critical system issue. Assigning too much space, however, limits what’s available to you for applications and user data, so be sure to strike a good balance. On all but the smallest of drives, we recommend reserving at least 10GB for System Restore.
With your changes made, clickВ Apply and thenВ OK to save your new configuration and close the window. System Restore will now be enabled for your selected drive, and you can let it operate automatically in the background or manually create restore points as desired. If you ever encounter an issue and need to perform a System Restore, just head back to this same window and clickВ System Restore to launch the restore interface. Of note, in the event of catastrophic issues where Windows is no longer bootable, you can access your system restore points from the Windows 10 recovery environment.
Why System Restore is Important in Windows 10
As we mentioned earlier, System RestoreВ has served an important role for many users over the past 15 years of Windows, but it may be especially important for Windows 10 users in mission critical environments. In the lead up to the launch of Windows 10, Microsoft has revealed that most Windows 10 users will be required to apply system updates via the Windows Update service.
Microsoft has long used Windows Update to deliver security patches, bug fixes, and new features to users, and most users were strongly urged to accept the updates as they became available. But a measurable number of Windows users failed to update in a timely manner, and there was nothing Microsoft could do to force these users to upgrade.
Some users had good reasons to delay or avoid applying Windows updates: updates could potentially conflict with certain software or hardware, particularly in large businesses where custom software and configurations are common, and some updates were known to have bugs that caused crashes or system instability. Other users simply neglected proper maintenance procedures and chose to leave their PCs unpatched.
Whatever the reason for avoiding Windows Updates, large numbers of Windows installations are currently running without the latest updates, a problem that creates a significant security vulnerability and one that Microsoft seeks to fix with Windows 10. Here’s how the Windows 10 update situation breaks down:
For all intents and purposes, there are three versions of Windows 10 that will be running on PCs this year: Windows 10 Home, Windows 10 Pro, and Windows 10 Enterprise. Most consumers will get their free upgradeВ to Windows 10 Home or Pro based on the version of Windows 7 or 8 they are currently running.

When it comes to Windows updates, Windows 10 Home users will be required by the Windows EULA to accept and installВ all security and feature updates that Microsoft releases. Some options exist to delay the installation of these updates for a short period of time, but Windows 10 Home users will get all Windows updatesВ soon after they are released.
Windows 10 Pro users, on the other hand, have a little bit more flexibility, but it comes with a pretty big catch. These users can defer Windows updates for up to 8 months by electing to join the Current Branch for Business (CBB), an update roadmap intended for businesses that need to manage and schedule updates for large groups of mission critical systems. Beyond that maximum 8-month staging period, however, Windows 10 Pro users won’t be able to receive any future security fixes or feature improvements until they’ve accepted all previous updates.
Out of these three primary versions of Windows 10, only Windows 10 Enterprise users have the ability to truly defer updates, and they can do so forВ years while still receiving support from Microsoft. This was a necessary concession by Microsoft, of course, to ensure that enterprise customers have the flexibility to accommodate their unique needs, and Windows 10 Enterprise customers are paying for the privilege, as this version of Windows is ineligible for the free upgrade offer.
This move by Microsoft to force most Windows 10 users to accept updates will likely be a positive change overall — preventing and combating security threats will be easier once theВ majority of Windows users are running the latest version of the operating system — but it’s sure to cause issues for some users, especially in the early days. That’s where System Restore comes in.
Chances are that you’ll be running a version of Windows 10 covered by Microsoft’s mandatory update policy.В In addition to proper user backups (you’re keeping good backups of your data, right?) and the recovery tools included in Windows 10, System Restore can provide another layer of security if one of these upcoming mandatory Windows updates has an inherent problem, or at the very least causes a compatibility issue unique to your PC and configuration. You’ll need to give up a small portion of your drive for system restore points, but it’s likely that you won’t give that small sacrifice a second thought if a future botched update forces you to turn to System Restore.
We hope that Microsoft eventually sorts out this new process for updating Windows, and that future updates are extremely reliable. Until then, however, it’s almost a certainty that some Windows 10 updates will slip through with potentially catastrophic bugs and compatibility issues. Absent abandoning Windows entirely, users will be forced to accept this new reality, and while the vast majority of users will be completely fine, it won’t hurt to have a handy System Restore point standing by in case of trouble.


