- Resetting NTFS files security and permission in Windows
- Share this:
- Like this:
- Related
- 151 Replies to “Resetting NTFS files security and permission in Windows”
- How to reset all user permissions to default?
- How to Reset NTFS Permissions Using a Simple, Free utility
- What are NTFS Permissions?
- Why do I need to reset NTFS Permissions?
- How to reset the NTFS Permissions using a UI tool
- Tool: Advanced Users
- Conclusion
Resetting NTFS files security and permission in Windows


I was running Vista with two NTFS partitions (C: and D:), then formatted C: partition and installed Windows 7. The second partition (D:) had some files security set on files and folders.
After Windows 7 was installed, some files on drive D: were not accessible anymore and I was getting “Access Denied”. I tried to right-click/properties on the folders that were not accessible and changed their owner and changed permissions but still some folders were still inaccessible not matter what I did.
After some research, it turned out the tool “cacls” that allows one to display or change ACLs (access control lists) can help to reset ACLs. In Windows 7 it is called “icalcs”.
To reset files permissions, follow these easy 3 steps:
Step 1: Run “cmd” as Administrator.
Note: In MS Windows 8 and above, press the Win+X keys, then choose “Command Prompt (Admin)”.
Step 2: Go to the drive or folder in question, for example:
Step 3: To reset all the files permissions, type:
That’s it! After that, the files permissions were reset and I could access them back again.
Very Important note:
Step 3 is irreversible. Make sure you backup the permissions before you proceed!
It is possible that “icacls” might fail. For that try to take ownership of the files first. Just before Step (3), please type the following command:
 Do you want to master Batch Files programming? Look no further, the Batchography is the right book for you.
Available in print or e-book editions from Amazon.
You might also like:
Share this:
Like this:
Related
151 Replies to “Resetting NTFS files security and permission in Windows”
Fantastic!! Thank you so very much for sharing. I messed-up my permissions and this did the trick.
i did this but it didn’t work because i got access denied on all files in my D drive
Before running this command, do the following:
1. Right click on the folder in question then choose Properties
2. Select the Security tab.
3. Click the Advanced button.
4. Select the Owner tab.
5. Click Edit
6. Select your user name and check the box marked Replace owner on subcontainers and objects.
7. Click OK
Now you should be able to run the command mentioned in this article successfully.
Thanks! This did the trick for me!
Dude! Awesome! This is what finally worked for me. I have spent hours over days trying to fix this and only by doing your method did it work for me. Gracias…
yes!! it finally worked after hours of web searching. that was immensely helpful and did the trick. thank you!
Tanx a million. I were loosing all my photos and videos! it helped me:)
thx sir i full day up said for thiz problam thank u
And that can I do when I am missing Security tab?
Try to type first:
Then proceed as normal.
I had this problem with a client’s Vista laptop hard drive that would not boot at all and had no restore point to recover from. None of the usual tricks to make Windows work again would coax it back to boot – even in safe mode. Curiously, the hard drive itself passed ALL diagnostics with Linux tools such as Parted Magic and Knoppix as being a happy home for data. It’s purely a Windows thing.
After losing most of the rest of my very short hair and somewhat sane mind, I did a lot of research on forums such as this and found a trick that worked. Boot into safe mode and the drive is accessible. None of the dreaded Access is Denied foolishness. (Of note, the drive is mounted in a USB to SATA external enclosure.) Files can easily be copied to a flash drive or even the primary hard drive Windows has booted from.
Here’s something to note. If the volume is not accessible in regular Windows mode but has a drive letter, try to use a system level tool such as antivirus app, malware bytes, etc. and see if it will scan it. If it will, you’ll be able to see the files listed as the tool does its thing.
If you don’t fancy using Safe Mode to access the volume, it is possible to right click on the drive letter, choose Properites, then the Tools tab and use Windows Backup to backup selected folders to another drive. Then reverse the process and restore the backup to a different destination. It’s time consuming to do it this way and requires a little more know how and careful attention than booting into safe mode, but it does work.
Hope this helps save someone.
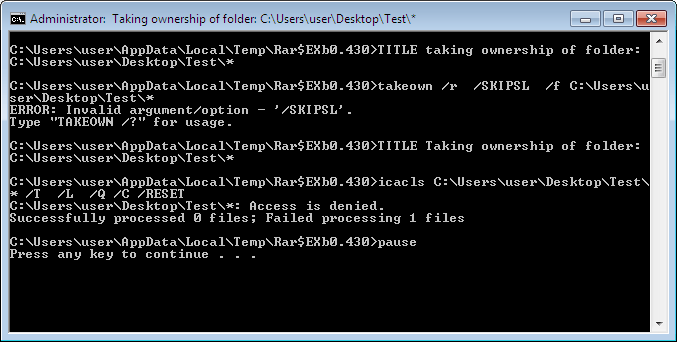
By the way, the Takeown command “worked” in that it granted access to every file and folder on the stubborn drive, but it didn’t help because the Access is Denied message wouldn’t permit the drive to be mounted in the first place.
I would suggest using the graphical utility (http://lallouslab.net/2013/08/26/resetting-ntfs-files-permission-in-windows-graphical-utility/) because it has an option to take ownership before resetting the permissions.
Please try it and let me know if that really helps or not.
Even when I go to change the ownership of the objects thru Properties> Advance> Security option, it says ‘Access Denied’ (even when mine is a fully admin account).
I’m unable to take ownership or change permissions to main windows folders in C drive.
Likewise, even running from safe mode cmd prompt as administrator I got access denied on all files and folders even though I know I’m owner with full permissions on many of the folders I tried. Any thoughts?
@alrieza, Jonny: I would suggest trying to run cmd as system account then trying to reset the permissions.
You need PsExec tool.
WindowsITPro link broken, here is new linky
recomend to do this in windows repair environment worked like a charm it didnt work in safe mnode for me neither
thanks for this post !
It solved my problem
thanks alot solved 100 problems of mine .
i tried FIXIT from microsoft Not workes but this worked like a charm
with regards
Kutub
Hey I just wanna say thanks a lot for this fix it helped me after I tried to restrict access to the Guest account and messed up the permissions. This system is so convoluted!
Likewise, even running from safe mode cmd prompt as administrator I got access denied on all files and folders even though I know I’m owner with full permissions on many of the folders I tried
I want to change the permissions on the users folder in windows 7 back to the defualts. When I try this however, it gives access denied and also that “the system cannot find the path specified”. I am the owner and have administrator rights.
I have played around with the permissions and think I messed something up. Now my backup program, syncback, runs into the infinite application data loop on the defualt folder in the users folder.
How to reset all user permissions to default?
I accidentally stopped a user permission change task and now my system is all messed up, programs won’t load correctly after reboot, etc.. . I can’t change the permissions back because it tells me that I do not have access to certain folders. When I try to find these folders to change them manually, for some reason they are not visible any more. (I have show hidden files to show them)
I tried a system restore and the restore points are corrupt, so, I have been looking for a way to reset all permissions to default or factory setting if you will.
Is there any way to reset all permissions to default without going one by one?
Any help will be much appreciated!!
Welcome to Microsoft Answers!
You will need to run ‘Subinacl Tool’ to reset the permission to normal. To reset system permissions, follow the steps:
1. Download subinacl.msi from the following link, and save it on the desktop.
http://www.microsoft.com/downloads/details.aspx?FamilyID=e8ba3e56-d8fe-4a91-93cf-ed6985e3927b&displaylang=en#AffinityDownloads (http://www.microsoft.com/downloads/details.aspx?FamilyID=e8ba3e56-d8fe-4a91-93cf-ed6985e3927b&displaylang=en#AffinityDownloads)
2. On the desktop, double-click subinacl.msi to install the tool.
3. Select C:\Windows\System32 as the destination folder.
Note This step assumes that Windows is installed in C:\Windows. If Windows is installed elsewhere, select the appropriate path to .\System32.
4. Open Notepad.
5. Copy the following commands and then paste them into the opened Notepad window.
subinacl /subkeyreg HKEY_LOCAL_MACHINE /grant=administrators=f
subinacl /subkeyreg HKEY_CURRENT_USER /grant=administrators=f
subinacl /subkeyreg HKEY_CLASSES_ROOT /grant=administrators=f
subinacl /subdirectories %SystemDrive% /grant=administrators=f
subinacl /subkeyreg HKEY_LOCAL_MACHINE /grant=system=f
subinacl /subkeyreg HKEY_CURRENT_USER /grant=system=f
subinacl /subkeyreg HKEY_CLASSES_ROOT /grant=system=f
subinacl /subdirectories %SystemDrive% /grant=system=f
6. In Notepad click File, Save As, and then type: reset.cmd
7. In Notepad click Save as type, and then select All Files (*.*).
8. Save the reset.cmdfile to your desktop, and close Notepad.
9. Double-click the reset.cmdfile to reset the Windows Update permissions.
Note This step may take several minutes, so please be patient. When the permissions have been reset, you will be prompted with «Finished, press any key to continue.»
10. Press any key to complete the installation.
Check if you have the right permissions to all the folders for all users.
For more information you may check the article given below. The article given is for Windows XP updates, but still holds good for Windows Vista as well as Windows 7.
Hope this information is helpful.
Microsoft Answers Support Engineer
Visit our Microsoft Answers Feedback Forum and let us know what you think.
How to Reset NTFS Permissions Using a Simple, Free utility
Do you need to reset the NTFS Permissions of a file or folder?
Tired of using command line tools?
Here you’ll find a How To guide on how to use an easy-to-use UI tool that gets you covered!
What are NTFS Permissions?
In the Windows operating system, the New Technology File System (NTFS) permissions are used to control the access to files and folders and prevent inadvertent changes from unauthorized users as well as malicious applications.
Why do I need to reset NTFS Permissions?
So, when you do not have sufficient permissions to control the resources on your system, resetting the NTFS permissions may be the only solution you have.
You can reset the NTFS permissions of files and folders directly from the command line. However, if you are not tech-savvy and following commands make your head to spin, you can use a very light utility called Reset NTFS file permission (actually, it’s about 60 KB!).
The tool has an easy-to-use interface with minimal features that will ensure the task is completed quickly and effectively. Before launching it, you need to ensure you enjoy administrative privileges on the system.
The Reset NTFS permissions utility is simply a shell that works by combining various utilities from Microsoft, including:
- icacls.exe – alters files permissions
- takeown.exe – takes files ownership
- attrib.exe – alters files attributes
All the commands that are going to be executed are displayed to you beforehand in a text area, allowing you to make any necessary tweaks before they are executed.
How to reset the NTFS Permissions using a UI tool
Here is the process for resetting NTFS permissions using this graphical tool.
1. Download the Reset NTFS file permission tool from here. It is provided for free.
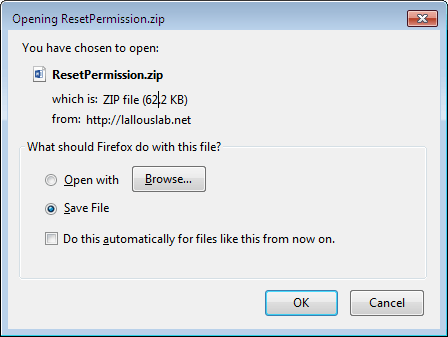
2. Open the zipped folder and run the executable file.

3. Enter the password (the current password is lallouslab) and click “Ok”.

Thereafter, a simple user interface will pop up, which allows you to specify various settings for using the tool.
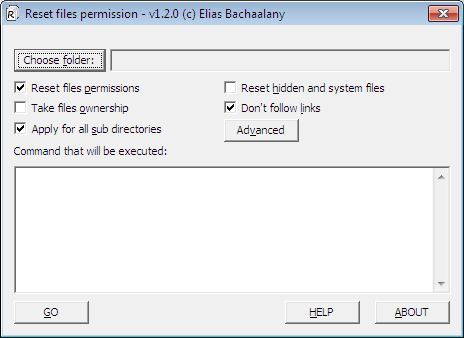
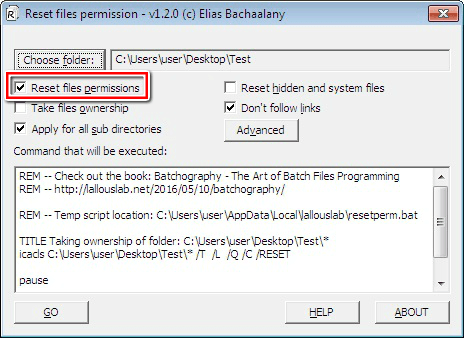
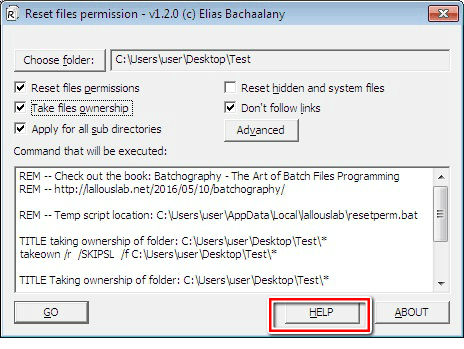
4. To select the folder you intend to reset its permissions, click the “Choose folder” button. After selecting the folder, click “Ok”.

5. The “Reset files permissions” feature is the fundamental option that enables the utility to carry out its function. Although it is ticked by default, you may uncheck it if you intend to carry out other tasks.
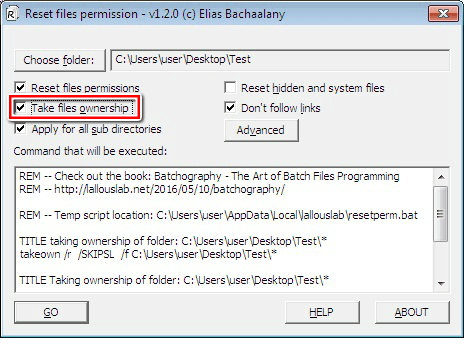
6. Checking the “Take files ownership” feature allows you to take ownership of the file or folder prior to resetting the permissions. If you are not the owner of the file, you may select this option to gain more control.
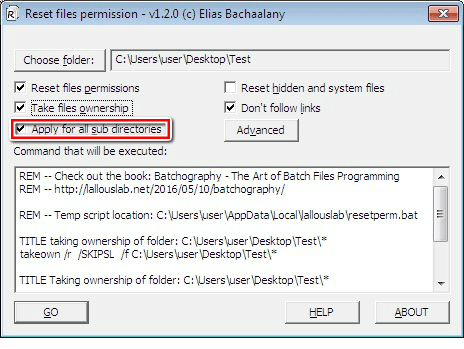
7. The “Apply for all sub directories” feature is useful if you intend to reset the permissions recursively. If you check this option, the permissions for every file and folder inside the chosen directory will also be reset.
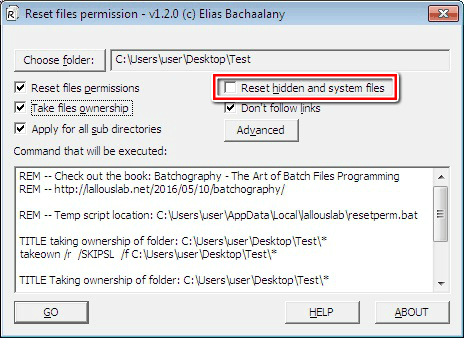
8. The “Reset hidden and system files” feature enables you to change the visibility of all the system files from invisible to visible as well as deactivate their respective file attributes.
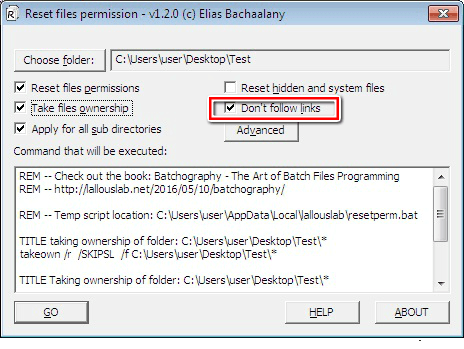
9. The “Don’t follow links” feature is only applicable to the “Reset files permissions” and “Take files ownership” options. You can use it if following any links is unnecessary.
10. Once you’ve applied the settings you want, which will also be displayed in the text box, click the “GO” button.
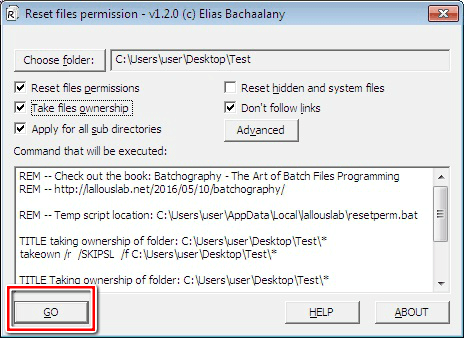
Thereafter, the Windows command line will appear displaying the executed commands. You can press any key to quit the command line.
Clicking the “HELP” button will take you to the website of the tool’s developer.
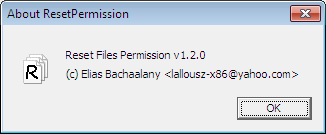
And, clicking the “ABOUT” button will display the tool’s version number and contact details of its developer.
Tool: Advanced Users
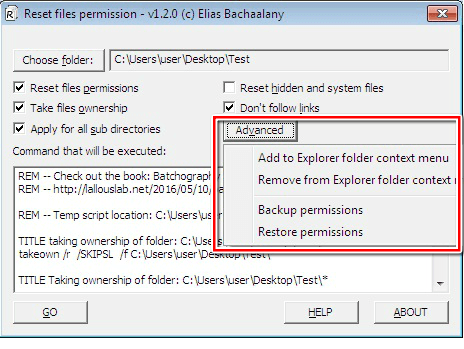
To access more advanced features, click the “Advanced” button.
Thereafter, a small window will pop up with the following options:
- Add to Explorer folder context menu
- Remove from Explorer folder context menu
- Backup permissions
- Restore permissions
The “Add to Explorer folder context menu” feature allows you to add a new option called “Reset Permission” to individual files and folders. This way, you can reset the NTFS file permissions directly by right-clicking the folder or file.
If you select this option, a small window will pop up asking you to confirm the next step.
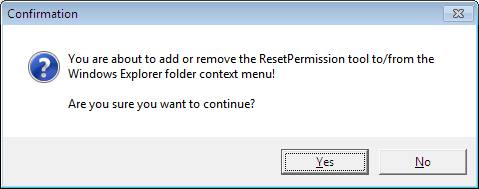
Thereafter, the “Reset Permission” feature will be added to the specified file or folder.

If you want to remove this feature, just select the “Remove from Explorer folder context menu” option and click “Yes”.

The “Backup Permissions” feature allows you to backup the present permissions on a folder prior to resetting them. This way, if your changes result into some errors, you can easily retrieve your backed up permissions. Sounds nice?
If you click the “Backup Permissions” option, you will be directed to a location you can save the permissions as a text file.
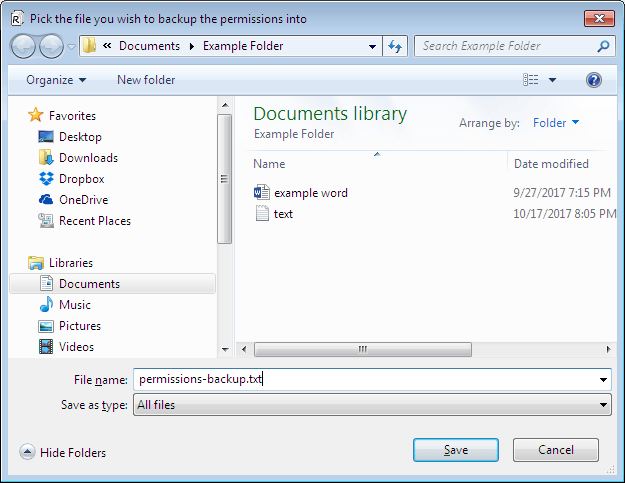
After picking the location, press “Save”.
Just a moment, you are not free to leave, yet!
The details of your commands will be displayed in the utility’s text area for you to confirm.
You’ll need to press the “GO” button for the command to be executed and the file permissions to be backed up.
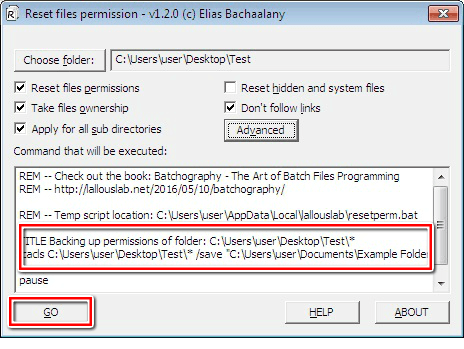
Consequently, you can now safely go ahead to reset the NTFS file permissions with the full confidence that if anything happens, you can easily restore the backed up file permissions by clicking “Restore Permissions” and following the prompts.
Conclusion
The Reset NTFS Permissions utility is what you need to easily and conveniently reset file and folder NTFS permissions without worrying about the complications of the command line.
Also, it’s important to note that this utility is not a virus or Trojan, as some antivirus solutions could identify it to be.
So, if any antivirus solution identifies it as a virus or Trojan, just ignore the false sense of security and continuing enjoying the use of this nifty little versatile utility.
Do you have unclear NTFS Permissions assignments?
Do you have too many special permissions set on your fileservers?
Or blocked NTFS Permission Inheritance?
Protect yourself and your clients against security leaks and get your free trial of the easiest and fastest NTFS Permission Reporter now!


