- Recover lost or deleted files
- 3 Ways to Restore Files from Windows 10/8/7 Backup
- Method 1: Restore files from backup with File History
- Method 2: Restore files with Backup and Restore(Windows 7) in Windows 10
- Method 3: Restore files from backup with AOMEI Backupper Standard
- Move files off a Windows 7 PC using Backup and Restore
- Back up files from a Windows 7 PC
- Restore files on a Windows 10 PC
- Get more info about moving to Windows 10
Recover lost or deleted files
Note: If you’ve recently updated Windows 10 and are having problems finding files, see Find lost files after the upgrade to Windows 10.
If you can’t find a file on your computer or you accidently modified or deleted a file, you can restore it from a backup (if you’re using Windows backup) or you can try to restore it from a previous version. Previous versions are copies of files and folders that Windows automatically saves as part of a restore point. Previous versions are sometimes referred to as shadow copies.
To restore a file from a backup, make sure the media or drive that your backup is saved on is available, and then follow these steps:
To restore files from a backup
Open Backup and Restore by selecting the Start button  , selecting Control Panel, selecting System and Maintenance, and then selecting Backup and Restore.
Select Restore my files, and then follow the steps in the wizard.
Restore deleted files and folders or restore a file or folder to a previous state.
To restore a deleted file or folder
Open Computer by selecting the Start button , and then selecting Computer.
Navigate to the folder that used to contain the file or folder, right-click it, and then select Restore previous versions. If the folder was at the top level of a drive, for example C:\, right-click the drive, and then select Restore previous versions.
You’ll see a list of available previous versions of the file or folder. The list will include files saved on a backup (if you are using Windows Backup to back up your files) as well as restore points, if both types are available.
Note: To restore a previous version of a file or folder that’s included in a library, right-click the file or folder in the location where it’s saved, rather than in the library. For example, to restore a previous version of a picture that’s included in the Pictures library but is stored in the My Pictures folder, right-click the My Pictures folder, and then select Restore previous versions.
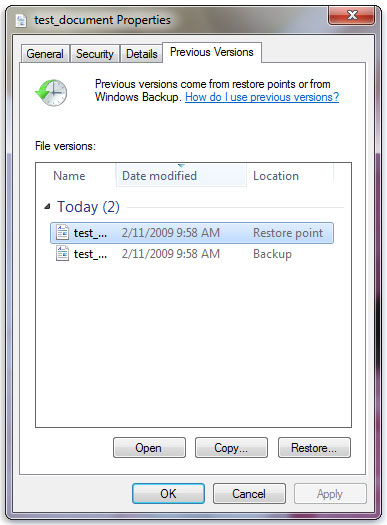
Some previous versions of files
Double-click a previous version of the folder that contains the file or folder you want to restore. (For example, if a file was deleted today, choose a version of the folder from yesterday, which should contain the file.)
Drag the file or folder that you want to restore to another location, such as your desktop or another folder.
The version of the file or folder is saved to the location that you selected.
Tip: If you don’t remember the exact file or folder name or its location, you can search for it by typing part of the name in the search box in the Documents library.
To restore a file or folder to a previous state
Right-click the file or folder, and then select Restore previous versions.
You’ll see a list of available previous versions of the file or folder. The list will include files saved on a backup (if you’re using Windows Backup to back up your files) as well as restore points, if both types are available.
The Previous Versions tab, showing some previous versions of files
Before restoring a previous version of a file or folder, select the previous version, and then click Open to view it to make sure it’s the version you want.
Note: You can’t open or copy previous versions of files that were created by Windows Backup, but you can restore them.
To restore a previous version, select the previous version, and then select Restore.
Warning: The file or folder replaces the current version on your computer, and the replacement can’t be undone.
Note: If the Restore button is unavailable, you can’t restore a previous version of the file or folder to its original location. You might be able to open it or save it to a different location.
3 Ways to Restore Files from Windows 10/8/7 Backup
The best time to create a file backup is when your computer is working properly, then you can restore files from backup in Windows 10/8/7 easily and quickly.

By Ivy  / Last Updated December 16, 2020
You will never want to use your backup unless something bad happens and damage or corrupt your files or system. But if you lose any files, you still can restore files from backup to minimize the loss. Please stay for a while to learn the stepwise guide in the following. It may save all the files you cherish, whether it’s working documents, family photos, videos, movies or other files.
Here are three ways in total, you could use Windows backup software — File History, Backup and Restore Windows 10, or third-party software AOMEI Backupper Standard. Anyway, you need to create a backup image at first. If you don’t have, please refer to the following articles and backup files now.
To backup entire system with Backup and Restore(Windows 7) in Windows 10: Windows 10 Backup and Restore
Then, you can continue to see below and learn how to restore files from backup with these backup and restore software.
Method 1: Restore files from backup with File History
File history is a file backup software in Windows 8/8.1/10 to help you backup files and then restore files to a previous version or recover the deleted files in the event of a disaster. Without further ado, let’s start to restore files from Windows 10 file history backup.
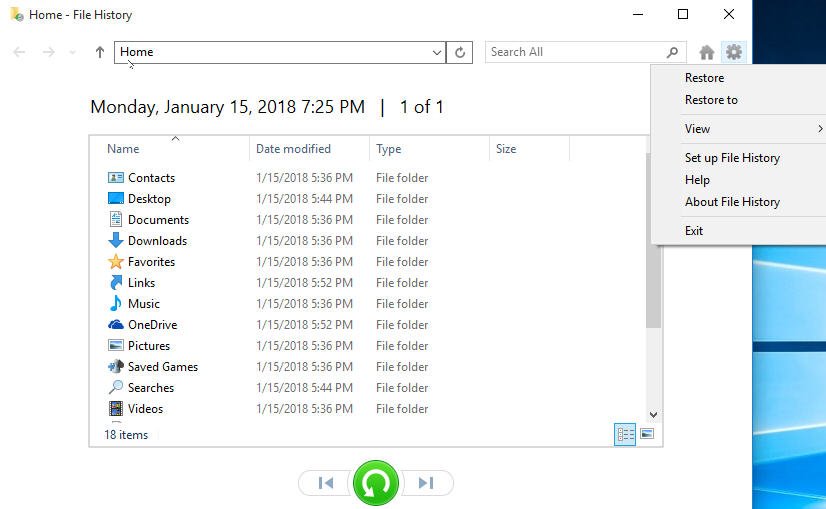
Step 1. Type file history in the search box, and then you will see the Restore your files with File History option. Please select this option from the result list.
Step 2. Click the left arrow or right arrow to find the latest file version and select the files you want to restore.
Step 3. Click the green restore button to restore the selected files. If you want to restore your files to a different location, you can click the Settings icon -> the Restore to option to select a new path.
Please note that sometimes file history is not working as expected. Some users report that there is still no file on thebackup drive in a few days, but they clearly see some words, saying, «File History is saving copies of your files», which indicates the backup is running normally.
Method 2: Restore files with Backup and Restore(Windows 7) in Windows 10
Backup and Restore was introduced in Windows 7, and later inherited in Windows 8/10, which can help you create a system image backup for your computer and then restore system image to new hard drive or SSD. Also, it gives you a chance to restore individual files, because all the files on the system partition will be included in this backup.
Then, let’s get started to restore files with Backup and Restore(Windows 7) in Windows 10. Also, these steps are also applicable to restore files from backup in Windows 7 and Windows 8.
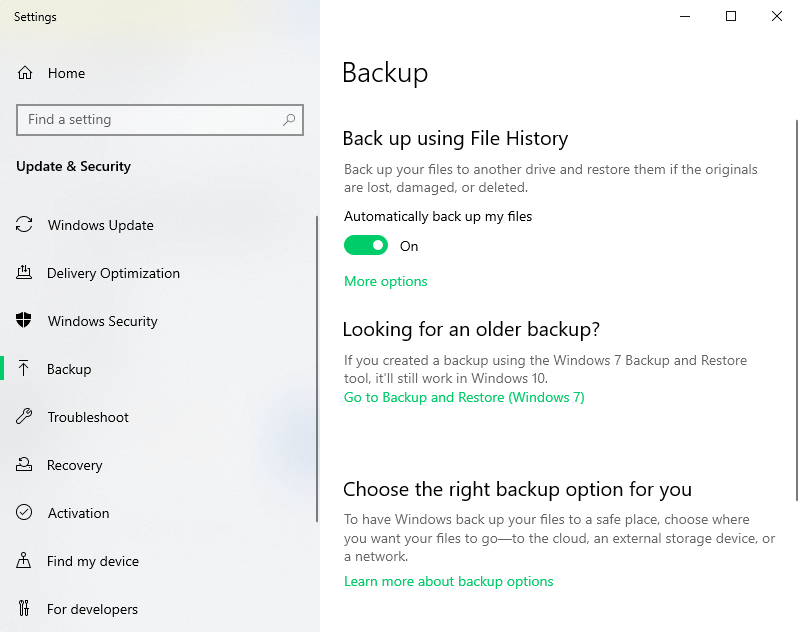
Step 1. Type backup settings and then select it. Then, you will see a Backup page, scroll down to «Looking for an older backup?» and click Go to Backup and Restore (Windows 7).
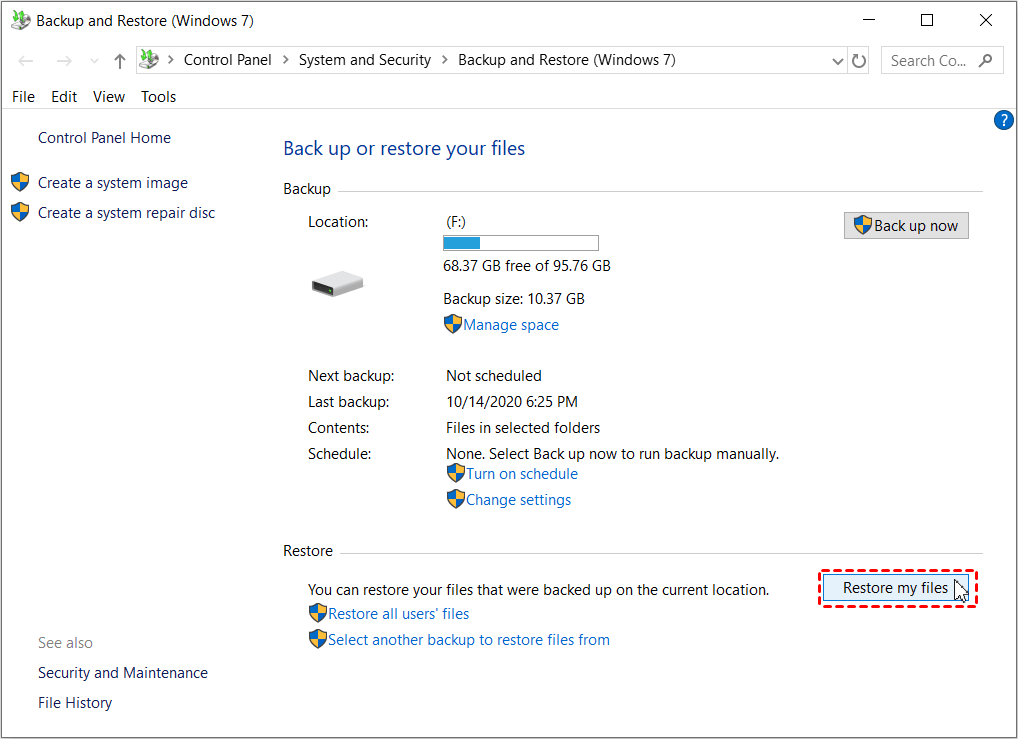
Step 2. Then, you will enter the Backup and Restore page, click «Restore my files» at the lower location.
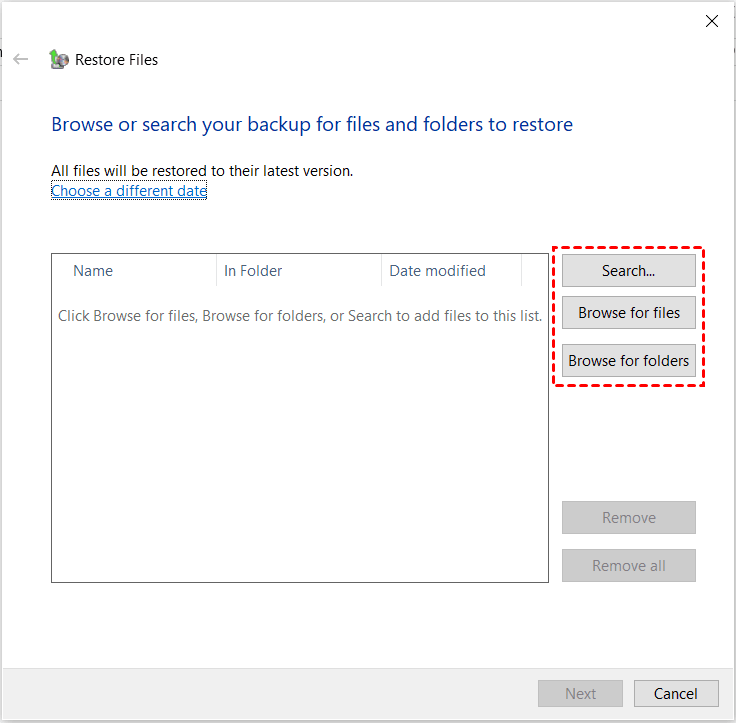
Step 3. In the Restore files page, click Search, Browse for files or Browse for folders to find files or folders you want to restore and select them.
Search: You just need to type part of the name of files and select the files you want to restore.
Browse for files: You can search the folder containing files you want to restore and then select it -> click Add Files.
Browse for folders: You can add entire folder to be restore.
Step 4. Select «In the original location» or «In the following location» to store your files.
Step 5. Click Restore to start the pending operation.
Backup and Restore(Windows 7) seems to be a great choice, which not only backup system, but also backup files stored in the system partition. Thus, you can restore either system image or file backup from this backup. But it will not include files outside the system partition.
Method 3: Restore files from backup with AOMEI Backupper Standard
AOMEI Backupper Standard is a free yet professional backup and restore software to help you protect system and data on it. With it, you can backup files/partition/system/disk in Windows XP/Vista/7/8/10 in simple steps. Then, you can restore files and other items per your needs.
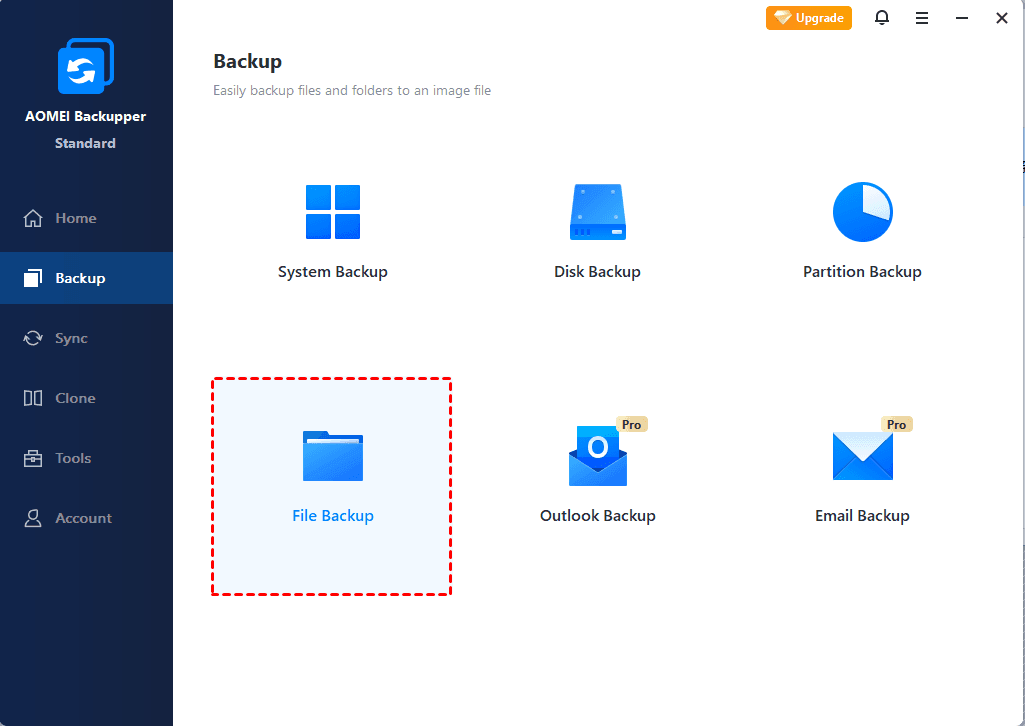
Please note that AOMEI Backupper Standard can only restore files from backup created by itself. If you don’t have a file backup, please download this software first and create a file backup with its «File Backup» feature.
To ensure you can restore files from backup in Windows 10 smoothly, please prepare a file backup ahead of time. If the backup image is created on the external hard drive, you need to connect it on your computer.
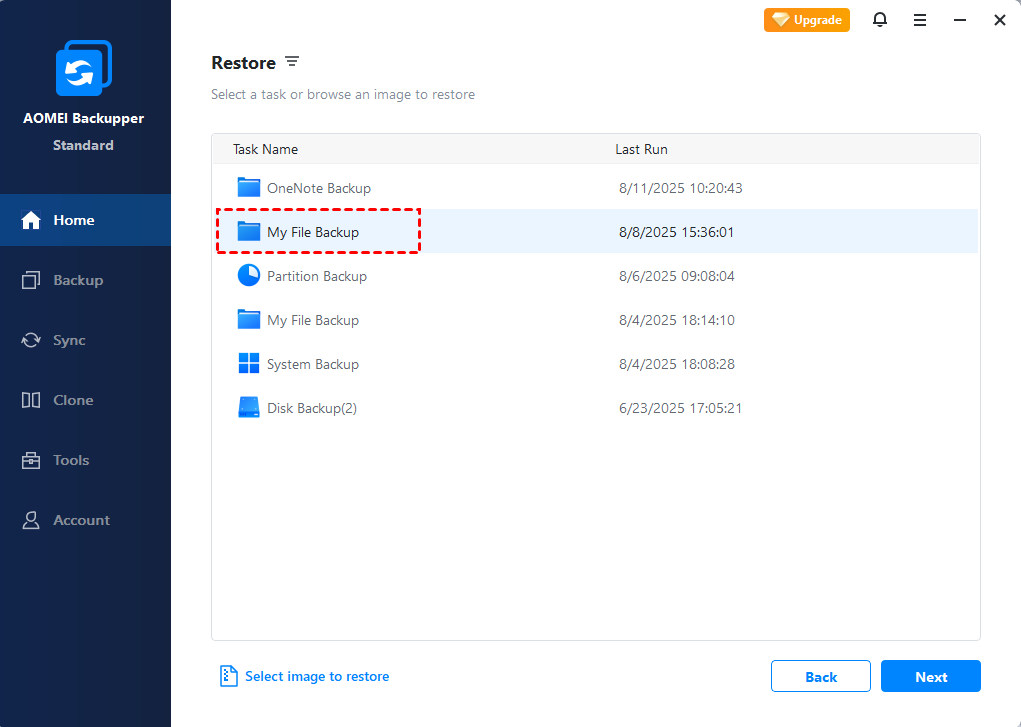
Step 1. Click Restore and Select Task to find the image file.

Step 2. Choose the file backup containing all your files and then click “Next”.
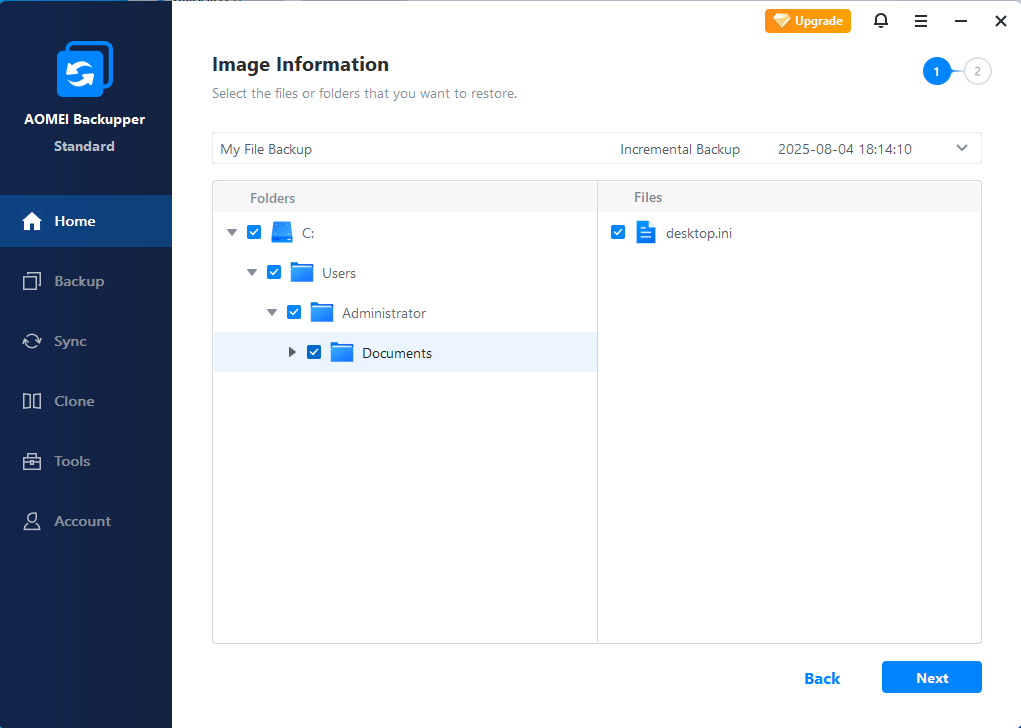
Step 3. Select files or folders you want to restore and then click “Next” to continue.
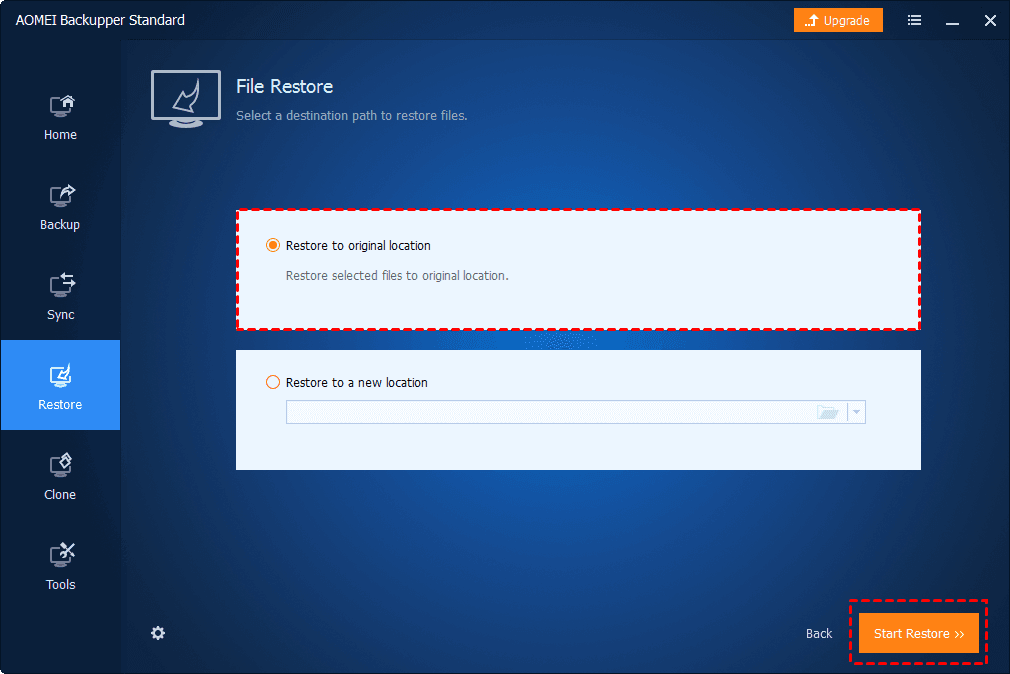
Step 4. Select «Restore to original location» or «Restore to a new location» to store the files. Then, click “Start Restore” to restore files from backup on external hard drive.
That’s all for how to restore files from backup in Windows 10/8/7, you have three options. File history is only suitable for Windows 8/8.1/10 users while the other two ways can be used on more system, for example, Windows 7.
Among them, AOMEI Backupper Standard is the easiest. And it’s an all-in-one backup and restore software, thus it’s a better choice to protect your computer, either system or personal data.
It supports file backup, system backup, disk backup, schedule backup, incremental & differential backup, USB plug in, create bootable media etc. To unlock all the useful features, you could consider upgrading to AOMEI Backupper Professional.
Move files off a Windows 7 PC using Backup and Restore
You can use your PC’s Backup and Restore feature to help you move all your favorite files off a Windows 7 PC and onto a Windows 10 PC. This option is best when you have an external storage device available. Here’s how to move your files using Backup and Restore.

Notes: You’ll need the following items to move your files from your Windows 7 PC to your Windows 10 PC.
An external storage device, such as a USB drive, SD card, or external hard drive
Your Windows 7 PC
Your Windows 10 PC
Back up files from a Windows 7 PC
Follow the below steps on your Windows 7 PC:
Select the Start button, then select Control Panel > System and Security > Backup and Restore.
Select Set up backup.
Connect your external storage device to the Windows 7 PC, and then select Refresh.
Under Backup Destination, select your external storage device, and then select Next.
Select Let me choose > Next.
By default, all files under Documents, Music, Pictures, and Videos will be backed up. You can back up additional files by expanding the locations under Computer and selecting the folders to back up.
Unselect the Include a system image of drives checkbox, and then select Next.
Select Change schedule.
Unselect the Run backup on a schedule checkbox, and then select OK.
Select Save settings and run backup to start backing up your files to the external storage device.
Safely remove the drive to ensure no files are lost or corrupted. To remove the device, select Eject before you disconnect the drive from your PC.
Restore files on a Windows 10 PC
Follow the below steps on your Windows 10 PC:
Connect the external storage device where you backed up your files to your Windows 10 PC.
Select the Start button, and then select Settings .
Select Update & Security > Backup > Go to Backup and Restore (Windows 7).
Select Select another backup to restore files from.
Select the backup created from your Windows 7 PC, and then select Next.
Select the Select all files from this backup checkbox, and then select Next.
By default, files from the backup will be restored to the same location on the Windows 10 PC. You can choose a different location to move the files by selecting In the following location, and then providing the path to a new destination location.
Select Restore to start restoring files to the Windows 10 PC.
Get more info about moving to Windows 10
If you’re considering a move to Windows 10, download the Guide to Windows 10 app to get the info you need to make a smooth transition, including personalized recommendations for your PC.


