- How to refresh, reset, or restore your PC
- Before you start to refresh or reset your PC
- Refresh, reset, or restore
- To refresh your PC
- To reset your PC
- To restore your PC to an earlier point in time
- Загрузка компьютера в безопасном режиме в Windows 10
- How to Do System Restore in Safe Mode Windows 10 Easily?
- Why to perform System Restore in Safe Mode?
- How to boot into Safe Mode in Windows 10?
- Method 1: Start Safe Mode from Power options
- Method 2: Start Safe Mode from Settings
- Method 3: Start Safe Mode from a black or blank screen
- Run System Restore from Safe Mode in Windows 10
- Easier way to backup and restore computer system
- Conclusion
How to refresh, reset, or restore your PC
Note: For information about this topic in Windows 10, see Recovery options in Windows 10.
If you’re having problems with your PC, you can:
Refresh your PC to reinstall Windows and keep your personal files and settings. Refresh also keeps the apps that came with your PC and the apps you installed from the Microsoft Store.
Reset your PC to reinstall Windows but delete your files, settings, and apps—except for the apps that came with your PC.
Restore your PC to undo recent system changes you’ve made.
If you’re having trouble starting (booting) your PC, see Windows Startup Settings (including safe mode), and go to the “Get to Windows Startup Settings in the Windows Recovery Environment” section. You can refresh, reset, or restore your PC from the Windows Recovery Environment.
If you want to back up and restore your personal files using File History, see Set up a drive for File History.
Before you start to refresh or reset your PC
In most cases, once you start to refresh or reset your PC, it’ll finish on its own. However, if Windows needs missing files, you’ll be asked to insert recovery media, which is typically on a DVD disc or thumb drive. If that happens, what you’ll need depends on your PC.
If your PC came with Windows 8.1 or Windows RT 8.1, you’ll need the discs or thumb drive that came with your PC. Check the info that came with your PC to see if your PC manufacturer provided these discs or media. In some cases, you might have created them when you first set up your PC.
If you don’t have either of those, you can make them if you have a USB thumb drive of 16 GB or larger. Having a recovery drive can help you troubleshoot and fix problems with your PC, even if it won’t start. For more info, see Create a USB recovery drive.
If you upgraded your PC to Windows 8.1 or Windows RT 8.1 with a DVD, use that disc. If you don’t have Windows 8.1 or Windows RT 8.1 media, contact Microsoft Support.
Refresh, reset, or restore
Select any of the following for more detailed info.
If your PC isn’t performing as well as it once did, and you don’t know why, you can refresh your PC without deleting any of your personal files or changing your settings.
Note: If you upgraded your PC from Windows 8 to Windows 8.1 and your PC has a Windows 8 recovery partition, refreshing your PC will restore Windows 8. You’ll need to upgrade to Windows 8.1 after the refresh has finished.
Warning: Apps you installed from websites and DVDs will be removed. Apps that came with your PC and apps you installed from Microsoft Store will be reinstalled. Windows puts a list of removed apps on your desktop after refreshing your PC.
To refresh your PC
Swipe in from the right edge of the screen, tap Settings, and then tap Change PC settings.
(If you’re using a mouse, point to the upper-right corner of the screen, move the mouse pointer down, click Settings, and then click Change PC settings.)
Tap or click Update and recovery, and then tap or click Recovery.
Under Refresh your PC without affecting your files, tap or click Get started.
Follow the instructions on the screen.
If you want to recycle your PC, give it away, or start over with it, you can reset it completely. This removes everything and reinstalls Windows.
Note: If you upgraded your PC from Windows 8 to Windows 8.1 and your PC has a Windows 8 recovery partition, resetting your PC will restore Windows 8. You’ll need to upgrade to Windows 8.1 after the reset has finished.
Warning: All of your personal files will be deleted and your settings will be reset. All apps that you installed will be removed. Only apps that came with your PC will be reinstalled.
To reset your PC
Swipe in from the right edge of the screen, tap Settings, and then tap Change PC settings.
(If you’re using a mouse, point to the upper-right corner of the screen, move the mouse pointer down, click Settings, and then click Change PC settings.)
Tap or click Update and recovery, and then tap or click Recovery.
Under Remove everything and reinstall Windows, tap or click Get started.
Follow the instructions on the screen.
Note: You’ll be asked to choose whether you want to erase data quickly or thoroughly. If you choose to erase data quickly, some data might be recoverable using special software. If you choose to erase data thoroughly, this will take longer but it makes recovering data less likely.
If you think an app or driver that you recently installed caused problems with your PC, you can restore Windows back to an earlier point in time, called a restore point. System Restore doesn’t change your personal files, but it might remove recently installed apps and drivers.
System Restore isn’t available for Windows RT 8.1.
Windows automatically creates a restore point when you install desktop apps and new Windows updates, if the last restore point is older than 7 days. You can also create a restore point manually at any time.
To restore your PC to an earlier point in time
Swipe in from the right edge of the screen, and then tap Search.
(If you’re using a mouse, point to the upper-right corner of the screen, move the mouse pointer down, and then click Search.)
Enter Control Panel in the search box, and tap or click Control Panel.
Enter Recovery in the Control Panel search box, and then tap or click Recovery.
Tap or click Open System Restore, and then follow the instructions.
If you need additional help refreshing, resetting, or restoring your PC, check out the Repair and Recovery community pages in the Windows forum for solutions that other people have found for problems they’ve experienced.
Загрузка компьютера в безопасном режиме в Windows 10
В безопасном режиме запуск Windows выполняется с использованием ограниченного набора файлов и драйверов. Если проблема не возникает в безопасном режиме, это означает, что эти параметры по умолчанию и основные драйверы устройств не приводят к возникновению проблемы. Наблюдение за Windows в безопасном режиме позволяет сузить источник проблемы и устранить неполадки на компьютере.
Существует две версии безопасного режима: Безопасный режим и Безопасный режим с загрузкой сетевых драйверов. В безопасном режиме с поддержкой сети добавляются сетевые драйверы и службы, необходимые для доступа к Интернету и другим компьютерам в сети.
Изучите следующие разделы, чтобы узнать, как запустить компьютер в безопасном режиме в разделе «Параметры», на экране входа в систему, на черном или пустом экране.
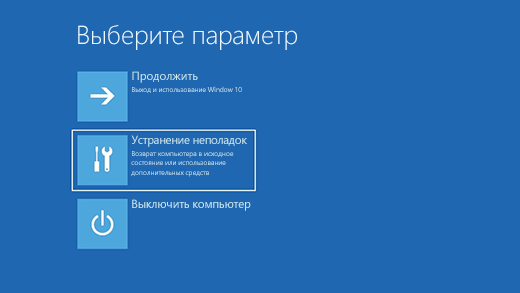
Нажмите клавишу с логотипом Windows + I на клавиатуре, чтобы открыть раздел «Параметры». Если это не поможет, нажмите Start кнопку «Пуск» и выберите » Параметры «.
В разделе Особые варианты загрузки выберите элемент Перезагрузить сейчас.
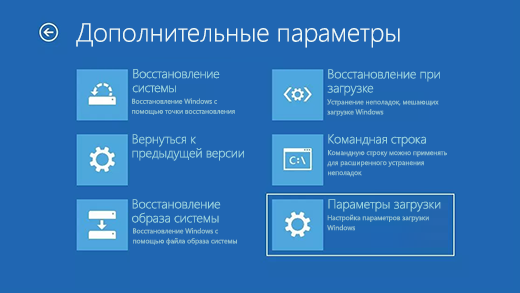
После перезагрузки компьютера на экране Выберите параметр выберите элементы Диагностика > Дополнительные параметры > Параметры загрузки > Перезапуск. Возможно, вам будет предложено ввести ключ восстановления BitLocker.

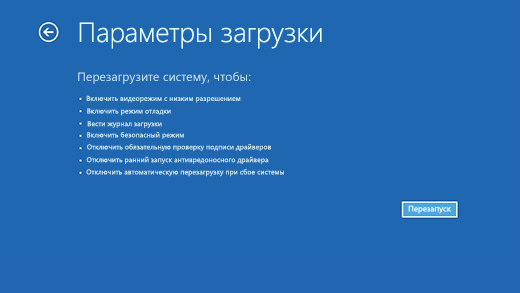
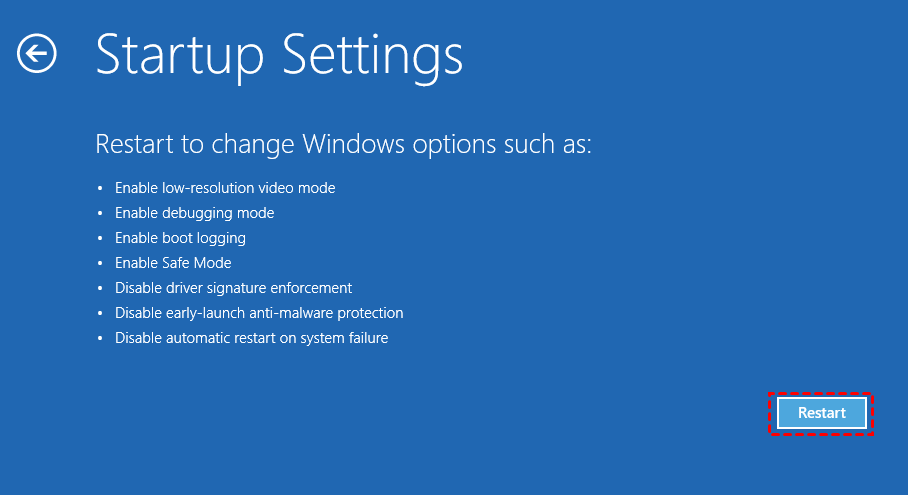
После перезагрузки компьютера вы увидите список параметров. Нажмите клавиши 4 или F4, чтобы запустить компьютер в безопасном режиме. Если вам будет нужен Интернет, выберите клавиши 5 или F5, чтобы войти в безопасный режим с загрузкой сетевых драйверов.
Если вам не удается открыть «Параметры» для перехода в безопасный режим, перезагрузите устройство на экране входа в Windows.
На экране входа в Windows удерживайте клавишу SHIFT и выберите в это время Выключение > Перезапуск .
После перезагрузки компьютера на экране Выберите параметр выберите элементы Диагностика > Дополнительные параметры > Параметры загрузки > Перезапуск. Возможно, вам будет предложено ввести ключ восстановления BitLocker.
После перезагрузки компьютера вы увидите список параметров. Нажмите клавиши 4 или F4, чтобы запустить компьютер в безопасном режиме. Или, если вам нужно использовать Интернет, выберите 5 или F5 для безопасного режима с помощью сети.
Примечание: Если вы зашифровали свое устройство, для запуска в безопасном режиме вам потребуется ключ BitLocker.
Перед входом в безопасный режим необходимо войти в среду восстановления Windows (winRE). Для этого вы будете периодически включать свое устройство, а затем:
Нажмите кнопку питания на устройстве и удерживайте ее нажатой в течение 10 секунд, чтобы выключить устройство.
Снова нажмите кнопку питания, чтобы включить устройство.
После появления первого признака запуска Windows (например, на некоторых устройствах отображается логотип производителя при перезапуске) удерживайте нажатой кнопку питания в течение 10 секунд, чтобы отключить устройство.
Снова нажмите кнопку питания, чтобы включить устройство.
После перезагрузки Windows удерживайте кнопку питания на устройстве нажатой в течение 10 секунд, чтобы выключить устройство.
Снова нажмите кнопку питания, чтобы включить устройство.
Разрешите полностью перезапустить устройство. Будет активирована среда восстановления Windows.
В среде winRE выполните следующие действия, чтобы перейти в безопасный режим.
На экране Выбор действия выберите Диагностика > Дополнительные параметры > Параметры загрузки > Перезагрузить.
После перезагрузки устройства вы увидите список параметров. Выберите параметр 5 в списке или нажмите клавишу F5, чтобы запустить безопасный режим с подключением к сети.
Если вам нужны дополнительные сведения о черном или пустом экране, изучите раздел Устранение ошибок типа «черный» или «пустой» экран.
Примечания: Если вам необходимо выйти из безопасного режима, просто перезагрузите устройство или выполните следующие действия.
Нажмите клавишу с логотипом Windows+ R.
Введите msconfig в поле Открыть, а затем нажмите кнопку ОК.
Откройте вкладку Загрузка.
В разделе Параметры загрузки снимите флажок Безопасный режим.
How to Do System Restore in Safe Mode Windows 10 Easily?
System Restore is a useful tool to help you recover from system malfunctions. Sometimes you may need to run System Restore from Safe Mode. Learn how to perform it from this page.

By Lily  / Last Updated February 26, 2021
Quick Navigation:
Why to perform System Restore in Safe Mode?
System Restore is a recovery tool that allows users to revert their computer’s state (including system files, installed applications, Windows Registry, and system settings) to that of a previous point in time. It is of great help to recover from system malfunctions or other problems.
Safe Mode is a diagnostic mode that starts your PC with a minimal set of drivers and services. No third-party software or drivers get loaded, and even the built-in Windows stuff is limited to just what’s necessary. It enables you to narrow down the source of a problem and troubleshoot problems.
There are times when you need to perform System Restore in Safe Mode:
You can’t start Windows normally. You can only start it in Safe Mode.
Your computer is unstable and crashing. You may run System Restore without crashing from Safe Mode.
Then, how to do System Restore in Safe Mode Windows 10? First, you should boot into Safe Mode.
How to boot into Safe Mode in Windows 10?
There are three methods you can use to boot into Safe Mode in Windows 10:
Method 1: Start Safe Mode from Power options
1. Press and hold the Shift key while you select Power > Restart from the Start menu.
2. After your PC restarts to the Choose an option screen, select Troubleshoot > Advanced options > Startup Settings > Restart.
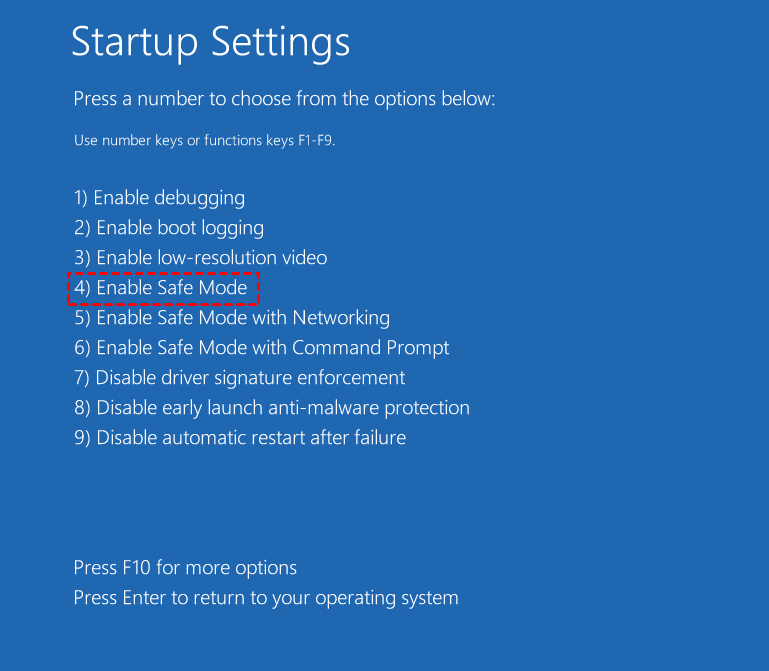
3. After your PC restarts, you’ll see a list of options. Select 4 or F4 to start your PC in Safe Mode.
Method 2: Start Safe Mode from Settings
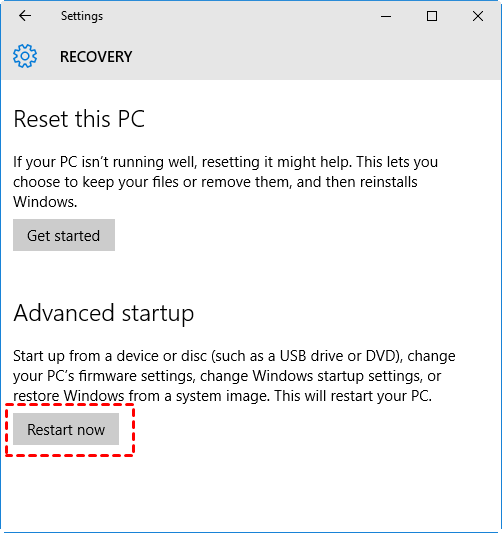
1. Select Start > Settings > Update & Security > Recovery.
2. Under Advanced startup, select Restart now.
3. After your PC restarts to the Choose an option screen, you can repeat Step 2 and 3 in Method 1.
Method 3: Start Safe Mode from a black or blank screen
1. Hold down the power button for 10 seconds to turn off your PC.
2. Press the power button again to turn on your PC. On the first sign that Windows has started, hold down the power button to turn off your PC.
3. Turn on and off your computer like you do above.
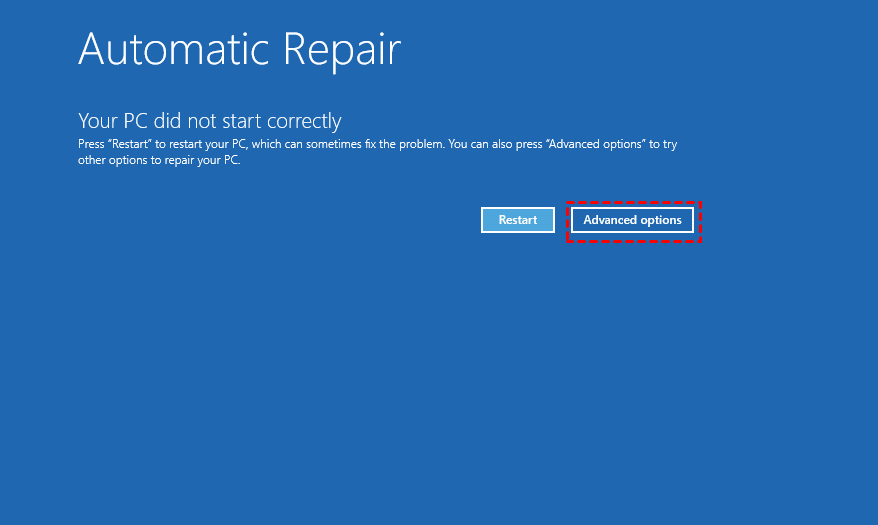
4. Turn on your computer and let it fully restart this time. You will enter WinRE. Choose Advanced options in the Automatic Repair screen.
5. When you access the Choose an option screen, you can repeat Step 2 and 3 in Method 1.
Run System Restore from Safe Mode in Windows 10
After you enter Safe Mode, you can follow the instructions below to perform System Restore from Safe Mode:
Note: You must have turned on system protection and created at least one restore point before you can restore from a system restore point using System Restore.
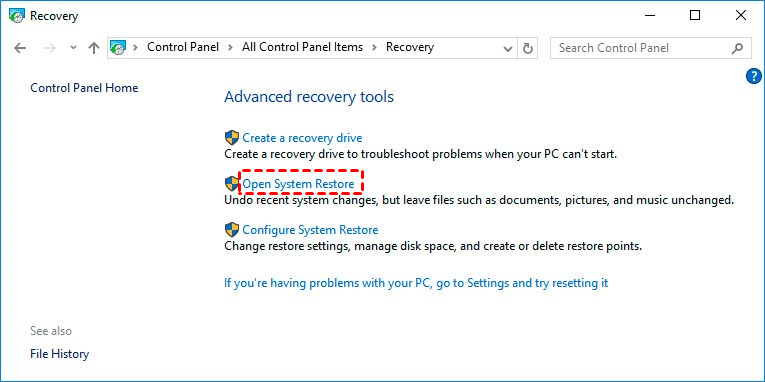
1. Search “recovery” in the Windows 10 search box and select the top result Recovery.
2. In the pop-up window, click Open System Restore.
3. When you launch System Restore, click Next.
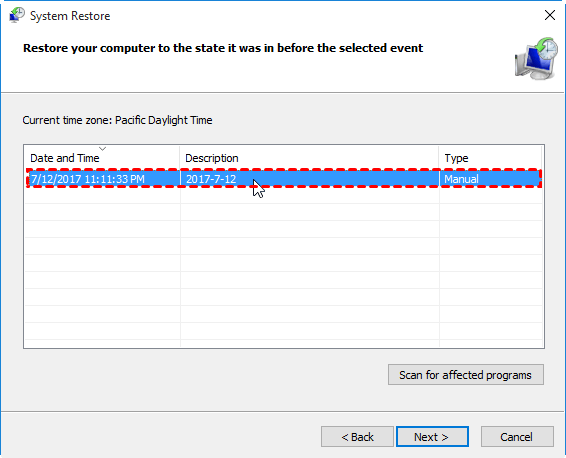
4. Select one of the available restore points to do system restore in Safe Mode. It is recommended to scan for affected programs before starting system restore. Click Next to continue.
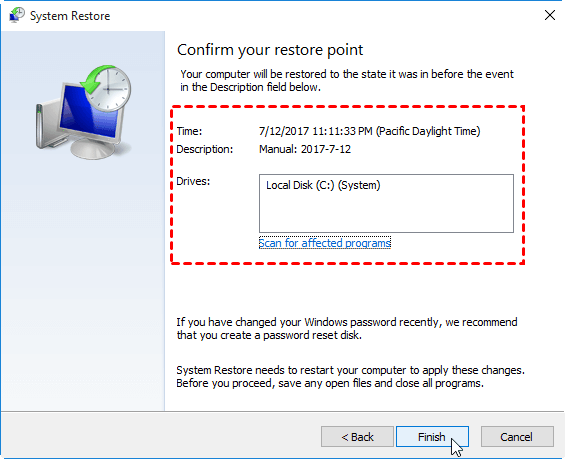
5. Confirm the restore point and click Finish to start system restore in Windows 10.
Tips: If you prefer to use Command Prompt, you can enter Safe Mode with Command Prompt. Then, type “rstrui.exe” and press Enter to open System Restore.
Easier way to backup and restore computer system
Now you know how to run System Restore in Safe Mode Windows 10. Nevertheless, the process may fail because system restores points are gone. Some users even find they can’t create restore point in the beginning. Is there another way to backup and restore Windows?
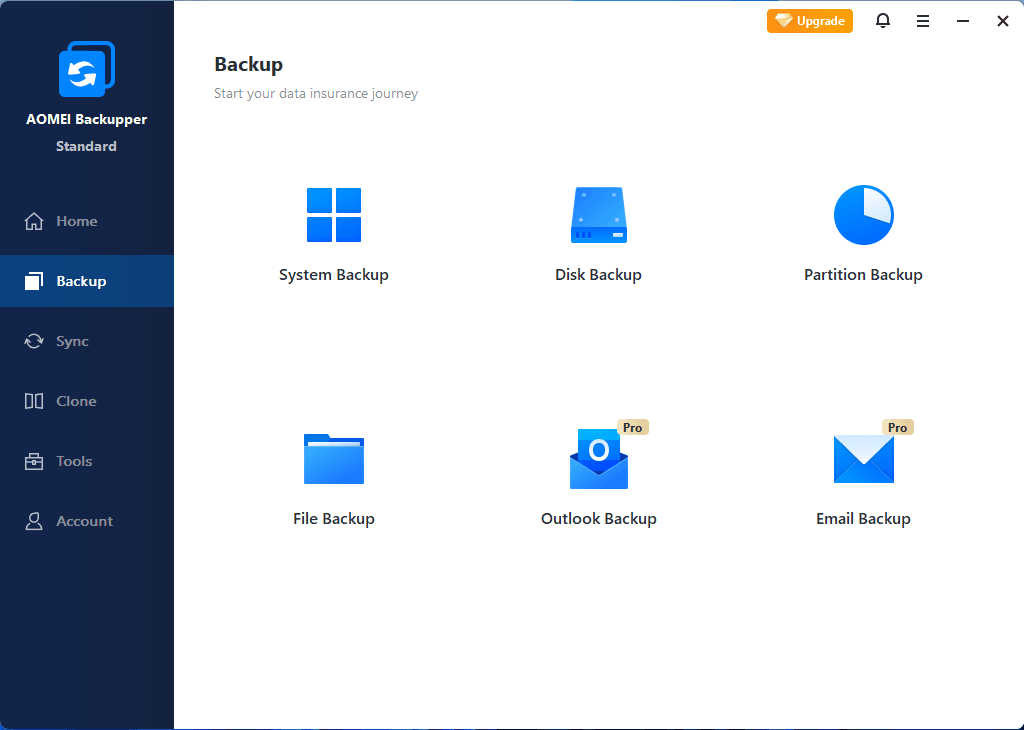
AOMEI Backupper Standard, the best free backup software, offers you full backup and recovery solutions.
There are four types of backup available: System/Disk/Partition/File Backup, which meets your different needs.
You are allowed to restore your computer to an earlier date and recover lost files easily from the backup image.
If your computer fails to boot, you are able to restore your computer under WinPE using the Windows recovery drive made by AOMEI Backupper.
All Windows PC operating systems like Windows 10/8.1/8/7/Vista/XP are supported. Just download this freeware to have a try.
Conclusion
When you want to do System Restore in Safe Mode Windows 10, you can refer to the detailed steps offered in this article. To double ensure your computer safety, you can turn to AOMEI Backupper. Apart from the backup & restore functions, AOMEI Backupper is capable of clone. You may use it to upgrade hard drive to SSD in Windows 10. Why not try it now?


