- How to disable the Windows Key in Windows 10 [FULL GUIDE]
- How can I disable the Windows Key while gaming?
- 1. Modify your registry
- 2. Use Disable Windows key reg
- 3. Use AutoHotkey
- 4. Use SharpKeys
- 5. Use Gaming mode on your keyboard
- 6. Use your keyboard software
- How to recover your Windows product key
- Ways to enter and change product key in Windows 7, 8, 10
- How to enter the Windows 10 product key?
- Option 1. Change your product key in Windows 10 via your system settings menu:
- Option 2. Change the Windows 10 product key via the Settings app:
- Option 3. Change your Windows 10 product key via Control Panel
- Option 4. Run Slui.EXE to enter your product key
- Option 5. Run changepk.exe to input your product key in Windows 10
- Now you can enter your product key.
- Option 6. Change the Win 10 product key, using Command Prompt
- How to change your product key in Windows 8?
- Option 1. Use Control Panel
- Option 2. Use Command Prompt
- Change your product key in Windows 8.1
- How to change the product key on Windows 7?
- Option 1. Configure your PC properties
- Option 2. Use your Command Prompt
- Resolve PC Issues with Driver Updater
How to disable the Windows Key in Windows 10 [FULL GUIDE]

- Have you wondered how to disable the Windows key? Modifying the registry is one solution.
- Instead of modifying the registry, you can download a .reg file and use it to disable the Windows key.
- Usually, gaming keyboards have dedicated software so you can check the key settings there.
- Using a dedicated third-party tool is another solution of how to disable the Windows key button.

- Download Restoro PC Repair Tool that comes with Patented Technologies (patent available here).
- Click Start Scan to find Windows issues that could be causing PC problems.
- Click Repair All to fix issues affecting your computer’s security and performance
- Restoro has been downloaded by 0 readers this month.
The Windows Key is rather useful and it’s a part of many shortcuts on Windows 10. Even though many users use it frequently, some users want to disable it.
Every advanced Windows user knows how useful Windows Key button is. Despite its usefulness, the key can sometimes be a problem, especially during intense gaming sessions.
By default, pressing the Windows Key will open the Start Menu and that can be a problem during gaming. By accidentally pressing the Windows button you’ll lose focus on your game and that can be a big problem.
In order to avoid these kinds of problems, many gamers disable their Windows Key during the gaming sessions.
In this guide, we’re going to show how to disable the Windows button. There are a couple of methods you can use from where you can choose the best for you.
How can I disable the Windows Key while gaming?
1. Modify your registry
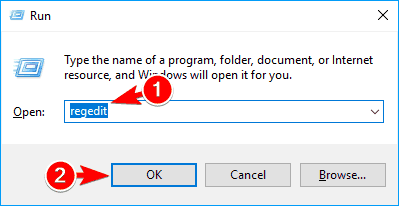
- Press Windows Key + R and enter regedit.
- Click on OK or press Enter.

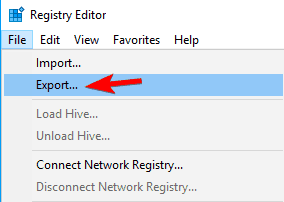
- Optional: Before you make any changes to your registry it’s always a good idea to create a backup. To do that, just click on File > Export.
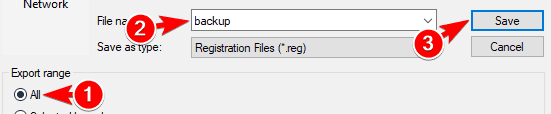
- Select All as Export range, choose a safe location, enter the desired file name and click on Save.
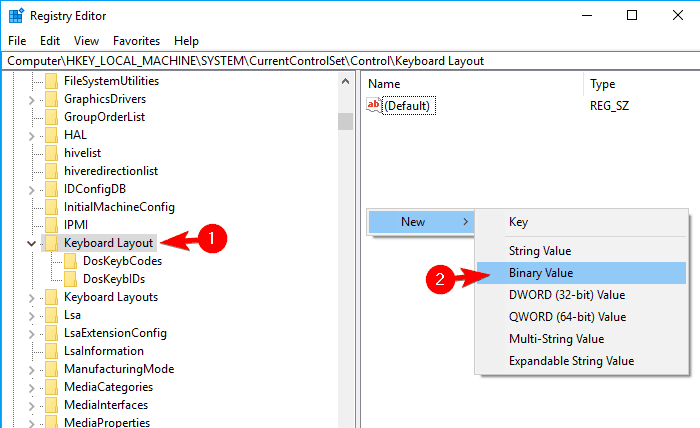
- In the left panel, navigate to: Computer\HKEY_LOCAL_MACHINE\SYSTEM\CurrentControlSet\Control\Keyboard Layout
- In the right pane, right-click the empty space and choose New >Binary Value from the menu.
- Enter Scancode Map as the name of the new value.
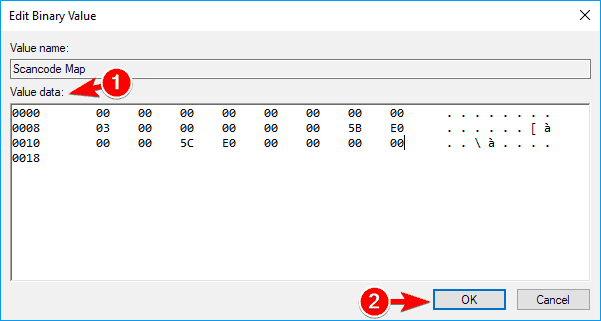
- Double click Scancode Map value and enter 00000000000000000300000000005BE000005CE000000000 in the Data field.
- Be extra cautious and double-check if the entered value is correct. Now click OK.
- After doing that, close Registry Editor and restart your PC.
Note: Keep in mind that your registry has sensitive information in it, so if you want to edit it, use extra caution. If you encounter any problems with your PC after modifying the registry, restore the backup created at steps 3-4.
After your PC restarts, the Windows Key should be completely disabled. To enable the Windows Key, you need to go back to Registry Editor and delete the Scancode Map that you created.
2. Use Disable Windows key reg

If you don’t want to modify your registry manually, there’s a .reg file available that you can use to modify it. Simply download Disable Windows key.reg and run it.
When the warning message appears, click on Yes. If you want to enable Windows Key again, download and run Enable Caps Lock and Windows keys.reg.
This method is a lot faster and simpler, so if you’re not comfortable with modifying the registry manually, be sure to try using the .reg file.
This method is great if you want to disable Windows Key and prevent other users from enabling it. Modifying the registry manually might not be the simplest method, but you can always use the .reg file to modify it automatically.
3. Use AutoHotkey

If you want to disable your Windows Key, you might want to try using AutoHotkey. This is an open-source and powerful automation scripting language.
The application allows you to assign certain commands to your keys, but it also allows you to disable keys. AutoHotkey isn’t the simplest application , so you might want to learn how it works before you can use it correctly.
Basically, you need to create a script that will block Windows Keys and add that script to AutoHotkey. Simply click AutoHotkey icon in your Taskbar and choose Edit this Script. Now you need to paste the following script at the bottom:
Save your script, right-click AutoHotkey and choose to Reload This Script from the menu. After doing that, both Windows Keys will be disabled.
Keep in mind that this solution won’t disable shortcuts that involve Windows Key, instead, it will just disable the keys themselves.
It’s worth mentioning that some online games might recognize AutoHotkey as a cheating application, so keep that in mind.
Before you use this solution it’s always a good idea to do some research and check if the game developers allow you to use AutoHotkey with their game.
⇒ Download Autohotkey
4. Use SharpKeys
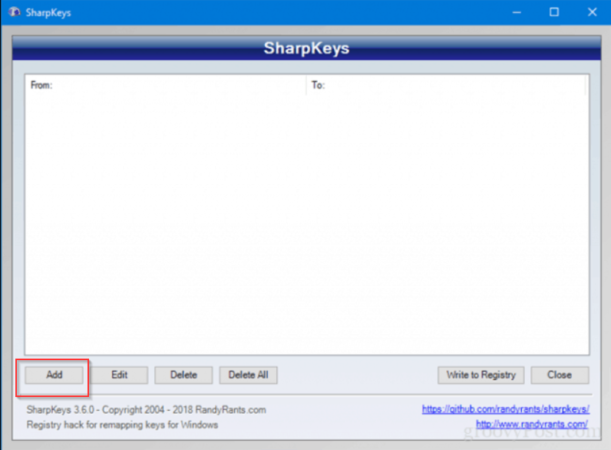
- Download and start SharpKeys.
- Once the application starts, click on Add.
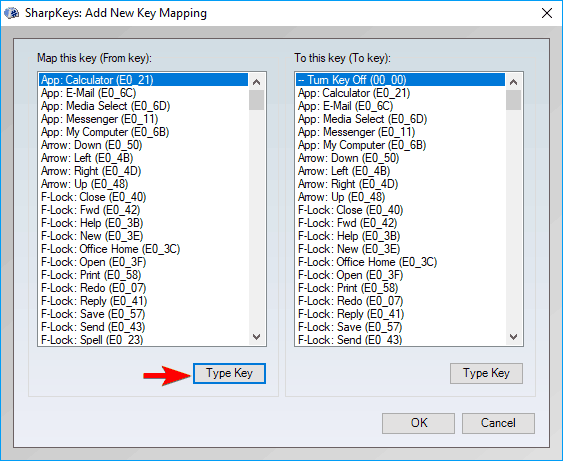
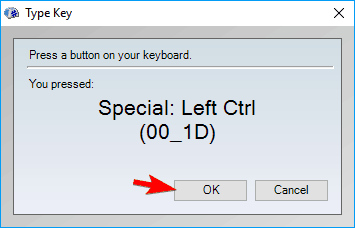
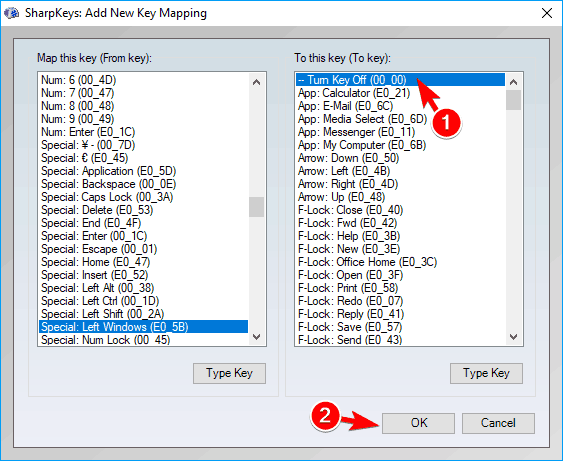
- Now you’ll see two columns. Click on Type Key in the left pane and press the Windows Key.
- Now click on OK to select the pressed key.
- Select Turn Key Off in the right pane and click on OK to save changes.
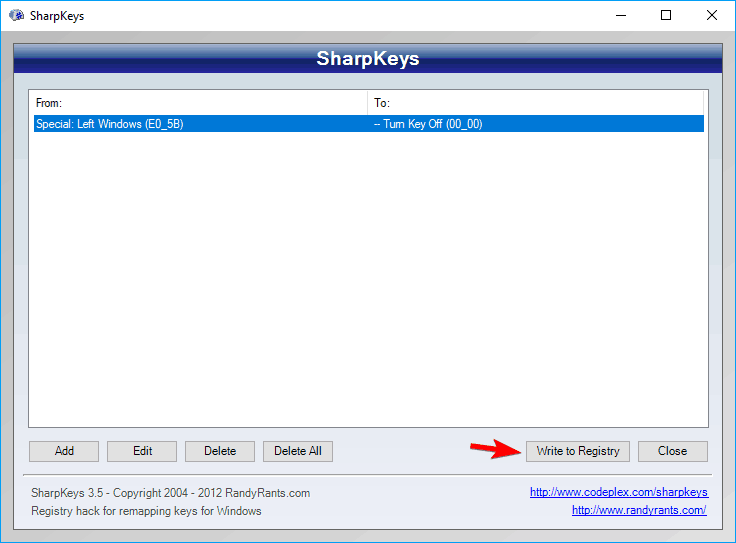
- Now click on Write to Registry button.
- Now you just have to restart your PC or log out and log back in to apply the changes.
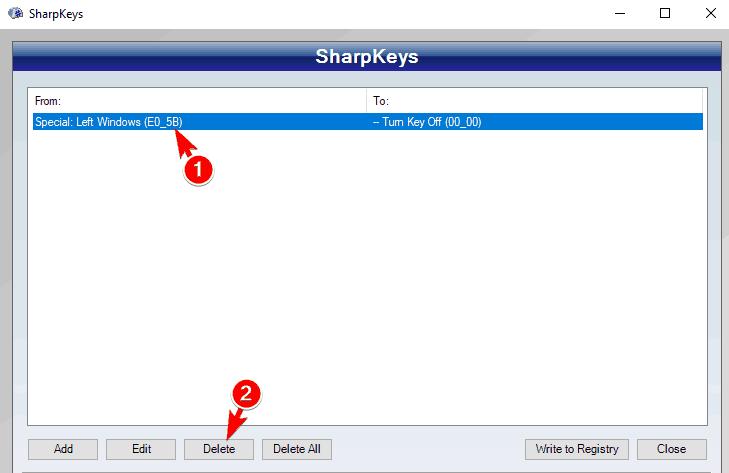
- To enable Windows Key again, start Sharpkeys, s elect the desired key from the menu, and click on Delete.
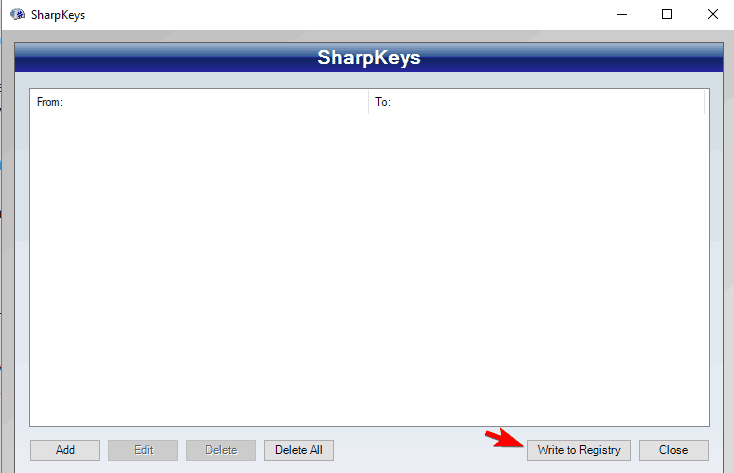
- After deleting the key, click on Write to Registry button.
- Now restart your PC or log off and back on to apply the changes.
Note: This is a free and portable tool that allows you to remap your keys, but it also has the ability to disable keys or to assign them to certain functions. Keep in mind that this is a powerful application, so you’re using it at your own risk.
5. Use Gaming mode on your keyboard
Many gaming keyboards have a Gaming mode feature that allows you to block Windows Key with ease. To activate Gaming mode you usually have to press a certain keyboard shortcut.
Some keyboards even have a controller icon on one of its keys so you can easily find the shortcut key for Gaming mode. If you can’t find the shortcut on your own, we advise you to check your keyboard manual for detailed instructions on how to activate Gaming mode.
Keep in mind that not all keyboards support this feature, so before you can use it you need to check if your keyboard supports it. Activating the Gaming mode is the simplest and fastest way to disable Windows Key, but unfortunately, not all keyboards support this feature.
6. Use your keyboard software
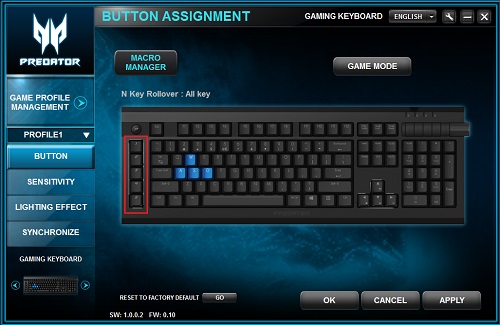
As we previously mentioned, many gaming keyboards support Gaming mode. These keyboards usually have dedicated software that you can use to configure various settings such as macros and lighting.
How to recover your Windows product key
Technical Level : Basic
If you are planning to reinstall Windows but you can’t find your product key, this article will show you where and how you can find your product key.
The key could be:
- Printed on a Certificate of Authenticity sticker
- Stored in the Windows Registry
- Embedded in the PC’s UEFI firmware
Note that if you are currently running Windows 10 and wish to reinstall the operating system, you don’t need your product key. After the reinstall, Windows 10 will detect that it has been reinstalled on a previously activated system and will automatically reactivate.
Printed on a Certificate of Authenticity Sticker
If your PC came with Windows 7 or earlier, then your product key will be printed on a COA sticker. This sticker verifies that the computer came with a genuine copy of Windows. You will need to examine your computer to find the sticker. On laptops, it’s usually on the bottom side. On desktops, it could be on the back, sides, or top. It looks something like this:
Embedded in the PC’s UEFI firmware
If you have a newer PC that came with Windows 8 or Windows 10, then your product key likely won’t be on a sticker. Instead, computer manufacturers now embed the key right into the computer’s UEFI firmware. Unlike the COA sticker, the embedded key can’t be smudged off, stolen or erased (easily).
If you want to extract the UEFI key, the process is simple. Open the Start menu, type powershell and then run the program.
Next type the following command in the PowerShell window and hit Enter.
You will be presented with the key in the window.
Stored in the Windows Registry
If your product key isn’t embedded in the firmware or you’re missing your COA sticker, you’re not out of luck as long as you haven’t formatted your computer. You can still recover the key because Windows stores it in the registry. Here is how:
1. Open a new Notepad window
2. Copy and paste the following text into the window
3. Click File > Save As and save the file to your desktop as productkey.vbs. It’s important to include the .vbs extension because this is a Windows Scripting Host file.
4. Close Notepad and double-click the file. Wait a few seconds, and then you will be presented with a popup displaying your product key:
Ways to enter and change product key in Windows 7, 8, 10
‘Knowledge is the key’
It is a wise idea to keep your Windows product key handy: you can use it to upgrade your OS to a newer version or to activate your Windows should the need arise.
The good news is, changing the product key in your OS, be it Windows 7, 8, 8.1, or 10, is a simple and straightforward procedure. So, if the question “How to re-enter my Windows product key?” is the reason you ended up on this page, you should move on to the instructions below and carry out what is stated there.
How to enter the Windows 10 product key?
If you are running Windows 10, you can rest easy knowing that Microsoft has done its utmost to simplify the procedure you are willing to perform. There are no fewer than 6 ways to reach your system settings and change your product key in Windows 10. To begin with, make sure you are signed in as an administrator. If you are, feel free to choose any of the following methods:
Option 1. Change your product key in Windows 10 via your system settings menu:
- Simultaneously press the Windows logo key and X key. This shortcut is designed to evoke the Quick Access menu in Windows 10.
- Select System from the menu.
- From the left-pane menu, select the About option.
- Navigate to the right pane.
- Scroll down until you arrive at the “Change product key or upgrade your edition of Windows” link. Click this link to continue.
- You will be taken to the Activation screen.
- From the right pane, select Change product key.
Follow the on-screen prompts to complete the process.
Option 2. Change the Windows 10 product key via the Settings app:
- Press the Windows logo key + I keyboard shortcut.
- Select Update & Security.
- Move down to the Activation option.
- Click Change product key.
Enter your product key and follow the instructions to complete your task.
Option 3. Change your Windows 10 product key via Control Panel
- Click on the Windows logo icon that is always present on your Taskbar.
- Select Control Panel. Then click on System and security.
- Click on System to proceed.
- Navigate to the Windows activation section.
- Locate and click the Change product key link.
Do what you are asked to get the job done.
To quickly change «product key in Windows 7, 8, 10», use a safe FREE tool developed by the Auslogics team of experts.
The app contains no malware and is designed specifically for the problem described in this article. Just download and run it on your PC. free download
Developed by Auslogics
Auslogics is a certified Microsoft® Silver Application Developer. Microsoft confirms Auslogics’ high expertise in developing quality software that meets the growing demands of PC users.
Option 4. Run Slui.EXE to enter your product key
- Press the Windows logo key + R shortcut in order to evoke the Run app.
- Once Run is up, type slui.exe 3 and click OK or hit the Enter key.
Enter your 25-digit product key and press Enter.
Option 5. Run changepk.exe to input your product key in Windows 10
- Open the Run app by pressing the Windows logo and R keys.
- Tap in changepk.exe and click OK.
Now you can enter your product key.
Option 6. Change the Win 10 product key, using Command Prompt
- Press the Windows logo key + X shortcut.
- From the quick-access menu, select Command Prompt (Admin).
- Type slmgr.vbs /ipk and hit Enter.
You have successfully entered your Windows 10 product key.
How to change your product key in Windows 8?
Option 1. Use Control Panel
The easiest way to change your product key in Windows 8 is via Control Panel. These are the instructions for you to follow:
- Open your Start menu and locate Control Panel. Click on it.
- Click on System and security. Then select System.
- Click “Get more features with a new edition of Windows”.
- Select “I already have a product key”.
- Then enter your product key and click on Next.
Option 2. Use Command Prompt
You can also change your product key in Windows 8 via an elevated Command Prompt window. Here is how:
- Press the Windows logo + X keyboard combination.
- Select Command Prompt (admin).
- Type the following: slmgr.vbs -ipk .
Press Enter. After your new product key has been validated, you are good to go.
Change your product key in Windows 8.1
This set of instructions is for those running Windows 8.1:
- Press the Windows logo + W keyboard shortcut.
- Once the Charms bar is up, move to the Search area and tap in PC settings.
- Select PC and devices and proceed to PC info.
There you can enter or change your product key.
How to change the product key on Windows 7?
Is it possible to change the Windows 7 product key? If you are looking for the answer to this question, you have come to the right place. The answer is yes, definitely.
Option 1. Configure your PC properties
- Open your Start menu.
- Right-click Computer.
- Click Properties.
- Select Change Product Key.
Finally, enter your new product key and click Next.
Option 2. Use your Command Prompt
- Open your Start menu.
- Locate Search and type cmd.
- Select Command Prompt (Admin) from the search results. If this option is not available, right-click Command Prompt and choose to run it with administrative privileges.
- Type C:\Windows\System32> slmgr.vbs -ipk “Input your product key”. Press Enter.
- To activate your Windows, type C:\Windows\System32> slmgr.vbs -ato. Press Enter.
We hope you have successfully changed your product key. If you have upgraded to a newer version of Windows, ensure that all your drivers are up to date. This is important since your system may start to malfunction otherwise. To this end, it is a good idea to update all your drivers at once – which is possible if you have a dedicated tool such as Auslogics Driver Updater at your disposal.

Resolve PC Issues with Driver Updater
Unstable PC performance is often caused by outdated or corrupt drivers. Auslogics Driver Updater diagnoses driver issues and lets you update old drivers all at once or one at a time to get your PC running smoother


