- «Failure configuring Windows updates. Reverting changes.» error when you try to install Windows updates
- Symptoms
- Resolution
- Method 1: Restart Windows and install Windows updates in a clean boot state
- Failure configuring Windows Updates, Reverting changes. Error code: 8007003
- Solve the Failure Configuring Windows Updates Reverting Changes Error on Your Computer
- What Causes Windows Update to Fail When Configuring Updates?
- How to Fix: Failure Configuring Windows Updates Reverting Changes error
- Fix 1: Use the Advanced Repair Tool (Restoro)
- Fix 2: Remove all removable memory cards, disks, flash drives, etc.
- Fix 3: Use the Windows Update Troubleshooter
- Fix 4: Do a Clean Reboot
- Fix 5: Install the Updates in Safe Mode
- Fix 6: Break the Updates Into Smaller Groups
- Fix 7: Run the System File Checker
- Fix 8: Do a System Restore
- Fix 9: Do a System Installation
- Conclusion:
«Failure configuring Windows updates. Reverting changes.» error when you try to install Windows updates
Symptoms
When you try to install Windows updates, you get the following error:
Failure configuring Windows updates. Reverting changes. Do not turn off your computer.
Note If this issue occurs, it may take about 30 minutes to revert the changes, and then the system will show the Windows logon screen.
Resolution
To resolve this issue, use the following methods starting with the first method below. If that doesn’t resolve your issue, click next method.
Method 1: Restart Windows and install Windows updates in a clean boot state
To perform a clean boot in Windows, see how to perform a clean boot to troubleshoot a problem in Windows 8, Windows 7, or Windows Vista. And then, install Windows Updates according to your operating system.
Open Windows Update by swiping in from the right edge of the screen (or, if you’re using a mouse, by pointing to the lower-right corner of the screen and moving the mouse pointer up), then selecting Settings > Change PC settings.
Select Update and recovery > Windows Update.
Try to install Windows Updates again.
Select the Start button. In the search box, enter Update, and then, in the list of results, select Windows Update.
Try to install Windows Updates again.
Note Installing Windows updates in a clean boot state will avoid the Windows updates installation being blocked by some other applications and services that are installed in Windows.
Method 2: Run the Windows Update Troubleshooter
Download the Windows Update Troubleshooter, and then select O pen or Save in the pop-up window. And then, select Next and follow the steps in the wizard to find and fix problems with Windows Update .
If you don’t have an Internet connection in Windows 8, you can open the Windows Update troubleshooter that’s included in Windows 8. However, that troubleshooter does not perform all the troubleshooting steps that the linked troubleshooter above does.
Open the Windows Update troubleshooter by swiping in from the right edge of the screen, tapping Search (or if you’re using a mouse, pointing to the upper-right corner of the screen, moving the mouse pointer down, and then clicking Search).
Type Troubleshooting, tap or click on Settings, and then tap or click Troubleshooting.
Under System and Security, tap or click Fix Problems with Windows Update, and then select Next.
Download the Windows Update Troubleshooter, and then select O pen or Save in the pop-up window.
Select Next and follow the steps in the wizard to find and fix problems with Windows Update.
Method 3: Unplug your removable media from the computer
Check if any removable media is not removed from the computer, such as removable disks (Blu-ray disks, DVDs, CDs), memory cards (CompactFlash card, Secure Digital card, Memory Stick), and USB flash drives.
Unplug all the removable media.
Note These removable media may cause this issue during the restart of Windows.
Method 4: Perform a system restore When you start your computer by using the Windows installation disc, you can perform system recovery options on startup. To do this, follow these steps:
Insert the Windows 8 installation disc in the drive, and then restart the computer.
When you are prompted to start from the disc, press any key.
Tap or click Repair your computer.
Tap or click Troubleshoot, and then tap or click Advanced options.
Tap or click your version of Windows 8, tap or click System Restore, tap or click the restore point you want, and then tap or click Next.
Follow the onscreen instructions to perform the System Restore, and when prompted, restart your computer.
Insert the Windows Vista or Windows 7 installation disc in the drive, and then restart the computer.
When you are prompted to start from the disc, press any key.
When you are prompted, configure the Language to install, Time and currency format, and Keyboard or input method options that you want, and then select Next.
Select Repair your computer.
On the System Recovery Options page, click the version of the Windows operating system that you want to repair, and then select Next.
On the System Recovery Options page, select System Restore.
On the System Restore page, select Next.
Select a restore point at which you know that the operating system was working, and then select Next.
The restore point should be a date before the first time that you experienced the error. To select a date, use the Choose a different restore point option, and then select Next.
If you are prompted to specify which disk to restore, select the hard disk, and then select Next.
On the Confirm your restore point page, select Finish.
When the restoration process is complete, select Restart.
Note You must be logged on to Windows with an administrator account to complete this method. If this is a computer that is part of a network at work, you should ask the system administrator for help. For information about how to log into Windows as an administrator, click one of the following links, depending on the version of Windows that you’re running:
Note If your computer is not configured to start from a CD or from a DVD, or if Windows came preinstalled on your computer without the CDs or DVDs, see the documentation that was included with the computer for instruction about how to continue, or skip to the next method.
Method 5: Perform an in-place upgrade (reinstallation) (Windows 7 and Windows Vista)
Performing an in-place upgrade will restore the current Windows installation to the version of the installation DVD. This also requires the installation of all updates that are not included on the installation DVD. If your computer came with Windows pre-installed, review your computer’s documentation for instructions on how to do an in-place upgrade. Otherwise, follow these steps.
Insert the Windows Vista or Windows 7 DVD in the computer’s DVD drive.
In the Setup window, select Install Now.
Note If Windows does not automatically detect the DVD, follow these steps:
Select Start, and then type Drive:\setup.exe in the Start Search box. Note The Drive placeholder is the drive letter of the computer’s DVD drive, usually D:\.
In the Programs list, select Setup.exe.
In the Setup window, select Install Now.
Select Go online to obtain the latest updates for installation (recommended).
Type the CD key if you are prompted to do this.
Select the operating system in the Install Windows page you want to upgrade.
Select Yes to accept the Microsoft Software License Terms.
On the Which type of installation do you want? screen, select Upgrade.
When the installation is complete, restart your computer.
Note We strongly recommend that you back up all your personal files. For information, see how to back up your files.
If these methods did not fix the issue, you can use the Microsoft Customer Support Services Web site to find other solutions to your problem. Some services that the Microsoft Customer Support Services Web sites provide include the following:
Searchable Knowledge Base: Search technical support information and self-help tools for Microsoft products.
Solution Centers: View product-specific frequently asked questions and support highlights.
Other Support Options: Use the Web to ask a question, contact Microsoft Customer Support Services, or provide feedback.
If you continue to have problems, you might want to contact Microsoft Support.
How to restore or repair your Windows installation
Note These sites include options to use when the manufacturer has installed the System Recovery options on the computer.
How to avoid this problem in Windows Vista
To avoid this problem in Windows Vista, obtain and install update 937287 from the Microsoft Download Center separately from all other updates on the Windows Update site. Install the update that applies to your version of Windows Vista so that you can successfully install future updates.
The following files are available for download from the Microsoft Download Center:
Windows Vista x86-based systems  Download the Windows6.0-KB937287-x86.msu package now.
Windows Vista x64-based systems Download the Windows6.0-KB937287-x64.msu package now.
Microsoft has confirmed that this is a problem in the Microsoft products that are listed in the «Applies to» section.
Failure configuring Windows Updates, Reverting changes. Error code: 8007003
- A known fix!
- If not, A technical consultant to remotely access my PC and find the issue
- If he/she cannot solve the issue, A brand new Windows 8 Pro installation disc
- If this does not solve the problem, A full refund + Damage costs to my hardware for running a defective OS (i.e. a replacement SSD)
![]()
Important Note: Security software can help protect your computer against viruses and other security threats. In most cases, you shouldn’t disable your antivirus software. If you have to temporarily disable it to install other software, you should re-enable it as soon as you’re done. If you’re connected to the Internet or a network while your antivirus software is disabled, your computer is vulnerable to attacks.
I would suggest you to run Microsoft Safety scanner and scan for any infected files on the computer.
To download and run the Microsoft Safety Scanner, follow these steps:
a) Go to the Microsoft Safety Scanner site at: Microsoft Safety Scanner
b) Click Download Now.
c) If prompted, click Run. Follow the on-screen instructions to download and install the Microsoft Safety Scanner. When prompted, add a shortcut to the Microsoft Safety Scanner to your desktop.
d) From your desktop, double click the Microsoft Safety Scanner icon. When the Microsoft Safety Scanner program launches, click Scan Type, then click Full Scan, then click Next.
e) After the scan is complete, remove all detected malware entries
Note: Any data files that are infected may only be cleaned by deleting the file entirely, which means there is a potential for data loss.
I would suggest you to send us the CBS.log file to get the events that has caused this issue. You can follow the steps to view the log files:
a) Type ‘cmd’ on the start screen and click on Command prompt.
b) Type the following command without quotes and press Enter:
«findstr /c:»[SR]» %windir%\logs\cbs\cbs.log >sfcdetails.txt «
You can post us the log files on Skydrive link.
Solve the Failure Configuring Windows Updates Reverting Changes Error on Your Computer

In the Windows versions Vista, 7, and 8, sometimes the updates lag, and you may see a “Failure configuring Windows updates Reverting changes” error. This error frequently appears when people attempt to upgrade to newer versions of Windows (especially on Windows 8, which had a short lifespan and is no longer supported by Microsoft).
To fix various PC problems, we recommend the Restoro PC Repair Tool:
This software will repair common computer errors, protect you from file loss, malware, hardware failure, and optimize your PC for maximum performance. Fix PC issues and remove viruses now in 3 easy steps:
- Download Restoro PC Repair Tool rated Great on TrustPilot.com.
- Click Start Scan to find Windows issues that could be causing PC problems.
- Click Repair All to fix issues with Patented Technologies (patent available here).
Restoro has been downloaded by 14,567 readers this week.
If you are experiencing this problem, continue reading to find out how to resolve it. If you have Windows 10 and are experiencing updates that are not installing correctly, you can look here to find the answer.
What Causes Windows Update to Fail When Configuring Updates?
During an update, many things can cause Windows to freeze. On earlier Windows systems when this happened, the operating system tries to roll back to the way Windows was before the update. That is what happens when you see this screen.
Updates can fail for a variety of reasons. Some of these include the following:
- The software you have already installed on your computer is not compatible with the update.
- The update itself causes an issue that did not occur during testing.
- Removable media is interfering with the way your computer restarts.
- Too many updates are trying to load at once.
In some cases where automatic updates are on, the “Failure configuring Windows updates Reverting changes” error can create a reboot loop that is very discouraging. Help is here! Keep reading to resolve this issue on your Windows Vista, Windows 7, or Windows 8 computer.
How to Fix: Failure Configuring Windows Updates Reverting Changes error
Fix 1: Use the Advanced Repair Tool (Restoro)
If you’re looking for an easy and hassle-free solution to your critical error, then there’s an excellent tool that can help you. The Restoro program can help you identify, fix, and prevent any issues that occur. The program is simple enough to download & install, and it will fix any Windows issues.
Follow the steps below to install and run the Advanced Repair Tool on your PC:
Step #1
Download the Advanced Repair Tool for free.

Step #2
Run the file to start the installation process, accept the license agreement by checking the “I Accept the EULA and Privacy Policy” option, and click on the Install and Scan button.

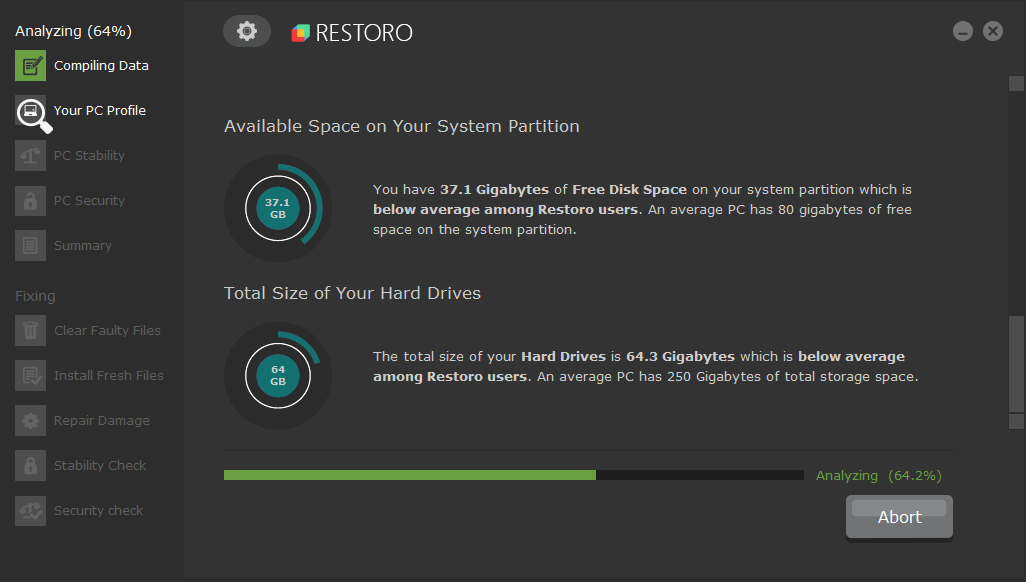
Step #3
Once installed, the program will automatically scan and check your computer for errors. It will also check your PC for junk files and any weaknesses that make your PC vulnerable to hackers. Once complete, you will get a detailed view of any issues found on your computer. To perform a full scan, you will need to install a full version of the program.
Step #4
Once the full scan is complete, select the green “Clean Now” button to fix your issues.
The program will attempt to fix all found issues, including the WiFi connected but no internet problem that you’re running into. Reboot your PC and check your internet connection.
If you want to address the issue manually, try one of the methods below.
Fix 2: Remove all removable memory cards, disks, flash drives, etc.
Although removable media does not create a problem with the update, it does cause a problem during the system restart where the updates are installed.
Step #1
Check the disk drives, USB ports, and memory card slots for any removable media such as SD cards, flash drives, CDs, and DVDs. If you don’t find any, you can continue to the next method. If you do find something, proceed to Step #2.

Step #2
Shut down the computer if it is not already shut down. You may have to perform a hard shut down by holding down the power button for thirty seconds.

Step #3
Remove the media from the computer. For memory cards and USB drives, you can pull them out as soon as the computer is completely off. If you need to remove a disk with the computer off, you insert the unfolded end of a paper clip into the manual disk eject hole. This is a tiny hole located somewhere on the front of the disk player. Examples can be seen in the following pictures.

Step #4
Once the media is removed, start your computer and see if the updates install correctly.
Fix 3: Use the Windows Update Troubleshooter
The Windows Update Troubleshooter by Microsoft is an app that finds the exact problem with an update and fixes it. To use the Troubleshooter, you must first download it for Windows Vista or Windows 7 or 8. Make sure you only download it from the official Microsoft website.
Step #1
Visit Microsoft’s website here and click the blue highlighted “Fix it” under the appropriate version of Windows you are running.

Step #2
Choose “Run” when the popup asks if you want to save or run the file. This should automatically open the Troubleshooter.
Step #3
Follow the onscreen prompts to run the Troubleshooter. It will automatically detect any update problems and fix them.
If the Troubleshooter cannot detect any problems or if after fixing the issues detected you still have trouble with the update and see the “Failure configuring Windows updates reverting changes” error, continue to another method to resolve the issue.
Fix 4: Do a Clean Reboot
Sometimes third-party apps might be interfering with the download. If this is the case, restarting the computer without these apps running should resolve the matter.
Step #1
Log into an administrator account. If at any time during the following steps you are asked for your password, type in the password for this administrator account. Press the [R] key and the [Windows] key at the same time. This opens the Run box. Type “msconfig” into it without quotation marks. Click the “OK” button.

Step #2
When the System Configuration window opens, click on the services tab and make sure that “Hide all Microsoft services” has a check mark next to it. Click the button to “Disable all.”

Step #3
If you have Windows 7 or Vista, skip this step and go to Step #4. In Windows 8, click the “Startup” tab in the System Configuration window. Then click on “Open Task Manager.”
When the Task Manager opens, click the “Startup” tab in that, and select each item you find there and click the button to “Disable” it if it isn’t already disabled. When you are finished, close the Task Manager.

Step #4
If you have Windows 8, skip this step and go to Step #5. In Windows 7 or Vista, click the “General” tab in the System Configuration window. Choose “Selective startup.” Now make sure there isn’t a checkmark in the box next to “Load startup items.”

Step #5
On the System Configuration window that is still open, click the “Apply” button and then “OK.”
Step #6
Click on the Power icon and choose “Restart” to restart the computer.
Step #7
Once the computer restarts, attempt to rerun the updates. In Windows 8, you do this by opening the Start Menu, selecting “Settings” and then Change PC Settings. Then choose Update and Recovery, and Windows Update.
Finally, click the “Install Updates” button. In Windows 7 and Vista, open the Start Menu, type “Update” in the search box, and choose “Windows Update.” Again, click the “Install Updates” button.
With a clean reboot, you should be able to install the updates normally, as long as a third-party app was interfering with them and causing the “Failure configuring Windows updates Reverting changes” error.
Fix 5: Install the Updates in Safe Mode
In some cases, Microsoft’s apps may be interfering with the updates. Installing updates in Safe Mode ensures that only the necessary programs are running in the background.
Step #1
If the loop is continuous and you cannot access your computer, press F8 during the reboot and select “Safe Mode with Networking” when prompted. If you can get to your computer desktop, press the [R] key and the [Windows] key together to open the Run box. Type “msconfig” into it without quotation marks and click “OK.”
Step #2
Go to the “Boot” tab in the System Configuration Window that opens. Make sure the box next to “Safe Boot” is marked and choose “Minimal” underneath it. Now click “Apply” and then “OK.”

Step #3
Windows should ask if you want to restart your computer now. Click “Restart.”

Step #4
Once you have restarted in Safe Mode, open the Start Menu and choose “Control Panel.”

Step #5
When the Control Panel opens, select “System and Security” (or “Security” in some versions). Then click Windows Update to open that window. Find the button that says “Install updates” and click it.
Step #6
When the updates finish installing, you should restart your computer. Because the settings have been changed, it should automatically restart in Safe Mode. Once it does, press the [R] key and the [Windows] key together again to open the Run box. Then, you can type “msconfig” into it without quotation marks into the box and click “OK” as you did before.
Step #7
Return to the “Boot” tab in the System Configuration Window. This time, uncheck the box next to “Safe Boot.” Click “Apply” and then “OK.” Again, restart your computer.

With the updates applied in Safe Mode, you should have no problems restarting your computer. If the “Failure configuring Windows updates Reverting changes” error continues to appear, go to the next method.
Fix 6: Break the Updates Into Smaller Groups
Sometimes you get stuck in the loop because there are so many updates in the queue it takes too long to download them all at once. To fix this problem, you need to install the updates manually in smaller groups.
Step #1
If the loop is continuous and you cannot access your computer, press F8 during the reboot and enter Safe Mode when prompted. Follow the instructions in method 5 to ensure your computer continues rebooting into Safe Mode throughout this process.
Step #2
Once you are in Safe Mode, open the Start Menu and click on the “Control Panel” option.
Step #3
Choose “System and Security” in the Window that opens. (This is just called “Security” in Vista.) Now click on “Windows Update.”

Step #4
In the drop-down menu under “Important Updates,” select “Check for updates but let me choose whether to download and install them.” Make sure the box under “Recommended Updates” has a check mark in it. None of the other boxes should be marked. Now click “OK.”

Step #5
Return to the main Windows Update page. This time click on the blue words telling you the number of significant updates available.

Step #6
You should see a list of updates. Make sure only a few are selected and click “Install.” It is best to choose the lowest numbered updates first since Microsoft expects them to be installed in order.

Step #7
Continue repeating steps #4 and #5 until all the critical updates have been installed. You can then repeat the process for optional updates if you want. When you have finished, reset the Windows Update settings to update Automatically.

Step #8
Restart your computer in Normal Mode.
This process is long, but it should resolve the “Failure configuring Windows updates reverting changes” error you have.
Fix 7: Run the System File Checker
Some files may become corrupt or damaged. The file checker will fix them for you so updates can continue normally.
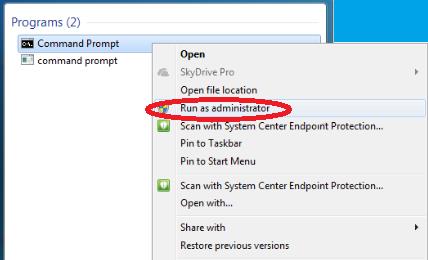
Step #1
In the Start Menu search bar, type “Command Prompt” without the quotations. Right-click the “Command Prompt” option that appears and choose “Run as administrator.” Depending on the version of Windows you are using, you may have to enter your password or click “Allow” to continue to the Command Prompt window.
Step #2
If you have Windows 7 or Windows Vista, skip this step and go to step 3. If you have Windows 8, you first need to run the DISM. To do this, you need removable media such as the Windows DVD that contains source material to repair the Updater. You can create this media from another Windows 8 computer that is not having the Failure configuring Windows updates error. Insert the media into the DVD player or the USB port (depending on what it is). Once the media is inserted, type “DISM.exe /Online /Cleanup-Image /RestoreHealth /Source:D:RepairSourceWindows /LimitAccess” into the command prompt without the quotation marks where D:RepairSourceWindows is the location of the uncorrupted Windows Updater files. Once you press enter, the repair should take place automatically, but it may take a little time.

Step #3
Now, you need to check for other corrupt files you may have. To do so, type “sfc /scannow” into the Command Prompt or cut and paste it without the quotation marks. You will need to wait for the process to be 100% complete before closing the window and exiting the Command Prompt. Many messages could appear once the scan is complete. Windows may not find corrupt files or may automatically fix them. If the message says Windows could not perform the requested operation, you need to retry the scan in Safe Mode. In some cases, Windows may fix some of the files but be unable to correct others. If this happens, you may be able to access the log and replace the files that are corrupt with good copies.

Hopefully, repairing Windows Updater will resolve your Failure configuring Windows error. If not you can still try the next method.
Fix 8: Do a System Restore
In some cases, you may need to do a system restore using the Windows installation disk. Make sure you back up any files you have before you perform this method.
Step #1
Log in as an administrator. If at any point during this process you are asked for your password, use the password for your administrator account. Place the Windows installation disk in the disk drive. Restart your computer and press any key when it asks if you want to start the computer using the disk.
Step #2
If you have Windows 8, skip this step and go to Step #3. On Vista or 7, you will need to configure the installation language, currency and time format, and the methods of input (such as the keyboard). When you have finished, click “Next.”
Step #3
Select the option to repair your computer.

Step #4
Skip to Step #5 if you have Windows Vista or 7. In Windows 8, you need to choose Troubleshoot and “Advanced Options.”

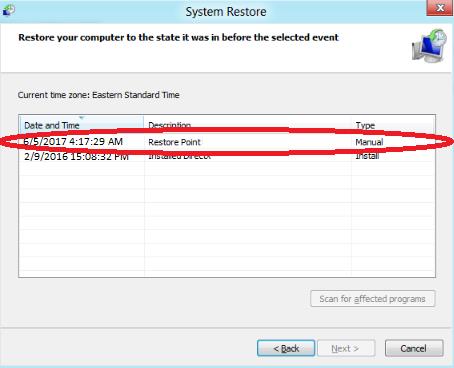
Step #5
Click “System Restore,” choose the restore point and click “Next” on Windows 8. For Windows 7 and Vista, click “Next,” “System Restore,” “Next,” choose your restore point and click “Next” again.
Step #6
If you are asked which disk you want to restore, choose the hard disk. You may also need to confirm the restore point. When the restore is finished, you need to “Restart” your computer to apply the changes.

Fix 9: Do a System Installation
When all else fails, you may have to reinstall windows. Again, make sure you have completely backed up all your files before you begin.
Step #1
Insert the installation disk in the disk drive. When the Setup window appears, choose “Install now.” Windows should automatically detect the disk. If it doesn’t, type “D:setup.exe” into the Start Menu Search bar, where D: is the drive where the disk is located.
You should see “Setup.exe” in the list of programs that appear. Clicking on that will give you the option to “Install Now.” Clicking “Install Now” will rewrite your drive back to factory standards.

Step #2
At this point, you will need to perform an extended amount of updates. It is best to install these updates in smaller groups as was done in Method 6 above. You may also need to do an Upgrade if you made any upgrades to newer versions of Windows. You will probably need to enter your product key at some point and agree to Microsoft’s licensing terms.

Step #3
When you have finished upgrading and updating, you will need to restart the computer.
Conclusion:
These methods should have resolved your “Failure configuring Windows updates Reverting changes” error. If the error occurs again, you might want to try one of the additional methods to address it since each way fixes a different problem that could be causing the issue.


