Linux Mint Forums
Welcome to the Linux Mint forums!
Ricoh laser printer+scanner SP111SU
Ricoh laser printer+scanner SP111SU
Post by avi » Sat Apr 21, 2018 4:53 am
Re: Ricoh laser printer+scanner SP111SU
Post by deepakdeshp » Sat Apr 21, 2018 10:59 am
If I have helped you solve a problem, please add [ SOLVED] t o your first post title , it helps other users looking for help, and keeps the forum clean.
Regards,
Deepak
Mint 20.1 Cinnamon 64 bit with AMD A8/7410 / 8GB
Mint 20.1 Cinnamon AMD Ryzen3500U/8gb
Re: Ricoh laser printer+scanner SP111SU
Post by pdc_2 » Sat Apr 21, 2018 5:52 pm
so you are right: Ricoh do not supply linux drivers; that I can find;
Open Printing is the go-to place to look for printing support in linux; for open-source solutions;
If one looks in Ricoh there; your SP111SU does NOT get a mention; other SP devices are listed as supported;
indeed many SP devices are said to work perfectly eg http://www.openprinting.org/printer/Ric . o_SP_4100N
that device uses what Open Printing call the PDF-Ricoh driver; when one looks on that page, they say
Under this entry Ricoh’s PPD files for their PDF printers are hosted. PDF printers are supported natively in Linux and Unix environments, so you only need the PPD file for your printer, no driver executables, to get access to all printing functionality.
The PPD contains all information about properties and user-settable options which are specific to the printer and makes printing dialogs show these options and allow the user to control all the printer’s functionality.
These PPDs are especially made for use on Linux/Unix systems. Especially they support all advanced printer features like Locked Print, Ducument Server, User Code, .
so I have never had to do this; but you can download the ppd file for the 4100; if you used a text editor; and changed all references to the 4100; to your 111; and saved it as a 111;
then if you saved it to /etc/cups/ppd; and perhaps also saved a copy in the database; that usually resides in /usr/share/ppd
Having saved the ppd then if one went to the PRINTERS folder; clicked on NEW; to set up a new printer; then when the dialogue asks you for options; there should be one that says «use ppd file . » and you can point the system to the 111 ppd file that you saved in /etc/cups/ppd . and hopefully . that gives you some chance that you might be able to print;
Источник
Принтер Ricoh SP111 SU [dубликат]
U также может поместить ваши собственные файлы .desktop в каталог /home/
/.local/share/applications/, они должны получить предпочтение от тех, которые находятся в / usr / share / applications / there Вам действительно понадобятся права суперпользователя для редактирования & amp; сохраняя их.
В KDE-среде u использовал бы kdesudo kate в качестве редактора для root. Если вы не знакомы с этим, это хорошая помощь, чтобы сделать screencopy с Ksnapshot, прежде чем что-либо изменить. Еще один совет: прочитать man-страницу программы, например. man kpat pgdown / pgup & amp; Q до конца — Иногда мне нравится играть в Клондайк, поэтому я создал стартер /home/
/.local/share/applications / . В man-странице рассказывается, как запустить его с помощью опции: kpat —gametype klondike U может попробовать это с терминала в первую очередь. Поскольку вы получите обратную связь о каких-либо ошибках там.
Больше вопросов? Продолжайте спрашивать; -)
Еще один совет — также настроить необработанную установку вашего выбора-дистрибутива в VirtualBox и проверить там вещи. Это называется «Testing-Environment». Я говорю по собственному опыту — кривая знаний будет ускоряться таким образом. Получайте удовольствие от Kubuntuing!
5 ответов
Чтобы установить принтер в Ubuntu, сначала вам нужно установить пару зависимостей:
Установить pbmtojbg и inotify-wait: sudo apt-get install jbigkit-bin inotify-tools Теперь установить драйвер чашек: git clone git@github.com:droidzone/ricoh-sp100.git (Все кредиты Сергею Шистареву за оригинальный PPD для Ricoh SP 100) Скопируйте файл pstoricohddst-gdi в каталог, содержащий фильтры чашек: sudo cp pstoricohddst-gdi /usr/lib/cups/filter/ sudo chown root:root /usr/lib/cups/filter/pstoricohddst-gdi[/bash] Теперь откройте апплет Принтеры: Добавить принтер> Выбрать Ricoh SP 111> Выбрать файл PPD Выберите RICOH_Aficio_SP_111.ppd Если вы не можете выбрать файл PPD с помощью вышеуказанных шагов, попробуйте следующее: чтобы добавить принтер из веб-интерфейса CUPS: в своем веб-браузере перейдите по адресу http: // localhost: 631 / CUPS для администраторов> Добавление принтеров и Классы Принтеры> Добавить принтер Введите имя пользователя и пароль root Когда ваш принтер подключен и включен, Ubuntu должен обнаружить его и присвоить ему имя. Выберите этот принтер прямо сейчас. Нажмите несколько раз, пока не дойдете до раздела, где вас попросят выбрать файл PPD. На этом этапе выберите файл RICOH_Aficio_SP_111.ppd.
Источник: Мой блог
(Следуйте рекомендуемым параметрам)
Чтобы установить принтер в Ubuntu, сначала вам нужно установить пару зависимостей:
Источник
Драйвер для принтера Ricoh SP 111 / 111SF / 110SU / 111SU
| Тип |  Windows Windows |  Bit Bit |  |  |  |  |  |
 (DDST драйвер) (DDST драйвер) SP 111 | 10 — 7 / 2019 — 2008 | 32 | 27.01.2016 |  | 1.01 | 2.3 [MB] | Скачать |
| 64 | 03.02.2016 | | 1.01 | 2.5 [MB] | Скачать | ||
| (DDST) SP 111SF | 10 — 7 / 2019 — 2008 | 32 | 27.01.2016 | | 1.01 | 2.3 [MB] | Скачать |
| 64 | 27.01.2016 | | 1.01 | 2.5 [MB] | Скачать | ||
| (DDST) SP 110SU/111SU | 10 — 7 / 2019 — 2008 | 32 | 27.01.2016 | | 1.01 | 2.3 [MB] | Скачать |
| 64 | 27.01.2016 | | 1.01 | 2.5 [MB] | Скачать | ||
 SP 111SF/110SU/111SU | 10 — 7 / 2019 — 2008 | 32 / 64 | 10.03.2014 | | 1.01 | 10.4 [MB] | Скачать |
 LAN Fax LAN Fax SP 111SF | 10 — 7 / 2019 — 2008 | 32 | 27.01.2016 | | 1.01 | 2.9 [MB] | Скачать |
| 64 | 27.01.2016 | | 1.01 | 3.0 [MB] | Скачать | ||
| Smart Organizing Monitor | 10 — 7 / 2019 — 2008 | 32 / 64 | 10.03.2014 | | 1.03 | 9.5 [MB] | Скачать |
Драйверы для принтеров Ricoh
для Windows 10 — 7 / 2019 — 2008.
Источник
Ricoh sp 111 linux
First, let me take a moment to shower abuses on Ricoh to royally assume that Windows and Mac are the only two operating systems used by customers. I just bought a Ricoh Aficio SP 111 printer, and found that I couldn’t locate any drivers for Ubuntu, nor was one available in Ubuntu’s repositories. Thanks to the open source phenomenon, I was able to modify a ppd written by Serge V Shistarev, and available on Github. A couple of minutes later, the printer was happily churning away pages.
To install the printer in Ubuntu, first you need to install a couple of dependencies:
Install pbmtojbg and inotify-wait:
Now install the cups driver:
All credits to Serge V Shistarev for the original PPD for Ricoh SP 100
Copy the file pstoricohddst-gdi to the directory containing cups filters:
Now open the Printers applet:
Add Printer
Choose Ricoh SP 111
Choose ppd file (RICOH_Aficio_SP_111.ppd)
Note: If you’re unable to select the ppd file by the above steps, try the following:
To add printer from the ppd file:
In your web browser, navigate to http://localhost:631/
CUPS for Administrators > Adding Printers and Classes
Printers > Add a printer
Enter your root username and password
When your printer is connected and switched on Ubuntu should detect it and assign it a name. Select that printer right now. Click next a couple of times until you reach the section where you’re asked to select the ppd file.
At this point, choose the file RICOH_Aficio_SP_111.ppd which should have got cloned by github. Click next and it will say your printer is successfully installed. Check by giving a test print.
Joel G Mathew, known in tech circles by the pseudonym Droidzone, is an opensource and programming enthusiast.
He is a full stack developer, whose favorite languages are currently Python and Vue.js. He is also fluent in Javascript, Flutter/Dart, Perl, PHP, SQL, C and bash shell scripting. He loves Linux, and can often be found tinkering with linux kernel code, and source code for GNU applications. He used to be an active developer on XDA forums, and his tinkered ROMS used to be very popular in the early 2000s.
His favorite pastime is grappling with GNU compilers, discovering newer Linux secrets, writing scripts, hacking roms, and programs (nothing illegal), reading, blogging. and testing out the latest gadgets.
When away from the tech world, Dr Joel G. Mathew is a practising ENT Surgeon, busy with surgeries and clinical practise.
Источник
Xubuntu-ru.net
В данной статье постараюсь описать процесс установки принтера Ricoh sp 100. Этот принтер является проблемным в поддержке Linux, но все же нашлось решение проблемы с установкой.
1. Скачиваем архив ricoh-sp100-master.
2. Распаковываем его в любое доступное место (для избежания возможных ошибок лучше чтоб путь не содержал кириллические символы и пробелы).
3. Переходим в распакованную папку, открываем окно терминала и запускаем скрипт check-requirements
sudo sh check-requirements
данный скрипт проверяет наличие необходимых компонентов в системе.
4. Устанавливаем недостающие компоненты, у меня их было два, т.е в моем случае
sudo apt-get install inotify-tools
(ставит пакет inotify-wait)
sudo apt-get install jbigkit-bin
(ставит пакет pbmtojbg)
5. Копируем файл `pstoricohddst-gdi` в папку
требуются права root
6. Подключаем принтер к компьютеру, система определит принтер и добавит его в систему. Оставляем пока все как есть.
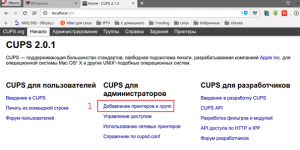
7.Добавляем новый принтер через CUPS web интерфейс, для чего в адресной строке браузера вводим
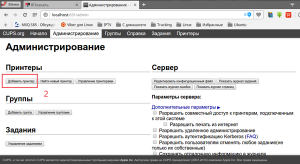
8. Далее будут картинки которые пошагово показывают процесс установки через web интерфейс
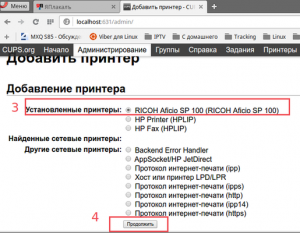
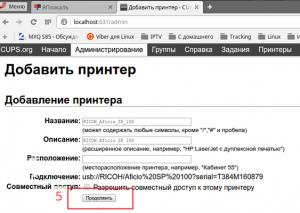
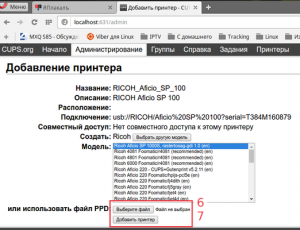
на шестом шаге выбираем файл RICOH_Aficio_SP_100.ppd который находится в распакованной папке (см.п.2)
на седьмом шаге процесс добавления принтера завершается.
9. Теперь необходимо удалить принтер, который был автоматически установлен по п.6
в открывшемся окне удаляем установленный принтер. (с именем RICOH_Aficio_SP_100, или если имя было изменено от дефолтного по шагу 5 (см. скриншоты) оставляем)
Пробуем тестовую печать.
PS Кстати после вышеперечисленных манипуляций мне удалось настроить сетевой принтер windows через samba с предоставлением файла RICOH_Aficio_SP_100.ppd.
Так что возможно вместо вышеперечисленных манипуляций и получится настройка принтера через
с предоставлением файла ppd, тут нужно пробовать. Если у кого получится прошу отписаться.
Если буду переустанавливать систему обязательно сначала попробую этот вариант.
Источник


