- How to change directory in Linux terminal
- How to change directory in Linux terminal
- How to use the Linux command line to change directory or folder
- How to print the current working directory in Linux
- cd command in Linux termianl
- Absolute vs Relative pathname
- Understanding . and .. directories
- How can I return directly to my home directory when using the Linux terminal?
- How do I change directories in the Linux terminal and return to the previous directory?
- A note about symbolic links and cd command
- Linux cd command cheat sheet
- Conclusion
- Linux Root Folders Explained
- Linux Root folders
- / – The Root
- /bin – Binaries
- /boot – Boot Files
- /dev – Device Nodes
- /etc – Configuration Files
- /home – Users’ Folder
- /lib – Libraries
- /lost+found – Recovered Files
- /media – Automatic mount point
- /mnt – Manual mount point
- /opt – Optional Software
- /proc – Kernel Files
- /root – Root Home
- /run – Early temp
- /sbin – System Binaries
- /srv – Service Data
- /tmp – Temporary Files
- /usr – User Binaries
- /var – Variable Files
- Conclusion
- Права суперпользователя Linux
- Права суперпользователя в Linux
- Вход под суперпользователем
- Переключение на суперпользователя в терминале
- Получение прав root без переключения
- Графически приложения от имени суперпользователя
- Выводы
How to change directory in Linux terminal
M y Dell Laptop came preinstalled with Ubuntu Linux, and I am a new Linux desktop user. How do I change directories in the Linux terminal?
Introduction – On Linux the cd command allows you to change directories when using the terminal application. This page shows how to change directory in Linux terminal using the cd command.
| Tutorial details | |
|---|---|
| Difficulty level | Easy |
| Root privileges | No |
| Requirements | Linux terminal |
| Est. reading time | 3 minutes |
How to change directory in Linux terminal
- To return to the home directory immediately, use cd
OR cd
Let us see all examples and usage for terminal in details.
How to use the Linux command line to change directory or folder
The directory in which the user is currently working is called the current working directory (CDW).
How to print the current working directory in Linux
To display the name of the current/working directory, type the following pwd command:
pwd
cd command in Linux termianl
The syntax is:
cd
cd ..
cd /path/to/dir
When cd command used without stipulating any directory name, cd command returns to the home directory. Let us change the directory to /usr/sbin/, run:
cd /usr/sbin/
Verify it:
pwd
Want to list the files in the /usb/sbin/ directory? Try the ls command:
ls
ls -l
Let us go back to user’s home directory, run:
cd
Again verify it:
pwd
- No ads and tracking
- In-depth guides for developers and sysadmins at Opensourceflare✨
- Join my Patreon to support independent content creators and start reading latest guides:
- How to set up Redis sentinel cluster on Ubuntu or Debian Linux
- How To Set Up SSH Keys With YubiKey as two-factor authentication (U2F/FIDO2)
- How to set up Mariadb Galera cluster on Ubuntu or Debian Linux
- A podman tutorial for beginners – part I (run Linux containers without Docker and in daemonless mode)
- How to protect Linux against rogue USB devices using USBGuard
Join Patreon ➔
Absolute vs Relative pathname
The cd command changes the current directory when a directory name provided by the user. The name can be written as an absolute pathname (e.g. cd /etc/httpd/ ) or as local pathname relative to the root directory (e.g. cd conf.d/ ). For example:
cd /etc/httpd/
pwd
ls
cd conf.d/
pwd
ls
The absolute vs. relative pathname for cd command in Linux
Understanding . and .. directories
On Linux the current directory is represented by a single dot ( . ) and two consecutive dots represent its parent directory ( .. ). Thus, to change to the parent of the current directory, run cd . .. For example:
ls
pwd
cd ..
pwd
ls
How can I return directly to my home directory when using the Linux terminal?
How do I change directories in the Linux terminal and return to the previous directory?
Simply pass the — option to the cd:
cd —
Verify it:
pwd
A note about symbolic links and cd command
The -P option instructs cd to use the physical directory structure instead of following symbolic links:
cd -P LinkDir
pwd
The -L option forces cd to follow symbolic links:
cd -L LinkDir
pwd
Linux cd command cheat sheet
| Command | Description |
|---|---|
| cd | Returns you to your login directory |
| cd |
tom
Conclusion
The cd command is used to change the current directory in both Linux and other Unix-like systems. See Cd command wiki page.
🐧 Get the latest tutorials on Linux, Open Source & DevOps via
Источник
Linux Root Folders Explained
In this post, you will finally get the Linux root folders explained. You will learn how these folders are used by your Linux system and how you can use them.
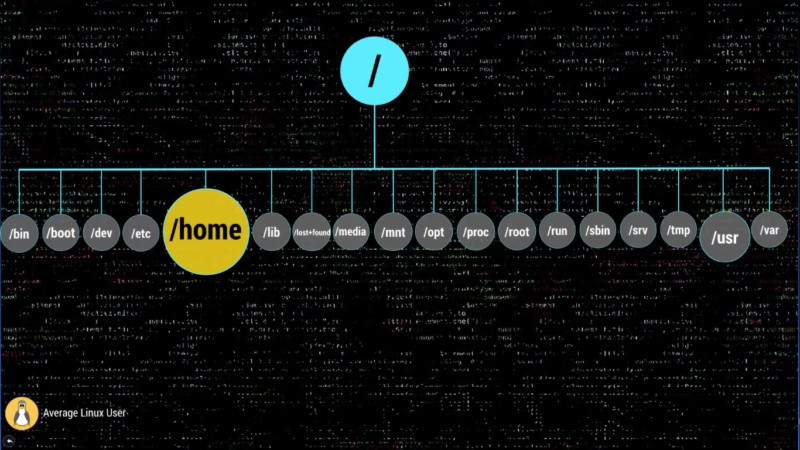
When you open your file manager, you are usually located in your home directory. But if you go two levels up, you will see this set of directories:
This post exactly about all these directories. You can watch the video where these Linux root folders explained or continue reading below.
Linux Root folders
I won’t use the terminal here and I will show you some visual presentation. But you are of course are encouraged to open the terminal and explore all these directories. Let’s get started.
/ – The Root
Everything begins in your system from this directory. All your folders, hard drives, USB drivers, everything is located in this root folder. You cannot go above this directory.
Also, the root directory is designated by the slash sign.
The concept of the root directory may be difficult to understand for Windows users who are used to see something like disk C, disk D and disk E. In Linux, every disk is a represented as a folder that is mounted under this root directory.
This Linux Directory Structure may look like a mess, but believe me when you learn it, you will realize how much sense it makes.
/bin – Binaries
The /bin folder contains programs that are essential for the system to boot and run. So, if you destroy this folder, your system won’t boot and run.
These programs are stored in the binary format. In other words, they are not in text format. You cannot open and read the content of these programs. The advantage of such format is that a computer can read and execute these programs very fast.
/boot – Boot Files
It is easy to guess from the name. This folder is needed to boot your system. It contains the Linux kernel, initial RAM disk image for drives need at boot time, and the bootloader.
I also would like to point out that within this boot folder, you can find the grub folder that contains grub configuration files.
If you read my Arch Linux post, you should remember than I used this command to generate the GRUB configuration file.
The boot folder also contains the Linux kernel.
/dev – Device Nodes
Here, I need to introduce another important concept of Linux – everything is a file. The /dev folder contains files for all devices your Linux is able to recognize.
If you have some Linux experience, you may recall that when you mount a hard drive, you use a name such as /dev/sda1 . The sda is the name of a first hard drive recognized by your Linux kernel and it is located in the dev folder. When the disk is mounted, you see it as a folder in that mounting point.
You can also find here USB devices, CPU etc.
/etc – Configuration Files
The /etc folder comprises all system-wide configuration files and some shell scripts that are executed during the system boot. All files here are text files, so they are human readable.
If you ever did any system-wide configuration, you probably edited some files here.
For example, there is /etc/fstab file that contains a table of storage devices and their mounting points.
/home – Users’ Folder
The home directory contains a home folder for each regular user on your Linux system. For example, I have tow folders in my /home folder. ALU is my home folder. The second folder belongs to another user, whom I named User2. So, the home folder of every user is named by its username.
You have as many folders as many users you have on your system.
These users’ folders are where users store their private data such as documents, videos, picture, music etc. When you open your file manager or your terminal by default you are located in you user’s home folder. It is also often marked as
/lib – Libraries
You already know the /bin directory that contains programs, this /lin folder contains libraries required by those programs from the /bin folder.
A library is a set of functions that are shared between programs. Thus, this /lib folder is also essential for your system to work correctly.
/lost+found – Recovered Files
You will have this directory if you use the ext4 file system. Most of the modern Linux distros use ext4, so most likely you have this folder. This is a file system specific folder that is used for data recovery in case of file corruption. Unless something bad has happened, this folder should be empty on your system.
This /lost+found folder is produced on every separate partition. So, if your /home folder is on a separate partition, you should have this /lost+found folder in your home directory too.
/media – Automatic mount point
This folder is used for automatic mounting of removable media such as USB drives, CD-ROM etc. For example, if your system is configured for automatic mounting, when you insert a USB drive it will be mounted to this folder.
/mnt – Manual mount point
The /mnt folder is similar to the /media folder, it is also used to mount devices, but usually, it is used for manual mounting. You, of course, can manually mount your devices to /media , but to keep some order in your system it is better to separate these two mounting points.
/opt – Optional Software
This folder is not essential for your system to work. Usually, it is used to install commercial programs on your system. For example, my Dropbox installation is located in this folder.
/proc – Kernel Files
This is a virtual file-system maintained by the Linux kernel. Usually, you do not touch anything in this folder. It is needed only for the kernel to run different processes.
/root – Root Home
This is the home directory of your root user. Don’t mix it with the / root directory. The / directory is the parental directory for the whole system, whereas this /root directory is the same as your user home directory but it is for the root account.
If you log in as a root, you will be located in this directory by default. This is a folder for private data and account specific setting of your root account.
/run – Early temp
The /run is a recently introduced folder that is actually a temporary file-system. It is used to store temporary files very early in system boot before the other temporary folders become available.
/sbin – System Binaries
Similar to /bin this folder contains binaries for essential system tasks but they are meant to be run by the super user, in other words, the administrator of the system.
/srv – Service Data
This directory contains service files installed on your system. For example, if you installed a web-served on your Linux system, it will be located in this folder.
/tmp – Temporary Files
This is just a place where programs store temporary files on your system. This directory is usually cleaned on reboot.
/usr – User Binaries
This is probably the largest folder after your home folder. It contains all programs used by a regular user.
I would like to stop little more on sub-directories of this /usr folder.
/usr/bin contains the programs installed by your Linux distribution. There are usually thousands of programs here.
The libraries for this /usr/bin executables are located in the /usr/lib folder.
The /usr/local doesn’t have any programs by default, but if you compile and install a program system-wide it will be placed here.
The most useful folder is /usr/share . It contains all the shared data used by the programs from /usr/bin .
All default configuration files, themes, icons, wallpapers, sound files are stored here, one more folder I would like to mention here is the /usr/share/doc folder, where you can find the documentation files for programs installed on your system.
/var – Variable Files
The /var contains files that are of variable content, so their content is not static and it constantly changes. For example, this is where the log files are stored. If you don’t know, a log file is a file that records all events happening in your system while it is running. These log files often help to find out if something is not working correctly in your system.
Conclusion
Now you have some clue about all those folders in your Linux system.
Please, feel free to add anything in the comments bellow in case I missed something.
Источник
Права суперпользователя Linux
Как вы знаете, Linux очень серьезно относится к управлению пользователями и предоставлению им прав на работу с системой. Обычный пользователь может записывать файлы только в свой каталог и каталог /tmp/. Также есть возможность читать некоторые файлы в корневой файловой системе. Но вы не можете устанавливать программы, ведь для этого нужно право на запись, не можете изменять атрибуты файлов, не можете запускать сервисы, не можете читать некоторые файлы логов и еще много чего не можете.
В Linux управлять корневой файловой системой и создавать там файлы имеет право только пользователь root.
В этой статье мы рассмотрим какие программы нужны для того, чтобы получить права root пользователя linux, как они работают, как выполнять программу с правами root от обычного пользователя и как запускать графические программы с правами root. А также выясним что такое sudo в чем разница su или sudo.
Права суперпользователя в Linux
Очень долго перечислять чего не может обычный пользователь Linux, проще сказать на что у него есть право, а именно при стандартной настройке полномочий для файлов в Linux, обычный пользователь может:
- Читать, писать и изменять атрибуты файлов в своем каталоге
- Читать, писать, изменять атрибуты файлов в каталоге /tmp
- Выполнять программы там, где это не запрещено с помощью флага noexec
- Читать файлы, для которых установлен флаг чтения для всех пользователей.
Если же нужно сделать что-то большее нам понадобятся права root пользователя linux. У root есть право делать все в вашей файловой системе независимо от того какие права установлены на файл.
Вход под суперпользователем
Чтобы войти под пользователем root можно переключиться в одну из виртуальных консолей, например, с помощью сочетания клавиш Ctrl+Alt+F1 и затем ввести логин root и пароль root пользователя.
Вы получите полноценное окружение root с возможностью выполнять все действия, но такой способ очень непрактичный, так как вы теряете все преимущества использования графического интерфейса.
Можно поступить полностью противоположным путем, ввести логин root и его пароль в графическом менеджере входа, чтобы окружение рабочего стола работало от имени root, и мы получаем все права root linux, но такой вариант крайне не рекомендованный, и очень опасный, вы можете случайно повредить всю систему. Поэтому этот способ был отключен во многих менеджерах входа.
Переключение на суперпользователя в терминале
Теперь мы подошли к более интересному и практичному. С помощью специальных утилит вы можете переключить текущий эмулятор терминала в окружения суперпользователя и выполнять все следующие команды не от своего имени, а от его, таким образом, дав программе права root linux. Для этого существует утилита su. Вообще говоря, эта утилита позволяет не только переключаться на пользователя root но и на любого другого пользователя, но по умолчанию используется именно root. Рассмотрим ее подробнее. Команда su linux имеет следующий синтаксис:
$ su опции пользователь
Вот ее основные опции:
- -c, —command — выполнить команду
- -g, —group — установить основную группу пользователя (только для root)
- -G —supp-group — дополнительные группы пользователя (только для root)
- -, -l, —login — режим входа, будут очищены и инициализированы с учетом нового пользователя все переменные окружения, а также изменен домашний каталог
- -p, —preserve-environment — сохранить переменные окружения
- -s, —shell — задать оболочку для входа
- —version — отобразить версию программы.
Теперь немного поэкспериментируем, чтобы понять как работает команда su linux.
Сначала выполним su без параметров, но для начала создадим переменную окружения, чтобы проверить как с ними обходится эта команда:
Теперь смотрим что получилось:
whoami
pwd
echo $VAR
echo $PATH
exit
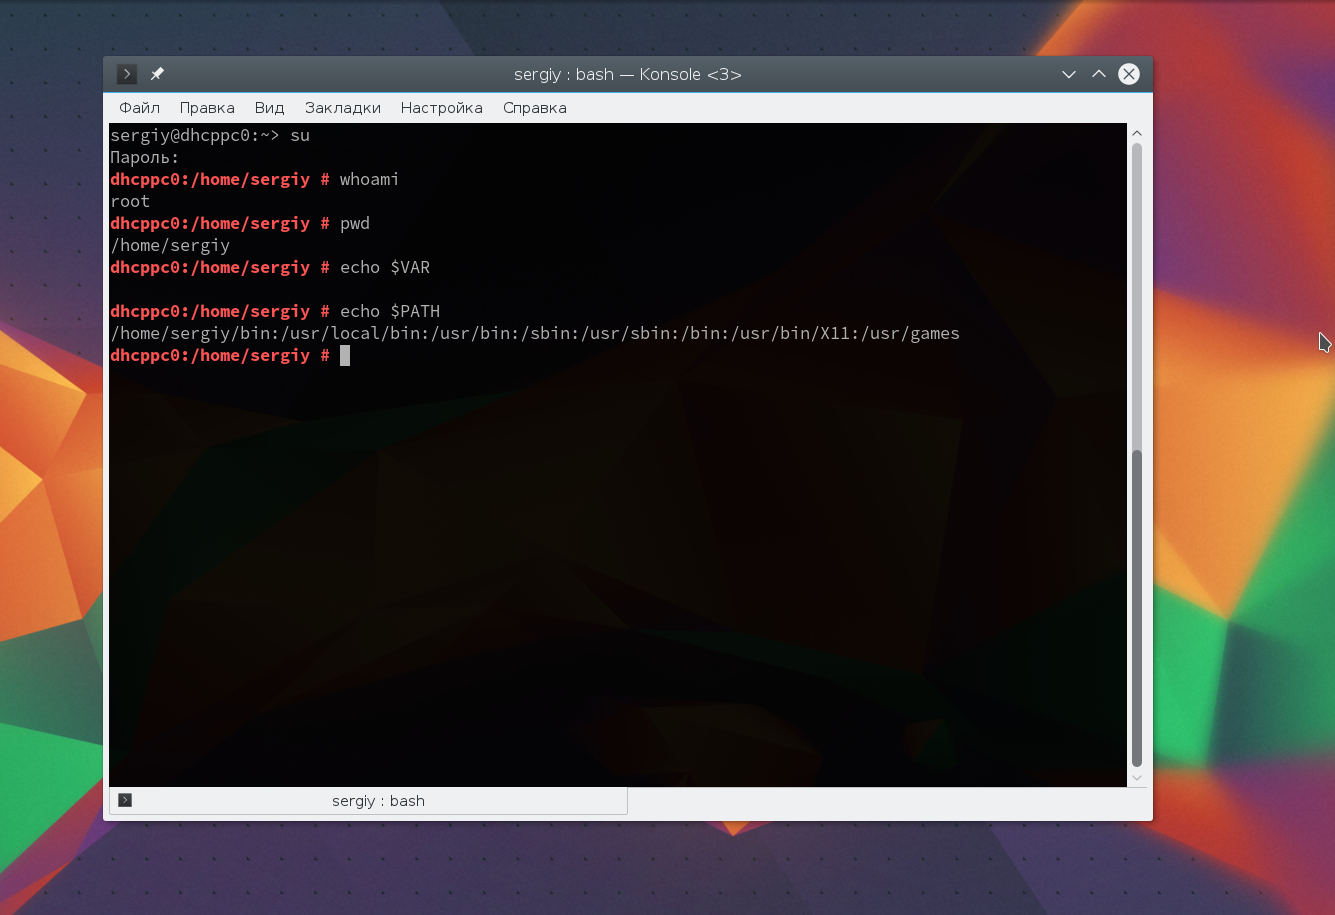
Из этих команд мы видим, что теперь мы пользователь root, но домашней директорией считается директория нашего предыдущего пользователя и наша переменная не сохранилась также изменилась переменная PATH, теперь там добавлен путь /sbin.
Теперь используем вход в режиме логина:
И повторим ту же комбинацию:
whoami
pwd
echo $VAR
echo $PATH
exit
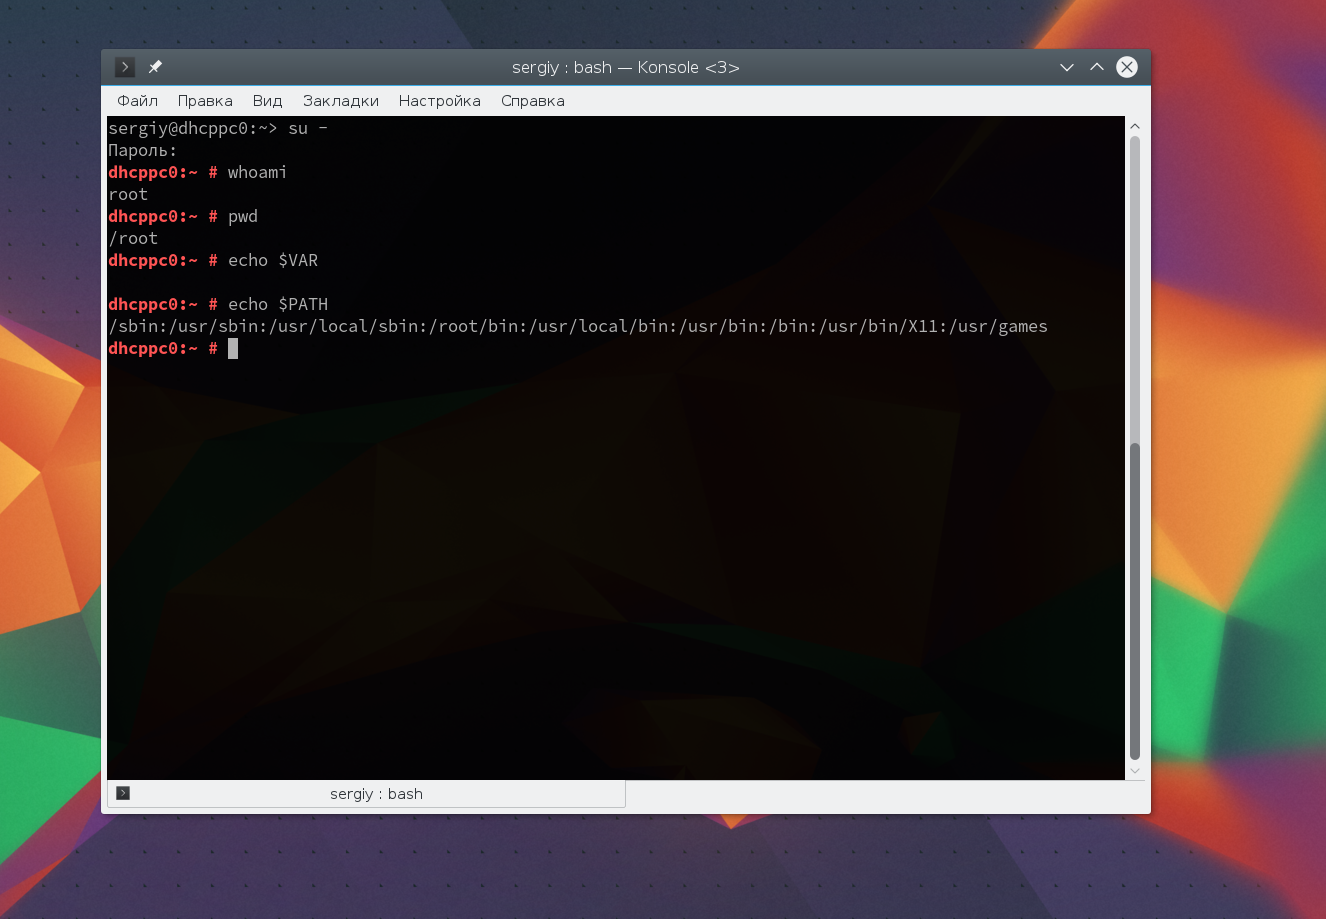
Та же ситуация, только на этот раз изменена ко всему еще и домашняя директория на директорию root. Но мы можем сохранить наши переменные окружения, если это нужно, для этого есть опция -p:
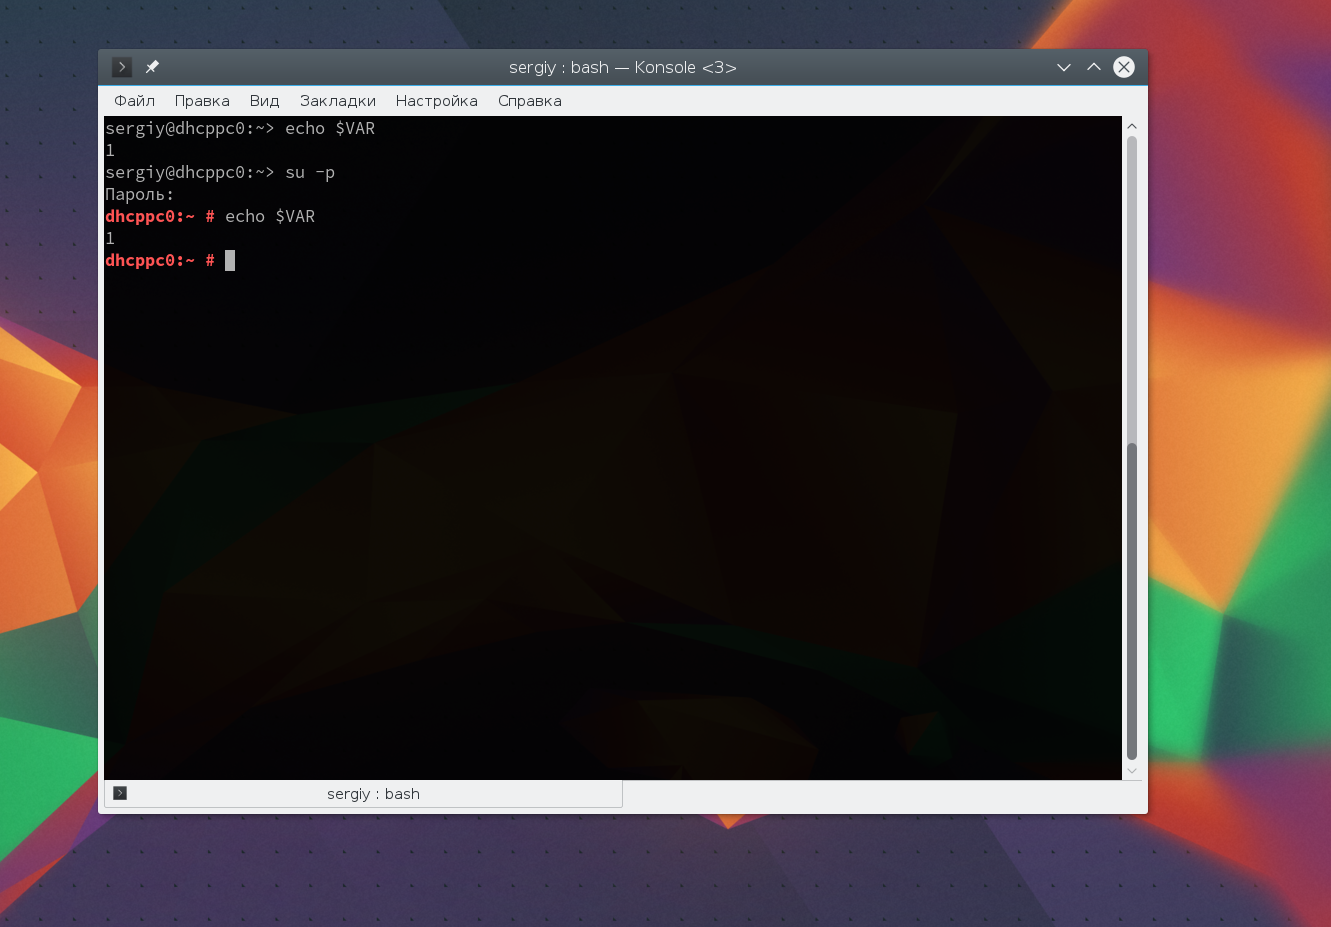
Как видите, наша переменная осталась. Вы также можете переключится на любого другого пользователя. Например:

Более подробно о команде su вы можете почитать в отдельной статье. Получение прав суперпользователя таким способом используется во многих дистрибутивах, например, Debian, OpenSUSE, ArchLInux, Gentoo и т д. Но в Ubuntu, как дистрибутиве для начинающих вход под пользователем root отключен. Это сделано потому, что это тоже не очень безопасно, вы можете забыть что выполняете команду от root и что-то натворить в системе. Поэтому переходим к следующей программе.
Получение прав root без переключения
Чтобы реализовать максимально безопасный интерфейс для работы с правами суперпользователя в Linux была разработана команда sudo. Давайте рассмотрим что такое sudo. Эта команда пишется перед каждой командой, которую нужно выполнить от имени суперпользователя, и для ее выполнения нужно ввести пароль уже не root, а всего лишь вашего пользователя. Так же, как и в предыдущей, в этой утилиты есть свои опции. Сначала рассмотрим синтаксис:
$ sudo опции команда
- -b — выполнять запускаемую утилиту в фоне
- -E — сохранить переменные окружения
- -g — запустить команду от группы
- -H — использовать домашний каталог
- -l — показать список полномочий в sudo для текущего пользователя
- -r — использовать для команды роль SELinux
- -s — использовать оболочку
- -u — запустить команду от имени пользователя, если не задано используется root
- -i — не выполнять команду, а войти в оболочку, эквивалентно su —
Вы можете выполнить те же эксперименты, только для этой команды, чтобы понять как использовать команду sudo. Например:
Использование sudo — это рекомендованный способ выполнять команды от имени суперпользователя в Linux. Так вы не забудете с чем имеете дело и меньше всего рискуете повредить систему. Более подробно о команде sudo читайте здесь. Но остался еще один нерешенный вопрос — как быть с графическими утилитами? Ведь команда sudo их не запускает, а запускать графическую оболочку от имени root небезопасно. Это мы и рассмотрим далее.
Графически приложения от имени суперпользователя
Для запуска графических приложений от имени суперпользователя существуют специальные утилиты. Они сохраняют все необходимые переменные окружения и полномочия. В KDE это команда kdesu, а в Gnome команда gksu.
Просто наберите gksu или kdesu, а затем нужную команду:
Эта команда запустит файловый менеджер KDE с правами суперпользователя. В Gnome это будет выглядеть вот так:
Программа запросит пароль, уже в графическом окне, а потом откроется файловый менеджер.
Выводы
Вот и все. Теперь вы знаете как получить права суперпользователя в Linux, знаете как использовать команду sudo и в чем разница sudo или su. Теперь программы, требующие дополнительных привилегий в системе, не вызовут у вас проблем. Если остались вопросы, пишите в комментариях!
Источник


