- What Does Root Mean: Root on Mac and Android
- Part 1. What Does Root Mean?
- Part 2. Getting Around Android Root on Mac
- Option 1. Set a Password for Root Account.
- Option 2. Set a Stronger Password for Root Account.
- Part 3. The Pros and Cons of Root on Android
- Part 4. Root Android Device to Recover Deleted Data
- Step 1. Connect your phone.
- Step 2. Select Files Type to Scan and Allow Root
- Step 3. Preview and Recover Deleted Files
- Rooting android mac os
What Does Root Mean: Root on Mac and Android
By Nathan E. Malpass, Last updated: December 23, 2019
“Can you explain to me what rooting is? They say it’s great to do on your Android phone, but how do you do that anyway?”
Part 1. What Does Root Mean?
If you have spent the time to research how to best use your Mac or Android device, then you would have chanced upon the term root or rooting. So what does root mean anyway?
Simply put, root grants users with administrative privileges on their device, which they would otherwise not have under default settings. Root on Mac and Android gives users full control over their device’s operating system. With that, you can access restricted files and folders, install apps, and customize your device like never before.
In Apple’s macOS High Sierra, root is a user account that allows superuser access to the system. While the new OS is already powerful as it is, activating the root user account will enable users to perform more advanced tasks. When you do some advanced setting to speed up your running slow mac, you need the root account.
By default, it is disabled but can be initiated upon logging in as root. However, this feature has exposed Mac users to the risk of a security breach. Widely known as the macOS High Sierra root bug, it allows hackers and unauthorized persons to log into your account even without a password. Part 2 of the article will discuss how users can address this issue.
As for Android users, rooting allows them to enhance their gadget’s performance. One way is by expanding its internal storage size. You can explore the other benefits in Part 3 of this post.
 What Does Mean Root on Mac
Part 2. Getting Around Android Root on Mac
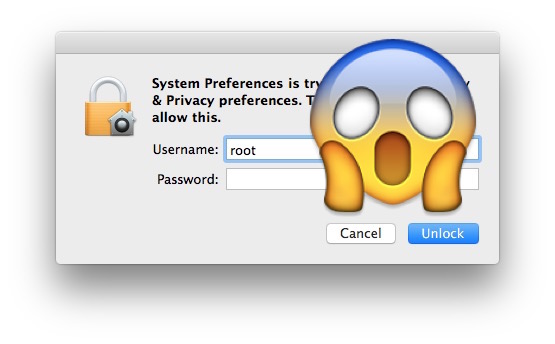
The newly discovered bug in macOS High Sierra presents serious security issues to users. Anyone with a physical access to the device will be able to have read and write privilege to your computer.
If anyone tries to log in as an administrator, typing in вЂroot’ as the username and leaving the password field empty can give him an instant access. He will simply have to click Unlock multiple times until he successfully gets in. By that time, he will be able to see all your files, install malware, and cause irreparable damage to your Mac. The same can be done on the login screen on a locked Mac.
To solve this problem, here are two easy-to-do fixes.
Option 1. Set a Password for Root Account.
You can enable root on Mac and set a password to protect your device and data. Here’s how.
- Click on the Apple icon () and head to System Preferences. Select Users & Groups or Accounts.
- Click the lock icon () and input your username and password for an administrator account on your computer.
- Select Login Options then Join or Edit.
- Click Open Directory Utility. When a new window opens, click the lock icon () and enter an administrator username and password.
- From the menu bar, click Edit then choose Enable Root User. Set your password by entering it.
Option 2. Set a Stronger Password for Root Account.
If you already have a password set for your root user account, then you can create an even more unique password. That way, your Mac can be less susceptible to unauthorized access. As much as possible, make it a combination of characters, numbers, and symbols.
- Follow Steps 1 to 4 of Option 1 (Set a Password for Root Account).
- Select Edit and click Change Root Password.
- Enter your desired password.
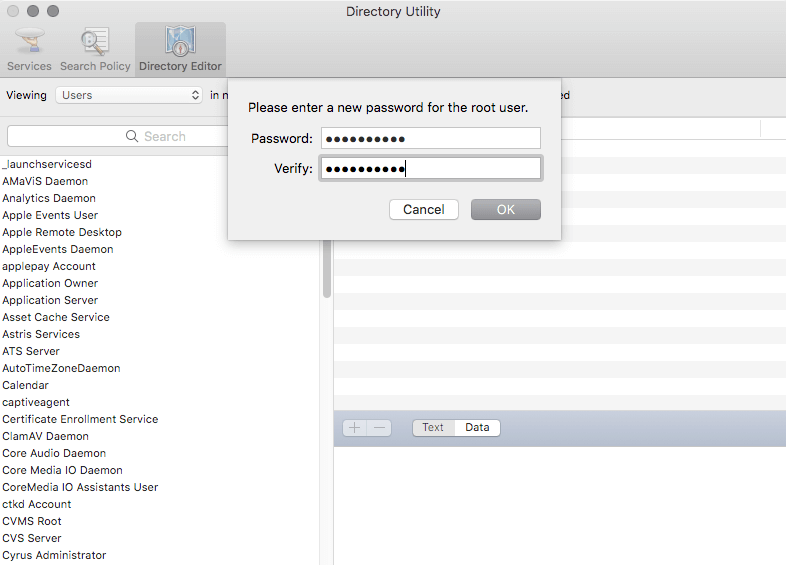 Set Password for Root Account
Part 3. The Pros and Cons of Root on Android
While rooting has caused a security problem for Mac users, it is a blessing for Android phone owners. Rooting an Android device offers plenty of great benefits. It unlocks your device’s full potential by making simple and significant modifications.
Here are some advantages of rooting:
- Freely install and uninstall apps
When you have made the necessary changes to your phone’s system, you can now install all apps that you want even if they are incompatible with your device. You can also get rid of pre-installed apps that you have no use for and take up too much space.
You will no longer have to be distracted by unsolicited ads when you’re using your app or playing a game.
- Customize your interface
You can change the built-in themes and skin of Android devices. By installing custom-built ROMs, you can modify the general appearance of the interface and add features.
You can also upgrade to the latest Android version even if your carrier has blocked it for your phone.
- Improve your phone’s overall performance
By uninstalling apps that you don’t need, you can improve RAM usage and speed up your smartphone. You can also install particular apps that enhance battery usage and allow a faster 3G network.
While it is useful, root on Android can cause security gaps especially if it was done incorrectly. Inexperienced users may have their phone bricked. This term simply refers to rendering one’s phone useless because of an improper modification. Here are some risks you have to watch out for:
- Compromised security
Now that the Android system has been modified, you are basically tampering with a layer of protection designed by the system’s creators, Google. In fact, the company does not support it, so much so that they have developed an API that can detect modified Android devices. Your device becomes vulnerable to viruses and malware too.
- Android update failure
New updates may fail to install because of software modifications. Some Android versions don’t work with rooted devices. You may have to stick with an old version or wait for new OS updates.
- Voided warranty
Rooting your phone automatically voids your device’s warranty. If your phone got damaged during or after the rooting process, you will have to pay the phone manufacturer for repairs.
The above risks may discourage you from rooting your device. However, it cannot be denied that the process opens up so many possibilities for your phone. The key here is to use an effective rooting tool and follow instructions closely.
Part 4. Root Android Device to Recover Deleted Data
If you want a safe and successful rooting, then FoneDog Toolkit is the best solution for you. Thousands of Android devices are supported by the software, so compatibility issues will not be a concern. Within a matter of minutes and a few clicks, you can make the best out of your Android phone! With FoneDog — Android Data Recovery, You can recover the deleted data with just 3 steps!
Before starting to root your phone, you should make a full backup of your device. Fully charge your device because there is knowing how long it would take to root it.
Step 1. Connect your phone.
With a USB cable, connect your Android phone to the computer. If a pop-up window asks you to authorize USB debugging, click OK to proceed. If no prompt appears, you will have to manually enable USB debugging. You may do it with the following steps:
Go to Settings on your device > About Phone > Tap Build Number multiple times until you are in developer mode > Return to Settings > Developer Options > USB debugging > Tap OK on your phone > Click OK on the software
After these steps, the software will then be able to detect your device.
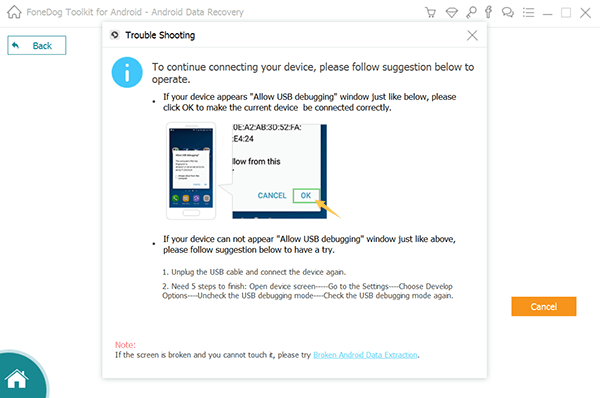
Connect Android and Allow USB Debugging — Step1
Step 2. Select Files Type to Scan and Allow Root
After your Android phone being detected by the program successfully, FoneDog — Android Data Recovery will display all the data types it supports to recover. By default, it has checked all the data types. You can just choose the type of files that you want to recover. And then click » Next « to begin scanning.
If there is a pop-up window on your device, Click «Allow» on the device.
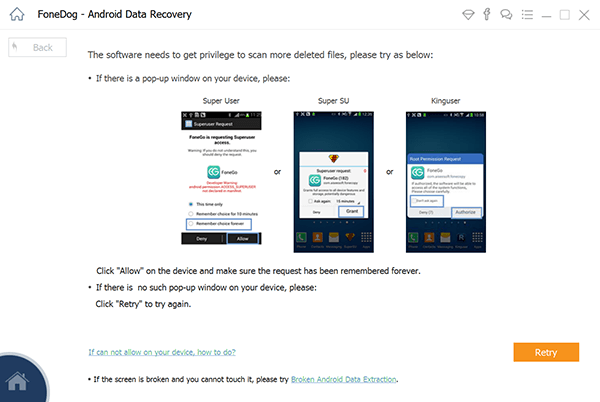
Choose File Type to Scan and Allow Root Android — Step2
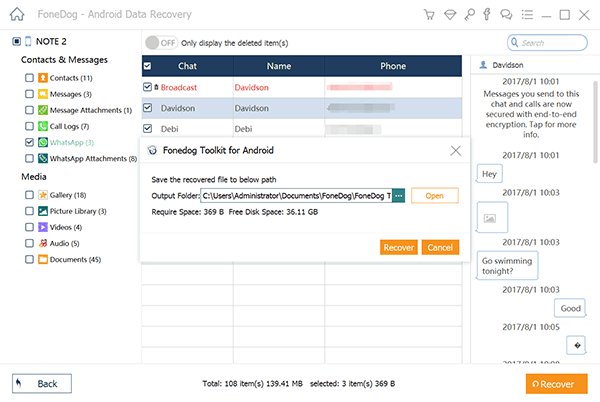
Step 3. Preview and Recover Deleted Files
Select the deleted files you want to recover. Then click on the » Recover » Button to restore the deleted files to computer.
Recover Deleted Files on Android — Step3
Источник
Rooting android mac os
Получение ROOT
 Разные варианты получения прав root
- Желательно иметь на компьютере установленный AndroidSDK
- Как включить «Отладку по USB» на китайских устройствах. Спасибо говорим Chervanev
- Для телефонов HTC EVO 4G, Sprint Hero, HTC Desire, HTC Wildfire, HTC Aria, HTC Droid Incredible необходимо сначала провести процедуру разблокировки NAND
- Разблокировки загрузчиков HTC через сайт
- При наличии мод. рекавери для устройства (CWM, TWRP, PhilZ, Carliv и пр.) рут можно получить путем прошивания мод. рекавери и последующей установкой пакета UPDATE-SuperSU***.zip из темы ® SuperSU.
- Тем, у кого нет root-прав после репака образа system.img со встраиванием root, возможно поможет этот пост Создание кастомных прошивок (Пост #26378422) и ниже.
 Universal_Androot_1.6.2_beta6.apk ( 2,33 МБ )
 *выпуск новых версий прекращен*
X10Root.1.0.8.zip ( 714,76 КБ ) *только для Sony Ericsson X10 (2.1)*
VISIONary___r14.apk ( 1,18 МБ ) GingerBreak_v1.20.apk ( 295,24 КБ )
A500root_GingerBreak_v1.20.apk ( 296,81 КБ ) *для Iconia A500*
update.zip ( 1,11 МБ ) *для SGA (2.3.x), установка из под рекавери*
Сообщение отредактировал AUDIMEN — 03.12.19, 20:14
Абсолютно ничего. В программе содержится код (или скрипт) для получения рута через уязвимость в защите OS Android.
В данном случае, приложение ставит рута, однако в остальных случаях, другими неизвестными приложениями, можно получить доступ к телефону и напакостить.
И официальная позиция Каспера — оставить все как есть — т.е. файл похож на вирус, а значит по умолчанию они его блокируют
Впрочем, этот файл и еще Universal AndRoot (который так же содержит тот же код) — они рекомендуют добавить в исключения.
На всех версиях программы пишет синтаксическая ошибка пакета.Куда копать? :blush: SGS
Сообщение отредактировал robert 1974 — 21.11.10, 21:54
Скорее всего установлен антивирус, который не дает полностью скачать файл. В данном случае файл надо добавить в исключения антивируса.
Samsung Galaxy S прошивка JPB.
Получил root с помощью z4root 1.3.0 по следующему алгоритму:
1. Пришлось сначала поставить BusyBox
2. Сделал Temporary root, потом дал root самой программе z4root и BusyBox
3. Сделал Permanent root.
По другому не получалось, при нажатии сразу на Permanent root зависала или была выгружена.
На сколько я понял.
temporary — временные права до первой перезагрузки.
permanent — постоянные права, которые остаются и после перезагрузки .
Иных различий нет.
На последнем варианте применял unroot. ПО требующие root права, ругалось на их отсутствие . Однако проверить сколько «грязи» осталось после этих телодвижений я к сожалению не могу, т.к. нет достаточного опыта .
Пы . Сы .
Применил z4root на Samsung GT-I9000 (родная «проша» 2.2, обновленная через «кису»)
Сообщение отредактировал mikhenty — 02.12.10, 08:30
Прошивка I5800XXJP9. root права получить не удается:(
даже методом, который описал nnmuser08
z4root 1.3.0 слетает при нажатии на любую кнопку.
сначала девайс вибронул 1 раз, потом два раза, и тишина.
ктото пробовал на данной прошивке рутится?
Зарутился с помощью SuperOneClick, спасибо lonely_nemo подсказал.
Правда на нее касперский ругается, удаляет один файл. Отключил, зарутился, включил.
Сообщение отредактировал 5[Strogino] — 05.12.10, 23:36
Или я задаю вопрос невнятно, или мне совсем не понятны ваши ответы.
1. Если я сделаю root, гарантия слетает ?
2. Если я сделаю после root un-root, тел. возвращается в прежнее состояние (как с ответов понял исчезает суперпользователь), что тогда с гаранией?
3. Для живых обоев (тел. Samsung I5800) нужен постоянно root ?
Альтернатива Universal AndRoot (использующая тот же самый эксплоит rageagainstthecage как и Universal AndRoot, z4root и прочие подобные программы)
http://forum.xda-developers.com/showthread.php?t=827058
Не обновлялась с 3 ноября 2010
Поддерживаются
* Google Nexus One (2.2)
* Google G1 (1.6)
* HTC Hero (2.1)
* HTC Magic (1.5) (Select Do not install Superuser)
* HTC Tattoo (1.6) (Please use this test release)
* Dell Streak (2.1)
* Motorola Milestone (2.1)
* Motorola XT701
* Motorola XT800 (2.1)
* Motorola ME511
* Motorola Droid (2.01/2.1/2.2 with FRG01B)
* Sony Ericsson X10 (1.6)
* Sony Ericsson X10 Mini (1.6)
* Sony Ericsson X10 Mini Pro (1.6)
* Acer Liquid (2.1)
* Acer beTouch E400 (2.1)
* Samsung Galaxy Beam
* Vibo A688 (1.6)
* Lenovo Lephone (1.6)
* LG GT540 (1.6)
* Gigabyte GSmart G1305
Не поддерживаются
* Samsung i9000 / i6500U / i7500 / i5700
* Motorola ME600 / ME501 / MB300 / CLIQ XT
* Motorola 2.2 FRG22D
* Archos 5
* HuaWei U8220
* HTC Desire / Legend /
* HTC EVO 4G / Aria
* SonyEricsson X10i R2BA020
* myTouch Slide
Сообщение отредактировал 5[Strogino] — 23.12.10, 12:16
Добрый вечер!
Приобрел НТС Desire! Все устраивает! Попытался установить программу Font Size (что бы буковки побольше стали — уж больно мелкова-то) Она запросила root права. Перепробовал все Ваши выше описанные варианты — результат ноль
SuperOneClick — не помогает (faild)
z4root — вроде дает временные права — запускаю прогу Font Size — после перезагрузки все как было маленькое так и осталось
Permanent — тоже результата не дает
Universal AndRoot *выпуск новых версий прекращен* — faild при рутировании
Если не трудно подскажите выход из данной ситуации?
Данную прогу (Font size) проверял на HTC HD2 Андроиде 2.2 (сборка revolution) — работает тока в путь
а вот с тем что ниже незнаю что делать
HTC Desire Android 2.2 Версия модуля 32.49.00.32U_5.11.05.27 Номер ПО 2.29.405.5CL293415 release=-keys
Z4 Root гарантированно не работает. Пробовал на droid v2.2.1 (frg83d). На предыдущей прошивке работало.
Мне помог этот способ http://www.droidforums.net/forum/droid-lab. os-version.html
Других способов на frg83d в прошлом году не было!
Сообщение отредактировал phu — 06.01.11, 18:14
Источник


