- How To Rotate Screen In Windows 7,8,10?
- Sideways Screen Problem
- Windows Screen Rotations or Layout
- Rotate Screen Via Display Settings
- Rotate Screen With Hotkeys (Keyboard Shortcuts)
- Rotate Screen with Intel Graphics Settings
- Rotate Screen with NVIDIA Control Panel
- Rotate screen in Windows 10
- How to rotate computer screen in Windows 10?
- Windows 10 Rotate Screen Hotkey & Shortcuts
- You can use the following hotkeys to rotate screen in Windows 10.
- How to:Rotate screen in Windows 7 by a shortcut.
- How to Rotate Screen in Windows 10
- Rotate Screen with a Keyboard Shortcut
- Rotate Screen with Display Settings Menu
- How To Rotate The Screen In Windows 10
- How To Rotate the Screen in Windows 10 Using a Keyboard Shortcut
- Using Built-in Tools to Rotate the Screen in Windows 10
- Rotate Screen In Windows 10 With Intel Graphics Command Center
- Use a Third-Party App To Rotate Screen In Windows 10
- How To Disable Screen Rotation In Windows 10
How To Rotate Screen In Windows 7,8,10?
Windows operating system provides different monitors or screen orientations for different cases. We can rotate integrated or external monitors easily by using different methods like Display Settings, Hotkeys, Intel Graphic Settings, NVIDIA Control Panel, or 3rd Party Application.
Sideways Screen Problem
While typing with the keyboard using shortcuts is a very easy way to accomplish different actions. But in some cases, heavy usage may create some problems with mistyped keys. We can change the screen layout with a mistyped key which is called Sideway Screen Problem . We can correct or solve this error by rotating the screen to the back which is explained below in detail.
Windows Screen Rotations or Layout
Windows provides 4 screen rotation. They can be configured by using different methods and tools like Display Settings, Keyboard shortcuts, Graphic Driver Tool etc.
Landscape is the default and most used screen or display rotation. It is the normal rotation where the graphics are displayed in a normal way. The horizontal resolution or pixel count is higher than the vertical resolution.
Portrait is very similar to the portrait resolution. The vertical resolution or pixel count is higher than the horizontal resolution or pixel count.
Landscape (flipped) is the reverse version of the lanscape where bottom goes up and upper side goes down.
Portrait (flipped) is the reverse version of the portrait where right side goes to the left side and left side goes to the right side.
Rotate Screen Via Display Settings
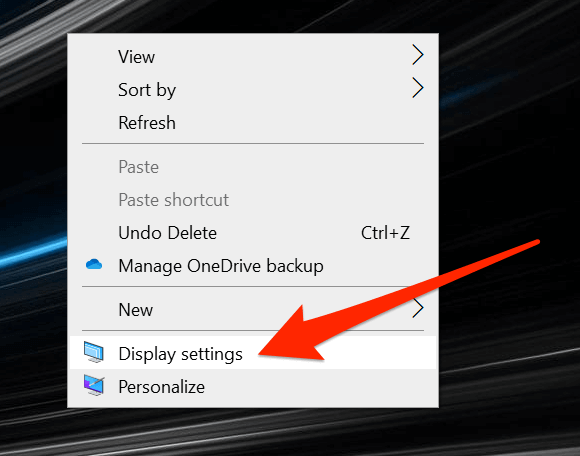
The most basic way to rotate or flip a screen is using the Display Settings . Display settings can be used for Windows 7, Windows 8, Windows 10 in order to flip or rotate screen into the landscape, portrait, flipped-landscape, flipped-portrait. Display settings can be opened in different waus but the most easi way is right click on the desktop and click to the Display Settings like below. Alternatively Settings->System->Display for Windows 10 and Windows 8, Control Panel->Appearance and Personalization-> Display->Display Settings for Windows 7 can be used.
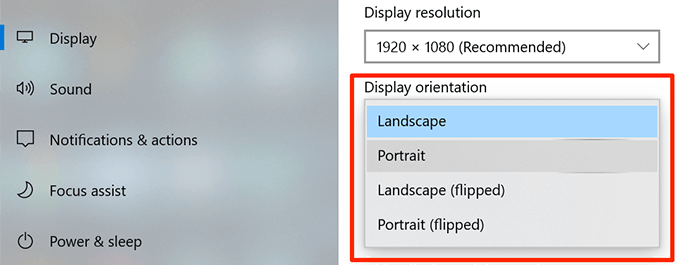
Below we will see the Display Configuration . We will navigate to the down Display orientation where the Landscape is the default configuration.
We will see a drop-down list which provides Landscape, Portrait, Landscape (flipped), Portrait (flipped). We can change to the orientation we want which are described above in detail.
If you can not see the Display Orientation setting on Windows 10 and Windows 7 please update your computer graphics driver.
Rotate Screen With Hotkeys (Keyboard Shortcuts)
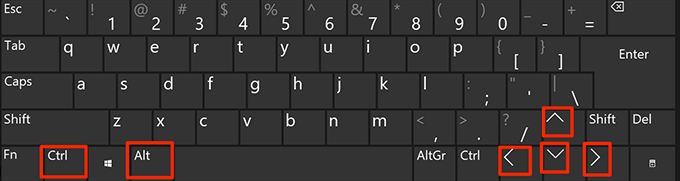
Windows also provide useful shortcuts in order to change, flip, or display orientation. Hotkeys or keyboard shortcuts are a fast and easy way in order to change the screen or display orientation. The CTRL+ALT key combination can be used to change the screen or display orientation. Below we will list the CTRL+ALT hotkey combinations with the arrow keys in order to specify the rotation direction.
The default hotkeys can be changed via the Intel Graphics settings tool or NVIDIA Graphics Settings.
Rotate Screen with Intel Graphics Settings
Even Display Settings are used to flip or rotate display the external graphic cards provides different tools in order to manage graphics settings and rotating screen. Intel Graphics are popularly used on Laptops and Intel Graphics Settings are provided to manage the graphics settings related to Intel Graphic card. We will right-click to the desktop and click to the Graphics Properties like below.
We will see the Intel HD Graphics Control Panel like below. This screen can be different for different versions of the Intel Graphics card. We will click to the Display button like below.
In the Display screen, we will see the Rotation configuration which provides numbers of the degrees to rotate. The default configuration is 0 degree which is no rotation. Other values are 90 degrees, 180 degrees, and 270 degrees to turn.
Rotate Screen with NVIDIA Control Panel
Similar to the Intel NVIDIA graphic cards provides configuration about display. The internal or external screen can be configured via the NVIDIA Control Panel. NVIDIA Control panel can be opened from the desktop by right-clicking to the desktop and clicking to the NVIDIA Control Panel. From the Display menu we will select the Rotate display configuration and we can select the screen or monitor and in the second step we will select the orientation which is explained above.
Rotate screen in Windows 10
Windows 10 not rotating the screen? If your computer screen is sideways, upside down, you can follow below steps to rotate computer screen on Windows 10 PC. Note that this is different from rotating display screen orientation on computer. If you like to change screen orientation, you can go to Windows 10 >> Settings >> Display >> Orientation, then choose from four display modes: Landscape, Portrait, Landscape (flipped), and Portrait (flipped). Check out below steps for screen rotation in Windows 10.
How to rotate computer screen in Windows 10?
Right click on the desktop of your Windows 10 laptop or desktop, you will get a pop-up menu. Choose Graphic Options from this menu, then choose Rotation from the sub-menu, and choose from four rotation modes in Windows 10: Normal landscape, 90 degress, 180 degress, 270 degrees. 
Windows 10 Rotate Screen Hotkey & Shortcuts
From the above screen to rotate computer screen in Windows 10, you can also find the shortcuts or hot keys to quickly rotate screen in Windows 10 by pressing the key combinations on the keyboard. For example, if you like to rotate screen 90 degrees, you can simply use the hotkey (Ctrl+Alt+Left). If your computer screen is upside down, simply press Ctrl+Alt+Down or Ctrl+Alt+Up keys to turn it to normal.
You can use the following hotkeys to rotate screen in Windows 10.
- Ctrl+Alt+Up to rotate to the default
- Ctrl+Alt+Left to rotate 90 degrees
- Ctrl+Alt+Down to rotate by 180 degrees
- Ctrl+Alt+Right to rotate by 270 degrees
If the hotkeys or shortcuts not workig and Windows 10 still not rotating computer screen, the hotkeys might be disabled. To enable screen rotation hot keys in Windows 10, go to Graphic Options >> Hot Keys >> Enable.
How to:Rotate screen in Windows 7 by a shortcut.
original title: Rotate screen in Windows 7 by a shortcut. Other answers tell that Shift+Alt+Arrows must do the trick. Nevertheless, only «Control Panel — Display» dialog works for me.
There are two reasons for shortcuting the task:
- Have you tried to rotate a GUI while GUI is being rotated?
- The option is supposed to utilize the rotatable monitors — some texts are easier to read in portrait, others in landscape. This suggests that flipping is supposed to take place tens of times every day.
What do I miss?
Several months have passed since this thread was started, and many things happened.
I had the same problem with an ATI Radeon adapter; Here’s how I solved it:
— Installed the latest version of Catalyst Control Center;
— in the main screen you have the «Preferences» button; click it
— Click the first option («Hotkeys» or similar, I have it in Italian, don’know exactly what is the english name)
— In the list, double-click the items you’d like to activate and assign a hotkey (i.e. CTRL-ALT+Cursor key). The ones meant to rotate the display are the first four.
— Click OK; Total time taken: about 2 minutes.
Enjoy ! 🙂
MAx — Italy
90 people found this reply helpful
Was this reply helpful?
Sorry this didn’t help.
Great! Thanks for your feedback.
How satisfied are you with this reply?
Thanks for your feedback, it helps us improve the site.
How to Rotate Screen in Windows 10
Perhaps it happened when you plugged in or detached an external monitor. Maybe you just hit the wrong key somehow, but now your laptop’s screen is rotated, positioned in portrait mode while your screen is in landscape (horizontal) view. You can’t even read the text without tilting your head or turning your display on its side. Fortunately, there are a couple of ways to rotate the screen in Windows 10; these methods work in Windows 7, 8 and 10.
Rotate Screen with a Keyboard Shortcut
Hit CTRL + ALT + Up Arrow and your Windows desktop should return to landscape mode. You can rotate the screen to portrait or upside-down landscape, by hitting CTRL + ALT + Left Arrow, Right Arrow or Down arrow.
Rotate Screen with Display Settings Menu
If, for some reason, the shortcut keys don’t work (and they should), try this method.
1. Right click on the desktop and select Display settings.

2. Choose a screen to fix if you have multiple monitors attached. Skip this step if you have only one.
3. Select Landscape from the orientation menu.
4. Click Apply (or OK)
5. Click Keep Changes when prompted.
How To Rotate The Screen In Windows 10
Via keyboard, built-in tools, or third-party apps
If you’re trying to do something on your PC that requires changing the screen orientation, you can use the Windows 10 screen rotation feature to do it. It lets you change your orientation from landscape to portrait and portrait to landscape – however you want it to be set up.
There are many reasons as to why you may want to rotate the screen in Windows 10. Maybe you want to use your second monitor in the portrait mode for previews. Or maybe you have an app that only looks good in a certain orientation?
How To Rotate the Screen in Windows 10 Using a Keyboard Shortcut
One of the many good things about Windows computers is that you have keyboard shortcuts to do pretty much everything on your computer. From opening apps to shutting down your computer, you have a time-saving shortcut to do it on your machine.
There’s a keyboard shortcut to rotate the screen in Windows 10 as well and you can use it to quickly turn the orientation of your current screen. It comes built with the video card utility that’s installed by default on your PC.
- While you’re on any screen, press Ctrl + Alt + any Arrow key and it’ll rotate your screen. The direction it rotates the screen to depends on what arrow key you used.
Keep in mind that this keyboard shortcut may not be available on all the computers out there. It should work on most computers that use Intel graphics. Also, the shortcut can be customized if you want from the Intel utility installed on your PC.
Using Built-in Tools to Rotate the Screen in Windows 10
The keyboard shortcut to do Windows 10 screen rotation may not work for all of you out there and there doesn’t seem to be an exact reason for it. However, if you’re one of those users, you might want to use an alternate method to get the task done on your machine.
A good way to rotate the screen in Windows 10 when the shortcut doesn’t work is to use a built-in option in the Settings app. It lets you quickly change the orientation of your screen to whatever you want with the click of a few options.
- Go to the desktop on your PC, right-click anywhere blank, and choose the option that says Display settings. It’ll directly take you to the screen you want to be at without launching the Settings app.
- Scroll down on the following screen and you’ll find an option that says Display orientation. Click on the option and choose a new orientation for your screen.
- It’ll apply the new orientation and let you preview it. If you think it’s good, you can click on Keep changes. Otherwise, click on Revert to go back to your previous orientation.
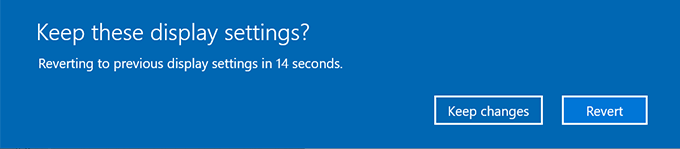
- In case you can’t click on the Revert button as the screen is rotated and you’re having trouble bringing your mouse cursor there, you can leave it as is and it’ll automatically revert back the changes.
Rotate Screen In Windows 10 With Intel Graphics Command Center
If your computer uses an Intel video or graphics card, you can actually use the company’s very own tool to rotate your screen in Windows 10. On most computers, the tool comes preinstalled and all you basically need to do is run it and change an option in there.
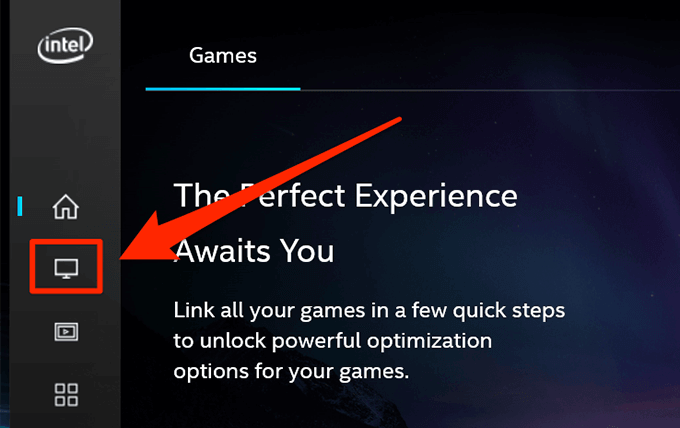
- Use the Cortana search to search for and open Intel Graphics Command Center. You may see another similar utility but don’t open it as it doesn’t have the screen rotation feature in it.

- When it opens, you’ll find several icons in the left sidebar. Click on the one that looks like a display and it’ll open your display settings for you.
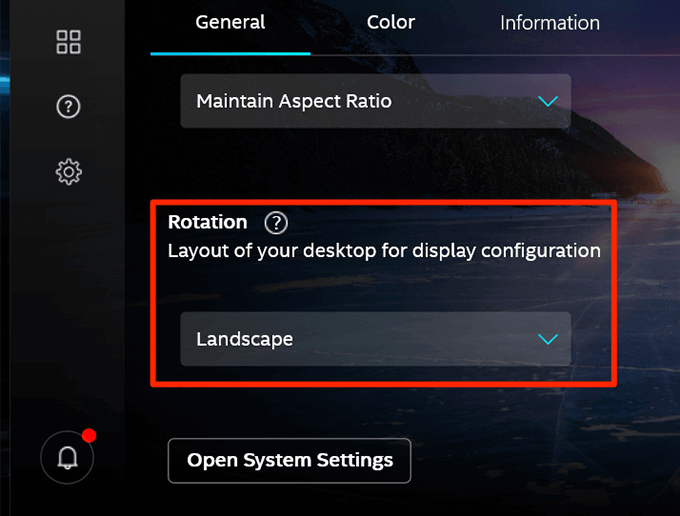
- Make sure you’re in the General tab on the display settings screen. Then scroll down and find the option that says Rotation. Use the dropdown menu to select a new orientation for your screen.
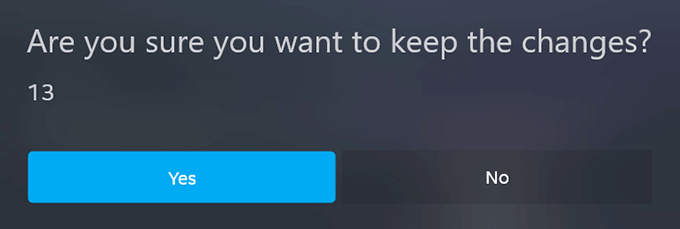
- You’ll instantly see the preview of your rotated screen. Click on Yes if you want to keep it or wait a few seconds and it’ll undo the changes.
Use a Third-Party App To Rotate Screen In Windows 10
As it is clearly seen in the above methods, there are a number of screens you need to go through before your screen actually rotates. If that’s too much for you to do and you’d prefer a simpler option, a third-party app might be a better solution for you.
There’s a free app called Screen Rotate on the Microsoft Store that lets you do Windows 10 screen rotation with the click of an option. It also has keyboard shortcuts to make things even easier for you.
- Download, install, and launch Screen Rotate on your PC.
- Select your display from the dropdown menu. Then click on any of the available rotation options to rotate your screen.
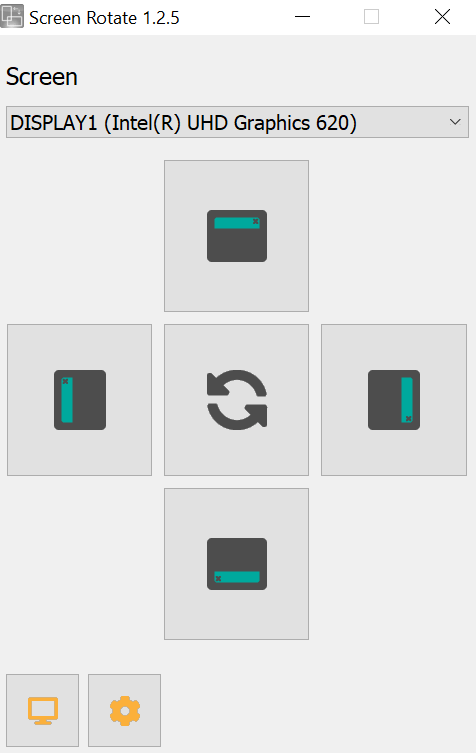
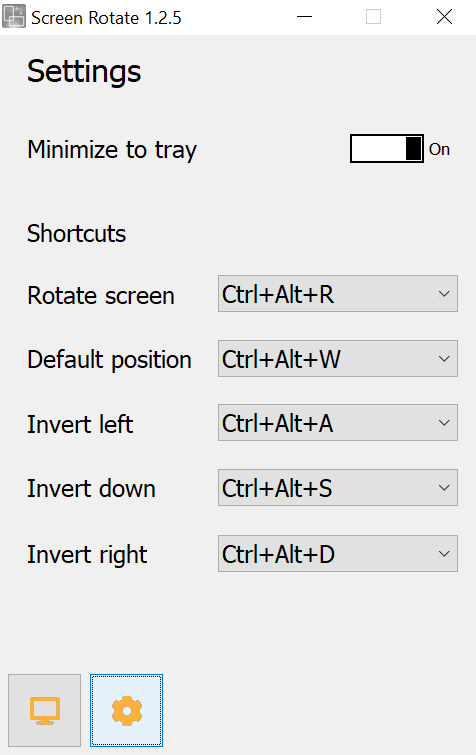
- Click on the settings icon at the bottom to view the available shortcuts.
How To Disable Screen Rotation In Windows 10
In addition to traditional computers, Windows 10 also runs on tablets and such other touch-enabled devices. On these devices, it automatically rotates the screen as you change the physical orientation of your device. It is to ensure that you can always view your screen in the correct orientation.
If you don’t like this behavior of the system, you can actually disable it. Disabling screen rotation will prevent your screen from being rotated no matter what physical orientation your device is in.
- Click on the Action Center at the bottom-right corner of your screen and enable the option that says Rotation lock.
- You can also find the option by launching the Settings app, clicking on System, and choosing Display.
Windows 10 screen rotation is certainly a useful feature for many users. Let us know where you use the feature and what method works the best for you. We await your response in the comments below.
Mahesh has been obsessed with technology since he got his first gadget a decade or so ago. Over the last few years, he’s written a number of tech articles on various online publications including but not limited to MakeTechEasier and Android AppStorm. Read Mahesh’s Full Bio


