- Устранение ошибки «Запрошенная операция требует повышения» в Windows 10
- Решение проблемы «Запрошенная операция требует повышения»
- Способ 1: Ручной запуск установщика
- Способ 2: Запуск с правами администратора
- Другие способы решения проблемы
- Route Add Windows — a Guide to Windows Routing
- Show the Current Routing Table
- Add a Static Route
- Remove a Static Route
- Change a Static Route
- Troubleshooting
- How to Fix “The Requested Operation Requires Elevation” Error
- Introduction
- Method 1 Fix for “The Requested Operation Requires Elevation” error (Run as Administrator)
- Method 2 Fix for “The Requested Operation Requires Elevation” error (Replace Owner on subcontainers and objects)
- Conclusion
- OpenVPN Support Forum
- Windows route add command failed
- Windows route add command failed
- Re: Windows route add command failed
- Re: Windows route add command failed
- Re: Windows route add command failed
- Re: Windows route add command failed
Устранение ошибки «Запрошенная операция требует повышения» в Windows 10

Ошибка «Запрошенная операция требует повышения» возникает в разных версиях операционной системы Windows, в том числе и в десятке. Она не представляет собой что-то сложное и может быть легко устранена.
Решение проблемы «Запрошенная операция требует повышения»
Как правило, эта ошибка носит код 740 и появляется при попытке установки каких-либо программ или любых других, требующих для инсталляции одну из системных директорий Windows.
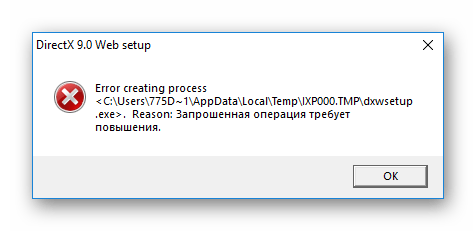
Она же может появиться и при попытке первого открытия уже установленной программы. Если учетной записи не хватает прав, чтобы самостоятельно провести установку/запустить ПО, пользователь без труда сможет выдать их. В редких ситуациях это происходит даже в учетной записи Администратора.
Способ 1: Ручной запуск установщика
Этот метод касается, как вы уже поняли, только скачанных файлов. Часто после загрузки мы открываем файл сразу из браузера, однако при появлении рассматриваемой ошибки советуем вручную зайти в то место, куда скачали его, и запустить инсталлятор оттуда самостоятельно.
Все дело в том, что запуск установщиков из браузера происходит с правами обычного пользователя даже несмотря на то, что учетка носит статус «Администратор». Возникновение окна с кодом 740 — достаточно редкая ситуация, ведь большинству программ достаточно прав обычного юзера, поэтому разобравшись с проблемным объектом можно снова продолжить открывать инсталляторы через браузер.
Способ 2: Запуск с правами администратора
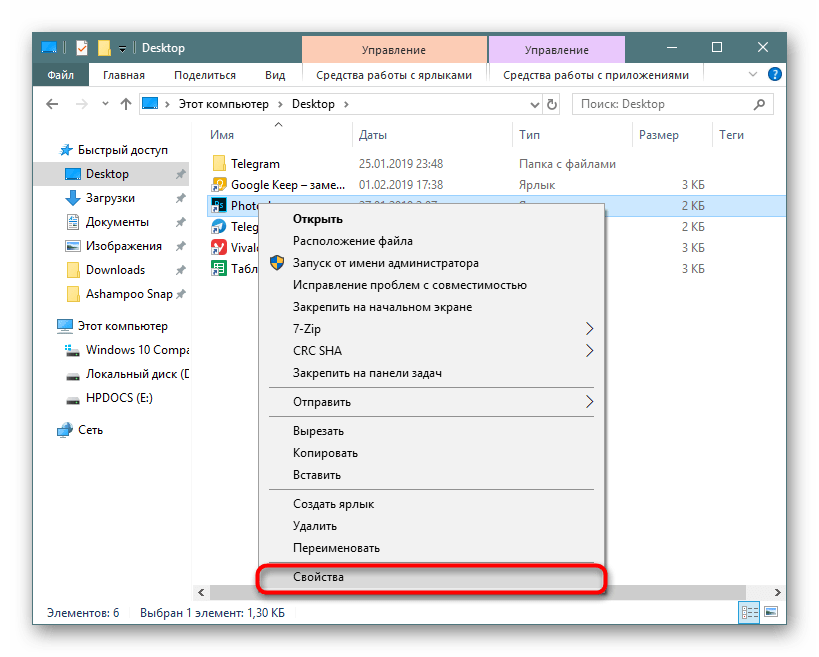
Чаще всего этот вопрос легко урегулировать, выдав установщику или уже установленному EXE-файлу права администратора. Для этого просто кликните по файлу правой кнопкой мыши и выберите пункт «Запуск от имени администратора».

Этот вариант помогает запустить работу установочного файла. Если же инсталляция уже была произведена, но программа не стартует или же окно с ошибкой появляется более одного раза, выдаем ей постоянный приоритет на запуск. Для этого открываем свойства EXE-файла или его ярлыка:
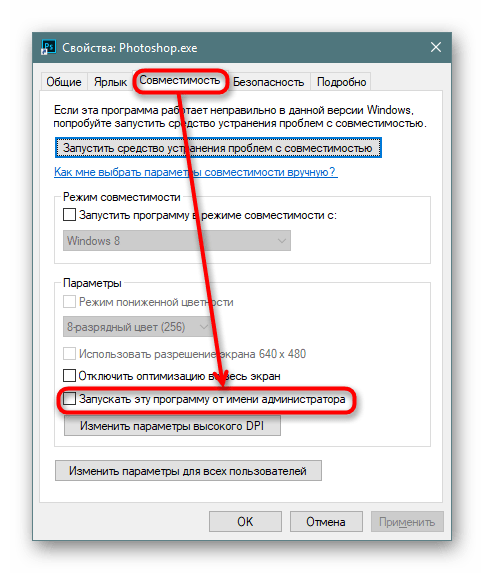
Переключаемся на вкладку «Совместимость» где ставим галочку рядом с пунктом «Запускать эту программу от имени администратора». Сохраняем на «ОК» и пробуем открыть ее.
Возможен и обратный ход, когда эту самую галочку нужно не установить, а снять, чтоб программа смогла открыться.
Другие способы решения проблемы
В некоторых случаях не удается запустить программу, требующую повышенных прав, если та открывается через другую программу, не имеющую их. Проще говоря, конечная программа запускается через лаунчер с отсутствием администраторских прав. Такая ситуация также не представляет особой сложности в решении, но она может быть не единственной. Поэтому в дополнение к ней мы разберем и другие возможные варианты:
- Когда программа хочет запустить установку других компонентов и из-за этого всплывает рассматриваемая ошибка, оставьте лаунчер в покое, зайдите в папку с проблемным ПО, найдите там установщик компонента и начните его установку вручную. Например, лаунчер не может начать инсталляцию DirectX — перейдите в папку, откуда он пытается его установить, и запустите EXE-файл ДиректИкс вручную. То же самое будет касаться любого другого компонента, название которого фигурирует в сообщении об ошибке.
- При попытке старта работы установщика через BAT-файл ошибка также возможна. В этом случае его можно без проблем отредактировать «Блокнотом» или специальным редактором, кликнув по файлу ПКМ и выбрав его через меню «Открыть с помощью…». В батнике найдите строчку с адресом программы, и вместо прямого пути к ней используйте команду:
cmd /c start ПУТЬ_ДО_ПРОГРАММЫ
Подробнее: Как отключить UAC в Windows 7 / Windows 10
В завершение хочется сказать о безопасности такой процедуры. Выдавайте повышенные права только той программе, в чистоте которой уверены. Вирусы любят проникать именно в системные папки Windows, и необдуманными действиями вы можете лично пропустить их туда. Перед установкой/открытием рекомендуем проверить файл через установленный антивирус или хотя бы через специальные сервисы в интернете, подробнее о которых вы можете прочитать по ссылке ниже.
Route Add Windows — a Guide to Windows Routing
Apr 25 th , 2016 | Comments
Sometimes you need to manually add, change, or remove a route on a Windows machine. Here is quick guide to help you accomplish these tasks.
First start by opening a CMD prompt by going to start then typing cmd .
These commands should work for Win XP, Win Vista, Win 98, Win NT, Win 2000, Win 2008, Win 2012, Win 7, Win 8, Win 10.
Show the Current Routing Table
The default route is represented by A destination/netmask of 0.0.0.0 . If there isn’t a route with a more specific destination and netmask, the default route is used.
Use this subnet calculator if you need help subnetting.
Add a Static Route
To add a route to the routing table use the route add command. An example looks like this:
You can optionally add a metric 2 to the end if you want to add a specific weight to the route. The routes with the lowest metric will take precedence over higher metrics. By default, static routes have a metric of 6.
You can also optionally add a IF 2 to the end. This will force the route to use interface 2. You can see what interface numbers you have with the route print command.
Remove a Static Route
To remove a route you must use the route delete command and the destination.
Change a Static Route
If you simply want to update a static route you can use the route change command.
Troubleshooting
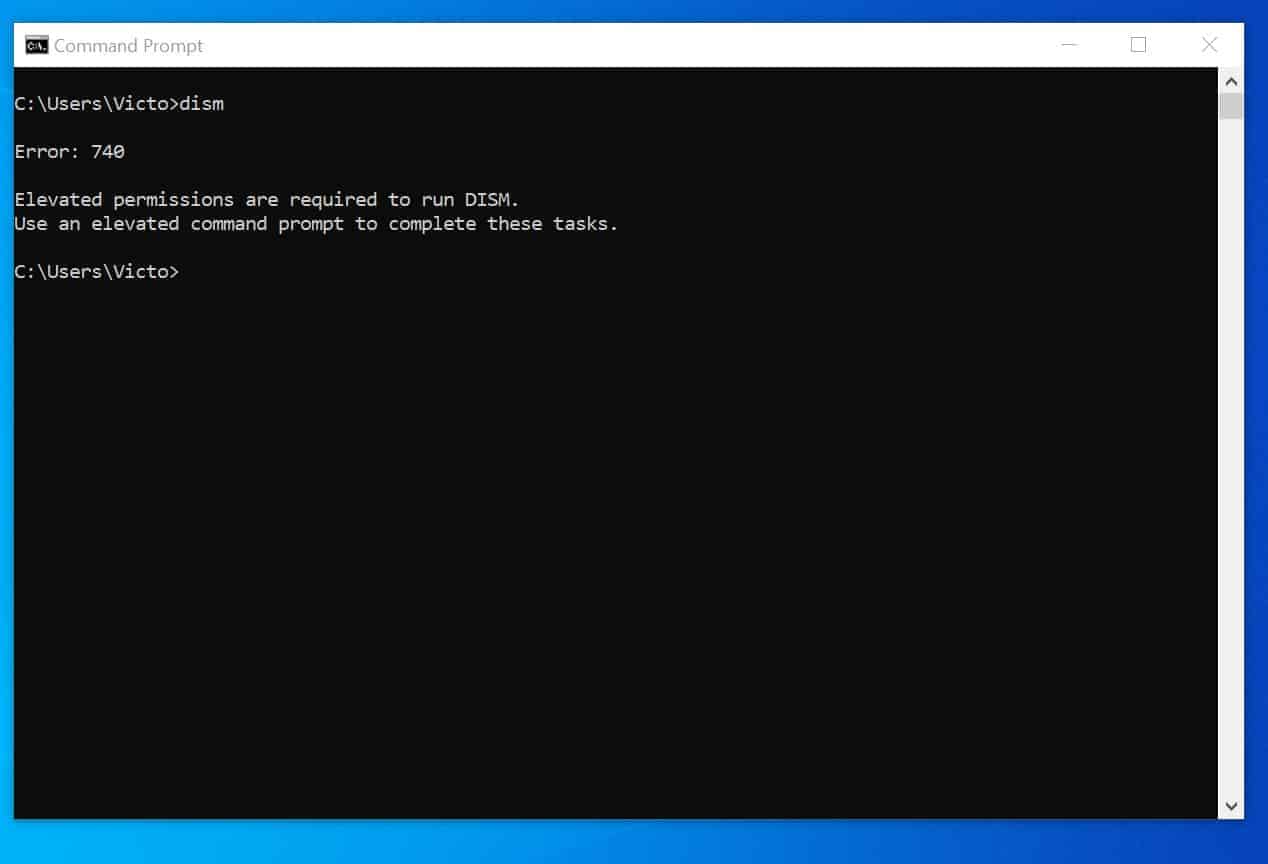
If you get the following error: The requested operation requires elevation.
To resolve this you will need administrator access to the system. Go to the start menu and when you type cmd right click on the cmd.exe program and click Run As Administrator . This opens a CMD prompt with more privileges.
For any further help you can use the built in help the route command provides. Simply type route and hit enter.
Check out this article for more cool Windows CLI commands.
Posted by Jack Apr 25 th , 2016 misc, routing, windows
How to Fix “The Requested Operation Requires Elevation” Error
Browse Post Topics
Introduction
“The Requested Operation Requires Elevation” error may be caused by a number of reasons. Here are some of the reasons you may receive “The Requested Operation Requires Elevation” message, it may be that:
- You are trying to run a command from cmd but the command needs to be run as an administrator
- Your folder permissions are not properly set. This may happen if recently migrated or upgraded your operating system. Because it is now a new Operating system, the user with permission to run programs on the computer may have changed. This error may also happen if you are trying to run a program from an external hard drive.
If you receive this error, follow the steps in this guide to fix it. Here are the high level fixes:
- Open command prompt or program as administrator
- Replace Owner on subcontainers and objects on your computer
Method 1 Fix for “The Requested Operation Requires Elevation” error (Run as Administrator)
If you received this error when you try to run a command via command prompt:
Close the command prompt prompt Window
Search command prompt, then right-click it and select Run as administrator.

When command prompt opens with administrator privileges, run the program. “The Requested Operation Requires Elevation” message should be gone.
If you still receive the error message, use the steps in Method 2 below to fix the problem.
Method 2 Fix for “The Requested Operation Requires Elevation” error (Replace Owner on subcontainers and objects)
If you are recently upgraded your computer. Or migrated your computer to a new hard drive, follow the steps below to fix “The Requested Operation Requires Elevation”:
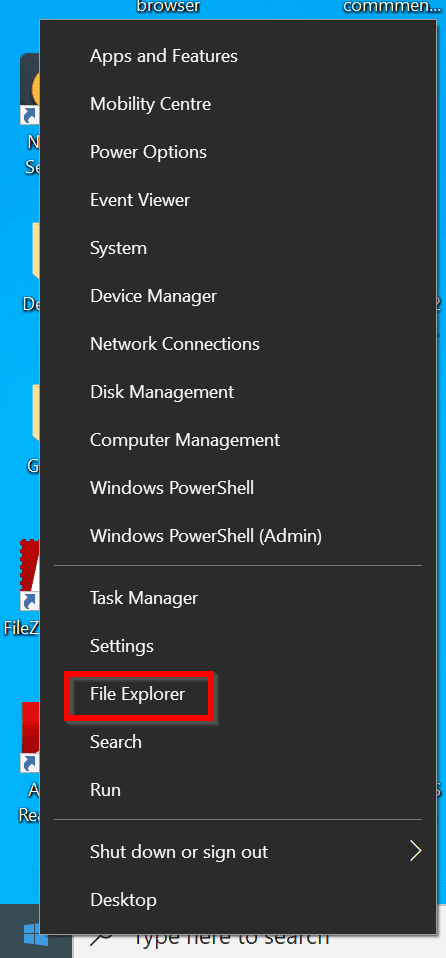
Right-click Windows logo and select File Explorer.
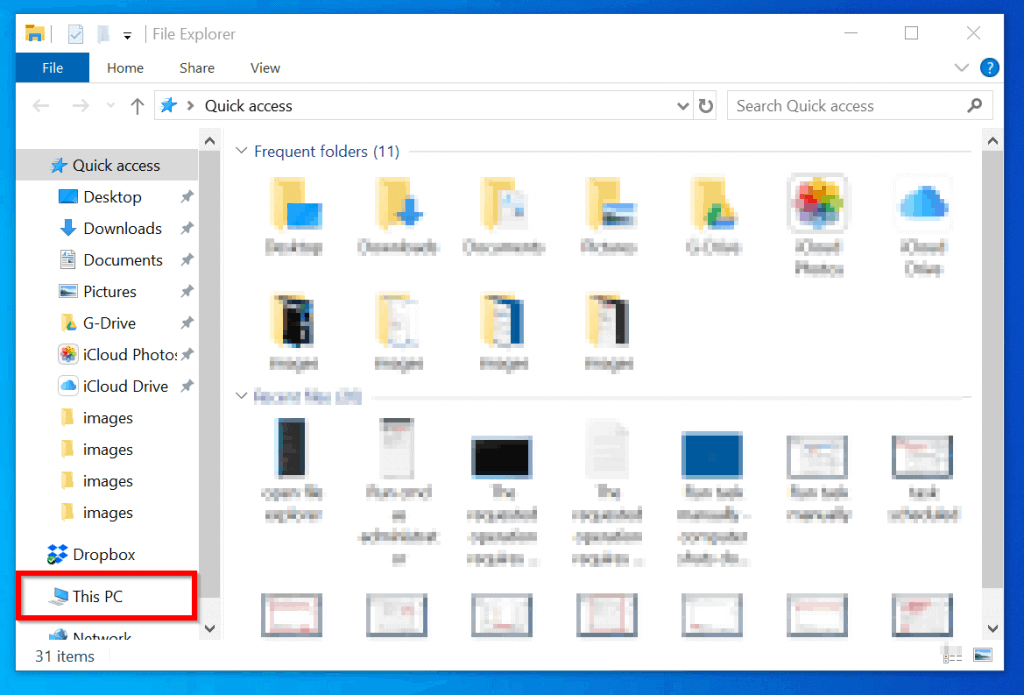
When File Explorer open, scroll down and click This PC.

On This PC, scroll down until you can see your Drive C: Then right-click it and select Properties


On the drive C properties, click the Security tab. Then click Advanced. The second image below shows Advanced options.


On the Advanced options, click Change (highlighted in the previous image). The Select User or Group option will open. Type the name of the new user to take ownership. Then click Check Names. The name should resolve without errors. Then click OK.

The option to take ownership will open. Beside Owner, the new user you selected will be displayed. Then beneath the user, check the Replace owner on subcontainers and object box. Click OK.

You should now be able to perform the task you wanted perform without receiving “The requested operation requires elevation” message.
Conclusion
The two methods described in this guide should resolve “The requested operation requires elevation” error for you. If you have any comments or ask a question use the “Leave a Reply” form found at the end of this page.
Better still, share the method that resolved this error for you. This will help other readers.
OpenVPN Support Forum
Community Support Forum
Windows route add command failed
Windows route add command failed
Post by ShanghaiPhil » Tue Apr 05, 2011 11:18 am
I’m not quite sure this is the right place to go to or not, I certainly hope so!
I’m trying to install my OpenVPN on my computer, but it won’t work on my PC.
I’ve already installed it on my Mac and iPhone, it works great. But the PC is giving me issues. (I’m using the same .crt .ca .ovpn files)
What I don’t understand is that I already have set my route «route 192.168.1.1 255.255.255.0 vpn_gateway 3» in my .ovpn file. and yet it seems to try to connect on 192.168.1.0
Here is the log I get:
Any help is MUCH appreciated!!

Re: Windows route add command failed
Post by maikcat » Tue Apr 05, 2011 11:24 am
please post configs (server/client) ip configurations (server/client)
also os used (client/server)
Amiga 500 , Zx +2 owner
Long live Dino Dini (Kick off 2 Creator)
Inflammable means flammable? (Dr Nick Riviera,Simsons Season13)
«objects in mirror are losing»
Re: Windows route add command failed
Post by ShanghaiPhil » Tue Apr 05, 2011 11:37 am
Here is the config.
OpenVPNGUI
On Windows 7
TCP/IP settings:
IP: 192.168.1.8
Subnetmask: 255.255.255.0
Router: 192.168.1.1
#dev-node MyTAP #If you renamed your TAP interface or have more than one TAP interface then remove the # at the beginning and change «MyTAP» to its name
remote 184.95.36.118 80 #You will need to enter you dyndns account or static IP address here. The number following it is the port you set in the server’s config
route 192.168.1.1 255.255.255.0 vpn_gateway 3 #This it the IP address scheme and subnet of your normal network your server is on. Your router would usually be 192.168.1.1
cipher BF-CBC # Blowfish (default) encrytion
Re: Windows route add command failed
Post by maikcat » Tue Apr 05, 2011 11:45 am
route 192.168.1.1 255.255.255.0 vpn_gateway 3 #This it the IP address scheme and subnet of your normal network your server is on. Your router would usually be 192.168.1.1
post server configs also
Amiga 500 , Zx +2 owner
Long live Dino Dini (Kick off 2 Creator)
Inflammable means flammable? (Dr Nick Riviera,Simsons Season13)
«objects in mirror are losing»
Re: Windows route add command failed
Post by ShanghaiPhil » Wed Apr 06, 2011 11:30 am
#################################################
# Sample OpenVPN 2.0 config file for #
# multi-client server. #
# #
# This file is for the server side #
# of a many-clients one-server #
# OpenVPN configuration. #
# #
# OpenVPN also supports #
# single-machine single-machine #
# configurations (See the Examples page #
# on the web site for more info). #
# #
# This config should work on Windows #
# or Linux/BSD systems. Remember on #
# Windows to quote pathnames and use #
# double backslashes, e.g.: #
# «C:\\Program Files\\OpenVPN\\config\\foo.key» #
# #
# Comments are preceded with ‘#’ or ‘;’ #
#################################################
# Which local IP address should OpenVPN
# listen on? (optional)
;local a.b.c.d
# Which TCP/UDP port should OpenVPN listen on?
# If you want to run multiple OpenVPN instances
# on the same machine, use a different port
# number for each one. You will need to
# open up this port on your firewall.
port 80
# TCP or UDP server?
;proto tcp
proto udp
# «dev tun» will create a routed IP tunnel,
# «dev tap» will create an ethernet tunnel.
# Use «dev tap» if you are ethernet bridging.
# If you want to control access policies
# over the VPN, you must create firewall
# rules for the the TUN/TAP interface.
# On non-Windows systems, you can give
# an explicit unit number, such as tun0.
# On Windows, use «dev-node» for this.
# On most systems, the VPN will not function
# unless you partially or fully disable
# the firewall for the TUN/TAP interface.
;dev tap
dev tun
# Windows needs the TAP-Win32 adapter name
# from the Network Connections panel if you
# have more than one. On XP SP2 or higher,
# you may need to selectively disable the
# Windows firewall for the TAP adapter.
# Non-Windows systems usually don’t need this.
;dev-node MyTap
# SSL/TLS root certificate (ca), certificate
# (cert), and private key (key). Each client
# and the server must have their own cert and
# key file. The server and all clients will
# use the same ca file.
#
# See the «easy-rsa» directory for a series
# of scripts for generating RSA certificates
# and private keys. Remember to use
# a unique Common Name for the server
# and each of the client certificates.
#
# Any X509 key management system can be used.
# OpenVPN can also use a PKCS #12 formatted key file
# (see «pkcs12» directive in man page).
ca /usr/src/openvpn-2.0/easy-rsa/keys/ca.crt
cert /usr/src/openvpn-2.0/easy-rsa/keys/server.crt
key /usr/src/openvpn-2.0/easy-rsa/keys/server.key # This file should be kept secret
# Diffie hellman parameters.
# Generate your own with:
# openssl dhparam -out dh1024.pem 1024
# Substitute 2048 for 1024 if you are using
# 2048 bit keys.
dh /usr/src/openvpn-2.0/easy-rsa/keys/dh1024.pem
# Configure server mode and supply a VPN subnet
# for OpenVPN to draw client addresses from.
# The server will take 10.8.0.1 for itself,
# the rest will be made available to clients.
# Each client will be able to reach the server
# on 10.8.0.1. Comment this line out if you are
# ethernet bridging. See the man page for more info.
server 10.8.0.0 255.255.255.0
# Maintain a record of client virtual IP address
# associations in this file. If OpenVPN goes down or
# is restarted, reconnecting clients can be assigned
# the same virtual IP address from the pool that was
# previously assigned.
ifconfig-pool-persist ipp.txt
# Configure server mode for ethernet bridging.
# You must first use your OS’s bridging capability
# to bridge the TAP interface with the ethernet
# NIC interface. Then you must manually set the
# IP/netmask on the bridge interface, here we
# assume 10.8.0.4/255.255.255.0. Finally we
# must set aside an IP range in this subnet
# (start=10.8.0.50 end=10.8.0.100) to allocate
# to connecting clients. Leave this line commented
# out unless you are ethernet bridging.
;server-bridge 10.8.0.4 255.255.255.0 10.8.0.50 10.8.0.100
# Push routes to the client to allow it
# to reach other private subnets behind
# the server. Remember that these
# private subnets will also need
# to know to route the OpenVPN client
# address pool (10.8.0.0/255.255.255.0)
# back to the OpenVPN server.
;push «route 192.168.10.0 255.255.255.0»
;push «route 192.168.20.0 255.255.255.0»
# To assign specific IP addresses to specific
# clients or if a connecting client has a private
# subnet behind it that should also have VPN access,
# use the subdirectory «ccd» for client-specific
# configuration files (see man page for more info).
# EXAMPLE: Suppose the client
# having the certificate common name «Thelonious»
# also has a small subnet behind his connecting
# machine, such as 192.168.40.128/255.255.255.248.
# First, uncomment out these lines:
;client-config-dir ccd
;route 192.168.40.128 255.255.255.248
# Then create a file ccd/Thelonious with this line:
# iroute 192.168.40.128 255.255.255.248
# This will allow Thelonious’ private subnet to
# access the VPN. This example will only work
# if you are routing, not bridging, i.e. you are
# using «dev tun» and «server» directives.
# EXAMPLE: Suppose you want to give
# Thelonious a fixed VPN IP address of 10.9.0.1.
# First uncomment out these lines:
;client-config-dir ccd
;route 10.9.0.0 255.255.255.252
# Then add this line to ccd/Thelonious:
# ifconfig-push 10.9.0.1 10.9.0.2
# Suppose that you want to enable different
# firewall access policies for different groups
# of clients. There are two methods:
# (1) Run multiple OpenVPN daemons, one for each
# group, and firewall the TUN/TAP interface
# for each group/daemon appropriately.
# (2) (Advanced) Create a script to dynamically
# modify the firewall in response to access
# from different clients. See man
# page for more info on learn-address script.
;learn-address ./script
# If enabled, this directive will configure
# all clients to redirect their default
# network gateway through the VPN, causing
# all IP traffic such as web browsing and
# and DNS lookups to go through the VPN
# (The OpenVPN server machine may need to NAT
# the TUN/TAP interface to the internet in
# order for this to work properly).
# CAVEAT: May break client’s network config if
# client’s local DHCP server packets get routed
# through the tunnel. Solution: make sure
# client’s local DHCP server is reachable via
# a more specific route than the default route
# of 0.0.0.0/0.0.0.0.
push «redirect-gateway def1»
# Certain Windows-specific network settings
# can be pushed to clients, such as DNS
# or WINS server addresses. CAVEAT:
# http://openvpn.net/faq.html#dhcpcaveats
;push «dhcp-option DNS 10.8.0.1»
;push «dhcp-option WINS 10.8.0.1»
# Uncomment this directive to allow different
# clients to be able to «see» each other.
# By default, clients will only see the server.
# To force clients to only see the server, you
# will also need to appropriately firewall the
# server’s TUN/TAP interface.
;client-to-client
# Uncomment this directive if multiple clients
# might connect with the same certificate/key
# files or common names. This is recommended
# only for testing purposes. For production use,
# each client should have its own certificate/key
# pair.
#
# IF YOU HAVE NOT GENERATED INDIVIDUAL
# CERTIFICATE/KEY PAIRS FOR EACH CLIENT,
# EACH HAVING ITS OWN UNIQUE «COMMON NAME»,
# UNCOMMENT THIS LINE OUT.
;duplicate-cn
# The keepalive directive causes ping-like
# messages to be sent back and forth over
# the link so that each side knows when
# the other side has gone down.
# Ping every 10 seconds, assume that remote
# peer is down if no ping received during
# a 120 second time period.
keepalive 10 120
# For extra security beyond that provided
# by SSL/TLS, create an «HMAC firewall»
# to help block DoS attacks and UDP port flooding.
#
# Generate with:
# openvpn —genkey —secret ta.key
#
# The server and each client must have
# a copy of this key.
# The second parameter should be ‘0’
# on the server and ‘1’ on the clients.
;tls-auth ta.key 0 # This file is secret
# Select a cryptographic cipher.
# This config item must be copied to
# the client config file as well.
;cipher BF-CBC # Blowfish (default)
;cipher AES-128-CBC # AES
;cipher DES-EDE3-CBC # Triple-DES
# Enable compression on the VPN link.
# If you enable it here, you must also
# enable it in the client config file.
comp-lzo
# The maximum number of concurrently connected
# clients we want to allow.
;max-clients 100
# It’s a good idea to reduce the OpenVPN
# daemon’s privileges after initialization.
#
# You can uncomment this out on
# non-Windows systems.
;user nobody
;group nobody
# The persist options will try to avoid
# accessing certain resources on restart
# that may no longer be accessible because
# of the privilege downgrade.
persist-key
persist-tun
# Output a short status file showing
# current connections, truncated
# and rewritten every minute.
status openvpn-status.log
# By default, log messages will go to the syslog (or
# on Windows, if running as a service, they will go to
# the «\Program Files\OpenVPN\log» directory).
# Use log or log-append to override this default.
# «log» will truncate the log file on OpenVPN startup,
# while «log-append» will append to it. Use one
# or the other (but not both).
;log openvpn.log
;log-append openvpn.log
# Set the appropriate level of log
# file verbosity.
#
# 0 is silent, except for fatal errors
# 4 is reasonable for general usage
# 5 and 6 can help to debug connection problems
# 9 is extremely verbose
verb 3
# Silence repeating messages. At most 20
# sequential messages of the same message
# category will be output to the log.
;mute 20


